java设计模式(五)--桥接模式
2017-08-12 00:00
169 查看
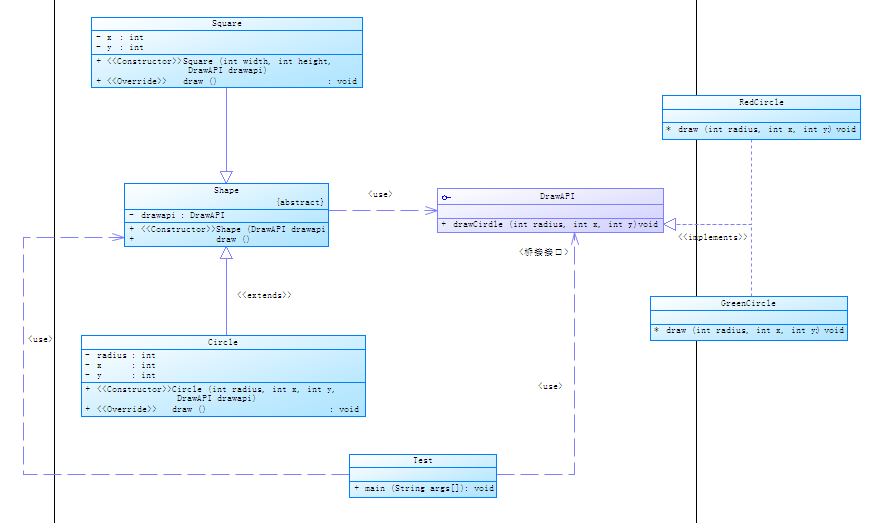
对于桥接模式,在我看来,就是将实体与动作的实现进行分离,举一个例子,我们要画一个圆形和正方形,分别是红色和绿色的。

如果我们用之前的抽象模式进行创建的话,先让圆形和正方形继承一个图形类,然后再用两个类来分别实现圆形和正方形的红色和绿色画法,这样的话会导致重复代码过多,由于继承关系太多,就会不利于后期的维护,以后也会由于形状和颜色的增多,也回导致这个结构会变得很庞大。

由此,我们用到了桥接模式,桥接模式他将这两种关系分成了两个大类,一个是管理形状的抽象父类,一个是管理画不同颜色的形状的接口,通过父类来调用接口的实现类的方法达到与实例相同的结果,并且会与前一种方法更优。

在网络上的专业解释:

桥接是用于把抽象化于实现化解耦,使得二者可以独立变化,他通过提供抽象化和实现化之间的桥接结构,来实现二者的解耦,使得实体类的功能独立于桥接接口实现,这两种类型的类可被结构化改变而互不影响。
我就附上我对上面试的实例所写的第二种方式的代码了:
形状的抽象父类及实现类:
public abstract class Shape {
protected DrawAPI drawAPI;
public Shape(DrawAPI drawAPI){
this.drawAPI=drawAPI;
}
public abstract void draw();
}

public class Square extends Shape {
private int height;//高度
private int width;//宽度
public Square(DrawAPI drawAPI,int height,int width) {
super(drawAPI);
this.height=height;
this.width=width;
}
@Override
public void draw() {
drawAPI.drawSquare(width, height);
}
}

public class Circle extends Shape {
private int radius;//半径
private int x;//圆心x坐标
private int y;//圆心y坐标
public Circle(DrawAPI drawAPI,int radius,int x,int y) {
super(drawAPI);
this.radius=radius;
this.x=x;
this.y=y;
}
@Override
public void draw() {
drawAPI.drawCircle(radius, x, y);
}
}
所画不同颜色的接口及实现类:
interface DrawAPI {
void drawCircle(int radius,int x,int y);
void drawSquare(int width,int height);
}

public class GreenDraw implements DrawAPI {
@Override
public void drawCircle(int radius, int x, int y) {
System.out.println(String.format("画一个绿色的,半径为: %d 的,圆点坐标是 (%d,%d) 的圆", radius,x,y));
}
@Override
public void drawSquare(int width, int height) {
System.out.println(String.format("画一个绿色的,长为: %d 的,宽为: %d 的正方形", height,width));
}
}

public class RedDraw implements DrawAPI {
@Override
public void drawCircle(int radius, int x, int y) {
System.out.println(String.format("画一个红色的,半径为: %d 的,圆点坐标是 (%d,%d) 的圆", radius,x,y));
}
@Override
public void drawSquare(int width, int height) {
System.out.println(String.format("画一个红色的,长为: %d 的,宽为: %d 的正方形", height,width));
}
}
测试类:
public class Test {
public static void main(String[] args) {
System.out.println("圆形:");
Shape circle1=new Circle(new RedDraw(), 12, 4, 5);
Shape circle2=new Circle(new GreenDraw(), 78, 3, 7);
circle1.draw();
circle2.draw();
System.out.println("正方形:");
Shape square1=new Square(new RedDraw(), 23, 11);
Shape square2=new Square(new GreenDraw(), 56, 34);
square1.draw();
square2.draw();
}
}
控制台显示:
圆形:
画一个红色的,半径为: 12 的,圆点坐标是 (4,5) 的圆
画一个绿色的,半径为: 78 的,圆点坐标是 (3,7) 的圆
正方形:
画一个红色的,长为: 23 的,宽为: 11 的正方形
画一个绿色的,长为: 56 的,宽为: 34 的正方形

相关文章推荐
- JAVA设计模式之桥接模式
- 设计模式之桥接模式(Java语言描述)
- Java设计模式 Bridge(桥接)Adapter,command,State,Mediator,Facade
- JAVA设计模式:桥接模式
- 设计模式学习笔记---桥接模式bridge(Java版)
- java设计模式之桥接模式
- 讲故事,学(Java)设计模式—桥接模式
- java设计模式-桥接模式
- JAVA设计模式--桥接模式
- Java设计模式--------装饰器,桥接和适配器模式的异同
- 设计模式之桥接模式(Java语言描述)
- JAVA设计模式之桥接模式
- 菜鸟版JAVA设计模式-从抽象与实现说桥接模式
- java设计模式---桥接模式
- java/android 设计模式学习笔记(8)---桥接模式
- JAVA设计模式(07):结构型-桥接模式(Bridge)
- JAVA设计模式-从抽象与实现说桥接模式
- java23种设计模式--桥接模式(bridge)
- java设计模式之桥接模式
- Java与设计模式(十六)结构型--桥接模式