Google Authenticator 原理及Java实现
2017-08-09 09:06
120 查看
作者:徐小花
链接:https://www.zhihu.com/question/20462696/answer/18731073
来源:知乎
著作权归作者所有。商业转载请联系作者获得授权,非商业转载请注明出处。
开启Google的登陆二步验证(即Google Authenticator服务)后用户登陆时需要输入额外由手机客户端生成的一次性密码。
实现Google Authenticator功能需要服务器端和客户端的支持。服务器端负责密钥的生成、验证一次性密码是否正确。客户端记录密钥后生成一次性密码。
目前客户端有:
android版:
Google 身份验证器
iOS版:https://itunes.apple.com/cn/app/google-authenticator/id388497605
实现原理:
一、用户需要开启Google Authenticator服务时,
1.服务器随机生成一个类似于『DPI45HKISEXU6HG7』的密钥,并且把这个密钥保存在数据库中。
2.在页面上显示一个二维码,内容是一个URI地址(otpauth://totp/账号?secret=密钥),如『otpauth://totp/kisexu@gmail.com?secret=DPI45HCEBCJK6HG7』,下图:
otpauth://totp/kisexu@gmail.com?secret=DPI45HCEBCJK6HG7 (二维码自动识别)
3.客户端扫描二维码,把密钥『DPI45HKISEXU6HG7』保存在客户端。
二、用户需要登陆时
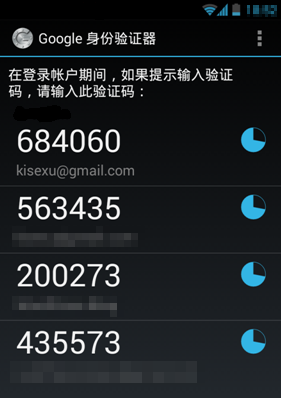
1.客户端每30秒使用密钥『DPI45HKISEXU6HG7』和时间戳通过一种『算法』生成一个6位数字的一次性密码,如『684060』。如下图android版界面:
<img src="https://pic1.zhimg.com/c2056261a0b106af19517697887c0b38_b.jpg" data-rawwidth="281" data-rawheight="398" class="content_image" width="281">
2.用户登陆时输入一次性密码『684060』。
3.服务器端使用保存在数据库中的密钥『DPI45HKISEXU6HG7』和时间戳通过同一种『算法』生成一个6位数字的一次性密码。大家都懂控制变量法,如果算法相同、密钥相同,又是同一个时间(时间戳相同),那么客户端和服务器计算出的一次性密码是一样的。服务器验证时如果一样,就登录成功了。
Tips:
1.这种『算法』是公开的,所以服务器端也有很多开源的实现,比如php版的:https://github.com/PHPGangsta/GoogleAuthenticator
。上github搜索『Google Authenticator』可以找到更多语言版的Google Authenticator。
2.所以,你在自己的项目可以轻松加入对Google Authenticator的支持,在一个客户端上显示多个账户的效果可以看上面android版界面的截图。目前dropbox、lastpass、wordpress,甚至vps等第三方应用都支持Google Authenticator登陆,请自行搜索。
3.现实生活中,网银、网络游戏的实体动态口令牌其实原理也差不多,大家可以自行脑补下,谢谢。
示例url: https://www.google.com/chart?chs=200x200&chld=M%7C0&cht=qr&chl=otpauth://totp/testuser@testhost%3Fsecret%3DIV5H5FGFJS6K4N2Y
-------------------------------------------
链接:http://blog.csdn.net/a623397674a/article/details/38336461
著作权归作者所有。商业转载请联系作者获得授权,非商业转载请注明出处。
[java]
view plain
copy
print?
//Google Authenticator
// 只从google出了双重身份验证后,就方便了大家,等同于有了google一个级别的安全,但是我们该怎么使用google authenticator (双重身份验证),
//下面是java的算法,这样大家都可以得到根据key得到公共的秘钥了,直接复制,记得导入JAR包:
//
//commons-codec-1.8.jar
//
//junit-4.10.jar
//测试方法:
//
//1、执行测试代码中的“genSecret”方法,将生成一个KEY(用户为testuser),URL打开是一张二维码图片。
//
//2、在手机中下载“GOOGLE身份验证器”。
//
//3、在身份验证器中配置账户,输入账户名(第一步中的用户testuser)、密钥(第一步生成的KEY),选择基于时间。
//
//4、运行authcode方法将key和要测试的验证码带进去(codes,key),就可以知道是不是正确的秘钥了!返回值布尔
//main我就不写了大家~~因为这个可以当做util工具直接调用就行了
//
package coin.util;
import java.security.InvalidKeyException;
import java.security.NoSuchAlgorithmException;
import java.security.SecureRandom;
import javax.crypto.Mac;
import javax.crypto.spec.SecretKeySpec;
import org.apache.commons.codec.binary.Base32;
import org.apache.commons.codec.binary.Base64;
public class GoogleAuthenticator {
// taken from Google pam docs - we probably don't need to mess with these
public static final int SECRET_SIZE = 10;
public static final String SEED = "g8GjEvTbW5oVSV7avLBdwIHqGlUYNzKFI7izOF8GwLDVKs2m0QN7vxRs2im5MDaNCWGmcD2rvcZx";
public
f0a0
static final String RANDOM_NUMBER_ALGORITHM = "SHA1PRNG";
int window_size = 3; // default 3 - max 17 (from google docs)最多可偏移的时间
public void setWindowSize(int s) {
if (s >= 1 && s <= 17)
window_size = s;
}
public static Boolean authcode(String codes, String savedSecret) {
// enter the code shown on device. Edit this and run it fast before the
// code expires!
long code = Long.parseLong(codes);
long t = System.currentTimeMillis();
GoogleAuthenticator ga = new GoogleAuthenticator();
ga.setWindowSize(15); // should give 5 * 30 seconds of grace...
boolean r = ga.check_code(savedSecret, code, t);
return r;
}
public static String genSecret() {
String secret = GoogleAuthenticator.generateSecretKey();
GoogleAuthenticator.getQRBarcodeURL("testuser",
"testhost", secret);
return secret;
}
public static String generateSecretKey() {
SecureRandom sr = null;
try {
sr = SecureRandom.getInstance(RANDOM_NUMBER_ALGORITHM);
sr.setSeed(Base64.decodeBase64(SEED));
byte[] buffer = sr.generateSeed(SECRET_SIZE);
Base32 codec = new Base32();
byte[] bEncodedKey = codec.encode(buffer);
String encodedKey = new String(bEncodedKey);
return encodedKey;
}catch (NoSuchAlgorithmException e) {
// should never occur... configuration error
}
return null;
}
public static String getQRBarcodeURL(String user, String host, String secret) {
String format = "https://www.google.com/chart?chs=200x200&chld=M%%7C0&cht=qr&chl=otpauth://totp/%s@%s%%3Fsecret%%3D%s";
return String.format(format, user, host, secret);
}
public boolean check_code(String secret, long code, long timeMsec) {
Base32 codec = new Base32();
byte[] decodedKey = codec.decode(secret);
// convert unix msec time into a 30 second "window"
// this is per the TOTP spec (see the RFC for details)
long t = (timeMsec / 1000L) / 30L;
// Window is used to check codes generated in the near past.
// You can use this value to tune how far you're willing to go.
for (int i = -window_size; i <= window_size; ++i) {
long hash;
try {
hash = verify_code(decodedKey, t + i);
}catch (Exception e) {
// Yes, this is bad form - but
// the exceptions thrown would be rare and a static configuration problem
e.printStackTrace();
throw new RuntimeException(e.getMessage());
//return false;
}
if (hash == code) {
return true;
}
}
// The validation code is invalid.
return false;
}
private static int verify_code(byte[] key, long t) throws NoSuchAlgorithmException, InvalidKeyException {
byte[] data = new byte[8];
long value = t;
for (int i = 8; i-- > 0; value >>>= 8) {
data[i] = (byte) value;
}
SecretKeySpec signKey = new SecretKeySpec(key, "HmacSHA1");
Mac mac = Mac.getInstance("HmacSHA1");
mac.init(signKey);
byte[] hash = mac.doFinal(data);
int offset = hash[20 - 1] & 0xF;
// We're using a long because Java hasn't got unsigned int.
long truncatedHash = 0;
for (int i = 0; i < 4; ++i) {
truncatedHash <<= 8;
// We are dealing with signed bytes:
// we just keep the first byte.
truncatedHash |= (hash[offset + i] & 0xFF);
}
truncatedHash &= 0x7FFFFFFF;
truncatedHash %= 1000000;
return (int) truncatedHash;
}
}
工程源码分享:
链接: http://pan.baidu.com/s/1eRUelqi 密码: xz25
链接:https://www.zhihu.com/question/20462696/answer/18731073
来源:知乎
著作权归作者所有。商业转载请联系作者获得授权,非商业转载请注明出处。
开启Google的登陆二步验证(即Google Authenticator服务)后用户登陆时需要输入额外由手机客户端生成的一次性密码。
实现Google Authenticator功能需要服务器端和客户端的支持。服务器端负责密钥的生成、验证一次性密码是否正确。客户端记录密钥后生成一次性密码。
目前客户端有:
android版:
Google 身份验证器
iOS版:https://itunes.apple.com/cn/app/google-authenticator/id388497605
实现原理:
一、用户需要开启Google Authenticator服务时,
1.服务器随机生成一个类似于『DPI45HKISEXU6HG7』的密钥,并且把这个密钥保存在数据库中。
2.在页面上显示一个二维码,内容是一个URI地址(otpauth://totp/账号?secret=密钥),如『otpauth://totp/kisexu@gmail.com?secret=DPI45HCEBCJK6HG7』,下图:
otpauth://totp/kisexu@gmail.com?secret=DPI45HCEBCJK6HG7 (二维码自动识别)
3.客户端扫描二维码,把密钥『DPI45HKISEXU6HG7』保存在客户端。
二、用户需要登陆时
1.客户端每30秒使用密钥『DPI45HKISEXU6HG7』和时间戳通过一种『算法』生成一个6位数字的一次性密码,如『684060』。如下图android版界面:
&amp;lt;img src=&quot;https://pic1.zhimg.com/c2056261a0b106af19517697887c0b38_b.jpg&quot; data-rawwidth=&quot;281&quot; data-rawheight=&quot;398&quot; class=&quot;content_image&quot; width=&quot;281&quot;&amp;gt;
2.用户登陆时输入一次性密码『684060』。
3.服务器端使用保存在数据库中的密钥『DPI45HKISEXU6HG7』和时间戳通过同一种『算法』生成一个6位数字的一次性密码。大家都懂控制变量法,如果算法相同、密钥相同,又是同一个时间(时间戳相同),那么客户端和服务器计算出的一次性密码是一样的。服务器验证时如果一样,就登录成功了。
Tips:
1.这种『算法』是公开的,所以服务器端也有很多开源的实现,比如php版的:https://github.com/PHPGangsta/GoogleAuthenticator
。上github搜索『Google Authenticator』可以找到更多语言版的Google Authenticator。
2.所以,你在自己的项目可以轻松加入对Google Authenticator的支持,在一个客户端上显示多个账户的效果可以看上面android版界面的截图。目前dropbox、lastpass、wordpress,甚至vps等第三方应用都支持Google Authenticator登陆,请自行搜索。
3.现实生活中,网银、网络游戏的实体动态口令牌其实原理也差不多,大家可以自行脑补下,谢谢。
示例url: https://www.google.com/chart?chs=200x200&chld=M%7C0&cht=qr&chl=otpauth://totp/testuser@testhost%3Fsecret%3DIV5H5FGFJS6K4N2Y
-------------------------------------------
链接:http://blog.csdn.net/a623397674a/article/details/38336461
著作权归作者所有。商业转载请联系作者获得授权,非商业转载请注明出处。
[java]
view plain
copy
print?
//Google Authenticator
// 只从google出了双重身份验证后,就方便了大家,等同于有了google一个级别的安全,但是我们该怎么使用google authenticator (双重身份验证),
//下面是java的算法,这样大家都可以得到根据key得到公共的秘钥了,直接复制,记得导入JAR包:
//
//commons-codec-1.8.jar
//
//junit-4.10.jar
//测试方法:
//
//1、执行测试代码中的“genSecret”方法,将生成一个KEY(用户为testuser),URL打开是一张二维码图片。
//
//2、在手机中下载“GOOGLE身份验证器”。
//
//3、在身份验证器中配置账户,输入账户名(第一步中的用户testuser)、密钥(第一步生成的KEY),选择基于时间。
//
//4、运行authcode方法将key和要测试的验证码带进去(codes,key),就可以知道是不是正确的秘钥了!返回值布尔
//main我就不写了大家~~因为这个可以当做util工具直接调用就行了
//
package coin.util;
import java.security.InvalidKeyException;
import java.security.NoSuchAlgorithmException;
import java.security.SecureRandom;
import javax.crypto.Mac;
import javax.crypto.spec.SecretKeySpec;
import org.apache.commons.codec.binary.Base32;
import org.apache.commons.codec.binary.Base64;
public class GoogleAuthenticator {
// taken from Google pam docs - we probably don't need to mess with these
public static final int SECRET_SIZE = 10;
public static final String SEED = "g8GjEvTbW5oVSV7avLBdwIHqGlUYNzKFI7izOF8GwLDVKs2m0QN7vxRs2im5MDaNCWGmcD2rvcZx";
public
f0a0
static final String RANDOM_NUMBER_ALGORITHM = "SHA1PRNG";
int window_size = 3; // default 3 - max 17 (from google docs)最多可偏移的时间
public void setWindowSize(int s) {
if (s >= 1 && s <= 17)
window_size = s;
}
public static Boolean authcode(String codes, String savedSecret) {
// enter the code shown on device. Edit this and run it fast before the
// code expires!
long code = Long.parseLong(codes);
long t = System.currentTimeMillis();
GoogleAuthenticator ga = new GoogleAuthenticator();
ga.setWindowSize(15); // should give 5 * 30 seconds of grace...
boolean r = ga.check_code(savedSecret, code, t);
return r;
}
public static String genSecret() {
String secret = GoogleAuthenticator.generateSecretKey();
GoogleAuthenticator.getQRBarcodeURL("testuser",
"testhost", secret);
return secret;
}
public static String generateSecretKey() {
SecureRandom sr = null;
try {
sr = SecureRandom.getInstance(RANDOM_NUMBER_ALGORITHM);
sr.setSeed(Base64.decodeBase64(SEED));
byte[] buffer = sr.generateSeed(SECRET_SIZE);
Base32 codec = new Base32();
byte[] bEncodedKey = codec.encode(buffer);
String encodedKey = new String(bEncodedKey);
return encodedKey;
}catch (NoSuchAlgorithmException e) {
// should never occur... configuration error
}
return null;
}
public static String getQRBarcodeURL(String user, String host, String secret) {
String format = "https://www.google.com/chart?chs=200x200&chld=M%%7C0&cht=qr&chl=otpauth://totp/%s@%s%%3Fsecret%%3D%s";
return String.format(format, user, host, secret);
}
public boolean check_code(String secret, long code, long timeMsec) {
Base32 codec = new Base32();
byte[] decodedKey = codec.decode(secret);
// convert unix msec time into a 30 second "window"
// this is per the TOTP spec (see the RFC for details)
long t = (timeMsec / 1000L) / 30L;
// Window is used to check codes generated in the near past.
// You can use this value to tune how far you're willing to go.
for (int i = -window_size; i <= window_size; ++i) {
long hash;
try {
hash = verify_code(decodedKey, t + i);
}catch (Exception e) {
// Yes, this is bad form - but
// the exceptions thrown would be rare and a static configuration problem
e.printStackTrace();
throw new RuntimeException(e.getMessage());
//return false;
}
if (hash == code) {
return true;
}
}
// The validation code is invalid.
return false;
}
private static int verify_code(byte[] key, long t) throws NoSuchAlgorithmException, InvalidKeyException {
byte[] data = new byte[8];
long value = t;
for (int i = 8; i-- > 0; value >>>= 8) {
data[i] = (byte) value;
}
SecretKeySpec signKey = new SecretKeySpec(key, "HmacSHA1");
Mac mac = Mac.getInstance("HmacSHA1");
mac.init(signKey);
byte[] hash = mac.doFinal(data);
int offset = hash[20 - 1] & 0xF;
// We're using a long because Java hasn't got unsigned int.
long truncatedHash = 0;
for (int i = 0; i < 4; ++i) {
truncatedHash <<= 8;
// We are dealing with signed bytes:
// we just keep the first byte.
truncatedHash |= (hash[offset + i] & 0xFF);
}
truncatedHash &= 0x7FFFFFFF;
truncatedHash %= 1000000;
return (int) truncatedHash;
}
}
//Google  Authenticator

// 只从google出了双重身份验证后,就方便了大家,等同于有了google一个级别的安全,但是我们该怎么使用google authenticator (双重身份验证),

//下面是java的算法,这样大家都可以得到根据key得到公共的秘钥了,直接复制,记得导入JAR包:
//
//commons-codec-1.8.jar
//
//junit-4.10.jar

//测试方法:
//
//1、执行测试代码中的“genSecret”方法,将生成一个KEY(用户为testuser),URL打开是一张二维码图片。
//
//2、在手机中下载“GOOGLE身份验证器”。
//
//3、在身份验证器中配置账户,输入账户名(第一步中的用户testuser)、密钥(第一步生成的KEY),选择基于时间。
//
//4、运行authcode方法将key和要测试的验证码带进去(codes,key),就可以知道是不是正确的秘钥了!返回值布尔

//main我就不写了大家~~因为这个可以当做util工具直接调用就行了
//

package coin.util;

import java.security.InvalidKeyException;
import java.security.NoSuchAlgorithmException;
import java.security.SecureRandom;

import javax.crypto.Mac;
import javax.crypto.spec.SecretKeySpec;

import org.apache.commons.codec.binary.Base32;
import org.apache.commons.codec.binary.Base64;

public class GoogleAuthenticator {

// taken from Google pam docs - we probably don't need to mess with these
public static final int SECRET_SIZE = 10;

public static final String SEED = "g8GjEvTbW5oVSV7avLBdwIHqGlUYNzKFI7izOF8GwLDVKs2m0QN7vxRs2im5MDaNCWGmcD2rvcZx";

public static final String RANDOM_NUMBER_ALGORITHM = "SHA1PRNG";

int window_size = 3; // default 3 - max 17 (from google docs)最多可偏移的时间

public void setWindowSize(int s) {
if (s >= 1 && s <= 17)
window_size = s;
}

public static Boolean authcode(String codes, String savedSecret) {
// enter the code shown on device. Edit this and run it fast before the
// code expires!
long code = Long.parseLong(codes);
long t = System.currentTimeMillis();
GoogleAuthenticator ga = new GoogleAuthenticator();
ga.setWindowSize(15); // should give 5 * 30 seconds of grace...
boolean r = ga.check_code(savedSecret, code, t);
return r;
}
public static String genSecret() {
String secret = GoogleAuthenticator.generateSecretKey();
GoogleAuthenticator.getQRBarcodeURL("testuser",
"testhost", secret);
return secret;
}
public static String generateSecretKey() {
SecureRandom sr = null;
try {
sr = SecureRandom.getInstance(RANDOM_NUMBER_ALGORITHM);
sr.setSeed(Base64.decodeBase64(SEED));
byte[] buffer = sr.generateSeed(SECRET_SIZE);
Base32 codec = new Base32();
byte[] bEncodedKey = codec.encode(buffer);
String encodedKey = new String(bEncodedKey);
return encodedKey;
}catch (NoSuchAlgorithmException e) {
// should never occur... configuration error
}
return null;
}

public static String getQRBarcodeURL(String user, String host, String secret) {
String format = "https://www.google.com/chart?chs=200x200&chld=M%%7C0&cht=qr&chl=otpauth://totp/%s@%s%%3Fsecret%%3D%s";
return String.format(format, user, host, secret);
}

public boolean check_code(String secret, long code, long timeMsec) {
Base32 codec = new Base32();
byte[] decodedKey = codec.decode(secret);
// convert unix msec time into a 30 second "window"
// this is per the TOTP spec (see the RFC for details)
long t = (timeMsec / 1000L) / 30L;
// Window is used to check codes generated in the near past.
// You can use this value to tune how far you're willing to go.
for (int i = -window_size; i <= window_size; ++i) {
long hash;
try {
hash = verify_code(decodedKey, t + i);
}catch (Exception e) {
// Yes, this is bad form - but
// the exceptions thrown would be rare and a static configuration problem
e.printStackTrace();
throw new RuntimeException(e.getMessage());
//return false;
}
if (hash == code) {
return true;
}
}
// The validation code is invalid.
return false;
}

private static int verify_code(byte[] key, long t) throws NoSuchAlgorithmException, InvalidKeyException {
byte[] data = new byte[8];
long value = t;
for (int i = 8; i-- > 0; value >>>= 8) {
data[i] = (byte) value;
}
SecretKeySpec signKey = new SecretKeySpec(key, "HmacSHA1");
Mac mac = Mac.getInstance("HmacSHA1");
mac.init(signKey);
byte[] hash = mac.doFinal(data);
int offset = hash[20 - 1] & 0xF;
// We're using a long because Java hasn't got unsigned int.
long truncatedHash = 0;
for (int i = 0; i < 4; ++i) {
truncatedHash <<= 8;
// We are dealing with signed bytes:
// we just keep the first byte.
truncatedHash |= (hash[offset + i] & 0xFF);
}
truncatedHash &= 0x7FFFFFFF;
truncatedHash %= 1000000;
return (int) truncatedHash;
}
}
工程源码分享:
链接: http://pan.baidu.com/s/1eRUelqi 密码: xz25

相关文章推荐
- java中使用线程实现Timer(定时器)原理和源码
- 利用Java Reflection(反射)原理,在hibernate里面实现对单表、视图的动态组合查询
- java中使用线程实现Timer(定时器)原理和源码
- java中使用线程实现Timer(定时器)原理和源码
- Java对象池技术的原理及其实现
- java中使用线程实现Timer(定时器)原理和源码
- 利用Java实现电信宽带上网的Web 认证---1. 原理
- java中使用线程实现Timer(定时器)原理和源码
- Java对象池技术的原理及其实现的小结
- java中使用线程实现Timer(定时器)原理和源码
- java中使用线程实现Timer(定时器)原理和源码
- java中使用线程实现Timer(定时器)原理和源码
- java中使用线程实现Timer(定时器)原理和源码
- java中使用线程实现Timer(定时器)原理和源码
- Java 虚拟机类装载:原理、实现与应用
- Java对象池技术原理及其实现
- Java对象池技术的原理及其实现
- java中使用线程实现Timer(定时器)原理和源码
- 快速排序原理及java实现
- java中使用线程实现Timer(定时器)原理和源码