Linux命令:nginx启用SSL功能设置及虚拟主机
2017-08-07 14:21
429 查看
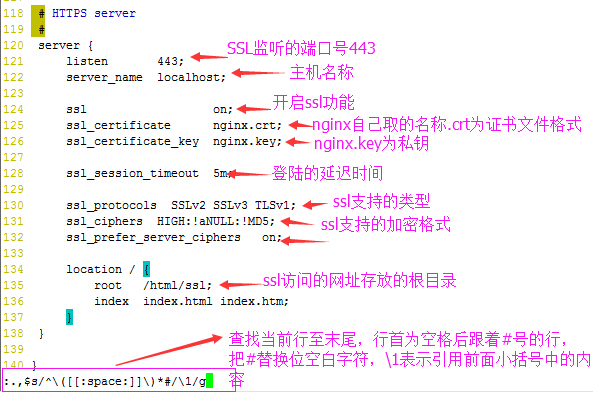
首先配置nginx配置文件/etc/nginx/nginx.conf,启用ssl功能配置如下:
[root@lamp ~]# vim /etc/nginx/nginx.conf
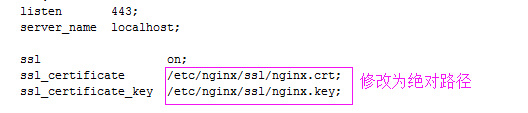
上图中的证书路径都是使用了相对路径,为了避免出现错误,把相对路径修改为绝对路径如下图:
编辑证书openssl.cnf,确保证书路径正确,然后保存退出:
[root@lamp ~]# vim /etc/pki/tls/openssl.cnf

确认CA路径下证书相关目录是否都有:
[root@lamp ~]# cd /etc/pki/CA
[root@lamp CA]# ls #下面四个目录必须都存在(nginx服务器默认已建立)
certs crl newcerts private
[root@lamp CA]# ls private/ #查看是否有私钥文件
[root@lamp CA]# (umask 077; openssl genrsa 2048 > private/cakey.pem) #生成一个私钥证书
Generating RSA private key, 2048 bit long modulus
.............+++
............+++
e is 65537 (0x10001)
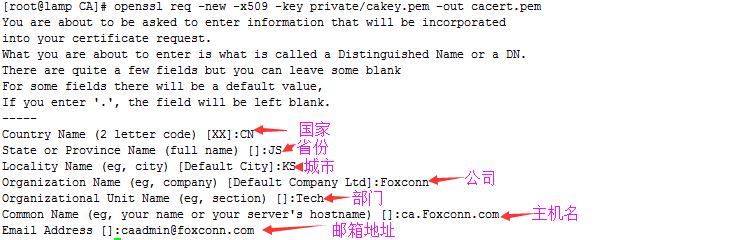
[root@lamp CA]# openssl req -new -x509 -key private/cakey.pem -out cacert.pem #针对cakey.pem该私钥证书生成一个自签证书。相关内容输入如下
[root@lamp CA]# ls
cacert.pem certs crl newcerts private
[root@lamp CA]# touch serial
[root@lamp CA]# echo 01 > serial
[root@lamp CA]# touch index.txt
[root@lamp CA]# cd /etc/nginx
[root@lamp nginx]# mkdir ssl
[root@lamp nginx]# cd ssl
[root@lamp ssl]# (umask 077;openssl genrsa 1024 > nginx.key) #生成一个私钥
Generating RSA private key, 1024 bit long modulus
...........................++++++
..++++++
e is 65537 (0x10001)
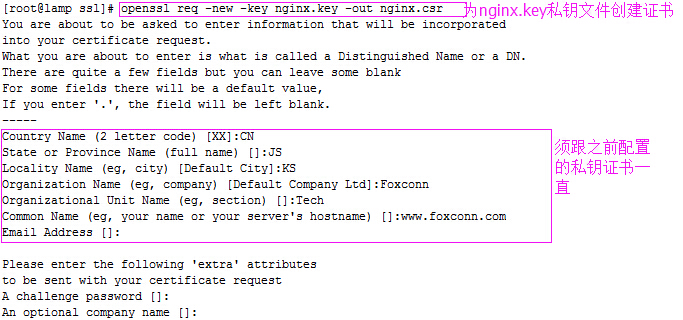
[root@lamp ssl]# openssl req -new -key nginx.key -out nginx.csr
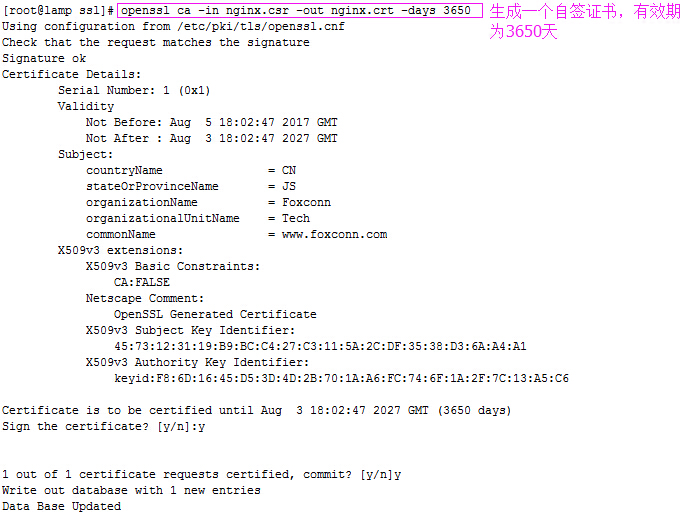
[root@lamp ssl] openssl ca -in nginx.csr -out nginx.crt -days 3650
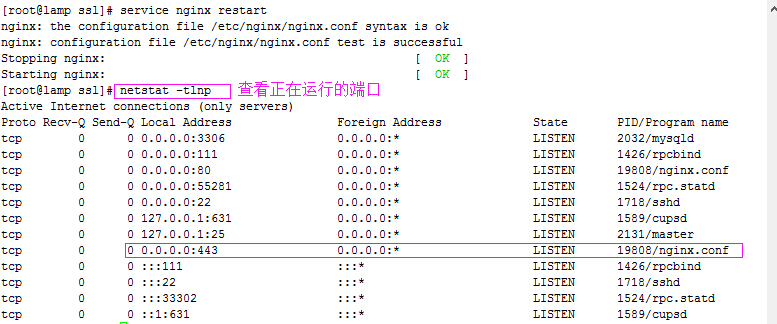
[root@lamp ssl]# service nginx restart
[root@lamp ssl]# cd /usr/html/ #进入网页保存目录,新建ssl
[root@lamp html]# ls
50x.html index.html test test1 test2 test3
[root@lamp html]# mkdir ssl
[root@lamp html]# ls
50x.html index.html ssl test test1 test2 test3
[root@lamp html]# cd ssl
[root@lamp ssl]# vim index.html #编辑ssl主页
<h1> SSL 10.109.134.252 SSL </h1>
[root@lamp ssl]# service nginx restart
nginx: the configuration file /etc/nginx/nginx.conf syntax is ok
nginx: configuration file /etc/nginx/nginx.conf test is successful
Stopping nginx: [ OK ]
Starting nginx: [ OK ]
*网页存放路径为/usr/html/ssl,所以/etc/nginx/nginx.conf配置文件中SSL服务中的location中的
root路径为/usr/html/ssl
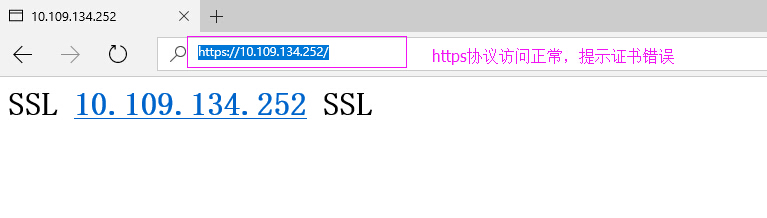
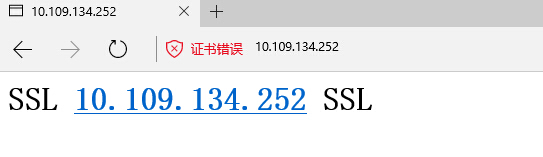
然后通过客户端访问结果如下:
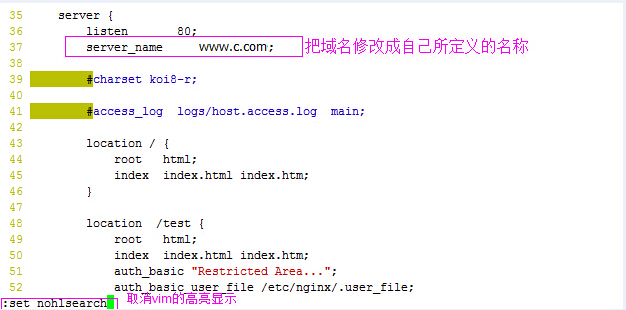
nginx域名访问功能,只要在nginx.conf配置文件中修改server字段,如下:
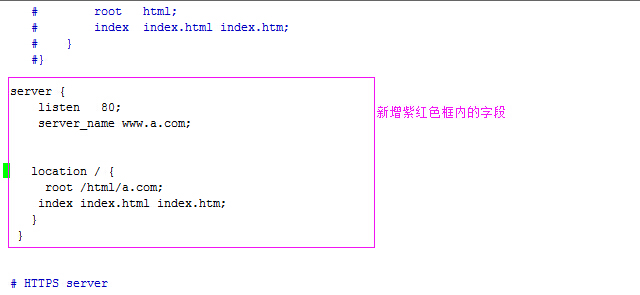
增加nginx虚拟主机功能,配置nginx.conf文件增加server字段
重启nginx服务,并在访问的主机host里面增加以下两行域名解析:
10.109.134.252 www.c.com
10.109.134.252 www.a.com
测试结果如下:

[root@lamp ~]# vim /etc/nginx/nginx.conf
上图中的证书路径都是使用了相对路径,为了避免出现错误,把相对路径修改为绝对路径如下图:
编辑证书openssl.cnf,确保证书路径正确,然后保存退出:
[root@lamp ~]# vim /etc/pki/tls/openssl.cnf
确认CA路径下证书相关目录是否都有:
[root@lamp ~]# cd /etc/pki/CA
[root@lamp CA]# ls #下面四个目录必须都存在(nginx服务器默认已建立)
certs crl newcerts private
[root@lamp CA]# ls private/ #查看是否有私钥文件
[root@lamp CA]# (umask 077; openssl genrsa 2048 > private/cakey.pem) #生成一个私钥证书
Generating RSA private key, 2048 bit long modulus
.............+++
............+++
e is 65537 (0x10001)
[root@lamp CA]# openssl req -new -x509 -key private/cakey.pem -out cacert.pem #针对cakey.pem该私钥证书生成一个自签证书。相关内容输入如下
[root@lamp CA]# ls
cacert.pem certs crl newcerts private
[root@lamp CA]# touch serial
[root@lamp CA]# echo 01 > serial
[root@lamp CA]# touch index.txt
[root@lamp CA]# cd /etc/nginx
[root@lamp nginx]# mkdir ssl
[root@lamp nginx]# cd ssl
[root@lamp ssl]# (umask 077;openssl genrsa 1024 > nginx.key) #生成一个私钥
Generating RSA private key, 1024 bit long modulus
...........................++++++
..++++++
e is 65537 (0x10001)
[root@lamp ssl]# openssl req -new -key nginx.key -out nginx.csr
[root@lamp ssl] openssl ca -in nginx.csr -out nginx.crt -days 3650
[root@lamp ssl]# service nginx restart
[root@lamp ssl]# cd /usr/html/ #进入网页保存目录,新建ssl
[root@lamp html]# ls
50x.html index.html test test1 test2 test3
[root@lamp html]# mkdir ssl
[root@lamp html]# ls
50x.html index.html ssl test test1 test2 test3
[root@lamp html]# cd ssl
[root@lamp ssl]# vim index.html #编辑ssl主页
<h1> SSL 10.109.134.252 SSL </h1>
[root@lamp ssl]# service nginx restart
nginx: the configuration file /etc/nginx/nginx.conf syntax is ok
nginx: configuration file /etc/nginx/nginx.conf test is successful
Stopping nginx: [ OK ]
Starting nginx: [ OK ]
*网页存放路径为/usr/html/ssl,所以/etc/nginx/nginx.conf配置文件中SSL服务中的location中的
root路径为/usr/html/ssl
然后通过客户端访问结果如下:
nginx域名访问功能,只要在nginx.conf配置文件中修改server字段,如下:
增加nginx虚拟主机功能,配置nginx.conf文件增加server字段
重启nginx服务,并在访问的主机host里面增加以下两行域名解析:
10.109.134.252 www.c.com
10.109.134.252 www.a.com
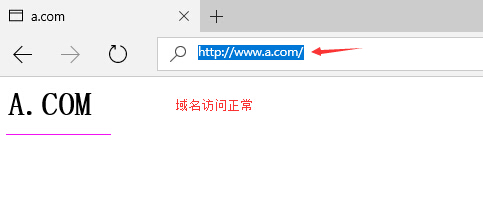
测试结果如下:

相关文章推荐
- nginx虚拟主机设置
- nginx下CI框架虚拟主机设置
- nginx for windows 中虚拟主机路径设置问题
- nginx生产环境常用功能include 、虚拟主机别名、rewrite、nginx status详细解析、fastcgi、访问控制
- nginx实验---lnmp实现多虚拟主机部署wordpress和phpmyadmin,并为后者提供https,及rewrite功能
- Nginx服务器设置虚拟主机 添加多个站点
- nginx启用虚拟主机【nginx】
- 如何在CentOS 6上设置nginx虚拟主机(Server块)
- nginx虚拟主机设置
- Nginx设置虚拟主机,添加多站点
- nginx的虚拟主机功能(nginx多站点,绑定多个域名)-----nginx的学习之路
- Nginx如何反向代理网站和设置虚拟主机
- [转载]nginx简单防盗链及设置默认虚拟主机(禁止通过IP访问)
- 为nginx设置默认虚拟主机(空主机头,默认主机头)
- Nginx多站点虚拟主机实现单独启动停止php-fpm、单独控制权限设置
- nginx 验证默认虚拟主机和用户认证(设置网站需要账号密码访问)
- Nginx多站点虚拟主机实现单独启动停止php-fpm、单独控制权限设置
- apache 虚拟主机启用SSL
- Nginx虚拟主机及相关设置