Django使用Session
2017-08-06 12:17
218 查看
当用户打开浏览器发起请求,服务端会自动生成一个Session,对该用户作为唯一标识。
服务端可以在这个Session中保存一些用户不需要的或者不希望被用户看见的信息。
当用户关闭浏览器重新打开发起请求,服务端会重新创建一个Session,原先的Session就作废了。
Session有寿命限制,在寿命之内再次发起请求会自动延期,而经过一段时间没有延期会自动被销毁。
基于数据库的Session、缓存Session、基于文件的Session还有基于Cookie的Session。
To enable session functionality, do the following:
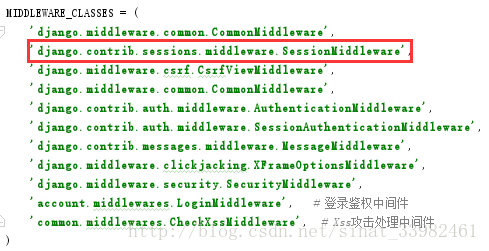
· Edit the MIDDLEWARE setting and make sure it contains ‘django.contrib.sessions.middleware.SessionMiddleware’. The default settings.py created by django-admin startproject has SessionMiddleware activated.
If you don’t want to use sessions, you might as well remove the SessionMiddleware line from MIDDLEWARE and ‘django.contrib.sessions’ from your INSTALLED_APPS. It’ll save you a small bit of overhead.
做这些事来开启Session:
· 编辑MIDDLEWARE配置,让它包含’django.contrib.sessions.middleware.SessionMiddleware’。由django-admin创建的sesstins.py默认激活了这个东西。
如果你不想使用Session,那就删掉MIDDLEWARE里的SessionMiddleware和INSTALLED_APPS里的’django.contrib.sessions’吧,节省一下开销。
Once you have configured your installation, run manage.py migrate to install the single database table that stores session data.
修改了你的配置文件之后,运行manage.py migrate,安装独立的表来保存session数据。
新手上路,就读到这里吧,使用默认的Session方式。
最后再运行一下项目目录下的manage.py,后面加上参数migrate。
就这么简单完成了配置。
Session保存信息:
读取Session中的信息:
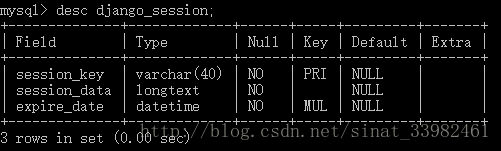
查看一下表结构,有三个字段:
session_key、session_data以及expire_data。
再查看一下表中的数据
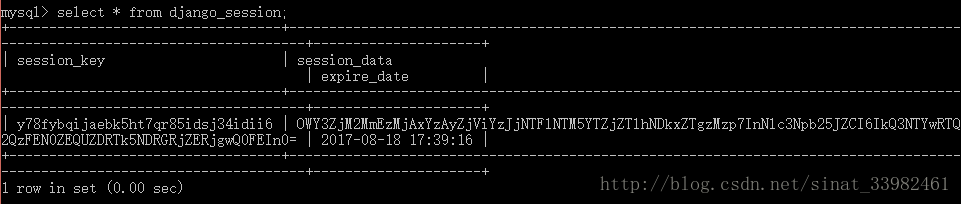
不难看出,session_key是对请求自动创建的标识,是唯一的;session_data是这个Session中记录了的具体的数据,是经过了加密的数据;而第三个字段是这个Session自动被销毁的时间,默认情况下,Session的生命有两周的时长。
服务端可以在这个Session中保存一些用户不需要的或者不希望被用户看见的信息。
当用户关闭浏览器重新打开发起请求,服务端会重新创建一个Session,原先的Session就作废了。
Session有寿命限制,在寿命之内再次发起请求会自动延期,而经过一段时间没有延期会自动被销毁。
Django中使用Session保存信息
Django的Session有四种:基于数据库的Session、缓存Session、基于文件的Session还有基于Cookie的Session。
翻译一下说明书
文档链接:https://docs.djangoproject.com/en/dev/topics/http/sessions/Enabling sessions
Sessions are implemented via a piece of middleware.To enable session functionality, do the following:
· Edit the MIDDLEWARE setting and make sure it contains ‘django.contrib.sessions.middleware.SessionMiddleware’. The default settings.py created by django-admin startproject has SessionMiddleware activated.
If you don’t want to use sessions, you might as well remove the SessionMiddleware line from MIDDLEWARE and ‘django.contrib.sessions’ from your INSTALLED_APPS. It’ll save you a small bit of overhead.
开启Session
Session通过一个中间件实现。做这些事来开启Session:
· 编辑MIDDLEWARE配置,让它包含’django.contrib.sessions.middleware.SessionMiddleware’。由django-admin创建的sesstins.py默认激活了这个东西。
如果你不想使用Session,那就删掉MIDDLEWARE里的SessionMiddleware和INSTALLED_APPS里的’django.contrib.sessions’吧,节省一下开销。
Configuring the session engine
By default, Django stores sessions in your database (using the model django.contrib.sessions.models.Session). Though this is convenient, in some setups it’s faster to store session data elsewhere, so Django can be configured to store session data on your filesystem or in your cache.配置session引擎
默认地,Django将session保存在你的数据里。这样虽然很方便,但是如果你要更高速的存储session,可以将Django配置成用你的文件系统或者高速缓存才存储。Using database-backed sessions
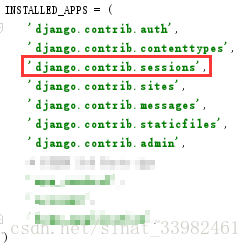
If you want to use a database-backed session, you need to add ‘django.contrib.sessions’ to your INSTALLED_APPS setting.Once you have configured your installation, run manage.py migrate to install the single database table that stores session data.
使用基于数据库的Session
如果你想要使用基于数据库的Session,你需要添加’django.contrib.sessions’到你的INSTALLED_APPS配置中。修改了你的配置文件之后,运行manage.py migrate,安装独立的表来保存session数据。
新手上路,就读到这里吧,使用默认的Session方式。
开始配置
最后再运行一下项目目录下的manage.py,后面加上参数migrate。
就这么简单完成了配置。
使用Session
登陆的简易示例Session保存信息:
def test_set(request):
username = request.POST.get('username')
password = request.POST.get('password')
if cmp(username, password) == 0: #假设用户名和密码一致可以成功登陆
request.session['user'] = username;
return render_json({'status': True})
else:
return render_json({'status': False})
读取Session中的信息:
def test_set(request):
user = request.session.get('user')
if user == None:
return render_json({'status': False, 'msg':'Not Login Yet'})
else:
print user
return render_json({'status': False, 'user':user})
更多的
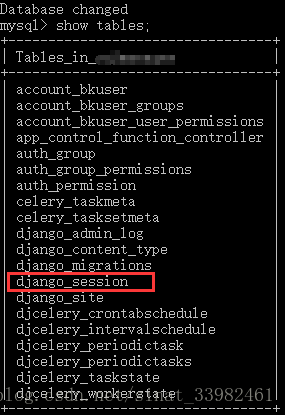
前面运行完manage.py migrate后,查看一下数据库,会发现为项目创建的数据库中,Django自动创建了一个表django_session。查看一下表结构,有三个字段:
session_key、session_data以及expire_data。
再查看一下表中的数据
不难看出,session_key是对请求自动创建的标识,是唯一的;session_data是这个Session中记录了的具体的数据,是经过了加密的数据;而第三个字段是这个Session自动被销毁的时间,默认情况下,Session的生命有两周的时长。

相关文章推荐
- 在Python的Django框架的视图中使用Session的方法
- 在Django的session中使用User对象的方法
- django的用户认证管理,如何使用session(1)
- django的用户认证管理,如何使用session(2)
- django之状态保持-使用redis存储session
- django session使用方法
- django进阶之cookie和session的使用示例
- 第七章:Django开发中cookie与session的使用
- 在django模板中使用session数据
- 在Django中使用缓存提供Session支持
- 在Django所有模板中使用session中的数据
- django中使用redis保存session
- django 中ajax、session、cache的使用
- Django中使用session保持用户登陆连接
- django模板中直接使用session
- django使用session报错 (1146, "Table 'test3.django_session' doesn't exist")
- 在Django的视图(View)外使用Session的方法
- 在Django的session中使用User对象的方法
- 在Django 模板中使用session
- django 使用redis存放session