nginx+keepalived+php+memcached+repcached
2017-07-24 15:16
399 查看
部署准备:
VIP1 192.168.1.9
VIP2 192.168.1.10
Nginx1 192.168.1.11 nginx php keepalived memcached repcached
Nginx2 192.168.1.12 nginx php keepalived memcached repcached
一、部署nginx1
1.安装nginx
yum -y installpcre-devel zlib-devel openssl-devel
useradd -M -s/sbin/nologin nginx
tar xfnginx-1.6.2.tar.gz
cd nginx-1.6.2
./configure--prefix=/usr/local/nginx --user=nginx --group=nginx --with-file-aio--with-http_stub_status_module --with-http_ssl_module --with-http_flv_module--with-http_gzip_static_module && make && make install
启动nginx
ln -s/usr/local/nginx/sbin/nginx /usr/local/sbin/
nginx
2.安装php
tar xfphp-5.3.28.tar.gz
cd php-5.3.28
./configure--prefix=/usr/local/php --with-openssl --enable-fpm --enable-sockets --enable-sysvshm --enable-xml --with-config-file-path=/etc && make && make install
cp/usr/local/php/etc/php-fpm.conf.default /usr/local/php/etc/php-fpm.conf
启动php-fpm
cd /usr/local/php/
sbin/php-fpm
如果启动报错:
[root@localhostphp]# sbin/php-fpm
[01-Dec-201600:41:54] ALERT: [pool www] pm.min_spare_servers(0) must be a positive value
[01-Dec-201600:41:54] ERROR: failed to post process the configuration
排错方法:
vim /usr/local/php/etc/php-fpm.conf
把以下几项的注释去掉
pm.start_servers=20
pm.min_spare_servers=5
pm.max_spare_servers=35
如下为启动成功
[root@CentOS6-node1~]# netstat -antp |grep php-fpm
tcp 0 0 127.0.0.1:9000 0.0.0.0:* LISTEN 6337/php-fpm
3.整合nginx、php
修改nginx.conf以支持php
vim /usr/local/nginx/conf/nginx.conf
添加以下红色部分:
server {
listen 80;
server_name localhost;
location / {
root html;
index index.html index.html;
location ~ \.php$ {
fastcgi_pass 127.0.0.1:9000;
fastcgi_index index.php;
fastcgi_param SCRIPT_FILENAME /$document_root$fastcgi_script_name;
include fastcgi_params;
}
}
创建php测试页
cd /usr/local/nginx/html/
vim index.php
<?php
phpinfo();
?>
重启nginx
killall -9 nginx
nginx
验证:
访问http://192.168.1.11/index.php,出现以下页面

Nginx与php整合成功
4.安装memcached
yum -y install gccopenssl-devel pcre-devel zlib-devel
tar xflibevent-2.0.15-stable.tar.gz
cd libevent-2.0.15-stable
./configure--prefix=/usr/local/libevent && make && make install
tar xfmemcached-1.4.5.tar.gz
cd memcached-1.4.5
./configure--prefix=/usr/local/memcached --with-libevent=/usr/local/libevent/ &&make && make install
vim /etc/ld.so.conf
加入红色内容:
include ld.so.conf.d/*.conf
/usr/local/libevent/lib/
ldconfig
/usr/local/memcached/bin/memcached -u root -m 512M -n 10 -f 2 -d -vvv -c 512
选项:
-h #查看帮助信息
-p #指定memcached监听的端口号默认11211
-l #memcached服务器的ip地址
-u #memcached程序运行时使用的用户身份必须是root用户
-m #指定使用本机的多少物理内存存数据默认64M
-c #memcached服务的最大链接数
-vvv #显示详细信息
-n #chunk size 的最小空间是多少单位字节
-f #chunk size大小增长的倍数默认 1.25倍
-d #在后台启动
检测memcached是否启动:
netstat -antp| grep :11211
tcp 0 0 0.0.0.0:11211 0.0.0.0:* LISTEN 97860/memcached
测试memcached 能否存取数据
yum -y installtelnet
telnet 192.168.1.11 11211
set username 0 08
zhangsan
STORED
get username
VALUE username 0 8
zhangsan
END
quit
Connection closedby foreign host.
Memcached安装成功
5.整合php、memcached
安装php支持memcached模块
需要安装libmemcached客户端库,php的扩展memcached模块,因为该扩展是依赖libmemcached的API
安装libmemcached客户端库
tar xflibmemcached-1.0.18.tar.gz
cd libmemcached-1.0.18
./configure-prefix=/usr/local/libmemcached -with-memcached && make && makeinstall
安装php的扩展memcached模块
tar xfmemcached-2.2.0.tgz
cd memcached-2.2.0
/usr/local/php/bin/phpize //先使用phpize命令生成一个configure文件
./configure-enable-memcached -with-php-config=/usr/local/php/bin/php-config -with-zlib-dir-with-libmemcached-dir=/usr/local/libmemcached -prefix=/usr/local/phpmemcached--disable-memcached-sasl
make &&make install
记录下安装成功后的提示,类似于:
Installing sharedextensions: /usr/local/php/lib/php/extensions/no-debug-non-zts-20090626/
cp /root/php-5.3.28/php.ini-development/etc/php.ini //在编译安装php时指定配置文件的路径是/etc下
增加扩展extension配置文件
vim /etc/php.ini
添加以下内容:
822 extension_dir ="/usr/local/php/lib/php/extensions/no-debug-non-zts-20090626/"
823 extension = "memcached.so"
重启php-fpm:
killall -9 php-fpm
/usr/local/php/sbin/php-fpm
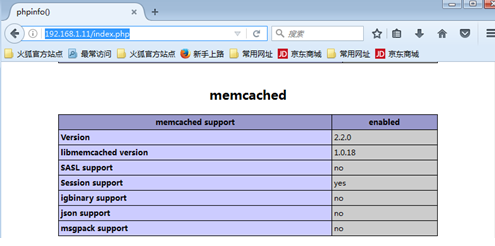
执行php –m命令查看是否加载了memcached模块
/usr/local/php/bin/php–m
访问http://192.168.1.11/index.php出现以下页面
建立测试页面:
vim /usr/local/nginx/html/memcached.php
<?php
session_start();
if(!isset($_SESSION['test'])){
$_SESSION['test']= time();
}
print$_SESSION['test'];
print"<br><br>";
print"SessionID: " . session_id();
?>
访问http://192.168.1.11/memcached.php出现以下页面
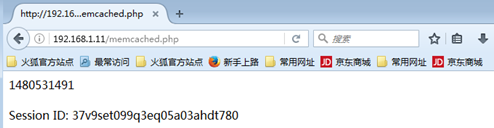
单台nginx+php+memcached存储session信息完成
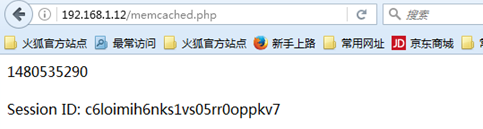
二、部署nginx2
Nginx2与Nginx1做相同操作
最后访问http://192.168.1.12/memcached.php出现以下页面
三、分别在nginx1和nginx2上安装keepalived实现高可用
在两台nginx上做以下相同操作:
yum -y installkernel-devel openssl-devel
tar xfkeepalived-1.2.13.tar.gz
cd keepalived-1.2.13
./configure--prefix=/ --with-kernel-dir=/usr/src/kernels/2.6.32-504.el6.x86_64/ &&make && make install
chkconfig --addkeepalived
chkconfig keepalived on
chkconfig --list keepalived
修改nginx1上的keepalived配置文件
vim /etc/keepalived/keepalived.conf
!Configuration File for keepalived
global_defs{
notification_email {
crushlinux@163.com
}
smtp_server 127.0.0.1
smtp_connect_timeout 30
router_id LVS_DEVEL
}
vrrp_instanceVI_1 {
state BACKUP
interface eth0
virtual_router_id 51
priority 50
advert_int 1
authentication {
auth_type PASS
auth_pass 123
}
virtual_ipaddress {
192.168.1.9
}
}
vrrp_instanceVI_2 {
state MASTER
interface eth0
virtual_router_id 52
priority 100
advert_int 1
authentication {
auth_type PASS
auth_pass 123
} virtual_ipaddress {
192.168.1.10
}
}
修改nginx2上的keepalived配置文件
vim /etc/keepalived/keepalived.conf
!Configuration File for keepalived
global_defs{
notification_email {
crushlinux@163.com
}
smtp_server 127.0.0.1
smtp_connect_timeout 30
router_id LVS_DEVEL
}
vrrp_instanceVI_1 {
state MASTER
interface eth0
virtual_router_id 51
priority 100
advert_int 1
authentication {
auth_type PASS
auth_pass 123
}
virtual_ipaddress {
192.168.1.9
}
}
vrrp_instanceVI_2 {
state BACKUP
interface eth0
virtual_router_id 52
priority 50
advert_int 1
authentication {
auth_type PASS
auth_pass 123
}
virtual_ipaddress {
192.168.1.10
}
}
分别启动nginx1和nginx2的keepalived服务
service keepalived start
nginx1的VIP地址为192.168.1.10
nginx2的VIP地址为192.168.1.9
VIP1 192.168.1.9
VIP2 192.168.1.10
Nginx1 192.168.1.11 nginx php keepalived memcached repcached
Nginx2 192.168.1.12 nginx php keepalived memcached repcached
一、部署nginx1
1.安装nginx
yum -y installpcre-devel zlib-devel openssl-devel
useradd -M -s/sbin/nologin nginx
tar xfnginx-1.6.2.tar.gz
cd nginx-1.6.2
./configure--prefix=/usr/local/nginx --user=nginx --group=nginx --with-file-aio--with-http_stub_status_module --with-http_ssl_module --with-http_flv_module--with-http_gzip_static_module && make && make install
启动nginx
ln -s/usr/local/nginx/sbin/nginx /usr/local/sbin/
nginx
2.安装php
tar xfphp-5.3.28.tar.gz
cd php-5.3.28
./configure--prefix=/usr/local/php --with-openssl --enable-fpm --enable-sockets --enable-sysvshm --enable-xml --with-config-file-path=/etc && make && make install
cp/usr/local/php/etc/php-fpm.conf.default /usr/local/php/etc/php-fpm.conf
启动php-fpm
cd /usr/local/php/
sbin/php-fpm
如果启动报错:
[root@localhostphp]# sbin/php-fpm
[01-Dec-201600:41:54] ALERT: [pool www] pm.min_spare_servers(0) must be a positive value
[01-Dec-201600:41:54] ERROR: failed to post process the configuration
排错方法:
vim /usr/local/php/etc/php-fpm.conf
把以下几项的注释去掉
pm.start_servers=20
pm.min_spare_servers=5
pm.max_spare_servers=35
如下为启动成功
[root@CentOS6-node1~]# netstat -antp |grep php-fpm
tcp 0 0 127.0.0.1:9000 0.0.0.0:* LISTEN 6337/php-fpm
3.整合nginx、php
修改nginx.conf以支持php
vim /usr/local/nginx/conf/nginx.conf
添加以下红色部分:
server {
listen 80;
server_name localhost;
location / {
root html;
index index.html index.html;
location ~ \.php$ {
fastcgi_pass 127.0.0.1:9000;
fastcgi_index index.php;
fastcgi_param SCRIPT_FILENAME /$document_root$fastcgi_script_name;
include fastcgi_params;
}
}
创建php测试页
cd /usr/local/nginx/html/
vim index.php
<?php
phpinfo();
?>
重启nginx
killall -9 nginx
nginx
验证:
访问http://192.168.1.11/index.php,出现以下页面
Nginx与php整合成功
4.安装memcached
yum -y install gccopenssl-devel pcre-devel zlib-devel
tar xflibevent-2.0.15-stable.tar.gz
cd libevent-2.0.15-stable
./configure--prefix=/usr/local/libevent && make && make install
tar xfmemcached-1.4.5.tar.gz
cd memcached-1.4.5
./configure--prefix=/usr/local/memcached --with-libevent=/usr/local/libevent/ &&make && make install
vim /etc/ld.so.conf
加入红色内容:
include ld.so.conf.d/*.conf
/usr/local/libevent/lib/
ldconfig
/usr/local/memcached/bin/memcached -u root -m 512M -n 10 -f 2 -d -vvv -c 512
选项:
-h #查看帮助信息
-p #指定memcached监听的端口号默认11211
-l #memcached服务器的ip地址
-u #memcached程序运行时使用的用户身份必须是root用户
-m #指定使用本机的多少物理内存存数据默认64M
-c #memcached服务的最大链接数
-vvv #显示详细信息
-n #chunk size 的最小空间是多少单位字节
-f #chunk size大小增长的倍数默认 1.25倍
-d #在后台启动
检测memcached是否启动:
netstat -antp| grep :11211
tcp 0 0 0.0.0.0:11211 0.0.0.0:* LISTEN 97860/memcached
测试memcached 能否存取数据
yum -y installtelnet
telnet 192.168.1.11 11211
set username 0 08
zhangsan
STORED
get username
VALUE username 0 8
zhangsan
END
quit
Connection closedby foreign host.
Memcached安装成功
5.整合php、memcached
安装php支持memcached模块
需要安装libmemcached客户端库,php的扩展memcached模块,因为该扩展是依赖libmemcached的API
安装libmemcached客户端库
tar xflibmemcached-1.0.18.tar.gz
cd libmemcached-1.0.18
./configure-prefix=/usr/local/libmemcached -with-memcached && make && makeinstall
安装php的扩展memcached模块
tar xfmemcached-2.2.0.tgz
cd memcached-2.2.0
/usr/local/php/bin/phpize //先使用phpize命令生成一个configure文件
./configure-enable-memcached -with-php-config=/usr/local/php/bin/php-config -with-zlib-dir-with-libmemcached-dir=/usr/local/libmemcached -prefix=/usr/local/phpmemcached--disable-memcached-sasl
make &&make install
记录下安装成功后的提示,类似于:
Installing sharedextensions: /usr/local/php/lib/php/extensions/no-debug-non-zts-20090626/
cp /root/php-5.3.28/php.ini-development/etc/php.ini //在编译安装php时指定配置文件的路径是/etc下
增加扩展extension配置文件
vim /etc/php.ini
添加以下内容:
822 extension_dir ="/usr/local/php/lib/php/extensions/no-debug-non-zts-20090626/"
823 extension = "memcached.so"
重启php-fpm:
killall -9 php-fpm
/usr/local/php/sbin/php-fpm
执行php –m命令查看是否加载了memcached模块
/usr/local/php/bin/php–m
访问http://192.168.1.11/index.php出现以下页面
建立测试页面:
vim /usr/local/nginx/html/memcached.php
<?php
session_start();
if(!isset($_SESSION['test'])){
$_SESSION['test']= time();
}
print$_SESSION['test'];
print"<br><br>";
print"SessionID: " . session_id();
?>
访问http://192.168.1.11/memcached.php出现以下页面
单台nginx+php+memcached存储session信息完成
二、部署nginx2
Nginx2与Nginx1做相同操作
最后访问http://192.168.1.12/memcached.php出现以下页面
三、分别在nginx1和nginx2上安装keepalived实现高可用
在两台nginx上做以下相同操作:
yum -y installkernel-devel openssl-devel
tar xfkeepalived-1.2.13.tar.gz
cd keepalived-1.2.13
./configure--prefix=/ --with-kernel-dir=/usr/src/kernels/2.6.32-504.el6.x86_64/ &&make && make install
chkconfig --addkeepalived
chkconfig keepalived on
chkconfig --list keepalived
修改nginx1上的keepalived配置文件
vim /etc/keepalived/keepalived.conf
!Configuration File for keepalived
global_defs{
notification_email {
crushlinux@163.com
}
smtp_server 127.0.0.1
smtp_connect_timeout 30
router_id LVS_DEVEL
}
vrrp_instanceVI_1 {
state BACKUP
interface eth0
virtual_router_id 51
priority 50
advert_int 1
authentication {
auth_type PASS
auth_pass 123
}
virtual_ipaddress {
192.168.1.9
}
}
vrrp_instanceVI_2 {
state MASTER
interface eth0
virtual_router_id 52
priority 100
advert_int 1
authentication {
auth_type PASS
auth_pass 123
} virtual_ipaddress {
192.168.1.10
}
}
修改nginx2上的keepalived配置文件
vim /etc/keepalived/keepalived.conf
!Configuration File for keepalived
global_defs{
notification_email {
crushlinux@163.com
}
smtp_server 127.0.0.1
smtp_connect_timeout 30
router_id LVS_DEVEL
}
vrrp_instanceVI_1 {
state MASTER
interface eth0
virtual_router_id 51
priority 100
advert_int 1
authentication {
auth_type PASS
auth_pass 123
}
virtual_ipaddress {
192.168.1.9
}
}
vrrp_instanceVI_2 {
state BACKUP
interface eth0
virtual_router_id 52
priority 50
advert_int 1
authentication {
auth_type PASS
auth_pass 123
}
virtual_ipaddress {
192.168.1.10
}
}
分别启动nginx1和nginx2的keepalived服务
service keepalived start
nginx1的VIP地址为192.168.1.10
nginx2的VIP地址为192.168.1.9

相关文章推荐
- Memcache安装(Linux+Nginx+PHP+Memcached)
- CentOS6.6 32位 Minimal版本纯编译安装Nginx Mysql PHP Memcached
- 利用nginx+apache+mysql+php+memcached+squid搭建门户网站
- 利用nginx+apache+mysql+php+memcached+squid搭建门户网站
- haproxy+keepalived+nginx+php-fpm
- (lnmp)nginx+mysql+php+memcached扩展
- 门户网站架构Nginx+Apache+MySQL+PHP+Memcached+Squid
- 试用memcached高可用repcached
- CentOS 7 安装php5.6,Nginx,Memcached环境及配置
- Linux下nginx,apache,memcached,php,mysql的安装和配置
- nginx+apache+mysql+php+memcached+squid搭建门户网站
- 门户网站架构Nginx+Apache+MySQL+PHP+Memcached+Squid
- 门户网站架构Nginx+Apache+MySQL+PHP+Memcached+Squid
- Nginx+mysql+php+memcached+Eaccelerator CENTOS下安装
- memcached-1.4.13 + repcached 自动安装脚本
- Centos6.4 + PHP5.5.11 + Mysql5.6.16 + Tnginx2.02 + Memcached1.4.17 + Redis2.2
- Centos6.3 编译源码搭建 PHP(fast-cgi)+Nginx+Mysql+Memcached+Redis高性能服务器
- tomcat+memcached+repcached(未完,待续)
- 门户网站架构Nginx+Apache+MySQL+PHP+Memcached+Squid