springmvc配置mysql数据库读写分离(基于注解aop)加上(搭建mysql主从同步)
2017-07-24 08:55
633 查看
1.先配置数据库的主从
以windows系统为主数据库,以虚拟机的linux系统为从数据库
(1)主数据库配置(windows系统)
1.在mysql文件my.ini里面加入
在[mysqld]中添加:
server-id = 1
log_bin = master-bin
log_bin_index = master-bin.index
binlog_do_db = my_data
binlog_ignore_db = mysql
2.登录主服务器MySQL创建从服务器用到的账户和权限:
3.重启MySQL,命令:
4.登录MySQL状态下,查看主服务器状态:
(2)从数据库配置(linux系统)
1.编辑my.cnf(命令查找文件位置:find / -name my.cnf)
在[mysqld]中添加:
server-id = 2
relay-log = slave-relay-bin
relay-log-index = slave-relay-bin.index
这个[mysqld]要自己加千万注意了!!!
2.重启Slave从服务器MySQL,命令:
3.登录Slave从服务器,连接Master主服务器:
最好主服务器ip固定
4.登录MySQL状态下,启动Slave数据同步。
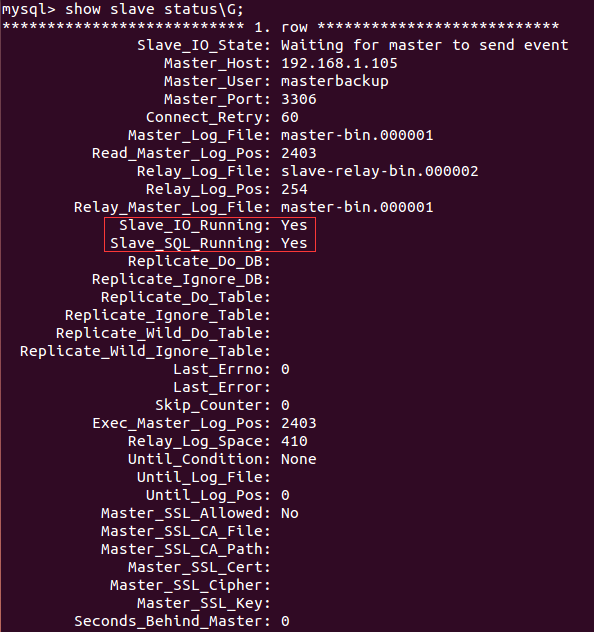
5.登录MySQL状态下,查看Slave信息:
这样就成功了。。!!
接下来开始在springmvc里面配置读写分离
1.在spring-dao.xml里面配置数据库连接池和事务管理
2.jdbc.properties配置
3.@DataSource自定义注解
4.
5.Aop的切面类DatasourceAspect
6.使用方式在mybatis的service接口内使用
7.这个类加上很重要的数据库初始化类
主库做写入操作,从库做读取操作
以windows系统为主数据库,以虚拟机的linux系统为从数据库
(1)主数据库配置(windows系统)
1.在mysql文件my.ini里面加入
在[mysqld]中添加:
server-id = 1
log_bin = master-bin
log_bin_index = master-bin.index
binlog_do_db = my_data
binlog_ignore_db = mysql
2.登录主服务器MySQL创建从服务器用到的账户和权限:
grant replication slave on *.* to 'masterbackup' @'192.168.1.%' identified by 'masterbackup';
3.重启MySQL,命令:
/etc/init.d/mysql restart
4.登录MySQL状态下,查看主服务器状态:
show master status;
(2)从数据库配置(linux系统)
1.编辑my.cnf(命令查找文件位置:find / -name my.cnf)
vi /etc/mysql/my.cnf
在[mysqld]中添加:
server-id = 2
relay-log = slave-relay-bin
relay-log-index = slave-relay-bin.index
这个[mysqld]要自己加千万注意了!!!
2.重启Slave从服务器MySQL,命令:
/etc/init.d/mysql restart
3.登录Slave从服务器,连接Master主服务器:
change master to master_host='192.168.1.103',master_port=3306,master_user='masterbackup',master_password='masterbackup',master_log_file='master-bin.000001',master_log_pos=2403;
最好主服务器ip固定
4.登录MySQL状态下,启动Slave数据同步。
start slave;
5.登录MySQL状态下,查看Slave信息:
show slave status\G;
这样就成功了。。!!
接下来开始在springmvc里面配置读写分离
1.在spring-dao.xml里面配置数据库连接池和事务管理
<?xml version="1.0" encoding="UTF-8"?>
<beans xmlns="http://www.springframework.org/schema/beans"
xmlns:xsi="http://www.w3.org/2001/XMLSchema-instance"
xmlns:context="http://www.springframework.org/schema/context"
xmlns:aop="http://www.springframework.org/schema/aop" xmlns:tx="http://www.springframework.org/schema/tx"
xsi:schemaLocation="http://www.springframework.org/schema/beans http://www.springframework.org/schema/beans/spring-beans.xsd http://www.springframework.org/schema/context http://www.springframework.org/schema/context/spring-context.xsd http://www.springframework.org/schema/aop http://www.springframework.org/schema/aop/spring-aop.xsd http://www.springframework.org/schema/tx http://www.springframework.org/schema/tx/spring-tx.xsd">
<context:component-scan base-package="com.example">
<context:exclude-filter type="annotation" expression="org.springframework.stereotype.Controller"/>
</context:component-scan>
<!-- 配置整合mybatis过程 -->
<!-- 1.配置数据库相关参数properties的属性:${url} -->
<!-- 使用数据库配置文件解耦 -->
<aop:aspectj-autoproxy/>
<context:property-placeholder location="classpath:jdbc.properties"/>
<!-- 下面的druid配置都是基本配置,具体优化设置可以上网查询,也可以去github上面直接搜索druid -->
<!-- dataSource 配置 -->
<!-- 主数据库-->
<bean name="masterDataSource" class="com.alibaba.druid.pool.DruidDataSource" init-method="init" destroy-method="close">
<property name="url" value="${jdbc.master.url}" />
<property name="username" value="${jdbc.master.username}" />
<property name="password" value="${jdbc.master.password}" />
<property name="initialSize" value="${jdbc.initialSize}" />
<property name="minIdle" value="${jdbc.minIdle}" />
<property name="maxActive" value="${jdbc.maxActive}" />
<property name="maxWait" value="${jdbc.maxWait}" />
<property name="timeBetweenEvictionRunsMillis" value="${jdbc.timeBetweenEvictionRunsMillis}" />
<property name="minEvictableIdleTimeMillis" value="${jdbc.minEvictableIdleTimeMillis}" />
<property name="validationQuery" value="${jdbc.validationQuery}" />
<property name="testWhileIdle" value
11419
="${jdbc.testWhileIdle}" />
<property name="testOnBorrow" value="${jdbc.testOnBorrow}" />
<property name="testOnReturn" value="${jdbc.testOnReturn}" />
<property name="removeAbandoned" value="${jdbc.removeAbandoned}" />
<property name="removeAbandonedTimeout" value="${jdbc.removeAbandonedTimeout}" />
<property name="filters" value="${jdbc.filters}" />
<!-- 关闭abanded连接时输出错误日志 -->
<property name="logAbandoned" value="true" />
</bean>
<!--从数据库-->
<bean name="slaveDataSource1" class="com.alibaba.druid.pool.DruidDataSource" init-method="init" destroy-method="close">
<property name="url" value="${jdbc.slave.url}" />
<property name="username" value="${jdbc.slave.username}" />
<property name="password" value="${jdbc.slave.password}" />
<property name="initialSize" value="${jdbc.initialSize}" />
<property name="minIdle" value="${jdbc.minIdle}" />
<property name="maxActive" value="${jdbc.maxActive}" />
<property name="maxWait" value="${jdbc.maxWait}" />
<property name="timeBetweenEvictionRunsMillis" value="${jdbc.timeBetweenEvictionRunsMillis}" />
<property name="minEvictableIdleTimeMillis" value="${jdbc.minEvictableIdleTimeMillis}" />
<property name="validationQuery" value="${jdbc.validationQuery}" />
<property name="testWhileIdle" value="${jdbc.testWhileIdle}" />
<property name="testOnBorrow" value="${jdbc.testOnBorrow}" />
<property name="testOnReturn" value="${jdbc.testOnReturn}" />
<property name="removeAbandoned" value="${jdbc.removeAbandoned}" />
<property name="removeAbandonedTimeout" value="${jdbc.removeAbandonedTimeout}" />
<property name="filters" value="${jdbc.filters}" />
<!-- 关闭abanded连接时输出错误日志 -->
<property name="logAbandoned" value="true" />
</bean>
<!-- 动态数据源 -->
<bean id="dynamicDataSource" class="com.example.data.ReadAndWriteDataSource">
<!-- 通过key-value关联数据源 -->
<property name="targetDataSources">
<map>
<entry value-ref="masterDataSource" key="master"></entry>
<entry value-ref="slaveDataSource1" key="slave"></entry>
</map>
</property>
<property name="defaultTargetDataSource" ref="masterDataSource" />
</bean>
<bean id="transactionManager" class="org.springframework.jdbc.datasource.DataSourceTransactionManager">

<property name="dataSource" ref="dynamicDataSource"/>
</bean>
<!--mybatis与Spring整合 开始 -->
<bean id="sqlSessionFactory" class="org.mybatis.spring.SqlSessionFactoryBean">
<property name="dataSource" ref="dynamicDataSource" />
<property name="mapperLocations">
<list>
<!--<value>classpath:cc/alino/business/authc/mapper/*.xml</value>-->
<value>classpath:mapper/*.xml</value>
</list>
</property>
<property name="configLocation" value="classpath:mybatis-config.xml" />
</bean>
<!-- 4.配置扫描Dao接口包,动态实现Dao接口,注入到spring容器中 -->
<bean class="org.mybatis.spring.mapper.MapperScannerConfigurer">
<!-- 注入sqlSessionFactory -->
<property name="sqlSessionFactoryBeanName" value="sqlSessionFactory"/>
<!-- 给出需要扫描Dao接口包 -->
<property name="basePackage" value="com.example.dao"
/>
</bean>
<!-- 上面的druid的配置 -->
<bean id="logFilter" class="com.alibaba.druid.filter.logging.Slf4jLogFilter">
<property name="statementExecutableSqlLogEnable" value="false" />
</bean>
<!--事务-->
<tx:advice id="txAdvice" transaction-manager="transactionManager">
<tx:attributes>
<tx:method name="publish*" />
<tx:method name="save*" />
<tx:method name="add*" />
<tx:method name="update*" />
<tx:method name="insert*" />
<tx:method name="create*" />
<tx:method name="del*" />
<tx:method name="load*" />
<tx:method name="init*" />
<tx:method name="*"  read-only="true"/>
</tx:attributes>
</tx:advice>
<!--aop-->
<bean id="dynamicDataSourceAspect" class="com.example.aspect.DatasourceAspect"></bean>
<aop:config>
<aop:pointcut id="myPointcut" expression="execution(public * com.example.service.serviceImp.*.*(..))" />
<aop:advisor advice-ref="txAdvice" pointcut-ref="myPointcut"  />

<aop:aspect id="c" ref="dynamicDataSourceAspect" order="1">
<aop:pointcut id="tx" expression="execution(public * com.example.service.serviceImp.*.*(..))" />
<aop:before pointcut-ref="tx"  method="before" />
</aop:aspect>
</aop:config>
</beans>
2.jdbc.properties配置
jdbc.master.url=jdbc:mysql://localhost:3306/testangular?useUnicode=true&characterEncoding=UTF8&zeroDateTimeBehavior=convertToNull
jdbc.master.username=root
jdbc.master.password=root

jdbc.slave.url=jdbc:mysql://192.168.60.128:3306/testangular?useUnicode=true&characterEncoding=UTF8&zeroDateTimeBehavior=convertToNull
jdbc.slave.username=root
jdbc.slave.password=poidsa

jdbc.initialSize=3
jdbc.minIdle=2
jdbc.maxActive=60
jdbc.maxWait=60000
jdbc.timeBetweenEvictionRunsMillis=60000
jdbc.minEvictableIdleTimeMillis=30000
jdbc.validationQuery=SELECT 'x'
jdbc.testWhileIdle=true
jdbc.testOnBorrow=false
jdbc.testOnReturn=false
jdbc.poolPreparedStatements=true
jdbc.maxPoolPreparedStatementPerConnectionSize=20
jdbc.removeAbandoned=true
jdbc.removeAbandonedTimeout=120
jdbc.logAbandoned=false
jdbc.filters=stat
3.@DataSource自定义注解
@Retention(RetentionPolicy.RUNTIME)
@Target(ElementType.METHOD)
public @interface DataSource {
String value() default "master";

}
4.
5.Aop的切面类DatasourceAspect
public class DatasourceAspect {

public void before(JoinPoint joinpoint) throws Exception{
String methodname=joinpoint.getSignature().getName();
Object target=joinpoint.getTarget();
Class<?>[] classzz=target.getClass().getInterfaces();
Class<?>[] paramesType=((MethodSignature)joinpoint.getSignature()).getMethod().getParameterTypes();
java.lang.reflect.Method method=classzz[0].getMethod(methodname,paramesType);
DataSource dataSource=null;
try {
if(method!=null&&method.isAnnotationPresent(DataSource.class)){
dataSource= method.getAnnotation(DataSource.class);
DataContextHolder.putDataType(dataSource.value());

}
}
catch (Exception e){
System.out.println("数据源选择错误");
}

}

}
6.使用方式在mybatis的service接口内使用
public interface LeftTabService {
@DataSource("slave")
List<LeftTabTable> list();
@DataSource("master")
int insertLeftTab(LeftTabTable leftTabTable);
}
7.这个类加上很重要的数据库初始化类
public class ReadAndWriteDataSource extends AbstractRoutingDataSource{

@Override
protected Object determineCurrentLookupKey() {
return DataContextHolder.getDataType();
}
}
主库做写入操作,从库做读取操作

相关文章推荐
- SSM基于注解配置Spring4.1.6、springMVC4.1.6、mybatis3.2.8的maven框架搭建
- 搭建基于springmvc,ibatis的工程实现读写分离,配置分离
- 搭建基于springmvc,ibatis的工程实现读写分离,配置分离
- 基于注解的SpringMVC搭建和freemark配置
- linux 安装mysql和主从配置 + Spring 基于注解配置mysql读写分离
- springmvc 基于注解的事务配置,事务失效
- VSFTP配置(二) ---基于mysql虚拟用户的搭建
- centos MySQL主从配置 ntsysv chkconfig setup命令 配置MySQL 主从 子shell MySQL备份 kill命令 pid文件 discuz!论坛数据库读写分离 双主搭建 mysql.history 第二十九节课
- SpringMVC中基于AOP的自定义注解记录日志
- 基于注解Spring MVC综合Hibernate(需要jar包,spring和Hibernate整合配置,springMVC组态,重定向,)批量删除
- SSM搭建-Spring AOP之基于注解的声明式AspectJ(9)
- 基于注解的AOP日志切面配置
- springmvc mybatis 基于全注解事务配置注意事项
- 基于注解的Spring AOP的配置和使用--转载
- Spring 、SpringMVC、Mybatis、MySQL、Maven、Tomcat搭建JavaWeb项目流程---学习笔记(一)工具准备及环境配置
- 基于注解的Spring AOP的配置和使用--转载
- Spring aop 简单示例——基于XML配置和基于注解配置
- Spring4.0学习笔记008——AOP的配置(基于注解)
- 8 -- 深入使用Spring -- 4...5 AOP代理:基于注解的“零配置”方式
- SpringMVC4 + Spring + MyBatis3 基于注解的最简配置