Nodejs创建HTTPS服务器
2017-07-20 18:35
357 查看
系统环境
win7 64bit
IP: 192.168.1.13
Nodejs:v0.10.5
Npm:1.2.19
创建express的开发环境
我本地已经安装了git客户端msysgit,其中包括了openssl程序。
openssl生成证书文件
新生成了3个文件:certificate.pem, certrequest.csr, privatekey.pem
privatekey.pem: 私钥
certrequest.csr: CSR证书签名
certificate.pem: 证书文件
修改启动文件:app.js
启动服务器:
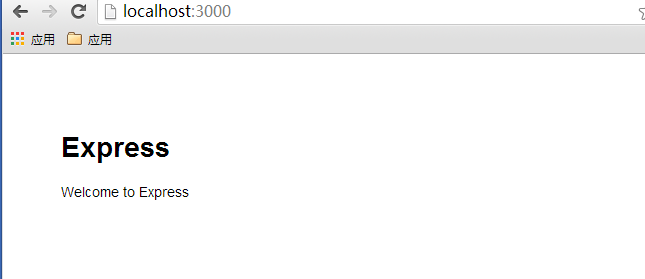
打开浏览器:HTTP访问
HTTPS访问

查看证书
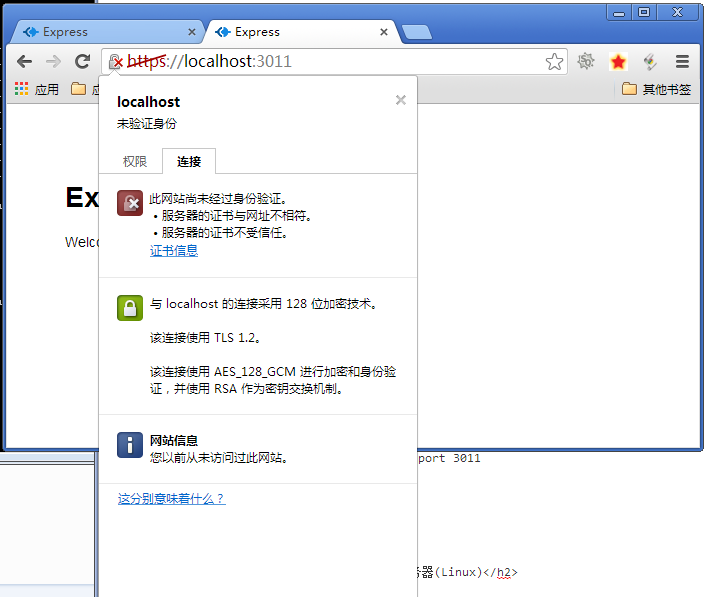
由于我们证书是自己创建的,没有经过第三方机构的验证,因此会出现警告的提示。大家可以去有资质的网络运营商,去申请自己的证书。比如:godaddy
SSL Certificates,优惠码:WOWfensme
这样我们就在win7完整的HTTPS服务器创建。
创建过程与win7类似
系统环境
Linux: Ubuntu 12.04.2 LTS 64bit deskop
IP: 192.168.1.20
Nodejs: npm 1.2.21
node v0.11.2
创建express项目
用openssl生成证书文件
修改文件app.js
启动服务器
打开浏览器:
为了验证数据在传输过程中是加密的,我们用wireshark抓取网络包。
HTTP请求:http://192.168.1.20:3000/users?a=111

HTTPS请求:https://192.168.1.20:3011/users?a=112
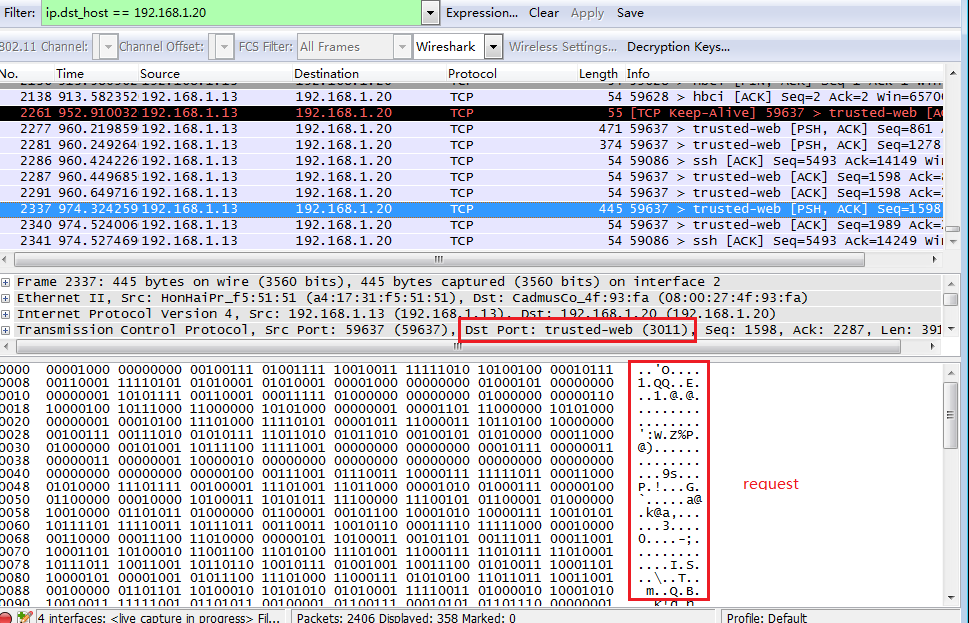
在HTTP下面,URL请求的参数是被暴露的。在HTTPS下面,URL的请求参数是被加密的。因此,希望需要填写个人信息,及在线支付的网站,都把HTTPS服务器搭建起来。防止私密数据,在网络传输过程中被获取。
win7 64bit
IP: 192.168.1.13
Nodejs:v0.10.5
Npm:1.2.19
创建express的开发环境
~ D:\workspace\javascript>express -e  nodejs-https
~ D:\workspace\javascript>cd nodejs-https && npm install

ejs@0.8.5 node_modules\ejs
express@3.2.6 node_modules\express
├── methods@0.0.1
├── fresh@0.1.0
├── cookie-signature@1.0.1
├── range-parser@0.0.4
├── debug@0.7.4
├── buffer-crc32@0.2.1
├── cookie@0.1.0
├── commander@0.6.1
├── mkdirp@0.3.4
├── send@0.1.0 (mime@1.2.6)
└── connect@2.7.11 (pause@0.0.1, qs@0.6.5, bytes@0.2.0, cookie@0.0.5, formidable@1.0.14, send@0.1.1)
我本地已经安装了git客户端msysgit,其中包括了openssl程序。
~ D:\workspace\javascript\nodejs-https>git --version
git version 1.8.1.msysgit.1

~ D:\workspace\javascript\nodejs-https>openssl version -a
OpenSSL 0.9.8e 23 Feb 2007
built on: Sat Sep 15 20:34:58 EDT 2007
platform: MSys
options:  bn(64,32) md2(int) rc4(idx,int) des(ptr,risc1,16,long) blowfish(idx)
compiler: gcc -D_WINDLL -DOPENSSL_PIC -DOPENSSL_THREADS  -DDSO_DLFCN -DHAVE_DLFCN_H -DTERMIOS -DL_ENDIAN -D__CYGWIN__ -f
omit-frame-pointer -fnative-struct -O3 -mcpu=pentium -march=i486 -Wall -DOPENSSL_BN_ASM_PART_WORDS -DOPENSSL_IA32_SSE2 -
DSHA1_ASM -DMD5_ASM -DRMD160_ASM -DAES_ASM
OPENSSLDIR: "/usr/ssl"
openssl生成证书文件
#生成私钥key文件:
~ D:\workspace\javascript\nodejs-https>openssl genrsa -out privatekey.pem 1024
Generating RSA private key, 1024 bit long modulus
.............
4000
..............++++++
........++++++
e is 65537 (0x10001)

#通过私钥生成CSR证书签名
~ D:\workspace\javascript\nodejs-https>openssl req -new -key privatekey.pem -out certrequest.csr
You are about to be asked to enter information that will be incorporated
into your certificate request.
What you are about to enter is what is called a Distinguished Name or a DN.
There are quite a few fields but you can leave some blank
For some fields there will be a default value,
If you enter '.', the field will be left blank.
-----
Country Name (2 letter code) [AU]:CN
State or Province Name (full name) [Some-State]:Beijing
Locality Name (eg, city) []:Beijing
Organization Name (eg, company) [Internet Widgits Pty Ltd]:fens.me
Organizational Unit Name (eg, section) []:fens.me
Common Name (eg, YOUR name) []:Conan Zhang
Email Address []:bsspirit@gmail.com

Please enter the following 'extra' attributes
to be sent with your certificate request
A challenge password []:
An optional company name []:

# 通过私钥和证书签名生成证书文件
~ D:\workspace\javascript\nodejs-https>openssl x509 -req -in certrequest.csr -signkey privatekey.pem -out certificate.pem
Signature ok
subject=/C=CN/ST=Beijing/L=Beijing/O=fens.me/OU=fens.me/CN=Conan Zhang/emailAddress=bsspirit@gmail.com
Getting Private key
新生成了3个文件:certificate.pem, certrequest.csr, privatekey.pem
~ D:\workspace\javascript\nodejs-https>ls -l
total 17
-rwx------  1 4294967295 mkpasswd 877 Dec 14 10:53 app.js
-rwx------  1 4294967295 mkpasswd 956 Dec 14 11:22 certificate.pem
-rwx------  1 4294967295 mkpasswd 704 Dec 14 11:21 certrequest.csr
drwx------+ 1 4294967295 mkpasswd   0 Dec 14 11:10 node_modules
-rwx------  1 4294967295 mkpasswd 216 Dec 14 11:03 package.json
-rwx------  1 4294967295 mkpasswd 887 Dec 14 11:20 privatekey.pem
drwx------+ 1 4294967295 mkpasswd   0 Dec 14 10:53 public
drwx------+ 1 4294967295 mkpasswd   0 Dec 14 10:53 routes
drwx------+ 1 4294967295 mkpasswd   0 Dec 14 10:53 views
privatekey.pem: 私钥
certrequest.csr: CSR证书签名
certificate.pem: 证书文件
修改启动文件:app.js
~ vi app.js

//最下面
var https = require('https')
,fs = require("fs");

var options = {
key: fs.readFileSync('./privatekey.pem'),
cert: fs.readFileSync('./certificate.pem')
};

https.createServer(options, app).listen(3011, function () {
console.log('Https server listening on port ' + 3011);
});
启动服务器:
~ D:\workspace\javascript\nodejs-https>node app.js

Express server listening on port 3000
Https server listening on port 3011
打开浏览器:HTTP访问
HTTPS访问
查看证书
由于我们证书是自己创建的,没有经过第三方机构的验证,因此会出现警告的提示。大家可以去有资质的网络运营商,去申请自己的证书。比如:godaddy
SSL Certificates,优惠码:WOWfensme
这样我们就在win7完整的HTTPS服务器创建。
3. 用Nodejs创建HTTPS服务器(Linux)
创建过程与win7类似系统环境
Linux: Ubuntu 12.04.2 LTS 64bit deskop
IP: 192.168.1.20
Nodejs: npm 1.2.21
node v0.11.2
创建express项目
~ cd /home/conan/nodejs
~ express -e  nodejs-https
~ cd nodejs-https
~ sudo npm install
用openssl生成证书文件
~ openssl version -a
OpenSSL 1.0.1 14 Mar 2012
built on: Tue Jun  4 07:26:06 UTC 2013
platform: debian-amd64
options:  bn(64,64) rc4(16x,int) des(idx,cisc,16,int) blowfish(idx)
compiler: cc -fPIC -DOPENSSL_PIC -DZLIB -DOPENSSL_THREADS -D_REENTRANT -DDSO_DLFCN -DHAVE_DLFCN_H -m64 -DL_ENDIAN -DTERMIO -g -O2 -fstack-protector --param=ssp-buffer-size=4 -Wformat -Wformat-security -Werror=format-security -D_FORTIFY_SOURCE=2 -Wl,-Bsymbolic-functions -Wl,-z,relro -Wa,--noexecstack -Wall -DOPENSSL_NO_TLS1_2_CLIENT -DOPENSSL_MAX_TLS1_2_CIPHER_LENGTH=50 -DMD32_REG_T=int -DOPENSSL_IA32_SSE2 -DOPENSSL_BN_ASM_MONT -DOPENSSL_BN_ASM_MONT5 -DOPENSSL_BN_ASM_GF2m -DSHA1_ASM -DSHA256_ASM -DSHA512_ASM -DMD5_ASM -DAES_ASM -DVPAES_ASM -DBSAES_ASM -DWHIRLPOOL_ASM -DGHASH_ASM
OPENSSLDIR: "/usr/lib/ssl"

~ openssl genrsa -out privatekey.pem 1024
~ openssl req -new -key privatekey.pem -out certrequest.csr
~ openssl x509 -req -in certrequest.csr -signkey privatekey.pem -out certificate.pem
修改文件app.js
~ vi app.js

//在最下面
var https = require('https')
,fs = require("fs");

var options = {
key: fs.readFileSync('./privatekey.pem'),
cert: fs.readFileSync('./certificate.pem')
};

https.createServer(options, app).listen(3011, function () {
console.log('Https server listening on port ' + 3011);
});
启动服务器
~ node app.js

Express server listening on port 3000
Https server listening on port 3011
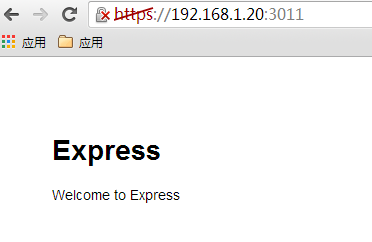
打开浏览器:
4. 抓取请求,验证加密
为了验证数据在传输过程中是加密的,我们用wireshark抓取网络包。HTTP请求:http://192.168.1.20:3000/users?a=111
HTTPS请求:https://192.168.1.20:3011/users?a=112
在HTTP下面,URL请求的参数是被暴露的。在HTTPS下面,URL的请求参数是被加密的。因此,希望需要填写个人信息,及在线支付的网站,都把HTTPS服务器搭建起来。防止私密数据,在网络传输过程中被获取。

相关文章推荐
- [NodeJS]创建HTTP、HTTPS服务器与客户端
- Nodejs创建HTTPS服务器
- [NodeJS]创建HTTP、HTTPS服务器与客户端区别
- Nodejs创建HTTPS服务器
- nodejs生成的证书转换成cer文件便于在ios中使用--附Nodejs创建HTTPS服务器,并且生成证书
- Nodejs创建https服务器(Windows 7)
- Nodejs创建https服务器(Windows 7)
- Nodejs创建HTTPS服务器
- Nodejs创建HTTPS服务器
- nodejs 创建https服务器
- Nodejs创建HTTPS服务器
- Nodejs创建HTTPS服务器
- 在使用angular2中使用nodejs创建服务器,并成功获取参数
- Linux(1)——在Linux下安装Nodejs(详细教程,包会),并成功创建一个简单的服务器
- node.js 创建 https 服务器
- 轻松创建nodejs服务器(8):非阻塞是如何实现的
- nodejs创建http或https请求
- 使用 python 创建最简单的 https 服务器
- 轻松创建nodejs服务器(4):路由
- 轻松创建nodejs服务器(2):nodejs服务器的构成分析