Redis的运用于liunx上的使用
2017-07-14 19:21
232 查看
1. Redis的安装
1.1. Redis的安装
Redis是c语言开发的。安装redis需要c语言的编译环境。如果没有gcc需要在线安装。yum
install gcc-c++
安装步骤:
第一步:redis的源码包上传到linux系统。
第二步:解压缩redis。
第三步:编译。进入redis源码目录。make
第四步:安装。make install PREFIX=/usr/local/redis
PREFIX参数指定redis的安装目录。一般软件安装到/usr目录下
1.2. 连接redis
1.2.1. redis的启动:
前端启动:在redis的安装目录下直接启动redis-server[root@localhost bin]# ./redis-server
后台启动:
把/root/redis-3.0.0/redis.conf复制到/usr/local/redis/bin目录下
[root@localhost redis-3.0.0]# cp redis.conf /usr/local/redis/bin/
修改配置文件:
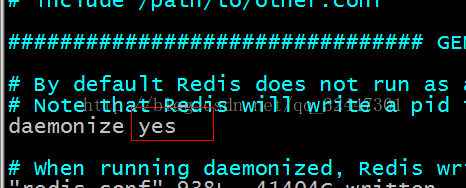
[root@localhost bin]# ./redis-server redis.conf
查看redis进程:
[root@localhost bin]# ps aux|grep redis
root 5190 0.1 0.3 33936 1712 ? Ssl 18:23 0:00 ./redis-server *:6379
root 5196 0.0 0.1 4356 728 pts/0 S+ 18:24 0:00 grep redis
[root@localhost bin]#
1.2.2. Redis-cli
[root@localhost bin]# ./redis-cli默认连接localhost运行在6379端口的redis服务。
[root@localhost bin]# ./redis-cli -h 192.168.25.153 -p 6379
-h:连接的服务器的地址
-p:服务的端口号
关闭redis:[root@localhost bin]# ./redis-cli shutdown
在redis 中存储中文,读取会出现乱码(其实不是乱码,只是不是我们存的中文显示)
1 redis> set test "我们"
2 OK
3 redis> get test
4 "\xe6\x88\x91\xe4\xbb\xac"
如何在get时取到它的中文呢?只需要在redis-cli 后面加上 --raw
redis> get test
"我们"
启动的时候 ./redis-cli --raw
1.3. Redis五种数据类型
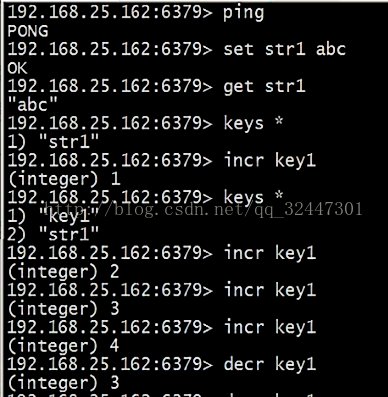
String:key-value(做缓存)Redis中所有的数据都是字符串。命令不区分大小写,key是区分大小写的。Redis是单线程的。Redis中不适合保存内容大的数据。
get、set、
incr:加一(生成id)
Decr:减一
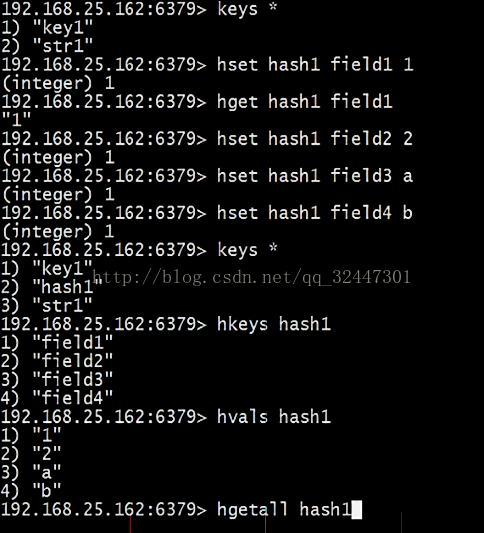
Hash:key-fields-values(做缓存)
相当于一个key对于一个map,map中还有key-value
使用hash对key进行归类。
Hset:向hash中添加内容
Hget:从hash中取内容

List:有顺序可重复
192.168.25.153:6379> lpush list1 a b c d
(integer) 4
192.168.25.153:6379> lrange list1 0 -1
1) "d"
2) "c"
3) "b"
4) "a"
192.168.25.153:6379> lpush list1 1 2 3 4
(integer) 8
192.168.25.153:6379> lrange list1 0 -
4000
1
1) "d"
2) "c"
3) "b"
4) "a"
5) "1"
6) "2"
7) "3"
8) "4"
192.168.25.153:6379>
192.168.25.153:6379> lpop list1注意 rpop list1
从右侧冒一个
"d"
192.168.25.153:6379> lrange list1 0 -1
1) "c"
2) "b"
3) "a"
4) "1"
5) "2"
6) "3"
7) "4"
192.168.25.153:6379> rpop list1
"4"
192.168.25.153:6379> lrange list1 0 -1
1) "c"
2) "b"
3) "a"
4) "1"
5) "2"
6) "3"
192.168.25.153:6379>
Set:元素无顺序,不能重复
192.168.25.153:6379> sadd set1 a b c c c d
(integer) 4
192.168.25.153:6379> smembers set1
1) "b"
2) "c"
3) "d"
4) "a"
192.168.25.153:6379> srem set1 a //删除元素
(integer) 1
192.168.25.153:6379> smembers set1
1) "b"
2) "c"
3) "d"
192.168.25.153:6379>
还有集合运算命令,自学。
Sadd seta a b c d e
Sadd setb c d e f g
Sdiff seta setb // a中独有元素
Sdiff setb seta // b中独有元素
Sinter seta setb //交集
Sunion seta setb //并集
SortedSet(zset):有顺序,不能重复
192.168.25.153:6379> zadd zset1 2 a 5 b 1 c 6 d
(integer) 4
192.168.25.153:6379> zrange zset1 0 -1
1) "c"
2) "a"
3) "b"
4) "d"
192.168.25.153:6379> zrem zset1 a
(integer) 1
192.168.25.153:6379> zrange zset1 0 -1
1) "c"
2) "b"
3) "d"
192.168.25.153:6379> zrevrange zset1 0 -1
1) "d"
2) "b"
3) "c"
192.168.25.153:6379> zrange zset1 0 -1 withscores
1) "c"
2) "1"
3) "b"
4) "5"
5) "d"
6) "6"
192.168.25.153:6379> zrevrange zset1 0 -1 withscores
1) "d"
2) "6"
3) "b"
4) "5"
5) "c"
6) "1"
192.168.25.153:6379>
1.4. Key命令
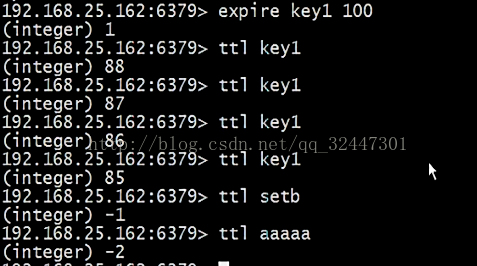
设置key的过期时间。Expire key second:设置key的过期时间
Ttl key:查看key的有效期
Persist key:清除key的过期时间。Key持久化。
是-1 代表是持久化的 -2代表不存在 是正数表示正在倒计时
192.168.25.153:6379> expire Hello 100
(integer) 1
192.168.25.153:6379> ttl Hello
(integer) 77
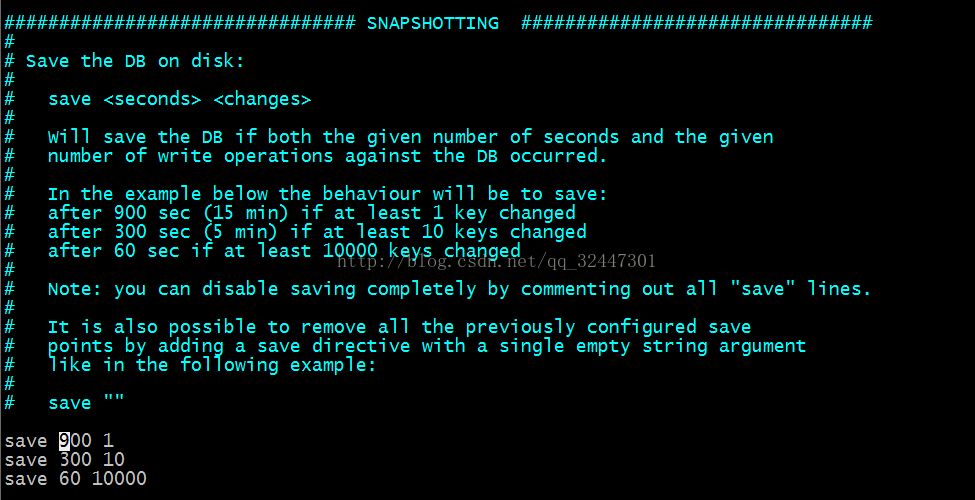
2. Redis的持久化方案
Redis的所有数据都是保存到内存中的。Rdb:快照形式,定期把内存中当前时刻的数据保存到磁盘。Redis默认支持的持久化方案。
aof形式:append only file。把所有对redis数据库操作的命令,增删改操作的命令。保存到文件中。数据库恢复时把所有的命令执行一遍即可。
在redis.conf配置文件中配置。
Rdb:
Aof的配置:
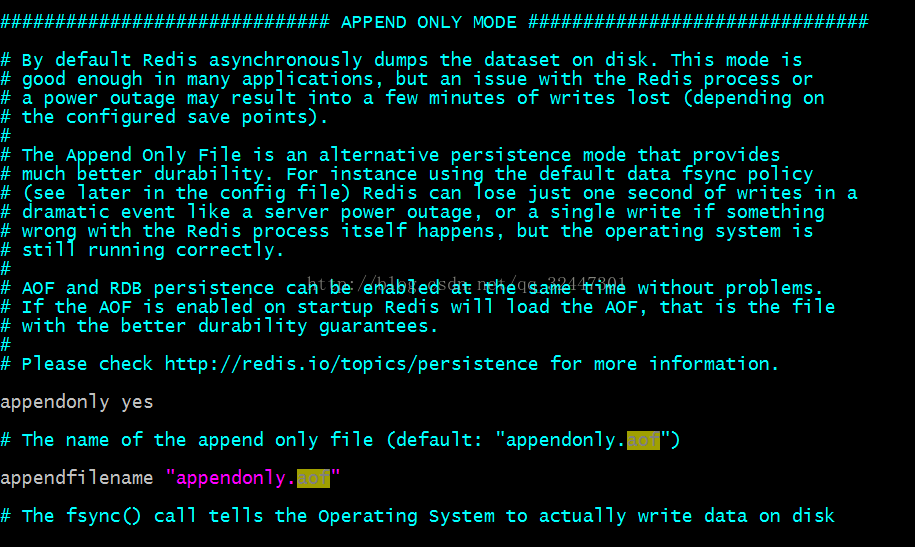
两种持久化方案同时开启使用aof文件来恢复数据库。
3. Jedis
需要把jedis依赖的jar包添加到工程中。Maven工程中需要把jedis的坐标添加到依赖。3.1. 连接单机版
第一步:创建一个Jedis对象。需要指定服务端的ip及端口。第二步:使用Jedis对象操作数据库,每个redis命令对应一个方法。
第三步:打印结果。
第四步:关闭Jedis
| @Test public void testJedis() throws Exception { // 第一步:创建一个Jedis对象。需要指定服务端的ip及端口。 Jedis jedis = new Jedis("192.168.25.153", 6379); // 第二步:使用Jedis对象操作数据库,每个redis命令对应一个方法。 String result = jedis.get("hello"); // 第三步:打印结果。 System.out.println(result); // 第四步:关闭Jedis jedis.close(); } |
3.2. 连接单机版使用连接池
第一步:创建一个JedisPool对象。需要指定服务端的ip及端口。第二步:从JedisPool中获得Jedis对象。
第三步:使用Jedis操作redis服务器。
第四步:操作完毕后关闭jedis对象,连接池回收资源。
第五步:关闭JedisPool对象。
| @Test public void testJedisPool() throws Exception { // 第一步:创建一个JedisPool对象。需要指定服务端的ip及端口。 JedisPool jedisPool = new JedisPool("192.168.25.153", 6379); // 第二步:从JedisPool中获得Jedis对象。 Jedis jedis = jedisPool.getResource(); // 第三步:使用Jedis操作redis服务器。 jedis.set("jedis", "test"); String result = jedis.get("jedis"); System.out.println(result); // 第四步:操作完毕后关闭jedis对象,连接池回收资源。 jedis.close(); // 第五步:关闭JedisPool对象。 jedisPool.close(); } |
4. 向业务逻辑中添加缓存
4.1. 接口封装
常用的操作redis的方法提取出一个接口,分别对应单机版和集群版创建两个实现类。4.1.1. 接口定义
| public interface JedisClient { String set(String key, String value); String get(String key); Boolean exists(String key); Long expire(String key, int seconds); Long ttl(String key); Long incr(String key); Long hset(String key, String field, String value); String hget(String key, String field); Long hdel(String key, String... field); } |
4.1.2. 单机版实现类
| public class JedisClientPool implements JedisClient { @Autowired private JedisPool jedisPool; @Override public String set(String key, String value) { Jedis jedis = jedisPool.getResource(); String result = jedis.set(key, value); jedis.close(); return result; } @Override public String get(String key) { Jedis jedis = jedisPool.getResource(); String result = jedis.get(key); jedis.close(); return result; } @Override public Boolean exists(String key) { Jedis jedis = jedisPool.getResource(); Boolean result = jedis.exists(key); jedis.close(); return result; } @Override public Long expire(String key, int seconds) { Jedis jedis = jedisPool.getResource(); Long result = jedis.expire(key, seconds); jedis.close(); return result; } @Override public Long ttl(String key) { Jedis jedis = jedisPool.getResource(); Long result = jedis.ttl(key); jedis.close(); return result; } @Override public Long incr(String key) { Jedis jedis = jedisPool.getResource(); Long result = jedis.incr(key); jedis.close(); return result; } @Override public Long hset(String key, String field, String value) { Jedis jedis = jedisPool.getResource(); Long result = jedis.hset(key, field, value); jedis.close(); return result; } @Override public String hget(String key, String field) { Jedis jedis = jedisPool.getResource(); String result = jedis.hget(key, field); jedis.close(); return result; } @Override public Long hdel(String key, String... field) { Jedis jedis = jedisPool.getResource(); Long result = jedis.hdel(key, field); jedis.close(); return result; } } |
配置:applicationContext-redis.xml
| <?xml version="1.0" encoding="UTF-8"?> <beans xmlns="http://www.springframework.org/schema/beans" xmlns:context="http://www.springframework.org/schema/context" xmlns:p="http://www.springframework.org/schema/p" xmlns:aop="http://www.springframework.org/schema/aop" xmlns:tx="http://www.springframework.org/schema/tx" xmlns:xsi="http://www.w3.org/2001/XMLSchema-instance" xsi:schemaLocation="http://www.springframework.org/schema/beans http://www.springframework.org/schema/beans/spring-beans4.2.xsd http://www.springframework.org/schema/context http://www.springframework.org/schema/context/spring-context4.2.xsd http://www.springframework.org/schema/aop http://www.springframework.org/schema/aop/spring-aop4.2.xsd http://www.springframework.org/schema/tx http://www.springframework.org/schema/tx/spring-tx4.2.xsd http://www.springframework.org/schema/util http://www.springframework.org/schema/util/spring-util4.2.xsd"> <!-- 配置单机版的连接 --> <bean id="jedisPool" class="redis.clients.jedis.JedisPool"> <constructor-arg name="host" value="192.168.25.153"></constructor-arg> <constructor-arg name="port" value="6379"></constructor-arg> </bean> <bean id="jedisClientPool" class="com.zhiyou100.jedis.JedisClientPool"/> </beans> |
4.2. 封装代码测试
| @Test public void testJedisClient() throws Exception { //初始化Spring容器 ApplicationContext applicationContext = new ClassPathXmlApplicationContext("classpath:spring/applicationContext-redis.xml"); //从容器中获得JedisClient对象 JedisClient jedisClient = applicationContext.getBean(JedisClient.class); jedisClient.set("first", "100"); String result = jedisClient.get("first"); System.out.println(result); } |
4.3. 添加缓存
4.3.1. 功能分析
查询内容列表时添加缓存。1、查询数据库之前先查询缓存。
2、查询到结果,直接响应结果。
3、查询不到,缓存中没有需要查询数据库。
4、把查询结果添加到缓存中。
5、返回结果。
向redis中添加缓存:
Key:cid
Value:内容列表。需要把java对象转换成json。
使用hash对key进行归类。
HASH_KEY:HASH
|--KEY:VALUE
|--KEY:VALUE
|--KEY:VALUE
|--KEY:VALUE
注意:添加缓存不能影响正常业务逻辑。
4.3.2. 代码实现
| @Override public List<TbContent> getContentList(long cid) { //查询缓存 try { String json = jedisClient.hget(CONTENT_KEY, cid + ""); //判断json是否为空 if (StringUtils.isNotBlank(json)) { //把json转换成list List<TbContent> list = JsonUtils.jsonToList(json, TbContent.class); return list; } } catch (Exception e) { e.printStackTrace(); } //根据cid查询内容列表 TbContentExample example = new TbContentExample(); //设置查询条件 Criteria criteria = example.createCriteria(); criteria.andCategoryIdEqualTo(cid); //执行查询 List<TbContent> list = contentMapper.selectByExample(example); //向缓存中添加数据 try { jedisClient.hset(CONTENT_KEY, cid + "", JsonUtils.objectToJson(list)); } catch (Exception e) { e.printStackTrace(); } return list; } |
4.4. 缓存同步
对内容信息做增删改操作后只需要把对应缓存删除即可。可以根据cid删除。
| @Override public E3Result addContent(TbContent content) { //补全属性 content.setCreated(new Date()); content.setUpdated(new Date()); //插入数据 contentMapper.insert(content); //缓存同步 jedisClient.hdel(CONTENT_KEY, content.getCategoryId().toString()); return E3Result.ok(); } |

相关文章推荐
- Redis的安装和使用之一 -----Redis相关运用
- Liunx 上面使用Python连接Redis遇到的一些问题
- liunx中使用redis
- Redis的安装和使用之一 -----Redis相关运用
- liunx服务使用(squid 代理服务器)
- 使用keepalived 实现redis主从高可用
- php redis pub/sub(Publish/Subscribe,发布/订阅的信息系统)之基本使用
- 04.spring-data-redis与Jedis整合使用
- 5 使用redis实现session共享
- redis的java客户端jedis 2.1.0版本使用备忘
- window下redis的安装和使用
- 在CentOS 6.9 x86_64的OpenResty 1.13.6.1上使用基于Redis实现动态路由示例
- redis使用watch完成秒杀抢购功能
- Windows下安装和使用redis
- 国内外三个不同领域巨头分享的Redis实战经验及使用场景(转)
- Redis在Java中的使用
- ubuntu下安装redis及在php中使用
- 使用Redis实现购物车
- Redis 使用的一些经验分享
- redis使用