iOS开发之自定义ActionSheet视图
2017-07-14 18:47
615 查看
有时我们需要用到actionSheet来展示,但是但是往往系统的界面显示很丑或者并不符合UI的要求,所以在这里自定义一个,方便以后使用,后续有时间写一下Swift的开发。
自定义ActionSheet的关键点,就是UI的样式修改和设计调整,还有就是点击单元格时进行的后续操作,再一个就是界面显示的平滑度。
首先界面设计:
创建一个半透明的背景视图;
然后一个表格,表格分成两个区,设置标题头、区尾和单元格边角
//背景
- (UIView*)maskView {
if (!_maskView) {
_maskView = [[UIView alloc]initWithFrame:[UIScreen mainScreen].bounds];
_maskView.backgroundColor = [UIColor blackColor];
_maskView.alpha = 0.5;
_maskView.userInteractionEnabled = YES;
}
return _maskView;
}
//表格
- (UITableView *)tableView {
if (!_tableView) {
_tableView = [[UITableView alloc]initWithFrame:CGRectZero style:UITableViewStylePlain];
_tableView.delegate = self;
_tableView.dataSource = self;
_tableView.layer.cornerRadius = 10;
_tableView.clipsToBounds = YES;
_tableView.rowHeight = 44.0;
_tableView.bounces = NO;
_tableView.backgroundColor = [UIColor clearColor];
_tableView.tableHeaderView = self.headView;
_tableView.separatorInset = UIEdgeInsetsMake(0, -50, 0, 0);
[_tableView registerClass:[UITableViewCell class] forCellReuseIdentifier:@"OneCell"];
}
return _tableView;
}
#pragma mark <UITableViewDelegate,UITableViewDataSource>
- (NSInteger)numberOfSectionsInTableView:(UITableView *)tableView {
return 2;
}
- (NSInteger)tableView:(UITableView *)tableView numberOfRowsInSection:(NSInteger)section {
return (section == 0)?_cellArray.count:1;
}
- (UITableViewCell*)tableView:(UITableView *)tableView cellForRowAtIndexPath:(NSIndexPath *)indexPath {
UITableViewCell *cell = [tableView dequeueReusableCellWithIdentifier:@"OneCell"];
if (indexPath.section == 0) {
cell.textLabel.text = _cellArray[indexPath.row];
if (indexPath.row == _cellArray.count - 1) {
//添加贝塞尔曲线,UIBezierPath与CAShapeLayer设计边角样式
/*
byRoundingCorners即为设置所需处理边角参数,有如下枚举克进行选择:
typedef NS_OPTIONS(NSUInteger, UIRectCorner) {
UIRectCornerTopLeft = 1 << 0,//左上圆角
UIRectCornerTopRight = 1 << 1,//右上圆角
UIRectCornerBottomLeft = 1 << 2,//左下圆角
UIRectCornerBottomRight = 1 << 3,//右下圆角
UIRectCornerAllCorners = ~0UL //四角圆角
};
*/
UIBezierPath *maskPath = [UIBezierPath bezierPathWithRoundedRect:CGRectMake(0, 0, Screen_Width - (Space_Line * 2), tableView.rowHeight) byRoundingCorners:UIRectCornerBottomLeft|UIRectCornerBottomRight cornerRadii:CGSizeMake(10, 10)];
CAShapeLayer *maskLayer = [[CAShapeLayer alloc]init];
maskLayer.frame = cell.contentView.bounds;
maskLayer.path = maskPath.CGPath;
cell.layer.mask = maskLayer;
}
} else {
cell.textLabel.text = _cancelTitle;
cell.layer.cornerRadius = 10;
}
cell.textLabel.textAlignment = NSTextAlignmentCenter;
cell.selectionStyle = UITableViewCellSelectionStyleNone;
return cell;
}
- (void)tableView:(UITableView *)tableView didSelectRowAtIndexPath:(NSIndexPath *)indexPath {
if (indexPath.section == 0) {
if (self.selectedBlock) {
self.selectedBlock(indexPath.row);
}
} else {
if (self.cancelBlock) {
self.cancelBlock();
}
}
[self dismiss];
}
- (CGFloat)tableView:(UITableView *)tableView heightForFooterInSection:(NSInteger)section {
return Space_Line;
}
- (UIView*)tableView:(UITableView *)tableView viewForFooterInSection:(NSInteger)section {
UIView *footerView = [[UIView alloc]initWithFrame:CGRectMake(0, 0, tableView.bounds.size.width, Space_Line)];
footerView.backgroundColor = [UIColor clearColor];
return footerView;
}界面设计完成,需要考虑的就是弹出、消失的问题/滑动弹出
- (void)show {
_tableView.frame = CGRectMake(Space_Line, Screen_Height, Screen_Width - (Space_Line * 2), _tableView.rowHeight * (_cellArray.count + 1) + _headView.bounds.size.height + (Space_Line * 2));
[UIView animateWithDuration:.5 animations:^{
CGRect rect = _tableView.frame;
rect.origin.y -= _tableView.bounds.size.height;
_tableView.frame = rect;
}];
}
//滑动消失
- (void)dismiss {
[UIView animateWithDuration:.5 animations:^{
CGRect rect = _tableView.frame;
rect.origin.y += _tableView.bounds.size.height;
_tableView.frame = rect;
} completion:^(BOOL finished) {
[self removeFromSuperview];
}];
}
#pragma mark ------ 触摸屏幕其他位置弹下
- (void)touchesEnded:(NSSet<UITouch *> *)touches withEvent:(UIEvent *)event {
[self dismiss];
}最后是对自定义的视图的调用://弹出ActionSheet
__weak typeof(self) weakSelf = self;
JasonActionSheetView *jasonSheetView = [[JasonActionSheetView alloc]initWithHeadView:self.headView cellArray:self.dataArr cancelTitle:@"取消" selectedBlock:^(NSInteger index) {
//点击单元格后续操作
if (index == 0) {
weakSelf.view.backgroundColor = [UIColor redColor];
}else if(index == 1){
weakSelf.view.backgroundColor = [UIColor yellowColor];
}else{
weakSelf.view.backgroundColor = [UIColor lightGrayColor];
}
} cancelBlock:^{
NSLog(@"点击了取消........");
}];
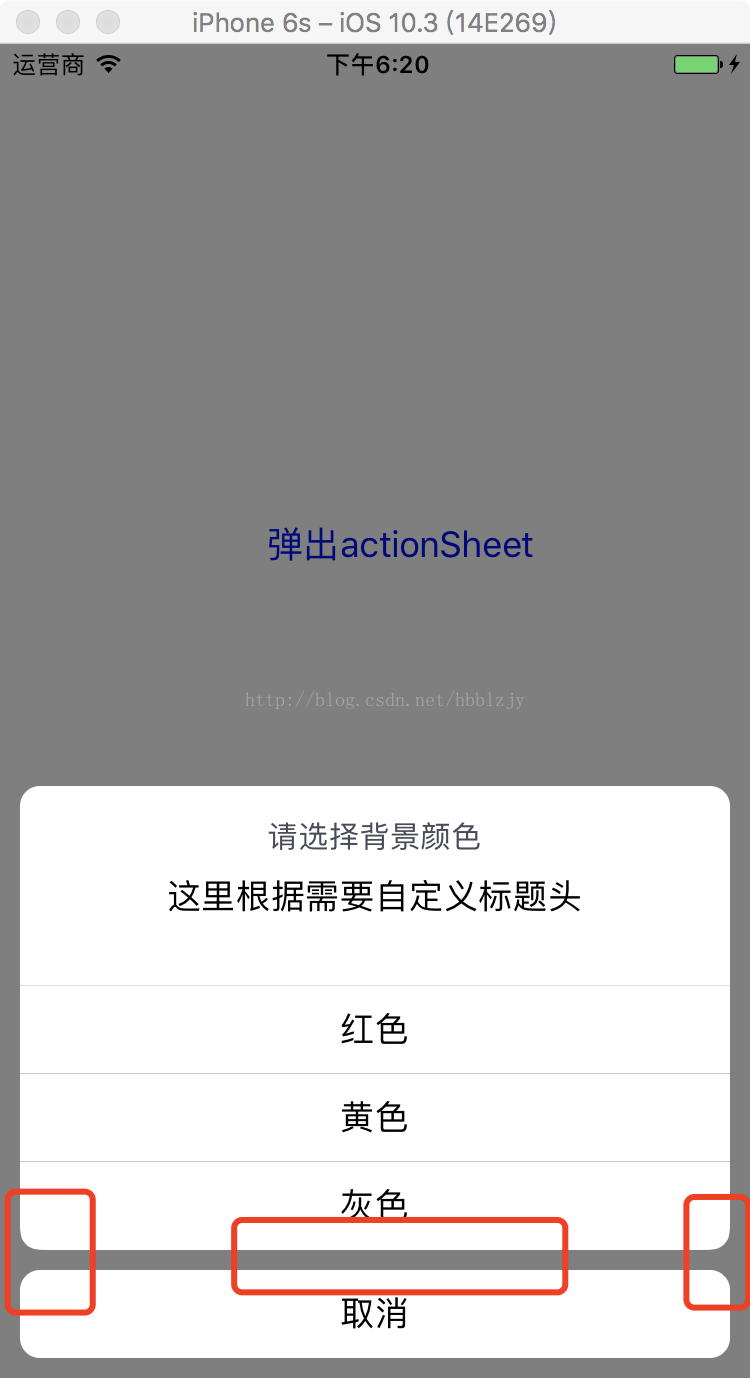
[self.view addSubview:jasonSheetView];效果图:
源码:https://github.com/hbblzjy/OC-JasonActionSheet
自定义ActionSheet的关键点,就是UI的样式修改和设计调整,还有就是点击单元格时进行的后续操作,再一个就是界面显示的平滑度。
首先界面设计:
创建一个半透明的背景视图;
然后一个表格,表格分成两个区,设置标题头、区尾和单元格边角
//背景
- (UIView*)maskView {
if (!_maskView) {
_maskView = [[UIView alloc]initWithFrame:[UIScreen mainScreen].bounds];
_maskView.backgroundColor = [UIColor blackColor];
_maskView.alpha = 0.5;
_maskView.userInteractionEnabled = YES;
}
return _maskView;
}
//表格
- (UITableView *)tableView {
if (!_tableView) {
_tableView = [[UITableView alloc]initWithFrame:CGRectZero style:UITableViewStylePlain];
_tableView.delegate = self;
_tableView.dataSource = self;
_tableView.layer.cornerRadius = 10;
_tableView.clipsToBounds = YES;
_tableView.rowHeight = 44.0;
_tableView.bounces = NO;
_tableView.backgroundColor = [UIColor clearColor];
_tableView.tableHeaderView = self.headView;
_tableView.separatorInset = UIEdgeInsetsMake(0, -50, 0, 0);
[_tableView registerClass:[UITableViewCell class] forCellReuseIdentifier:@"OneCell"];
}
return _tableView;
}
#pragma mark <UITableViewDelegate,UITableViewDataSource>
- (NSInteger)numberOfSectionsInTableView:(UITableView *)tableView {
return 2;
}
- (NSInteger)tableView:(UITableView *)tableView numberOfRowsInSection:(NSInteger)section {
return (section == 0)?_cellArray.count:1;
}
- (UITableViewCell*)tableView:(UITableView *)tableView cellForRowAtIndexPath:(NSIndexPath *)indexPath {
UITableViewCell *cell = [tableView dequeueReusableCellWithIdentifier:@"OneCell"];
if (indexPath.section == 0) {
cell.textLabel.text = _cellArray[indexPath.row];
if (indexPath.row == _cellArray.count - 1) {
//添加贝塞尔曲线,UIBezierPath与CAShapeLayer设计边角样式
/*
byRoundingCorners即为设置所需处理边角参数,有如下枚举克进行选择:
typedef NS_OPTIONS(NSUInteger, UIRectCorner) {
UIRectCornerTopLeft = 1 << 0,//左上圆角
UIRectCornerTopRight = 1 << 1,//右上圆角
UIRectCornerBottomLeft = 1 << 2,//左下圆角
UIRectCornerBottomRight = 1 << 3,//右下圆角
UIRectCornerAllCorners = ~0UL //四角圆角
};
*/
UIBezierPath *maskPath = [UIBezierPath bezierPathWithRoundedRect:CGRectMake(0, 0, Screen_Width - (Space_Line * 2), tableView.rowHeight) byRoundingCorners:UIRectCornerBottomLeft|UIRectCornerBottomRight cornerRadii:CGSizeMake(10, 10)];
CAShapeLayer *maskLayer = [[CAShapeLayer alloc]init];
maskLayer.frame = cell.contentView.bounds;
maskLayer.path = maskPath.CGPath;
cell.layer.mask = maskLayer;
}
} else {
cell.textLabel.text = _cancelTitle;
cell.layer.cornerRadius = 10;
}
cell.textLabel.textAlignment = NSTextAlignmentCenter;
cell.selectionStyle = UITableViewCellSelectionStyleNone;
return cell;
}
- (void)tableView:(UITableView *)tableView didSelectRowAtIndexPath:(NSIndexPath *)indexPath {
if (indexPath.section == 0) {
if (self.selectedBlock) {
self.selectedBlock(indexPath.row);
}
} else {
if (self.cancelBlock) {
self.cancelBlock();
}
}
[self dismiss];
}
- (CGFloat)tableView:(UITableView *)tableView heightForFooterInSection:(NSInteger)section {
return Space_Line;
}
- (UIView*)tableView:(UITableView *)tableView viewForFooterInSection:(NSInteger)section {
UIView *footerView = [[UIView alloc]initWithFrame:CGRectMake(0, 0, tableView.bounds.size.width, Space_Line)];
footerView.backgroundColor = [UIColor clearColor];
return footerView;
}界面设计完成,需要考虑的就是弹出、消失的问题/滑动弹出
- (void)show {
_tableView.frame = CGRectMake(Space_Line, Screen_Height, Screen_Width - (Space_Line * 2), _tableView.rowHeight * (_cellArray.count + 1) + _headView.bounds.size.height + (Space_Line * 2));
[UIView animateWithDuration:.5 animations:^{
CGRect rect = _tableView.frame;
rect.origin.y -= _tableView.bounds.size.height;
_tableView.frame = rect;
}];
}
//滑动消失
- (void)dismiss {
[UIView animateWithDuration:.5 animations:^{
CGRect rect = _tableView.frame;
rect.origin.y += _tableView.bounds.size.height;
_tableView.frame = rect;
} completion:^(BOOL finished) {
[self removeFromSuperview];
}];
}
#pragma mark ------ 触摸屏幕其他位置弹下
- (void)touchesEnded:(NSSet<UITouch *> *)touches withEvent:(UIEvent *)event {
[self dismiss];
}最后是对自定义的视图的调用://弹出ActionSheet
__weak typeof(self) weakSelf = self;
JasonActionSheetView *jasonSheetView = [[JasonActionSheetView alloc]initWithHeadView:self.headView cellArray:self.dataArr cancelTitle:@"取消" selectedBlock:^(NSInteger index) {
//点击单元格后续操作
if (index == 0) {
weakSelf.view.backgroundColor = [UIColor redColor];
}else if(index == 1){
weakSelf.view.backgroundColor = [UIColor yellowColor];
}else{
weakSelf.view.backgroundColor = [UIColor lightGrayColor];
}
} cancelBlock:^{
NSLog(@"点击了取消........");
}];
[self.view addSubview:jasonSheetView];效果图:
源码:https://github.com/hbblzjy/OC-JasonActionSheet

相关文章推荐
- iPhone开发【十八】自定义视图之ActionSheet中使用PickerView
- iPhone开发【十八】自定义视图之ActionSheet中使用PickerView
- iOS开发之自定义系统的UIActionSheet修改按钮的属性
- IOS开发UI篇--一个支持图文混排的ActionSheet
- Iphone开发(六)IOS中的通知--操作表ActionSheet和警报AlertView
- 【iOS开发-65】QQ聊天界面案例:自定义cell、图片拉伸处理、NSNotification通知、键盘与视图移动以及输入框左边缩进处理
- IOS开发UI篇之──自定义UIActionSheet【转】
- IOS开发之自定义segment实现视图切换
- IOS开发之自定义UIActionSheet
- Iphone开发(六)IOS中的通知--操作表ActionSheet和警报AlertView
- 一劳永逸,iOS自定义ActionSheet封装流程
- iOS开发-轻松学会封装自定义视图view(自定义弹框封装详解)
- iOS开发-------自定义简单的表情键盘(UICollectionView 集合视图)
- IOS开发UI篇--一个支持图文混排的ActionSheet
- iOS开发之基础视图—— UIActionSheet
- IOS开发—IOS自定义任意位置右滑POP视图控制器
- IOS开发UI篇之──自定义UIActionSheet
- IOS开发UI篇之──自定义UIActionSheet
- iOS开发之自定义视图上下无限循环滚动实现
- iOS开发- 自定义遮罩视图(引导, 功能说明)源码+解析