spring-boot快速入门
2017-07-14 17:26
441 查看
Spring Boot 相当于传统的Spring Web应用只不过不是作为war部署到Web容器中,而是可执行的jar包,内嵌一个Web服务器Jetty,在main函数中把上下文设置好并启动Jetty服务器去监听端口。
1、 新建maven项目,配置pom.xml文件

6、页面模板渲染在之前所有的@RequestMapping注解的方法中,返回值字符串都被直接传送到浏览器端并显示给用户。但是为了能够呈现更加丰富、美观的页面,我们需要将HTML代码返回给浏览器,浏览器再进行页面的渲染、显示。
一种很直观的方法是在处理请求的方法中,直接返回HTML代码,但是这样做的问题在于——一个复杂的页面HTML代码往往也非常复杂,并且嵌入在Java代码中十分不利于维护。更好的做法是将页面的HTML代码写在模板文件中,渲染后再返回给用户。为了能够进行模板渲染,需要将@RestController改成@Controller:
在pom文件中添加依赖
根据此地址做的测试:http://blog.csdn.net/xiaoyu411502/article/details/47864969
获取yml文件数据
application.yml
1、 新建maven项目,配置pom.xml文件
<parent>
<groupId>org.springframework.boot</groupId>
<artifactId>spring-boot-starter-parent</artifactId>
<version>1.2.5.RELEASE</version>
<relativePath/>
</parent>

<properties>
<project.build.sourceEncoding>UTF-8</project.build.sourceEncoding>
<java.version>1.8</java.version>
</properties>

<dependencies>
<dependency>
<groupId>org.springframework.boot</groupId>
<artifactId>spring-boot-starter-web</artifactId>
</dependency>

<!--渲染页面模板用-->
<dependency>
<groupId>org.springframework.boot</groupId>
<artifactId>spring-boot-starter-thymeleaf</artifactId>
</dependency>
</dependencies>

<build>
<plugins>
<plugin>
<groupId>org.springframework.boot</groupId>
<artifactId>spring-boot-maven-plugin</artifactId>
</plugin>
</plugins>
</build>
2、创建Application以及配置URL路由信息
@SpringBootApplication
@RestController
@RequestMapping("/classPath")
public class Application {

@RequestMapping("")
public String index0() {
return "index0!";
}

@RequestMapping("/")
public String index() {
return "index!";
}

@RequestMapping("/hello")
public String hello() {
return "Hello World!";
}

@RequestMapping(value = "/getUser/{id}" , method = RequestMethod.GET)
public String getUser(@PathVariable("id") String id) {
System.out.println("id:"+id);
//return "您传的id是"+id;
return String.format("id %s", id);
}

@RequestMapping(value = "/posts/{id}",method = RequestMethod.POST)
public String post(@PathVariable("id") int id) {
return String.format("post %d", id);
}

public static void main(String[] args) {
SpringApplication.run(Application.class, args);
}
}@RequestMapping可以注解
@Controller类:访问地址就应该加上“classPath”:http://localhost:8080/classPath/hello 3、使用@PathVariable传参在上述例子中,URL中的变量可以用{variableName}来表示,同时在方法的参数中加上@PathVariable("variableName"),那么当请求被转发给该方法处理时,对应的URL中的变量会被自动赋值给被@PathVariable注解的参数(能够自动根据参数类型赋值,例如上例中的int)。4、对于HTTP请求除了其URL,还需要注意它的方法(Method)。例如我们在浏览器中访问一个页面通常是GET方法,而表单的提交一般是POST方法。@Controller中的方法同样需要对其进行区分。5、可以定义多个@Controller将不同URL的处理方法分散在不同的类中,例如创建另一个controller
@Controller
@RequestMapping("/test")
public class HelloController {

@RequestMapping("/hello/{name}")
public String hello(@PathVariable("name") String name, Model model) {
model.addAttribute("name", name);
return "hello";
}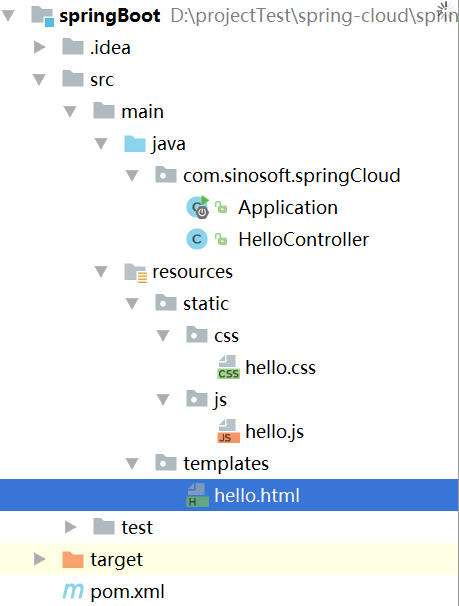
}添加html页面接下来需要在默认的模板文件夹src/main/resources/templates/目录下添加一个模板文件hello.html:<!DOCTYPE HTML>
<html xmlns:th="http://www.thymeleaf.org">
<head>
<title>Getting Started: Serving Web Content</title>
<meta http-equiv="Content-Type" content="text/html; charset=UTF-8" />
</head>
<body>
<p th:text="'Hello, ' + ${name} + '!!!!'" />
<div class="red">123</div>
</body>
</html>访问地址;http://localhost:8080/test/hello/123 6、页面模板渲染在之前所有的@RequestMapping注解的方法中,返回值字符串都被直接传送到浏览器端并显示给用户。但是为了能够呈现更加丰富、美观的页面,我们需要将HTML代码返回给浏览器,浏览器再进行页面的渲染、显示。
一种很直观的方法是在处理请求的方法中,直接返回HTML代码,但是这样做的问题在于——一个复杂的页面HTML代码往往也非常复杂,并且嵌入在Java代码中十分不利于维护。更好的做法是将页面的HTML代码写在模板文件中,渲染后再返回给用户。为了能够进行模板渲染,需要将@RestController改成@Controller:
在pom文件中添加依赖
<!--渲染页面模板用-->
<dependency>
<groupId>org.springframework.boot</groupId>
<artifactId>spring-boot-starter-thymeleaf</artifactId>
</dependency>
7、加载静态文件
<!DOCTYPE HTML>
<html xmlns:th="http://www.thymeleaf.org">
<head>
<title>Getting Started: Serving Web Content</title>
<meta http-equiv="Content-Type" content="text/html; charset=UTF-8" />
<link type="text/css" rel="stylesheet" href="/css/hello.css" />
<script type="text/javascript" src="/js/hello.js"></script>

</head>
<body>
<p th:text="'Hello, ' + ${name} + '!!!!'" />
<div class="red">123</div>
</body>
</html>
浏览器页面使用HTML作为描述语言,那么必然也脱离不了CSS以及JavaScript。为了能够浏览器能够正确加载类似/css/style.css, /js/main.js等资源,默认情况下我们只需要在src/main/resources/static目录下添加css/style.css和js/main.js文件后,Spring MVC能够自动将他们发布,通过访问/css/style.css, /js/main.js也就可以正确加载这些资源。根据此地址做的测试:http://blog.csdn.net/xiaoyu411502/article/details/47864969
获取yml文件数据
application.yml
user:
path: 123
java文件获取的话
@Value("${user.path}")
private String userPath;
这样的话数据就拿到了

相关文章推荐
- Spring Boot 系列 - 快速入门
- Spring Boot 基础知识学习(一)——快速入门
- Spring Boot 快速入门
- 第一章:Spring Boot快速入门
- Spring Boot快速入门
- Spring Boot 快速入门
- Spring Boot快速入门
- Spring Boot 快速入门
- Spring Boot快速入门教程
- Spring Boot 快速入门
- Spring Boot 快速入门
- Spring Boot 快速入门
- Spring Boot实战与原理分析之快速入门
- Spring Boot快速入门
- spring-boot入门(一)快速搭建一个web应用
- SpringBoot 快速入门
- Spring Boot快速入门
- SpringBoot快速入门(非maven)
- Spring Boot快速入门
- Spring Boot官方文档学习——Spring Boot快速入门