Google 以图搜图 - 相似图片搜索原理 - Java实现 (转)
2017-07-07 11:36
627 查看
前阵子在阮一峰的博客上看到了这篇《相似图片搜索原理》博客,就有一种冲动要将这些原理实现出来了。
Google "相似图片搜索":你可以用一张图片,搜索互联网上所有与它相似的图片。
打开Google图片搜索页面:

点击

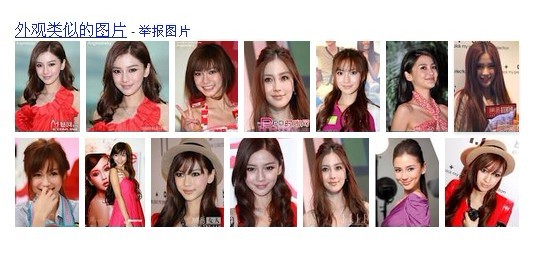
使用上传一张angelababy原图:

点击搜索后,Google将会找出与之相似的图片,图片相似度越高就越排在前面。如:
这种技术的原理是什么?计算机怎么知道两张图片相似呢?
根据Neal Krawetz博士的解释,实现相似图片搜素的关键技术叫做"感知哈希算法"(Perceptualhash algorithm),它的作用是对每张图片生成一个"指纹"(fingerprint)字符串,然后比较不同图片的指纹。结果越接近,就说明图片越相似。
以下是一个最简单的Java实现:
预处理:读取图片
[java] view plain copy print?File inputFile = newFile(filename);
BufferedImage sourceImage = ImageIO.read(inputFile);//读取图片文件
第一步,缩小尺寸。
将图片缩小到8x8的尺寸,总共64个像素。这一步的作用是去除图片的细节,只保留结构、明暗等基本信息,摒弃不同尺寸、比例带来的图片差异。
[java] view plain copy print?int width= 8;
intheight = 8;
// targetW,targetH分别表示目标长和宽
int type= sourceImage.getType();// 图片类型
BufferedImagethumbImage = null;
double sx= (double) width / sourceImage.getWidth();
double sy= (double) height / sourceImage.getHeight();
if (b) {
if(sx > sy) {
sx= sy;
width= (int) (sx * sourceImage.getWidth());
}else {
sy= sx;
height= (int) (sy * sourceImage.getHeight());
}
}
// 自定义图片
if (type== BufferedImage.TYPE_CUSTOM) { // handmade
ColorModelcm = sourceImage.getColorModel();
WritableRasterraster = cm.createCompatibleWritableRaster(width,height);
booleanalphaPremultiplied = cm.isAlphaPremultiplied();
thumbImage= new BufferedImage(cm, raster, alphaPremultiplied, null);
} else {
// 已知图片,如jpg,png,gif
thumbImage= new BufferedImage(width, height, type);
}
// 调用画图类画缩小尺寸后的图
Graphics2Dg = target.createGraphics();
//smoother than exlax:
g.setRenderingHint(RenderingHints.KEY_RENDERING, RenderingHints.VALUE_RENDER_QUALITY);
g.drawRenderedImage(sourceImage,AffineTransform.getScaleInstance(sx, sy));
g.dispose();
第二步,简化色彩。
将缩小后的图片,转为64级灰度。也就是说,所有像素点总共只有64种颜色。
[html] view plain copy print?int[]pixels = new int[width * height];
for (inti = 0; i < width; i++) {
for(int j = 0; j < height; j++) {
pixels[i* height + j] = rgbToGray(thumbImage.getRGB(i, j));
}
}
/**
* 灰度值计算
* @param pixels 彩色RGB值(Red-Green-Blue 红绿蓝)
* @return int 灰度值
*/
public static int rgbToGray(int pixels) {
// int _alpha =(pixels >> 24) & 0xFF;
int _red = (pixels >> 16) & 0xFF;
int _green = (pixels >> 8) & 0xFF;
int _blue = (pixels) & 0xFF;
return (int) (0.3 * _red + 0.59 * _green + 0.11 * _blue);
}
第三步,计算平均值。
计算所有64个像素的灰度平均值。
[java] view plain copy print?int avgPixel= 0;
int m = 0;
for (int i =0; i < pixels.length; ++i) {
m +=pixels[i];
}
m = m /pixels.length;
avgPixel = m;
第四步,比较像素的灰度。
将每个像素的灰度,与平均值进行比较。大于或等于平均值,记为1;小于平均值,记为0。
[java] view plain copy print?int[] comps= new int[width * height];
for (inti = 0; i < comps.length; i++) {
if(pixels[i] >= avgPixel) {
comps[i]= 1;
}else {
comps[i]= 0;
}
}
第五步,计算哈希值。
将上一步的比较结果,组合在一起,就构成了一个64位的整数,这就是这张图片的指纹。组合的次序并不重要,只要保证所有图片都采用同样次序就行了。

=
= 8f373714acfcf4d0
[html] view plain copy print?StringBufferhashCode = new StringBuffer();
for (inti = 0; i < comps.length; i+= 4) {
intresult = comps[i] * (int) Math.pow(2, 3) + comps[i + 1] * (int) Math.pow(2, 2)+ comps[i + 2] * (int) Math.pow(2, 1) + comps[i + 2];
hashCode.append(binaryToHex(result));//二进制转为16进制
}
StringsourceHashCode = hashCode.toString();
得到指纹以后,就可以对比不同的图片,看看64位中有多少位是不一样的。在理论上,这等同于计算"汉明距离"(Hammingdistance)。如果不相同的数据位不超过5,就说明两张图片很相似;如果大于10,就说明这是两张不同的图片。
[java] view plain copy print?int difference = 0;
int len =sourceHashCode.length();
for (inti = 0; i < len; i++) {
if(sourceHashCode.charAt(i) != hashCode.charAt(i)) {
difference++;
}
}
你可以将几张图片放在一起,也计算出他们的汉明距离对比,就可以看看两张图片是否相似。
这种算法的优点是简单快速,不受图片大小缩放的影响,缺点是图片的内容不能变更。如果在图片上加几个文字,它就认不出来了。所以,它的最佳用途是根据缩略图,找出原图。
实际应用中,往往采用更强大的pHash算法和SIFT算法,它们能够识别图片的变形。只要变形程度不超过25%,它们就能匹配原图。这些算法虽然更复杂,但是原理与上面的简便算法是一样的,就是先将图片转化成Hash字符串,然后再进行比较。
以上内容大部分直接从阮一峰的网站上复制过来,想看原著的童鞋可以去在最上面的链接点击进去看。
提供源码下载,源码下载链接:http://download.csdn.net/detail/luohong722/3965112
参考链接:神奇的图像处理算法, 11款相似图片搜索引擎推荐,以图搜图将不再是难事,http://insidesearch.blogspot.com/2011/07/teaching-computers-to-see-image.html
Google "相似图片搜索":你可以用一张图片,搜索互联网上所有与它相似的图片。
打开Google图片搜索页面:
点击
使用上传一张angelababy原图:
点击搜索后,Google将会找出与之相似的图片,图片相似度越高就越排在前面。如:
这种技术的原理是什么?计算机怎么知道两张图片相似呢?
根据Neal Krawetz博士的解释,实现相似图片搜素的关键技术叫做"感知哈希算法"(Perceptualhash algorithm),它的作用是对每张图片生成一个"指纹"(fingerprint)字符串,然后比较不同图片的指纹。结果越接近,就说明图片越相似。
以下是一个最简单的Java实现:
预处理:读取图片
[java] view plain copy print?File inputFile = newFile(filename);
BufferedImage sourceImage = ImageIO.read(inputFile);//读取图片文件
File inputFile = newFile(filename); BufferedImage sourceImage = ImageIO.read(inputFile);//读取图片文件
第一步,缩小尺寸。
将图片缩小到8x8的尺寸,总共64个像素。这一步的作用是去除图片的细节,只保留结构、明暗等基本信息,摒弃不同尺寸、比例带来的图片差异。
[java] view plain copy print?int width= 8;
intheight = 8;
// targetW,targetH分别表示目标长和宽
int type= sourceImage.getType();// 图片类型
BufferedImagethumbImage = null;
double sx= (double) width / sourceImage.getWidth();
double sy= (double) height / sourceImage.getHeight();
int width= 8;intheight = 8;// targetW,targetH分别表示目标长和宽int type= sourceImage.getType();// 图片类型BufferedImagethumbImage = null;double sx= (double) width / sourceImage.getWidth();double sy= (double) height / sourceImage.getHeight();[java] view plain copy print?// 将图片宽度和高度都设置成一样,以长度短的为准
if (b) {
if(sx > sy) {
sx= sy;
width= (int) (sx * sourceImage.getWidth());
}else {
sy= sx;
height= (int) (sy * sourceImage.getHeight());
}
}
// 自定义图片
if (type== BufferedImage.TYPE_CUSTOM) { // handmade
ColorModelcm = sourceImage.getColorModel();
WritableRasterraster = cm.createCompatibleWritableRaster(width,height);
booleanalphaPremultiplied = cm.isAlphaPremultiplied();
thumbImage= new BufferedImage(cm, raster, alphaPremultiplied, null);
} else {
// 已知图片,如jpg,png,gif
thumbImage= new BufferedImage(width, height, type);
}
// 调用画图类画缩小尺寸后的图
Graphics2Dg = target.createGraphics();
//smoother than exlax:
g.setRenderingHint(RenderingHints.KEY_RENDERING, RenderingHints.VALUE_RENDER_QUALITY);
g.drawRenderedImage(sourceImage,AffineTransform.getScaleInstance(sx, sy));
g.dispose();
// 将图片宽度和高度都设置成一样,以长度短的为准if (b) { if(sx > sy) { sx= sy; width= (int) (sx * sourceImage.getWidth()); }else { sy= sx; height= (int) (sy * sourceImage.getHeight()); }}// 自定义图片if (type== BufferedImage.TYPE_CUSTOM) { // handmade ColorModelcm = sourceImage.getColorModel(); WritableRasterraster = cm.createCompatibleWritableRaster(width,height); booleanalphaPremultiplied = cm.isAlphaPremultiplied(); thumbImage= new BufferedImage(cm, raster, alphaPremultiplied, null); } else { // 已知图片,如jpg,png,gif thumbImage= new BufferedImage(width, height, type);}// 调用画图类画缩小尺寸后的图Graphics2Dg = target.createGraphics();//smoother than exlax:g.setRenderingHint(RenderingHints.KEY_RENDERING, RenderingHints.VALUE_RENDER_QUALITY);g.drawRenderedImage(sourceImage,AffineTransform.getScaleInstance(sx, sy));g.dispose();第二步,简化色彩。
将缩小后的图片,转为64级灰度。也就是说,所有像素点总共只有64种颜色。
[html] view plain copy print?int[]pixels = new int[width * height];
for (inti = 0; i < width; i++) {
for(int j = 0; j < height; j++) {
pixels[i* height + j] = rgbToGray(thumbImage.getRGB(i, j));
}
}
/**
* 灰度值计算
* @param pixels 彩色RGB值(Red-Green-Blue 红绿蓝)
* @return int 灰度值
*/
public static int rgbToGray(int pixels) {
// int _alpha =(pixels >> 24) & 0xFF;
int _red = (pixels >> 16) & 0xFF;
int _green = (pixels >> 8) & 0xFF;
int _blue = (pixels) & 0xFF;
return (int) (0.3 * _red + 0.59 * _green + 0.11 * _blue);
}
int[]pixels = new int[width * height];for (inti = 0; i < width; i++) { for(int j = 0; j < height; j++) { pixels[i* height + j] = rgbToGray(thumbImage.getRGB(i, j)); }}/** * 灰度值计算 * @param pixels 彩色RGB值(Red-Green-Blue 红绿蓝) * @return int 灰度值 */public static int rgbToGray(int pixels) { // int _alpha =(pixels >> 24) & 0xFF; int _red = (pixels >> 16) & 0xFF; int _green = (pixels >> 8) & 0xFF; int _blue = (pixels) & 0xFF; return (int) (0.3 * _red + 0.59 * _green + 0.11 * _blue);}第三步,计算平均值。
计算所有64个像素的灰度平均值。
[java] view plain copy print?int avgPixel= 0;
int m = 0;
for (int i =0; i < pixels.length; ++i) {
m +=pixels[i];
}
m = m /pixels.length;
avgPixel = m;
int avgPixel= 0;int m = 0;for (int i =0; i < pixels.length; ++i) { m +=pixels[i];}m = m /pixels.length;avgPixel = m;第四步,比较像素的灰度。
将每个像素的灰度,与平均值进行比较。大于或等于平均值,记为1;小于平均值,记为0。
[java] view plain copy print?int[] comps= new int[width * height];
for (inti = 0; i < comps.length; i++) {
if(pixels[i] >= avgPixel) {
comps[i]= 1;
}else {
comps[i]= 0;
}
}
int[] comps= new int[width * height];for (inti = 0; i < comps.length; i++) { if(pixels[i] >= avgPixel) { comps[i]= 1; }else { comps[i]= 0; }}第五步,计算哈希值。
将上一步的比较结果,组合在一起,就构成了一个64位的整数,这就是这张图片的指纹。组合的次序并不重要,只要保证所有图片都采用同样次序就行了。
=
= 8f373714acfcf4d0
[html] view plain copy print?StringBufferhashCode = new StringBuffer();
for (inti = 0; i < comps.length; i+= 4) {
intresult = comps[i] * (int) Math.pow(2, 3) + comps[i + 1] * (int) Math.pow(2, 2)+ comps[i + 2] * (int) Math.pow(2, 1) + comps[i + 2];
hashCode.append(binaryToHex(result));//二进制转为16进制
}
StringsourceHashCode = hashCode.toString();
StringBufferhashCode = new StringBuffer();for (inti = 0; i < comps.length; i+= 4) { intresult = comps[i] * (int) Math.pow(2, 3) + comps[i + 1] * (int) Math.pow(2, 2)+ comps[i + 2] * (int) Math.pow(2, 1) + comps[i + 2]; hashCode.append(binaryToHex(result));//二进制转为16进制}StringsourceHashCode = hashCode.toString();得到指纹以后,就可以对比不同的图片,看看64位中有多少位是不一样的。在理论上,这等同于计算"汉明距离"(Hammingdistance)。如果不相同的数据位不超过5,就说明两张图片很相似;如果大于10,就说明这是两张不同的图片。
[java] view plain copy print?int difference = 0;
int len =sourceHashCode.length();
for (inti = 0; i < len; i++) {
if(sourceHashCode.charAt(i) != hashCode.charAt(i)) {
difference++;
}
}
int difference = 0;int len =sourceHashCode.length(); for (inti = 0; i < len; i++) { if(sourceHashCode.charAt(i) != hashCode.charAt(i)) { difference++; }}你可以将几张图片放在一起,也计算出他们的汉明距离对比,就可以看看两张图片是否相似。
这种算法的优点是简单快速,不受图片大小缩放的影响,缺点是图片的内容不能变更。如果在图片上加几个文字,它就认不出来了。所以,它的最佳用途是根据缩略图,找出原图。
实际应用中,往往采用更强大的pHash算法和SIFT算法,它们能够识别图片的变形。只要变形程度不超过25%,它们就能匹配原图。这些算法虽然更复杂,但是原理与上面的简便算法是一样的,就是先将图片转化成Hash字符串,然后再进行比较。
以上内容大部分直接从阮一峰的网站上复制过来,想看原著的童鞋可以去在最上面的链接点击进去看。
提供源码下载,源码下载链接:http://download.csdn.net/detail/luohong722/3965112
参考链接:神奇的图像处理算法, 11款相似图片搜索引擎推荐,以图搜图将不再是难事,http://insidesearch.blogspot.com/2011/07/teaching-computers-to-see-image.html

相关文章推荐
- Google 以图搜图 - 相似图片搜索原理 - Java实现
- 以图搜图 - Google 相似图片搜索原理 - Java实现
- Google 以图搜图 - 相似图片搜索原理 - Java实现
- Google 以图搜图 - 相似图片搜索原理 - Java实现
- Google 以图搜图 - 相似图片搜索原理 - Java实现
- Google 以图搜图 - 相似图片搜索原理 - Java实现
- Google 以图搜图 - 相似图片搜索原理 - Java实现
- Google 以图搜图 - 相似图片搜索原理 - Java实现
- 相似图片搜索原理一(ahash—c++实现)
- Google相似图片搜索原理
- 相似图片搜索原理二(phash-c++实现)
- 相似图片搜索原理三(颜色直方图—c++实现)
- 关于Google相似图片搜索的原理剖析
- Google相似图片搜索的原理
- Google相似图片搜索的原理概述
- 相似图片搜索原理二(phash—c++实现)
- 相似图片搜索原理二(phash—c++实现)
- 以图搜图 相似图片搜索的原理(一)
- 相似图片搜索原理一(ahash—c++实现)
- 以图搜图 相似图片搜索的原理(二)