自己动手编写spring IOC源码
前言:对于spring IOC概念不是很了解的朋友可以阅读我上一篇博客——轻松理解spring IOC(这两篇博客也是由于我的个人原因导致现在才发布,惭愧啊)。通过这篇博客的理解之后,相信大家会对spring的IOC概念会有进一步的理解。接下来我先预览一下本例中java的类图关系。
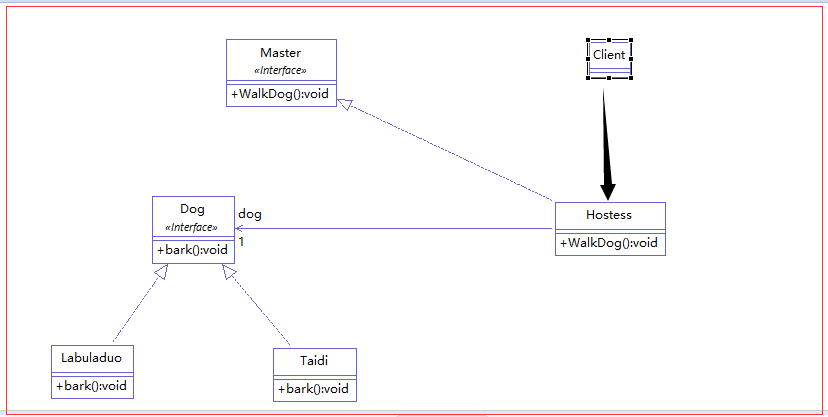
解析:我们有一个Master接口,接口中定义了一个WalkDog()遛狗的方法,Hostess是对这个接口的具体实现。然后我们有一个Dog接口,接口中有一个bark()方法,Labuladuo和Taidi是对其的实现。最后我们的程序入口Client类调用Hostess对象的WalkDog方法。
需求:Hostess对象遛狗需要一个狗对象,目前我们的类中有两个符合需求的对象,我们只要在配置文件中进行相关配置便可以指定我们的Hostess对象调用的是哪一个具体的Dog对象。
1 public static void main(String[] args) {
2         ApplicationContext context = new ClassPathXmlApplicationContext("applicationContext.xml");
3         Master master = (Master)context.getBean("hostess");
4
5         System.out.println();
6         System.out.println();
7         System.out.println();
8         System.out.println("***********************************");
9         master.WalkDog();
10     }
解析:从main方法的前两句原spring的代码中我们可以猜想,spring框架中一定是定义了ApplicationContext这个接口,并且接口中定义了一个getBean()的方法,而ClassPathXmlApplicationContext类肯定是对其的实现。既然是我们自己动手写spring框架,我们把这个接口和类实现了也就可以了。
接口 ApplicationContext
1 public interface ApplicationContext {
2     public Object getBean(String beanid);
3 }
实现类 ClassPathXmlApplicationContext
1 package com;
2
3 import java.io.File;
4 import java.lang.reflect.Method;
5
6 import org.dom4j.Document;
7 import org.dom4j.DocumentException;
8 import org.dom4j.Element;
9 import org.dom4j.Node;
10 import org.dom4j.io.SAXReader;
11
12 public class ClassPathXmlApplicationContext implements ApplicationContext {
13
14     private String fileName;
15
16     public ClassPathXmlApplicationContext(String fileName){
17         this.fileName = fileName;
18     }
19
20     @Override
21     public Object getBean(String beanid) {
22         //获取本类的当前目录
23         String currentPath = this.getClass().getResource("").getPath().toString();
24
25         SAXReader reader = new SAXReader();//DOM4J解释器
26         Document doc = null;//xml文档本身
27         Object obj = null;//目标表创建出来的实例
28         try {
29             doc = reader.read(  new File(currentPath+fileName)  );
30             String xpath = "/beans/bean[@id='"+beanid+"']";
31             Element beanNode = (Element) doc.selectSingleNode(xpath);
32             String className = beanNode.attributeValue("class");
33             obj = Class.forName(className).newInstance();
34
35             Element propertyNode = (Element) beanNode.selectSingleNode("property");
36
37             if(propertyNode!=null){
38                 System.out.println("当前bean有属性需要注入");
39
40                 String propertyName = propertyNode.attributeValue("name");
41                 System.out.println("当前bean需要注入的属性为"+propertyName);
42
43                 //拼接出注入方法
44                 String setMethod = "set"+(propertyName.substring(0, 1)).toUpperCase()+propertyName.substring(1,propertyName.length());
45                 System.out.println("自动调用注入方法"+setMethod);
46
47                 String set_object_name = propertyNode.attributeValue("ref");
48                 System.out.println("需要注入的对象名"+set_object_name);
49
50                 Object di_object = getBean(set_object_name);
51                 System.out.println("注入的对象实例"+di_object);
52
53                 Method []methods = obj.getClass().getMethods();
54
55                 for (Method m : methods) {
56                     if(setMethod.equals(m.getName())  ) {
57                         m.invoke(obj, di_object);
58                         break;
59                     }
60                 }
61
62             }else{
63                 System.out.println("当前bean没有属性,无需注入直接结束");
64             }
65
66         } catch (Exception e) {
67             e.printStackTrace();
68         }
69
70
71         return obj;
72     }
73
74 }
配置文件 applicationContext.xml
1 <?xml version="1.0" encoding="UTF-8"?>
2 <beans>
3     <bean id="hostess" class="com.Hostess">
4         <property name="dog" ref="Taidi_dog"></property>
5     </bean>
6
7     <bean id="Taidi_dog" class="com.Taidi"></bean>
8
9     <bean id="Labuladuo_dog" class="com.Labuladuo"></bean>
10 </beans>
解析:① 我们的applicationContext.xml文件主要是配置我们的java bean。这里我们自己写一份这样的文件通知我们自己的框架有哪些对象需要注入。
② 接口 ApplicationContext 这里我只是定义了一个方法就不多解释了。
③ 实现类 ClassPathXmlApplicationContext 主要是解析我们的xml文件然后构造实例的一个类。解析xml文件我们主要使用的是dom4j,获取各个节点和节点属性与属性值。创建对象则是通过反射的方式构造对象 [obj = Class.forName(className).newInstance();]。 在判断一个对象是否有属性需要注入则是使用递归算法对其一一注入。
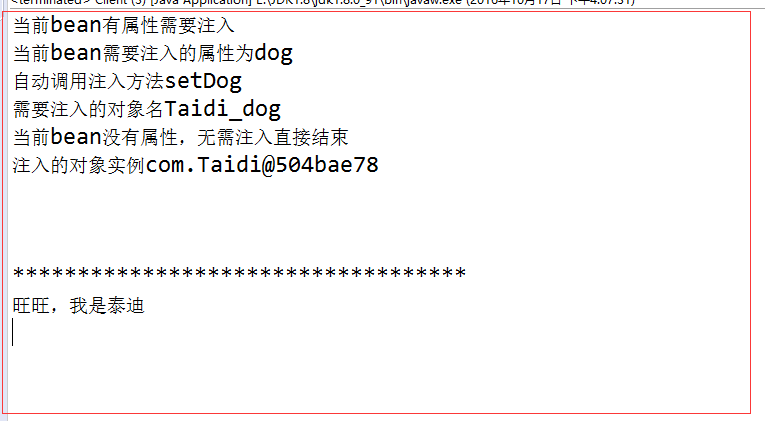
最后: 我们来看一下运行结果
小结:我们自己手写的框架自然没有spring框架严谨,安全(不然它早倒闭了),不过spring的原理我们自己的也是大同小异的。通过源码级别的解读,相信大家已经可以熟练掌握IOC原理。

- 自己动手写个spring IOC容器
- 自己动手编写IOC框架(一)
- 自己动手编写CSDN博客备份工具-blogspider之源码分析(1)
- 自己动手编写IoC容器(一)
- 自己动手编写CSDN博客备份工具-blogspider之源码分析(2)
- 自己动手编写IOC框架
- spring源码初步学习-自己实现的ioc容器结构
- 自己动手编写CSDN博客备份工具-blogspider之源码分析(3)
- 自己动手编写CSDN博客备份工具-blogspider之源码分析(3)
- 自己动手写个spring IOC容器
- 自己动手编写CSDN博客备份工具-blogspider之源码分析(2)
- 自己动手编写IOC框架(三)
- 自己动手编写CSDN博客备份工具-blogspider之源码分析(2)
- Spring学习(第二篇)——自己动手模拟spring的IOC
- 自己动手写一个SpringIOC!
- 自己动手编写CSDN博客备份工具-blogspider之源码分析(1)
- 自己动手编写CSDN博客备份工具-blogspider之源码分析(1)
- 自己动手编写CSDN博客备份工具-blogspider源码下载(4)
- 自己动手编写CSDN博客备份工具-blogspider之源码分析(2)
- 自己动手编写CSDN博客备份工具-blogspider之源码分析(3)