Spring Boot 构建应用——开发 RESTful API
2017-06-23 21:36
330 查看
转载请注明出处:http://blog.csdn.net/smartbetter/article/details/73441323
Restful 本质上是一个优雅的 URI 表达方式,基于 Restful 设计的软件可以更简洁,更有层次,更易于实现缓存等机制。资源的状态和状态转移。下面来看一组 传统API 和 RESTful API 写法的对比:
Restful API 用 URL 描述资源,用 HTTP 方法描述行为,使用 HTTP 状态码来表示不同的结果,使用 json 交互数据(/ 模块 / 资源 / {标示} / 集合1 / …)。
开发 RESTful API 常用的 Spring MVC 注解:
除此之外,Hibernate Validator 库还提供了一些对参数校验的注解,如下:
编写测试用例:
在 User 中添加校验约束:
在 UserControllerTest 增加创建请求的测试用例:
在 UserControllerTest 增加修改请求的测试用例:
在 UserControllerTest 增加删除请求的测试用例:
这种错误机制的具体实现可以查看 org.springframework.boot.autoconfigure.web.BasicErrorController 源码:
可以看出,其实就是根据 produces 参数来实现的。
运行项目,此时从浏览器访问 API 接口,如果发生 404 错误则不再返回 Spring Boot 提供的 html,而是返回上面自定义的 html(这种自定义只对浏览器生效,不会影响 APP)。下面我们自定义 APP 异常:
新建控制器的错误处理器,抛出的 UserNotExistException 都会到这里处理:
此时,如果代码发生错误,我们只需要手动 抛出 UserNotExistException(id) 即可。例如获得错误响应为:
三者的顺序是:过滤器 -> 拦截器 -> ControllerAdvice -> 切片 -> Controller
在配置类中添加拦截器:
另外多个拦截器协同时工作流程图如下:
新建 UploadControllerTest 添加文件上传的测试用例:
Restful 本质上是一个优雅的 URI 表达方式,基于 Restful 设计的软件可以更简洁,更有层次,更易于实现缓存等机制。资源的状态和状态转移。下面来看一组 传统API 和 RESTful API 写法的对比:
| - | 传统API请求方法 | 传统API写法 | RESTful API请求方法 | RESTful API写法 |
|---|---|---|---|---|
| 查询 | GET | /user/query?name=tom | GET | /user?name=tom |
| 详情 | GET | /user/getInfo?id=1 | GET | /user/{id} |
| 创建 | POST | /user/create?name=tom | POST | /user |
| 修改 | POST | /user/update?id=1&name=joy | PUT | /user/{id} |
| 删除 | GET | /user/delete?id=1 | DELETE | /user/{id} |
开发 RESTful API 常用的 Spring MVC 注解:
| Spring MVC常用注解 | 说明 |
|---|---|
| @RestController | Spring4之后新加的注解,等同于@ResponseBody+@Controller,标明此Controller提供RESTful API |
| @GetMapping | 组合注解,等同于@RequestMapping(method = RequestMethod.GET),同理还有@PostMapping、@PutMapping、@DeleteMapping |
| @RequestParam | 映射请求参数到java方法的参数,属性required:是否必传 |
| @PageableDefault | 指定分页参数默认值 |
| @RequestBody | 映射请求体到java方法的参数 |
| @Valid 和 @BindingResult | 验证请求参数的合法性并处理校验结果 |
| Hibernate Validator校验注解 | 说明 |
|---|---|
| @NotNull | 值不能为空 |
| @Null | 值必须为空 |
| @Pattern(regex=) | 字符串必须匹配正则表达式 |
| @Size(min=, max=) | 集合的元素数量必须在min和max之间 |
| @CreditCardNumber(ignoreNonDigitCharacters=) | 字符串必须是信用卡号(按美国的标准验的-_-!) |
| 字符串必须是Email地址 | |
| @Length(min=,max=) | 检查字符的长度 |
| @NotBlank | 字符串必须有字符 |
| @NotEmpty | 字符串不为null,集合有元素 |
| @Range(min=,max=) | 数字必须大于等于min,小于等于max |
| @SafeHtml | 字符串是安全的html |
| @URL | 字符串是合法的URL |
| @AssertFalse | 值必须是false |
| @AssertTrue | 值必须是true |
| @DecimalMax(value=,inclusive=) | 值必须小于等于(inclusive=true)/小于(inclusive=false)value属性指定的值。可注解在字符串类型的属性上 |
| @DecimalMin() | 值必须大于等于(inclusive=true)/大于(inclusive=false)value属性指定的值。可注解在字符串类型的属性上 |
| @Digits(integer=,fraction=) | 数字格式检查,integer指定整数部分的最大长度,fraction指定小数部分的最大长度 |
| @Future | 值必须是未来的日期 |
| @Past | 值必须是过去的日期 |
| @Max(value=) | 值必须小于等于value指定的值,不能注解在字符串类型的属性上 |
| @Min(value=) | 值必须大于等于value指定的值,不能注解在字符串类型的属性上 |
1.基于Restful设计的增删改查
测试用例这里使用 MockMvc 结合 PerfTest 进行编写,PerfTest 需要添加 Maven 依赖:<dependency> <groupId>org.databene</groupId> <artifactId>contiperf</artifactId> <version>2.3.4</version> </dependency>
1.查询请求API
public class User {
//使用接口来声明多个视图
public interface UserSimpleView {};
public interface UserDetailView extends UserSimpleView {};
private Long id;
private String username;
private String password;
private Date gmtCreate;
private Date gmtModified;
//在值对象的get方法上指定视图,然后在Controller方法上指定视图,就可以达到使用UserSimpleView视图隐藏password的效果
@JsonView(UserSimpleView.class)
public Long getId() { return id; }
@JsonView(UserSimpleView.class)
public String getUsername() { return username; }
@JsonView(UserDetailView.class)
public String getPassword() { return password; }
@JsonView(UserSimpleView.class)
public Date getGmtCreate() { return gmtCreate; }
@JsonView(UserSimpleView.class)
public Date getGmtModified() { return gmtModified; }
//省略setter请求
}
@RestController
public class UserController {
private Logger logger = LoggerFactory.getLogger(UserController.class);
@Autowired
private UserService userService;
@GetMapping("/user")
@JsonView(User.UserSimpleView.class) //指定视图
public List<User> queryUser(@RequestParam String username) {
return userService.queryUser(username);
}
//添加正则表达式 \d+ 表示id只能为数字
@GetMapping("/user/{id:\\d+}")
@JsonView(User.UserSimpleView.class)
public User getUserInfo(@PathVariable String id) {
return userService.getUserInfo(id);
}
}编写测试用例:
@RunWith(SpringRunner.class)
@SpringBootTest
public class UserControllerTest {
@Autowired
private UserController userController;
private MockMvc mvc;
private Logger logger = LoggerFactory.getLogger(UserControllerTest.class);
@Rule
public ContiPerfRule i = new ContiPerfRule();
@Before
public void setup() {
mvc = MockMvcBuilders.standaloneSetup(userController).build();
}
@Test
@PerfTest(invocations = 100000, threads = 1000)
public void whenQueryUserSuccess() throws Exception {
MvcResult result = mvc.perform(MockMvcRequestBuilders.get("/user")
.param("username", "tom")
.contentType(MediaType.APPLICATION_JSON_UTF8))
.andExpect(MockMvcResultMatchers.status().isOk())
.andExpect(MockMvcResultMatchers.jsonPath("$.length()").value(3))
.andReturn();
logger.info(result.getResponse().getContentAsString());
}
@Test
@PerfTest(invocations = 100000, threads = 1000)
public void whenGetUserInfoSuccess() throws Exception {
MvcResult result = mvc.perform(MockMvcRequestBuilders.get("/user/1")
.contentType(MediaType.APPLICATION_JSON_UTF8))
.andExpect(MockMvcResultMatchers.status().isOk())
.andExpect(MockMvcResultMatchers.jsonPath("$.username").value("tom"))
.andReturn();
logger.info(result.getResponse().getContentAsString());
}
@Test
@PerfTest(invocations = 100000, threads = 1000)
public void whenGetUserInfoFail() throws Exception {
mvc.perform(MockMvcRequestBuilders.get("/user/a")
.contentType(MediaType.APPLICATION_JSON_UTF8))
.andExpect(MockMvcResultMatchers.status().is4xxClientError());
}
}
2.创建请求API
在 UserController 增加创建请求的接口:/**
* @param user @Valid:校验数据,约束需要在pojo中定义,校验结果会通过BindingResult返回,可以写成:
* public User createUserInfo(@Valid @RequestBody User user, BindingResult erros) {
* if (erros.hasErrors()) {
* erros.getAllErrors().stream().forEach(error -> logger.error(error.getDefaultMessage()));
* }
* Date date = new Date();
* user.setGmtCreate(date);
* user.setGmtModified(date);
* return userService.createUserInfo(user);
* }
* 如果不写BindingResult,将会通过Spring Boot中默认的错误处理机制返回给客户端
*/
@PostMapping("/user")
@JsonView(User.UserSimpleView.class)
public User createUserInfo(@Valid @RequestBody User user) {
Date date = new Date();
user.setGmtCreate(date);
user.setGmtModified(date);
return userService.createUserInfo(user);
}在 User 中添加校验约束:
@NotBlank(message = "用户名不能为空") //校验约束
private String username;
@NotBlank(message = "密码不能为空")
private String password;
在 UserControllerTest 增加创建请求的测试用例:
@Test
@PerfTest(invocations = 100000, threads = 1000)
public void whenCreateUserSuccess() throws Exception {
String content = "{\"username\":\"bob\",\"password\":\"123\"}";
MvcResult result = mvc.perform(MockMvcRequestBuilders.post("/user")
.content(content)
.contentType(MediaType.APPLICATION_JSON_UTF8))
.andExpect(MockMvcResultMatchers.status().isOk())
.andExpect(MockMvcResultMatchers.jsonPath("$.id").value("1"))
.andReturn();
logger.info(result.getResponse().getContentAsString());
}
3.修改请求API
在 UserController 增加修改请求的接口:@PutMapping("/user/{id:\\d+}")
@JsonView(User.UserSimpleView.class)
public User updateUserInfo(@Valid @RequestBody User user) {
Date date = new Date();
user.setGmtCreate(date);
user.setGmtModified(date);
return userService.updateUserInfo(user);
}在 UserControllerTest 增加修改请求的测试用例:
@Test
@PerfTest(invocations = 100000, threads = 1000)
public void whenUpdateUserSuccess() throws Exception {
String content = "{\"id\":\"1\",\"username\":\"bob\",\"password\":\"123\"}";
MvcResult result = mvc.perform(MockMvcRequestBuilders.put("/user/1")
.content(content)
.contentType(MediaType.APPLICATION_JSON_UTF8))
.andExpect(MockMvcResultMatchers.status().isOk())
.andExpect(MockMvcResultMatchers.jsonPath("$.id").value("1"))
.andReturn();
logger.info(result.getResponse().getContentAsString());
}
4.删除请求API
在 UserController 增加删除请求的接口:@DeleteMapping("/user/{id:\\d+}")
@JsonView(User.UserSimpleView.class)
public void deleteUserInfo(@PathVariable String id) {
userService.deleteUserInfo(id);
}在 UserControllerTest 增加删除请求的测试用例:
@Test
@PerfTest(invocations = 100000, threads = 1000)
public void whenDeleteUserSuccess() throws Exception {
MvcResult result = mvc.perform(MockMvcRequestBuilders.delete("/user/1")
.contentType(MediaType.APPLICATION_JSON_UTF8))
.andExpect(MockMvcResultMatchers.status().isOk())
.andReturn();
logger.info(result.getResponse().getContentAsString());
}
2.Restful API错误处理
1.Spring Boot 中默认的错误处理机制
Spring Boot 提供默认的错误处理机制,浏览器发送请求遇到错误返回 html 错误网页,APP 发送请求遇到错误返回 json 错误代码。这种错误机制的具体实现可以查看 org.springframework.boot.autoconfigure.web.BasicErrorController 源码:
@Controller
@RequestMapping({"${server.error.path:${error.path:/error}}"})
public class BasicErrorController extends AbstractErrorController {
@RequestMapping(produces = {"text/html"})
public ModelAndView errorHtml(HttpServletRequest request, HttpServletResponse response) {
}
@RequestMapping
@ResponseBody
public ResponseEntity<Map<String, Object>> error(HttpServletRequest request) {
}
}
可以看出,其实就是根据 produces 参数来实现的。
2.自定义异常处理
大部分业务我们使用 Spring Boot 默认提供的错误处理机制即可。如果我们需要单独处理某些浏览器响应错误,例如 404,就需要自定义异常。新建 resources/resources/error 目录,在其中新建 404.html:<!DOCTYPE html> <html> <head> <meta charset="UTF-8"> <title>404</title> </head> <body> 您所访问的页面不存在</body> </html>
运行项目,此时从浏览器访问 API 接口,如果发生 404 错误则不再返回 Spring Boot 提供的 html,而是返回上面自定义的 html(这种自定义只对浏览器生效,不会影响 APP)。下面我们自定义 APP 异常:
public class UserNotExistException extends RuntimeException {
private String id;
public UserNotExistException(String id) {
super("user not exist");
this.id = id;
}
public String getId() {
return id;
}
}
新建控制器的错误处理器,抛出的 UserNotExistException 都会到这里处理:
@ControllerAdvice
public class ControllerExceptionHandler {
@ExceptionHandler(UserNotExistException.class)
@ResponseBody
@ResponseStatus(HttpStatus.INTERNAL_SERVER_ERROR)
public Map<String, Object> handleUserNotExistException(UserNotExistException ex) {
Map<String, Object> result = new HashMap<>();
result.put("id", ex.getId());
result.put("message", ex.getMessage());
return result;
}
}
此时,如果代码发生错误,我们只需要手动 抛出 UserNotExistException(id) 即可。例如获得错误响应为:
{
"id": "1",
"message": "user not exist"
}
3.Restful API的拦截机制
| 拦截机制 | 不同点 |
|---|---|
| 过滤器 | 依赖于servlet容器,能拿到原始的请求和相应信息,但是拿不到真正处理请求方法的信息 |
| 拦截器 | 不依赖与servlet容器,能拿到原始的请求和相应信息,也能拿到真正处理请求方法的信息,但是拿不到方法被调用时参数的值 |
| 切片 | 拦截Spring管理Bean的访问,可以拿到方法被调用时参数的值 |
1.过滤器Filter
@Component //添加该注解即可生效
public class TimeFilter implements javax.servlet.Filter {
//初始化
@Override
public void init(FilterConfig filterConfig) throws ServletException {
}
//处理过滤器逻辑
@Override
public void doFilter(ServletRequest request, ServletResponse response, FilterChain chain)
throws IOException, ServletException {
long start = System.currentTimeMillis();
chain.doFilter(request, response);
System.out.println("Time Filter 耗时:" + (System.currentTimeMillis()-start));
}
//销毁
@Override
public void destroy() {
}
}
2.添加第三方Filter到自己的项目
新建配置类注册 bean 即可(这里假设是第三方的TimeFilter):@Configuration
public class WebConfig {
@Bean
public FilterRegistrationBean timeFilter() {
FilterRegistrationBean registrationBean = new FilterRegistrationBean();
TimeFilter timeFilter = new TimeFilter();
registrationBean.setFilter(timeFilter);
List<String> urls = new ArrayList<>();
//所有路径都起作用
urls.add("/*");
registrationBean.setUrlPatterns(urls);
return registrationBean;
}
}3.拦截器Interceptor
拦截器是指通过统一拦截从浏览器发往服务器的请求来完成功能的增强,处理所有请求的共性问题。如解决乱码问题(web.xml 中配置 filter)、权限验证问题、验证是否登录等。拦截器的工作原理和过滤器非常相似。@Component
public class TimeInterceptor implements HandlerInterceptor {
/**
* 执行步骤1: 在控制器处理请求之前被调用
* @param handler 被拦截请求对象实例
* @return false:表示拦截当前请求, 请求被终止, true:表示不拦截当前请求, 请求被继续
*/
@Override
public boolean preHandle(HttpServletRequest request,
HttpServletResponse response, Object handler) throws Exception {
request.setAttribute("startTime", System.currentTimeMillis());
return true;
}
/**
* 执行步骤2: 在控制器处理请求之后被调用, 生成视图之前执行的动作
* @param handler 被拦截请求对象实例
* @param modelAndView 可通过modelAndView改变显示的视图或修改发往视图的方法, 比如当前时间
*/
@Override
public void postHandle(HttpServletRequest request,
HttpServletResponse response, Object handler, ModelAndView modelAndView) throws Exception {
}
/**
* 执行步骤3: 在DispatcherServlet完全处理完请求后被调用,可用于清理资源等
* 注意: 当有拦截器抛出异常时,会从当前拦截器往回执行所有的拦截器的afterCompletion方法
* @param handler 被拦截请求对象实例
*/
@Override
public void afterCompletion(HttpServletRequest request,
HttpServletResponse response, Object handler, Exception e) throws Exception {
Long start = (Long) request.getAttribute("startTime");
System.out.println("Time Interceptor 耗时:" + (System.currentTimeMillis()-start));
}
}在配置类中添加拦截器:
@Configuration
public class WebConfig extends WebMvcConfigurerAdapter{
@Autowired
private TimeInterceptor timeInterceptor;
@Override
public void addInterceptors(InterceptorRegistry registry) {
registry.addInterceptor(timeInterceptor);
}
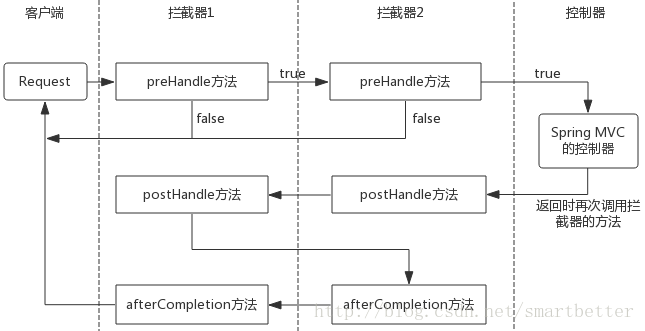
}另外多个拦截器协同时工作流程图如下:
3.切片Aspect
@Aspect
@Component
public class TimeAspect {
private final static Logger logger = LoggerFactory.getLogger(TimeAspect.class);
@Around("execution(public * com.example.security.web.controller.UserController.*(..))")
public Object handleControllerMethod(ProceedingJoinPoint pjp) throws Throwable {
long start = System.currentTimeMillis();
Object[] args = pjp.getArgs();
for (Object arg : args) {
System.out.println("Time Aspect 参数:" + arg);
}
Object object = pjp.proceed();
System.out.println("Time Aspect 耗时:" + (System.currentTimeMillis()-start));
return object;
}
}
4.使用REST方式处理文件上传
新建文件上传的控制器 UploadController:@RestController
public class UploadController {
@PostMapping("/upload")
public FileInfo upload(MultipartFile file) throws IOException {
String folder = "/Users/guochao/Documents";
String _fileName = file.getOriginalFilename();
String suffix = _fileName.substring(_fileName.lastIndexOf("."));
File localFile = new File(folder, UUID.randomUUID().toString() + suffix);
file.transferTo(localFile);
return new FileInfo(localFile.getAbsolutePath());
}
}新建 UploadControllerTest 添加文件上传的测试用例:
@RunWith(SpringRunner.class)
@SpringBootTest
public class UploadControllerTest {
@Autowired
private UploadController uploadController;
private MockMvc mvc;
private Logger logger = LoggerFactory.getLogger(UserControllerTest.class);
@Rule
public ContiPerfRule i = new ContiPerfRule();
@Before
public void setup() {
mvc = MockMvcBuilders.standaloneSetup(uploadController).build();
}
@Test
@PerfTest(invocations = 100000, threads = 1000)
public void whenUploadSuccess() throws Exception {
MvcResult result = mvc.perform(MockMvcRequestBuilders.fileUpload("/upload")
.file(new MockMultipartFile("file", "test.txt", "multipart/form-data", "hello upload".getBytes("UTF-8"))))
.andExpect(MockMvcResultMatchers.status().isOk())
.andReturn();
logger.info(result.getResponse().getContentAsString());
}
}
5.异步处理REST服务
@RestController
public class AsyncController {
private Logger logger = LoggerFactory.getLogger(AsyncController.class);
/**
* 同步处理
*/
@RequestMapping("/sync")
public String sync() throws InterruptedException {
long start = System.currentTimeMillis();
logger.info("主线程开始");
Thread.sleep(1000);
logger.info("主线程结束,耗时" + (System.currentTimeMillis()-start));
return "success";
}
/**
* 异步处理
*/
@RequestMapping("/async")
public Callable<String> async() {
long start = System.currentTimeMillis();
logger.info("主线程开始");
Callable<String> result = () -> {
long start2 = System.currentTimeMillis();
logger.info("副线程开始");
Thread.sleep(1000);
logger.info("副线程返回,耗时" + (System.currentTimeMillis()-start2));
return "success";
};
logger.info("主线程结束,耗时" + (System.currentTimeMillis()-start));
return result;
}
}

相关文章推荐
- 基于Spring Boot构建应用开发规范
- Spring Boot - Web 应用开发 - 错误处理
- Spring Boot中使用Swagger2构建强大的RESTful API文档
- Spring Boot开发Spring Java应用
- 分布式Session研究(一):Docker + spring boot +Nginx构建分布式应用
- 使用Spring Boot快速构建应用
- Spring Boot开发MongoDB应用实践
- Spring Boot框架快速构建应用
- Spring Boot中使用Swagger2构建强大的RESTful API文档
- SpringBoot非官方教程 | 第十一篇:springboot集成swagger2,构建优雅的Restful API
- 使用 Spring Boot 快速构建 Spring 框架应用
- 用 Docker 构建、运行、发布一个 Spring Boot 应用
- Spring Boot中使用Swagger2构建强大的RESTful API文档
- Spring Boot 构建应用——整合消息中间件 Kafka
- SpringCloud SpringBoot mybatis 分布式微服务(五)使用Swagger2构建强大的RESTful API文档
- 采用Gradle快速构建基于Spring boot的MVC应用
- 使用Gradle构建SpringBoot工程系列:第二篇:开发环境准备
- SpringBoot非官方教程 | 第十一篇:springboot集成swagger2,构建优雅的Restful API
- 第一个 spring Boot 应用通过Docker 来实现构建、运行、发布
- Spring Boot实践应用开发(4)