iOS CoreAnimation(三)CoreGraphics绘图,drawRect,CALayerDelegate,displayLayer
2017-06-04 23:12
441 查看
这篇文章先说 CoreGraphics 绘图,然后继续 上一篇文章 设置寄宿图。
除了给 contents 赋 CGImage 值,还可以用 CoreGraphics 直接绘制寄宿图。
CoreGraphics : 是一套基于C的框架,用于一切绘图操作, UIKit 库中所有 UI 组件都是由 CoreGraphics 绘制实现的!因此它可以实现比UIKit更底层的功能。实际上,绘图就是使用图形上下文和路径
要想绘图,需要先自定义类 继承 UIView 并且重写 drawRect方法。
drawRect 方法是干什么的?
func draw(_ rect: CGRect)
看看文档:
//The default implementation of this method does nothing.This method is called when a view is first displayed or when an event occurs that invalidates a visible part of the view.You should never call this method directly
yourself.
//You do not need to override this method in subclasses if your view can set its content in other ways. e.g. just displays a background color or sets its content directly using the
underlying layer object.
//If you subclass UIView directly, your implementation of this method does not need to call super. However, if you are subclassing a different view class(e.g. UIImageView), you should call super at some point in your
implementation
//废话一:By the time this method is called, UIKit has configured the drawing environment appropriately for your view and you can
simply call whatever drawing methods and functions you need to render your content.
//废话二:Specifically, UIKit creates and configures a graphics context for drawing and adjusts
the transform of that context so that its origin matches the origin of your view’s bounds rectangle.
//You can get a reference to the graphics context using the UIGraphicsGetCurrentContext() function, but do not establish a strong reference to the graphics context because it can
change between calls to the draw(_:) method.
//In addition, if the isOpaque property of your view is set to true, your draw(_:) method must totally fill the specified rectangle with opaque contents
//To invalidate part of your view, and thus cause that portion to be redrawn, call the setNeedsDisplay() or setNeedsDisplay(_:) method instead.
//You should limit any drawing to the rectangle specified in the rect parameter. rect: The portion of the view’s bounds that needs to be updated. The first time your view
is drawn, this rectangle is typically the entire visible bounds of your view. However, during subsequent drawing operations, the rectangle may specify only part of your view.
我翻译几个重点
方法默认是空的,当视图在屏幕上出现的时候或*****的时候, 方法就会被自动调用。不要自行调用该方法!(附:对UIView来说,寄宿图并不是必须的,它不在意那到底是单调的颜色还是有一个图片的实例。如果UIView检测到
drawRect 方法被调用了,它就会为视图分配一个寄宿图,这个寄宿图的像素尺寸等于视图大小乘以
contentsScale
的值)
如果你不需要自定义绘制,那就不要重写它(这会造成CPU资源和内存的浪费),所以苹果建议 如果没有自定义绘制的任务就用图层或视图的属性搞定。
如果你继承自UIView,重写方法时 可以不写 super.draw(rect)
,但是如果继承自别的UIView的子类,还是写上吧
使用 UIGraphicsGetCurrentContext() 获取图形上下文。不要用强引用,因为这CGContext可能会变 ,在不同的对draw的调用中(说是这样说,但是很少这样用)。
其他废话有兴趣的研究研究。我不翻了,翻错了可不好
demo ( 学过 java 用过 Graphics g 画笔吗 大同小异):
import UIKit
class CustomView:UIView{
override
func draw(_ rect:
CGRect) {
//get 画笔
weak
var cgContext =
UIGraphicsGetCurrentContext()
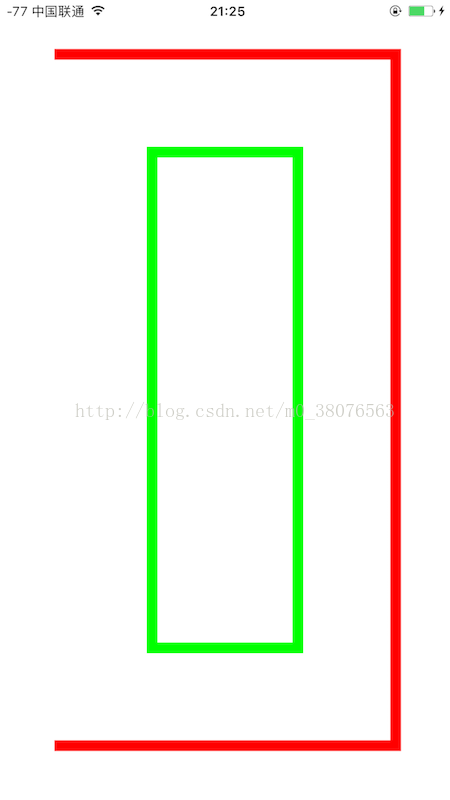
//矩形
变
路径
let drawRect:CGRect =
frame.insetBy(dx:
50, dy: 50)
let path =
CGMutablePath()
path.move(to:
CGPoint(x: drawRect.minX, y: drawRect.minY))
path.addLine(to:
CGPoint(x: drawRect.maxX, y: drawRect.minY))
path.addLine(to:
CGPoint(x: drawRect.maxX, y: drawRect.maxY))
path.addLine(to:
CGPoint(x: drawRect.minX, y: drawRect.maxY))
//脑中想着画笔的移动,move到一个点,加一条线到一个点·····
//改画笔的参数
cgContext?.setLineWidth(10)
cgContext?.setStrokeColor(UIColor.red.cgColor)
//画
cgContext?.addPath(path)
cgContext?.strokePath()
//再画一个
// stroke:he finished the portrait with no more than a few strokes
cgContext?.setStrokeColor(UIColor.green.cgColor)
cgContext?.stroke(drawRect.insetBy(dx:
90, dy: 90))
}
}
class ViewController:
UIViewController{
var myView:CustomView!
override
func viewDidLoad() {
super.viewDidLoad()
myView =
CustomView(frame:view.bounds)
myView.backgroundColor = UIColor.white//默认黑
view.addSubview(myView)
}
}
效果:
还有几个参数,
cgContext?.setLineCap(.round) //顶点样式
cgContext?.setLineJoin(.round) //连接点
cgContext?.setShadow(offset:
CGSize(width:3,height:3), blur:
0.5, color:
UIColor.gray.cgColor) //阴影
cgContext?.setLineDash(phase:
0, lengths: [20,8])
//画虚线,第一个参数写0,第二个数组是 实虚长度比例
2、画圆:
override
func draw(_ rect:
CGRect) {
weak
var cgContext =
UIGraphicsGetCurrentContext()
let drawRect:CGRect =
frame.insetBy(dx:
50, dy: 50)
let path =
CGMutablePath()
//绘制圆弧必须确定:圆心的坐标、半径、圆弧的起点角度和终点角度(弧度表示),常量 CGFloat.pi
是 π,即180。
let radius = drawRect.width/2
//半径
let center =
CGPoint(x: drawRect.midX, y: drawRect.midX)//圆心
path.addArc(center: center, radius: radius, startAngle:
0, endAngle: CGFloat.pi*1.5,
clockwise: true)
//clockwise如果是true,画的是互补的那部分圆
cgContext?.setLineWidth(6)
cgContext?.setStrokeColor(UIColor.red.cgColor)
cgContext?.addPath(path)
cgContext?.strokePath()
}
绘制其他图形:只写几个方法
cgContext?.setFillColor(UIColor.red.cgColor)
cgContext?.drawPath(using: .fillStroke)
path.addRoundedRect(in: CGRect, cornerWidth: CGFloat, cornerHeight: CGFloat)
path.addEllipse(in: CGRect)
path.addQuadCurve(to: CGPoint, control: CGPoint)
path.addCurve(to: CGPoint, control1: CGPoint, control2: CGPoint)
好,基础知识完了,详细知识以后写文章。回到正题,画寄宿图。
drawRect 方法利用Core Graphics去绘制一个寄宿图,然后内容就会被缓存起来直到它需要被更新(通常是因为开发者调用了 setNeedsDisplay
方法,尽管影响到表现效果的属性值被更改时,一些视图类型会被自动重绘,如
bounds
属性)。虽然 -drawRect:
方法是一个UIView方法,事实上都是底层的CALayer安排了重绘工作和保存了因此产生的图片。
CALayer 有一个可选的delegate 属性 实现 CALayerDelegate,当需要被重绘时,CALayer请求它的代理 给它一个寄宿图来显示。如果实现了协议方法:
func display(_ layer:
CALayer) { }
这个方法里就可以设置 contents 属性了;
如果没实现上面的方法,CALayer就会尝试调用
func draw(_ layer:
CALayer, in ctx:
CGContext) {
//print(1)
//ctx.setLineWidth(10)
//ctx.setStrokeColor(UIColor.red.cgColor)
//ctx.strokeEllipse(in: layer.bounds)
}
如果这个协议方法 还没实现,他就尝试调用自己的
layer’s draw(in:) method to fill that backing store with content.
看不懂没关系,看demo:
class ViewController:
UIViewController,CALayerDelegate {
var myView:UIView!
///myView
的大小
let size:CGFloat =
200
///屏幕的宽度
let width =
UIScreen.main.bounds.width
///屏幕的高度
let height =
UIScreen.main.bounds.height
override
func viewDidLoad() {
super.viewDidLoad()
myView =
UIView(frame:view.bounds)
myView.backgroundColor =
UIColor.lightGray//默认黑
let subLayer =
CALayer()
subLayer.frame =
CGRect(x: size/4, y:size/4,
width:size/2, height:size/2)
subLayer.backgroundColor =
UIColor(red: 0.6, green:0.3, blue:
0.2, alpha:1).cgColor
subLayer.contentsScale =
UIScreen.main.scale
subLayer.delegate =
self
myView.layer.addSublayer(subLayer)
view.addSubview(myView)
//(这里为了演示而调用,实际中是在需要重绘的时候自己调用)
subLayer.display()
//这个方法会调用代理的display方法
}
//下面的方法没实现
//func display(_ layer: CALayer) {}
//实现了这个
func draw(_ layer:
CALayer, in ctx:
CGContext) {
ctx.setLineWidth(10)
ctx.setStrokeColor(UIColor.red.cgColor)
ctx.strokeEllipse(in: layer.bounds)
}
}
自己运行看看。发现,尽管我们没有用
masksToBounds
属性,绘制的那个圆仍然沿边界被裁剪了。这是因为当你使用CALayerDelegate绘制寄宿图的时候,并没有对超出边界外的内容提供绘制支持
实际上,根本没必要用 这个协议画图,也没有必要学这节。。。。有 drawRect方法干啥用这个麻烦的==
通常做法就是实现 drawRect 方法,UIView会帮你做完剩下的工作,包括在需要重绘的时候调用 display 方法。
总结:本篇文章 后半部分不用看。会用CoreGraphics就行。
下一篇:图层几何学 之 布局与锚点 和相关应用
除了给 contents 赋 CGImage 值,还可以用 CoreGraphics 直接绘制寄宿图。
CoreGraphics : 是一套基于C的框架,用于一切绘图操作, UIKit 库中所有 UI 组件都是由 CoreGraphics 绘制实现的!因此它可以实现比UIKit更底层的功能。实际上,绘图就是使用图形上下文和路径
要想绘图,需要先自定义类 继承 UIView 并且重写 drawRect方法。
drawRect 方法是干什么的?
func draw(_ rect: CGRect)
看看文档:
//The default implementation of this method does nothing.This method is called when a view is first displayed or when an event occurs that invalidates a visible part of the view.You should never call this method directly
yourself.
//You do not need to override this method in subclasses if your view can set its content in other ways. e.g. just displays a background color or sets its content directly using the
underlying layer object.
//If you subclass UIView directly, your implementation of this method does not need to call super. However, if you are subclassing a different view class(e.g. UIImageView), you should call super at some point in your
implementation
//废话一:By the time this method is called, UIKit has configured the drawing environment appropriately for your view and you can
simply call whatever drawing methods and functions you need to render your content.
//废话二:Specifically, UIKit creates and configures a graphics context for drawing and adjusts
the transform of that context so that its origin matches the origin of your view’s bounds rectangle.
//You can get a reference to the graphics context using the UIGraphicsGetCurrentContext() function, but do not establish a strong reference to the graphics context because it can
change between calls to the draw(_:) method.
//In addition, if the isOpaque property of your view is set to true, your draw(_:) method must totally fill the specified rectangle with opaque contents
//To invalidate part of your view, and thus cause that portion to be redrawn, call the setNeedsDisplay() or setNeedsDisplay(_:) method instead.
//You should limit any drawing to the rectangle specified in the rect parameter. rect: The portion of the view’s bounds that needs to be updated. The first time your view
is drawn, this rectangle is typically the entire visible bounds of your view. However, during subsequent drawing operations, the rectangle may specify only part of your view.
我翻译几个重点
方法默认是空的,当视图在屏幕上出现的时候或*****的时候, 方法就会被自动调用。不要自行调用该方法!(附:对UIView来说,寄宿图并不是必须的,它不在意那到底是单调的颜色还是有一个图片的实例。如果UIView检测到
drawRect 方法被调用了,它就会为视图分配一个寄宿图,这个寄宿图的像素尺寸等于视图大小乘以
contentsScale
的值)
如果你不需要自定义绘制,那就不要重写它(这会造成CPU资源和内存的浪费),所以苹果建议 如果没有自定义绘制的任务就用图层或视图的属性搞定。
如果你继承自UIView,重写方法时 可以不写 super.draw(rect)
,但是如果继承自别的UIView的子类,还是写上吧
使用 UIGraphicsGetCurrentContext() 获取图形上下文。不要用强引用,因为这CGContext可能会变 ,在不同的对draw的调用中(说是这样说,但是很少这样用)。
其他废话有兴趣的研究研究。我不翻了,翻错了可不好
demo ( 学过 java 用过 Graphics g 画笔吗 大同小异):
import UIKit
class CustomView:UIView{
override
func draw(_ rect:
CGRect) {
//get 画笔
weak
var cgContext =
UIGraphicsGetCurrentContext()
//矩形
变
路径
let drawRect:CGRect =
frame.insetBy(dx:
50, dy: 50)
let path =
CGMutablePath()
path.move(to:
CGPoint(x: drawRect.minX, y: drawRect.minY))
path.addLine(to:
CGPoint(x: drawRect.maxX, y: drawRect.minY))
path.addLine(to:
CGPoint(x: drawRect.maxX, y: drawRect.maxY))
path.addLine(to:
CGPoint(x: drawRect.minX, y: drawRect.maxY))
//脑中想着画笔的移动,move到一个点,加一条线到一个点·····
//改画笔的参数
cgContext?.setLineWidth(10)
cgContext?.setStrokeColor(UIColor.red.cgColor)
//画
cgContext?.addPath(path)
cgContext?.strokePath()
//再画一个
// stroke:he finished the portrait with no more than a few strokes
cgContext?.setStrokeColor(UIColor.green.cgColor)
cgContext?.stroke(drawRect.insetBy(dx:
90, dy: 90))
}
}
class ViewController:
UIViewController{
var myView:CustomView!
override
func viewDidLoad() {
super.viewDidLoad()
myView =
CustomView(frame:view.bounds)
myView.backgroundColor = UIColor.white//默认黑
view.addSubview(myView)
}
}
效果:
还有几个参数,
cgContext?.setLineCap(.round) //顶点样式
cgContext?.setLineJoin(.round) //连接点
cgContext?.setShadow(offset:
CGSize(width:3,height:3), blur:
0.5, color:
UIColor.gray.cgColor) //阴影
cgContext?.setLineDash(phase:
0, lengths: [20,8])
//画虚线,第一个参数写0,第二个数组是 实虚长度比例
2、画圆:
override
func draw(_ rect:
CGRect) {
weak
var cgContext =
UIGraphicsGetCurrentContext()
let drawRect:CGRect =
frame.insetBy(dx:
50, dy: 50)
let path =
CGMutablePath()
//绘制圆弧必须确定:圆心的坐标、半径、圆弧的起点角度和终点角度(弧度表示),常量 CGFloat.pi
是 π,即180。
let radius = drawRect.width/2
//半径
let center =
CGPoint(x: drawRect.midX, y: drawRect.midX)//圆心
path.addArc(center: center, radius: radius, startAngle:
0, endAngle: CGFloat.pi*1.5,
clockwise: true)
//clockwise如果是true,画的是互补的那部分圆
cgContext?.setLineWidth(6)
cgContext?.setStrokeColor(UIColor.red.cgColor)
cgContext?.addPath(path)
cgContext?.strokePath()
}
绘制其他图形:只写几个方法
cgContext?.setFillColor(UIColor.red.cgColor)
cgContext?.drawPath(using: .fillStroke)
path.addRoundedRect(in: CGRect, cornerWidth: CGFloat, cornerHeight: CGFloat)
path.addEllipse(in: CGRect)
path.addQuadCurve(to: CGPoint, control: CGPoint)
path.addCurve(to: CGPoint, control1: CGPoint, control2: CGPoint)
好,基础知识完了,详细知识以后写文章。回到正题,画寄宿图。
drawRect 方法利用Core Graphics去绘制一个寄宿图,然后内容就会被缓存起来直到它需要被更新(通常是因为开发者调用了 setNeedsDisplay
方法,尽管影响到表现效果的属性值被更改时,一些视图类型会被自动重绘,如
bounds
属性)。虽然 -drawRect:
方法是一个UIView方法,事实上都是底层的CALayer安排了重绘工作和保存了因此产生的图片。
CALayer 有一个可选的delegate 属性 实现 CALayerDelegate,当需要被重绘时,CALayer请求它的代理 给它一个寄宿图来显示。如果实现了协议方法:
func display(_ layer:
CALayer) { }
这个方法里就可以设置 contents 属性了;
如果没实现上面的方法,CALayer就会尝试调用
func draw(_ layer:
CALayer, in ctx:
CGContext) {
//print(1)
//ctx.setLineWidth(10)
//ctx.setStrokeColor(UIColor.red.cgColor)
//ctx.strokeEllipse(in: layer.bounds)
}
如果这个协议方法 还没实现,他就尝试调用自己的
layer’s draw(in:) method to fill that backing store with content.
看不懂没关系,看demo:
class ViewController:
UIViewController,CALayerDelegate {
var myView:UIView!
///myView
的大小
let size:CGFloat =
200
///屏幕的宽度
let width =
UIScreen.main.bounds.width
///屏幕的高度
let height =
UIScreen.main.bounds.height
override
func viewDidLoad() {
super.viewDidLoad()
myView =
UIView(frame:view.bounds)
myView.backgroundColor =
UIColor.lightGray//默认黑
let subLayer =
CALayer()
subLayer.frame =
CGRect(x: size/4, y:size/4,
width:size/2, height:size/2)
subLayer.backgroundColor =
UIColor(red: 0.6, green:0.3, blue:
0.2, alpha:1).cgColor
subLayer.contentsScale =
UIScreen.main.scale
subLayer.delegate =
self
myView.layer.addSublayer(subLayer)
view.addSubview(myView)
//(这里为了演示而调用,实际中是在需要重绘的时候自己调用)
subLayer.display()
//这个方法会调用代理的display方法
}
//下面的方法没实现
//func display(_ layer: CALayer) {}
//实现了这个
func draw(_ layer:
CALayer, in ctx:
CGContext) {
ctx.setLineWidth(10)
ctx.setStrokeColor(UIColor.red.cgColor)
ctx.strokeEllipse(in: layer.bounds)
}
}
自己运行看看。发现,尽管我们没有用
masksToBounds
属性,绘制的那个圆仍然沿边界被裁剪了。这是因为当你使用CALayerDelegate绘制寄宿图的时候,并没有对超出边界外的内容提供绘制支持
实际上,根本没必要用 这个协议画图,也没有必要学这节。。。。有 drawRect方法干啥用这个麻烦的==
通常做法就是实现 drawRect 方法,UIView会帮你做完剩下的工作,包括在需要重绘的时候调用 display 方法。
总结:本篇文章 后半部分不用看。会用CoreGraphics就行。
下一篇:图层几何学 之 布局与锚点 和相关应用

相关文章推荐
- iOS学习6:CoreGraphics简单绘图
- iOS学习——CoreGraphics简单绘图
- iOS绘图系统(一) UIKit与CoreGraphics
- iOS底层绘图机制,CoreGraphics框架,和Context使用详解
- iOS绘图教程--Quartz 2D(CoreGraphics.framework) 详解
- iOS底层绘图机制,CoreGraphics框架,和Context使用详解
- iOS绘图—— UIBezierPath 和 Core Graphics
- iOS绘图—— UIBezierPath 和 Core Graphics
- iOS底层绘图机制,CoreGraphics框架,和Context使用详解
- iOS-Core-Animation之十三----高效绘图
- IOS开发:CoreGraphics简单绘图
- iOS绘图系统UIKit与Core Graphics
- iOS底层绘图机制,CoreGraphics框架,和Context使用详解
- iOS学习6:CoreGraphics简单绘图
- iOS Core Animation Advanced Techniques(七):高效绘图、图像IO以及图层性能
- iOS中核心绘图Core Graphics的小试
- iOS开发--CoreGraphics简单绘图
- iOS底层绘图机制,CoreGraphics框架,和Context使用详解
- iOS中 CoreGraphics快速绘图(详解) 韩俊强的博客
- iOS绘图UIBezierPath 和 Core Graphics框架