深度学习笔记——TensorFlow学习笔记(三)使用TensorFlow实现的神经网络进行MNIST手写体数字识别
2017-06-04 00:20
1006 查看
本文是TensorFlow学习的第三部分,参考的是《TensorFlow实战Google深度学习框架》一书,这部分讲述的是使用TensorFlow实现的神经网络进行MNIST手写体数字识别一个实例。
这个实例将第二部分讲述的激活函数、损失函数、优化算法、正则化等都运用上了。同时,使用TensorFlow中利用变量名称来创建/获取变量的机制将前向传播的过程抽象出来,使得训练和测试时不需要关心神经网络的结构或是参数;还使用了TensorFlow保存模型的方法将模型持久化(保存),以及加载模型进行预测。
总结来说,将神经网络的训练、测试和使用拆分成了不同的程序,并且将神经网络的前向传播过程抽象成了一个独立的库函数,通过这种方式可以将训练过程和测试。使用过程解耦合,从而使得整个过程更加灵活。
具体代码如下:
神经网络前向传播过程代码(mnist_inference.py):
训练过程的代码(minist_train.py):
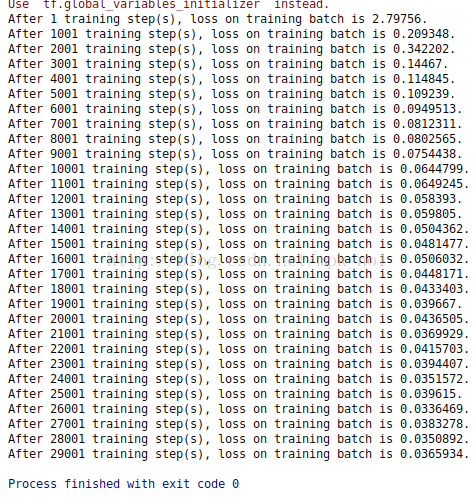
训练结果如下图所示:
测试过程(mnist_eval.py):
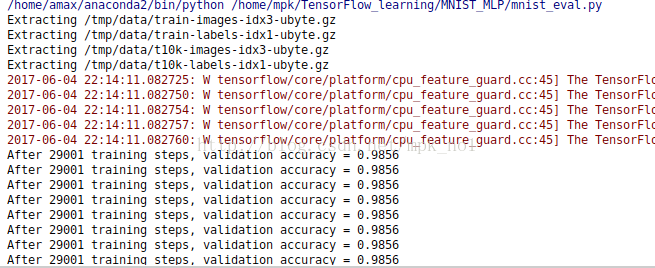
测试结果如下图:
代码也可以在我的GitHub获取:点击打开链接
这个实例将第二部分讲述的激活函数、损失函数、优化算法、正则化等都运用上了。同时,使用TensorFlow中利用变量名称来创建/获取变量的机制将前向传播的过程抽象出来,使得训练和测试时不需要关心神经网络的结构或是参数;还使用了TensorFlow保存模型的方法将模型持久化(保存),以及加载模型进行预测。
总结来说,将神经网络的训练、测试和使用拆分成了不同的程序,并且将神经网络的前向传播过程抽象成了一个独立的库函数,通过这种方式可以将训练过程和测试。使用过程解耦合,从而使得整个过程更加灵活。
具体代码如下:
神经网络前向传播过程代码(mnist_inference.py):
#coding: utf-8
import tensorflow as tf

#define the variables of nerual network
INPUT_NODE = 784
OUTPUT_NODE = 10
LAYER1_NODE = 500
#通过tf.get_variable函数来获取变量,在训练时会创建这些变量,在测试时会通过保存的模型加载这些变量的取值。因为可以在变量加载时将滑动平均变量重命名,所以可以直接通过同样的名字在训练时使用变量自身,而在测试时使用变量的滑动平均值。这个函数也会将变量的正则化损失加入损失集合。
def get_weight_variable(shape, regularizer):
weights = tf.get_variable("weights", shape, initializer=tf.truncated_normal_initializer(stddev=0.1))

if regularizer != None:
tf.add_to_collection('losses', regularizer(weights))

return weights

#define the forward network
def inference(input_tensor, regularizer):
with tf.variable_scope('layer1'):#声明第一层神经网络的变量并完成前向传播过程
weights = get_weight_variable([INPUT_NODE, LAYER1_NODE], regularizer)
biases = tf.get_variable("biases", [LAYER1_NODE], initializer=tf.constant_initializer(0.0))
layer1 = tf.nn.relu(tf.matmul(input_tensor, weights) + biases)

with tf.variable_scope('layer2'):#声明第二层神经网络的变量并完成前向传播过程
weights = get_weight_variable([LAYER1_NODE, OUTPUT_NODE], regularizer)
biases = tf.get_variable("biases", [OUTPUT_NODE], initializer=tf.constant_initializer(0.0))
layer2 = tf.matmul(layer1, weights) + biases

return layer2
训练过程的代码(minist_train.py):
#coding: utf-8
import os

import tensorflow as tf
from tensorflow.examples.tutorials.mnist import input_data

import mnist_inference

BATCH_SIZE = 100
LEARNING_RATE_BASE = 0.8
LEARNING_RATE_DECAY = 0.99
REGULARAZTION_RATE = 0.0001
TRAINING_STEPS = 30000
MOVING_AVERAGE_DECAY = 0.99
MODEL_SAVE_PATH = "/home/mpk/TensorFlow_learning/MNIST_MLP/model/"#模型保存的路径
MODEL_NAME = "model.ckpt"

def train(mnist):
x = tf.placeholder(tf.float32, [None, mnist_inference.INPUT_NODE], name='x-input')
y_ = tf.placeholder(tf.float32, [None, mnist_inference.OUTPUT_NODE], name='y-input')

regularizer = tf.contrib.layers.l2_regularizer(REGULARAZTION_RATE)
#直接使用mnist_inference.py中定义的前向传播过程
y = mnist_inference.inference(x, regularizer)
global_step = tf.Variable(0, trainable=False)
#定义损失函数、指数衰减学习率、滑动平均操作以及训练过程
variable_averages = tf.train.ExponentialMovingAverage(MOVING_AVERAGE_DECAY, global_step)
variable_averages_op = variable_averages.apply(tf.trainable_variables())
cross_entropy = tf.nn.sparse_softmax_cross_entropy_with_logits(logits=y, labels=tf.argmax(y_, 1))
cross_entropy_mean = tf.reduce_mean(cross_entropy)
loss = cross_entropy_mean + tf.add_n(tf.get_collection('losses'))
learning_rate = tf.train.exponential_decay(LEARNING_RATE_BASE, global_step, mnist.train.num_examples / BATCH_SIZE, LEARNING_RATE_DECAY)
train_step = tf.train.GradientDescentOptimizer(learning_rate).minimize(loss, global_step=global_step)

with tf.control_dependencies([train_step, variable_averages_op]):
train_op = tf.no_op(name='train')
#初始化TensorFlow持久化类
saver = tf.train.Saver()
with tf.Session() as sess:
tf.initialize_all_variables().run()
#训练过程
for i in range(TRAINING_STEPS):
xs, ys = mnist.train.next_batch(BATCH_SIZE)
_, loss_value, step = sess.run([train_op, loss, global_step], feed_dict={x: xs, y_: ys})
#每1000轮保存一次模型
if i % 1000 == 0:
print("After %d training step(s), loss on training batch is %g." % (step, loss_value))
print os.path.join(MODEL_SAVE_PATH, MODEL_NAME)
saver.save(sess, os.path.join(MODEL_SAVE_PATH, MODEL_NAME), global_step=global_step)

def main(argv=None):
mnist = input_data.read_data_sets("/tmp/data", one_hot=True)
train(mnist)

if __name__ == '__main__':
tf.app.run()
训练结果如下图所示:
测试过程(mnist_eval.py):
#coding: utf-8
import time
import tensorflow as tf
from tensorflow.examples.tutorials.mnist import input_data

import mnist_inference
import minist_train

#every 10 sec load the newest model
EVAL_INTERVAL_SECS = 10

def evaluate(mnist):
with tf.Graph().as_default() as g:
x = tf.placeholder(tf.float32, [None, mnist_inference.INPUT_NODE], name='x-input')
y_ = tf.placeholder(tf.float32, [None, mnist_inference.OUTPUT_NODE], name='y-input')
validate_feed = {x: mnist.validation.images, y_: mnist.validation.labels}
#直接调用封装好的函数来计算前向传播的结果
y = mnist_inference.inference(x, None)
#计算正确率
correcgt_prediction = tf.equal(tf.argmax(y, 1), tf.argmax(y_, 1))
accuracy = tf.reduce_mean(tf.cast(correcgt_prediction, tf.float32))
#通过变量重命名的方式加载模型
variable_averages = tf.train.ExponentialMovingAverage(minist_train.MOVING_AVERAGE_DECAY)
variable_to_restore = variable_averages.variables_to_restore()
saver = tf.train.Saver(variable_to_restore)
#每隔10秒调用一次计算正确率的过程以检测训练过程中正确率的变化
while True:
with tf.Session() as sess:
ckpt = tf.train.get_checkpoint_state(minist_train.MODEL_SAVE_PATH)
if ckpt and ckpt.model_checkpoint_path:
#load the model
saver.restore(sess, ckpt.model_checkpoint_path)
global_step = ckpt.model_checkpoint_path.split('/')[-1].split('-')[-1]
accuracy_score = sess.run(accuracy, feed_dict=validate_feed)
print("After %s training steps, validation accuracy = %g" % (global_step, accuracy_score))

else:
print('No checkpoint file found')
return
time.sleep(EVAL_INTERVAL_SECS)

def main(argv=None):
mnist = input_data.read_data_sets("/tmp/data", one_hot=True)
evaluate(mnist)

if __name__ == '__main__':
tf.app.run()
测试结果如下图:
代码也可以在我的GitHub获取:点击打开链接

相关文章推荐
- 利用tensorflow一步一步实现基于MNIST 数据集进行手写数字识别的神经网络,逻辑回归
- 深度学习-传统神经网络使用TensorFlow框架实现MNIST手写数字识别
- tensorflow 学习专栏(五):在mnist数据集上使用tensorflow实现临近算法(Nearest-Neighbor)进行手写数字识别
- tensorflow 全连接神经网络 MNIST手写体数字识别
- 使用Tensorflow实现CNN进行MNIST数字识别
- 使用tensorflow利用神经网络分类识别MNIST手写数字数据集,转自随心1993
- 神经网络与深度学习 使用Python实现基于梯度下降算法的神经网络和自制仿MNIST数据集的手写数字分类可视化程序 web版本
- 神经网络与深度学习 1.6 使用Python实现基于梯度下降算法的神经网络和MNIST数据集的手写数字分类程序
- 经典神经网络进行MNIST手写数字识别系列(一):ALEXNET
- Tensorflow系列三:深度神经网络和MNIST数字识别
- 深度学习-CNN卷积神经网络使用TensorFlow框架实现MNIST手写数字识别
- Tensorflow中使用CNN实现Mnist手写体识别
- tensorflow 学习笔记12 循环神经网络RNN LSTM结构实现MNIST手写识别
- 使用TensorFlow训练神经网络识别MNIST数据代码
- 【神经网络】6:CNN卷积神经网络实现MNIST数字识别
- 《神经网络与深度学习》第一章 使用神经网络来识别手写数字(三)- 用Python代码实现
- 使用逻辑回归和神经网络进行手写数字识别
- 使用tensorflow卷积神经网络实现mnist手写数字识别
- tensorflow 学习笔记7 普通神经网络实现mnist手写识别
- 使用TensorFlow重构神经网络的识别手写数字