Android数据库加解密逆向分析(二)--Line数据库解密
2017-06-03 20:30
197 查看
接着上一篇文章,这篇文章主要通过都对Line这款APP数据库加密方式的逆向分析来看看Android第一种数据库加密方式。
开发环境:
1、测试设备:root手机一部
2、反编译工具:Android Killer或ApkTool
3、静态分析工具:jadx或者jd-gui
4、动态调试工具:Android Studio + smalidea插件
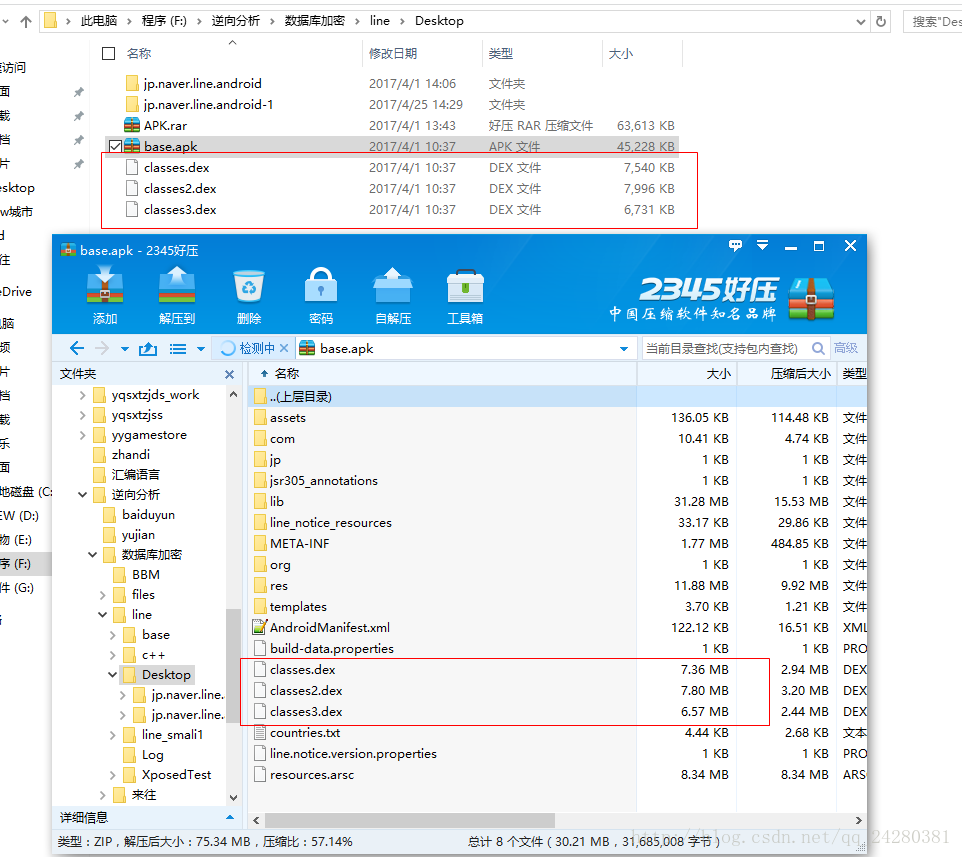
使用解压工具将APK文件打开,然后将Line的三个dex文件解压出来:
2、解压出dex文件后使用jadx对将dex文件打开,得到Line的反编译后的java层代码。
3、使用Android Killer对APK进行反编译,得到samli代码:
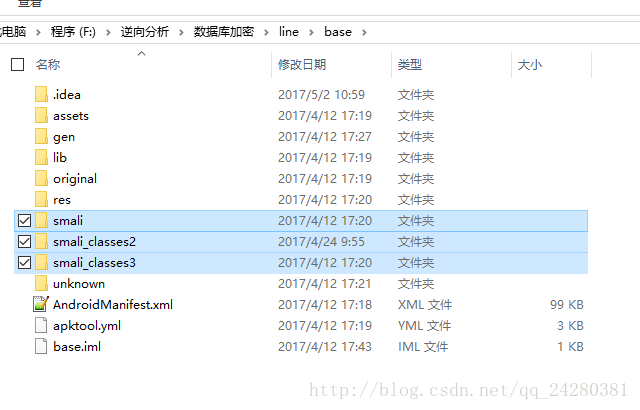
上图为反编译后的目录结构,其中dex文件反编译后的smali代码保存在上面的3个smali文件中。
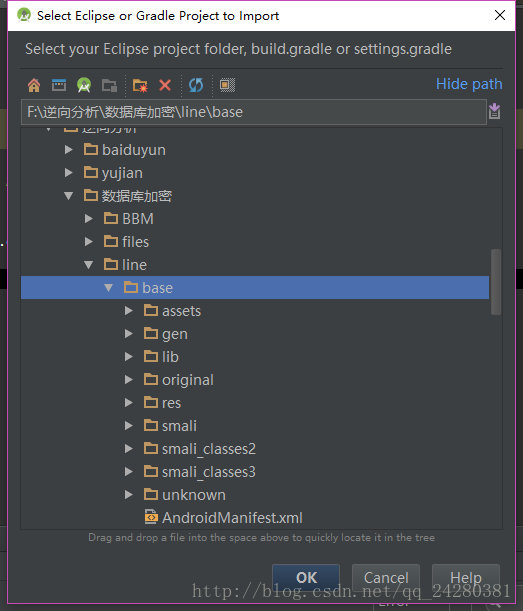
4、使用Android Studio导入反编译后的项目,准备动态调试:
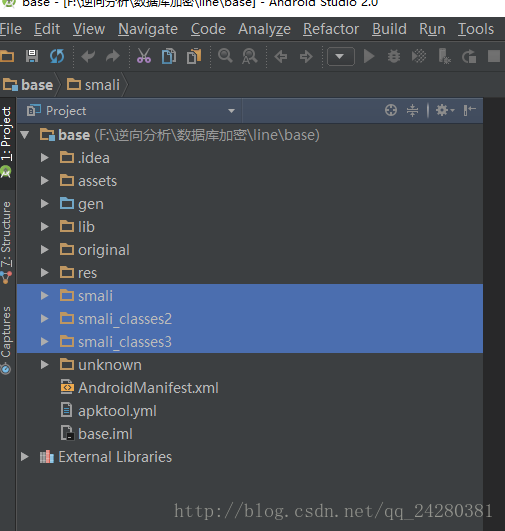
导入成功后Project目录结构如下:
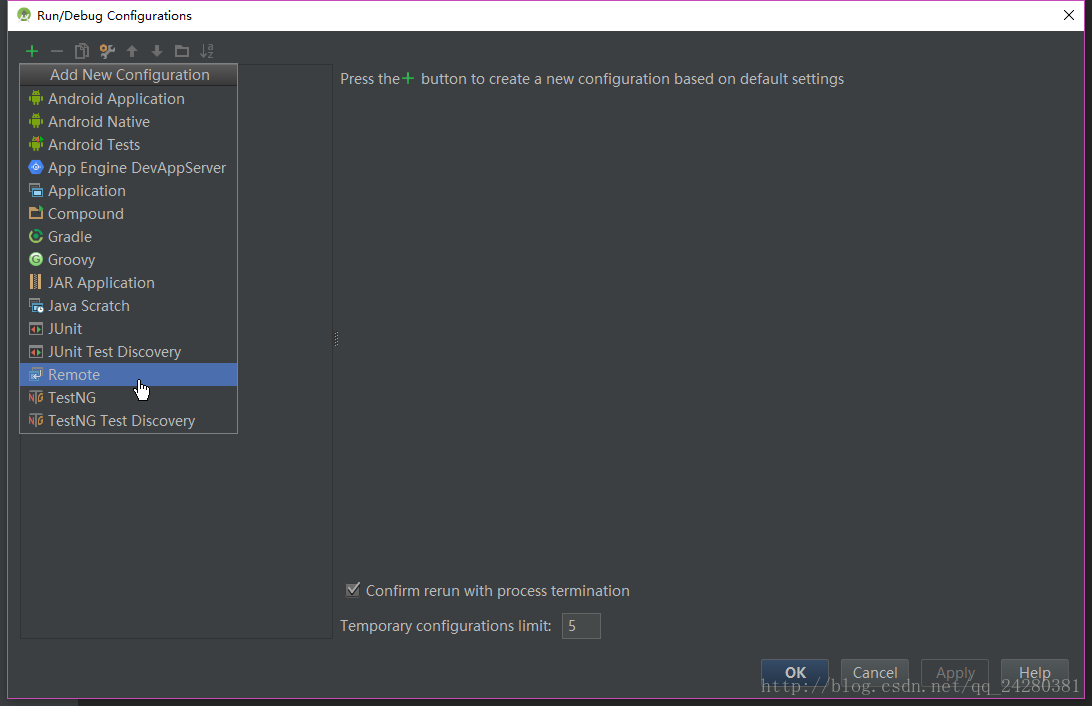
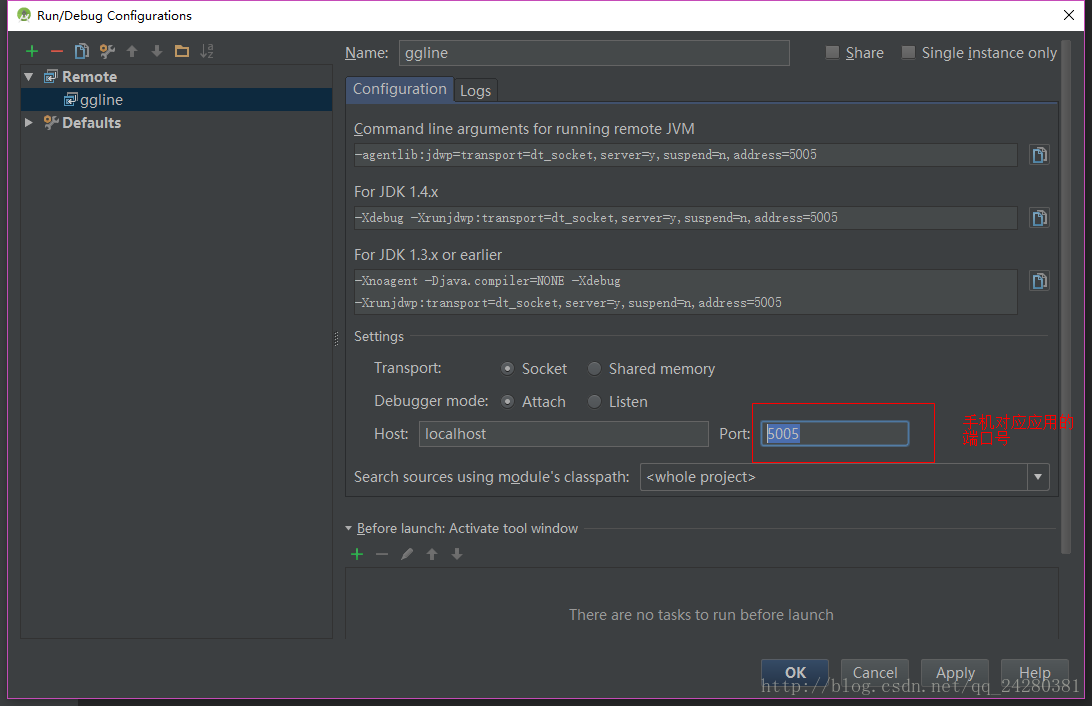
然后在Edit Configurations新建一个远程和手机的应用连接进行动态调试:
在这个APP中由于我们要分析对数据库的数据的加解密,这里首先可以从加解密这个关键点作为入口,全局搜索一些与加解密相关的关键字,然后一步一步的分析。也可以从对数据库的操作作为入口:在对数据写入数据库时必然要对写入的明文先加密,从数据库中读取数据时,必然要对读取的密文进行解密,所以可以全局搜索与数据库插入、更新、读取相关的操作的关键字,然后一步步的分析下去,找到核心的加解密方法。
我们这里使用第二种方法,首先我们先打开APP的设置界面,如下:
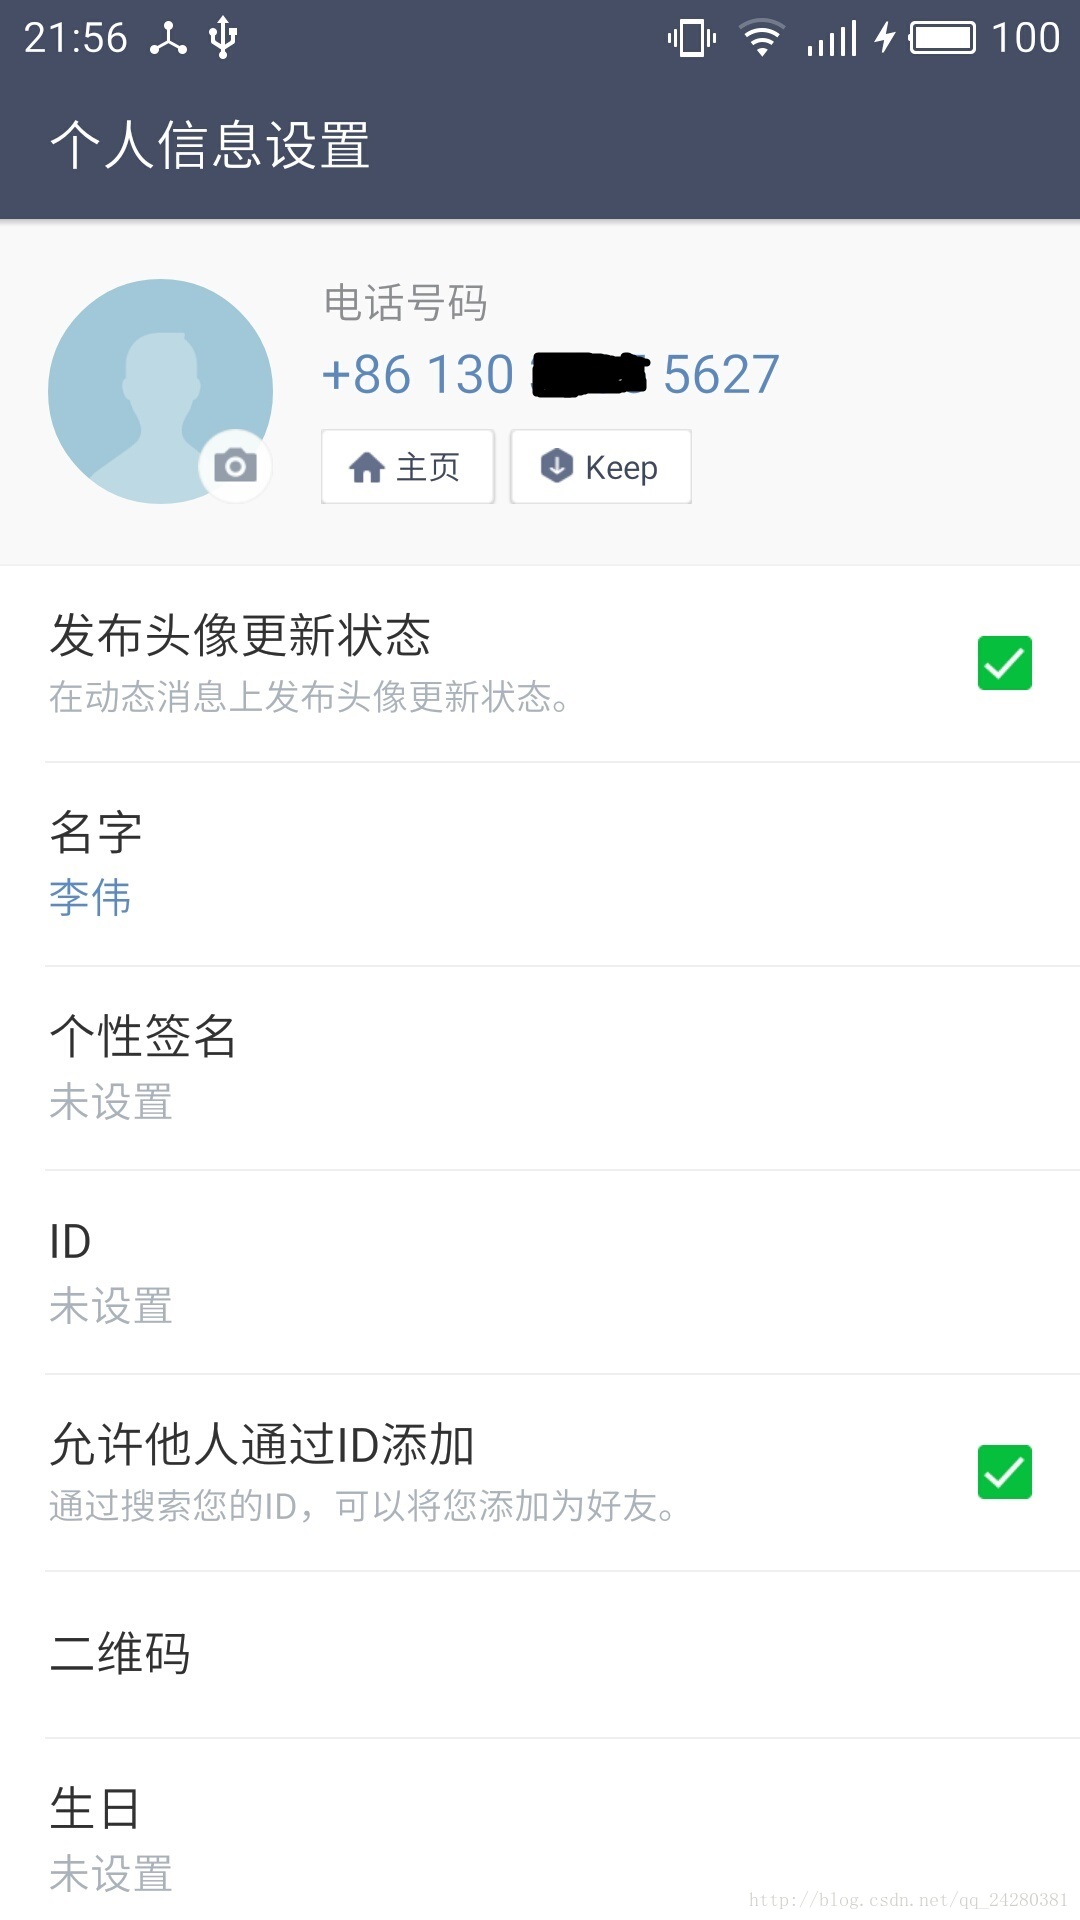
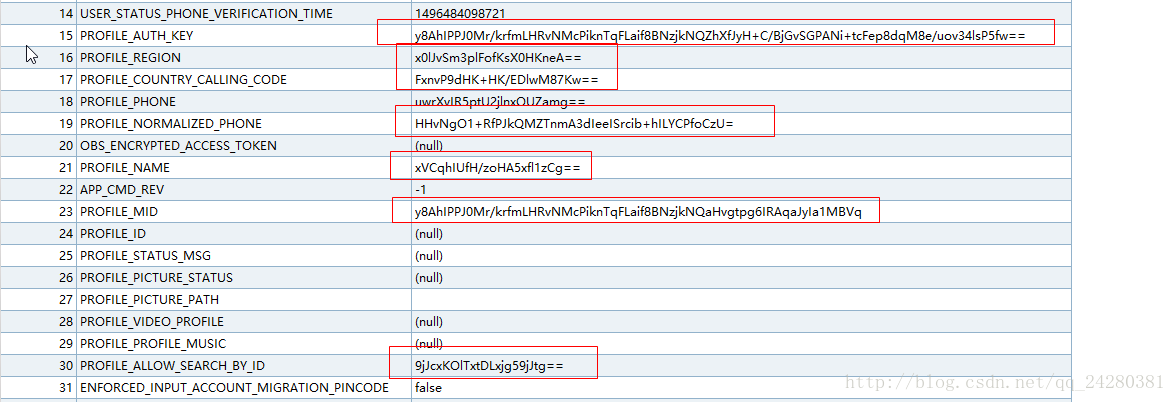
可以看到有一个”允许他人通过ID添加“的选项,可以对应到数据库中的如下
字段,当打钩时,数据库中存储的信息如下:

当去掉钩时,数据库中存储的信息如下:
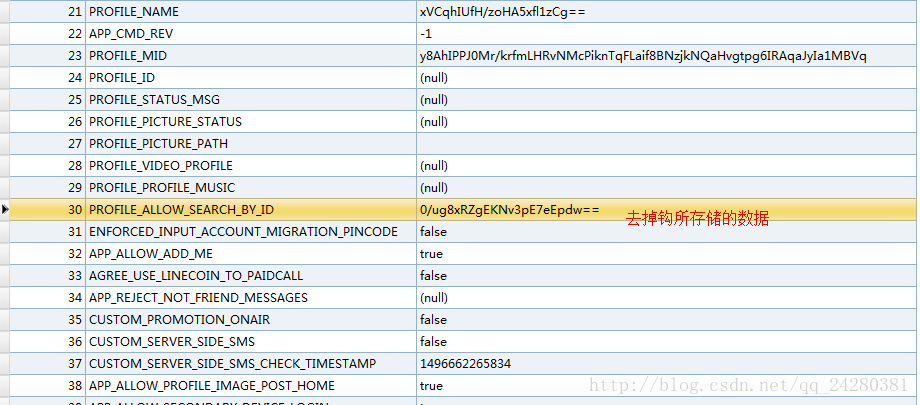
可以看到这里的value值只有两种,也就是说这里的这两个值应该就是true和false经过加密后的值。
所以我们分析这个打钩的过程,应该是打钩后将false改为true,然后对true进行加密写入数据库(更新数据库字段)。使用ddms进行method profiling:
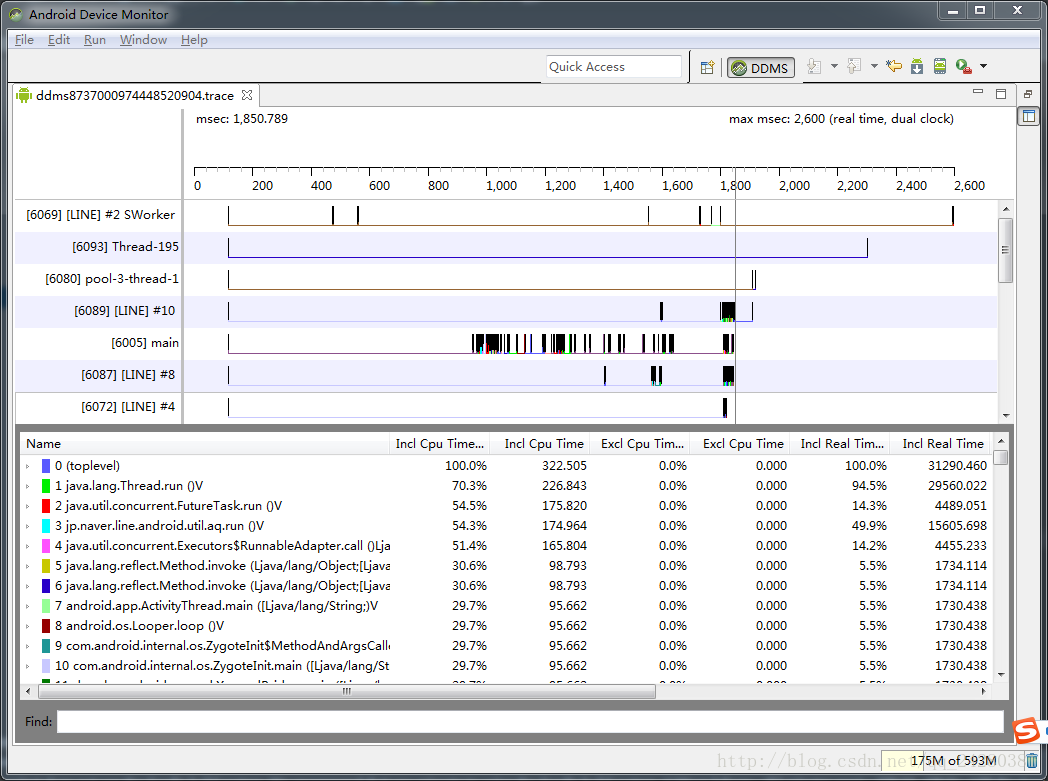
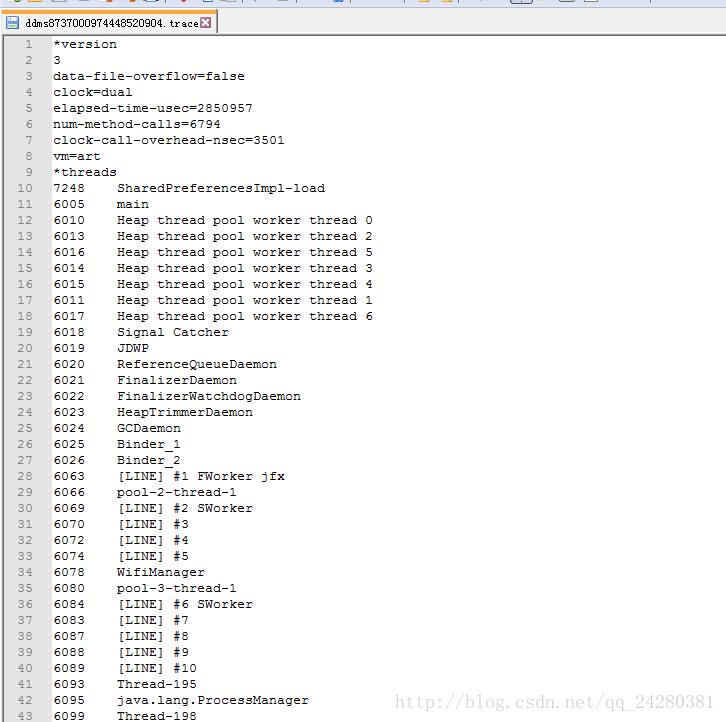
该图为method profiling后的结果,先使用文本编辑器将这个trace文件打开,如下:
搜索文本update,得到如下结果:
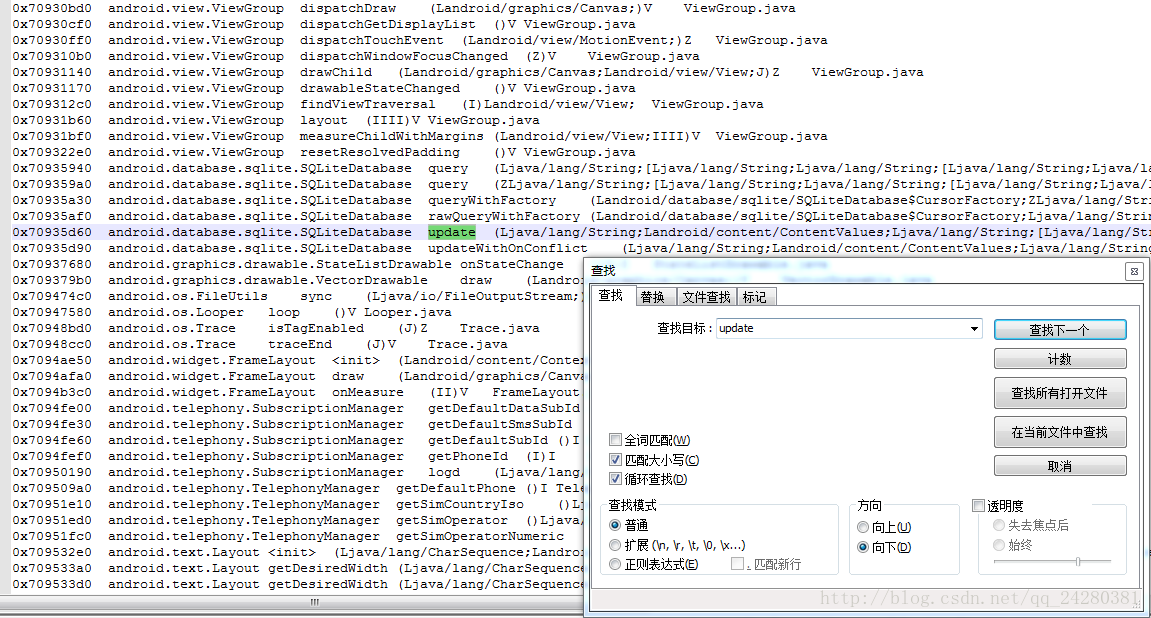
可以看到这里便是对数据库的数据进行更新的方法。
所以在DDMS中查找update方法,结果如下:
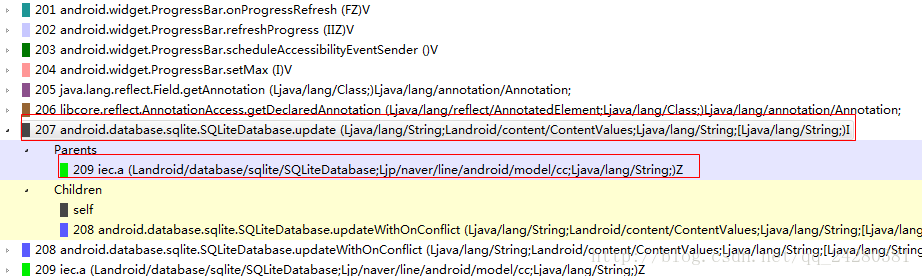
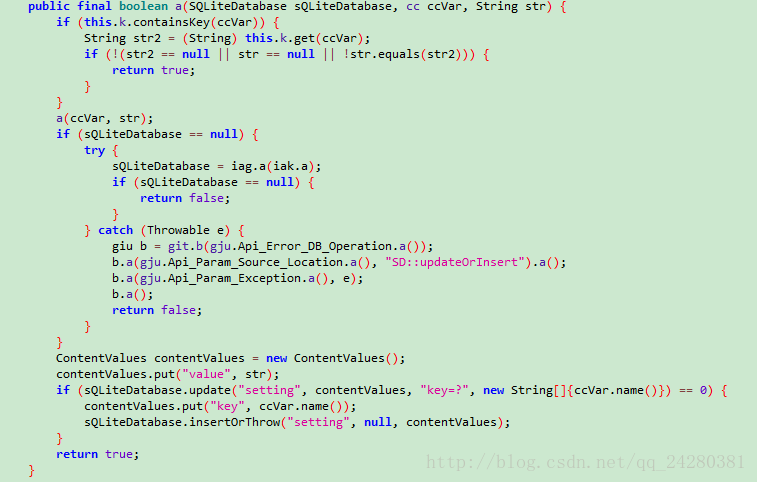
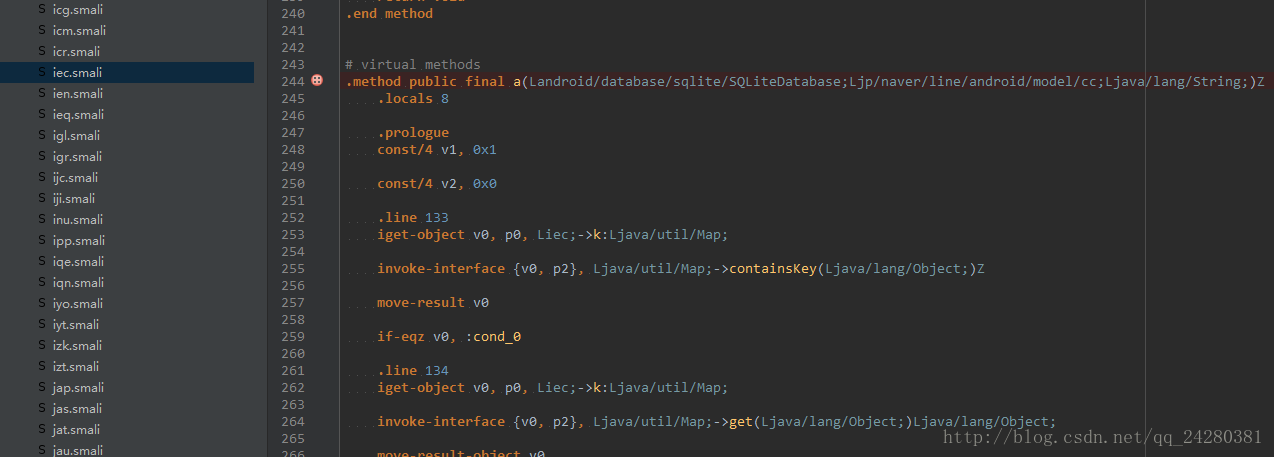
可以看到调用这个update方法的是iec.a方法,在jadx中打开iec类,查看iec.a(SQliteDatabase,cc,String)Z方法:
在该方法前设置断点进行动态调试,如图:
this.k.containsKey(ccVar)的ccVar参数,也就是key值:

可以看到这句话便是得到加密后的value:

得到的str2的值:

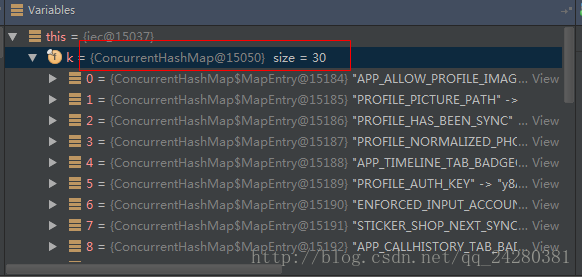
同时this.k便是存储要写入到数据库的数据的key-value键值对:
所以需要进行代码跟踪,查找this.k的key == PROFILE_ALLOW_SEARCH_BY_ID的value值的生成的地方,也就是加密的地方。
经过一步步的跟踪,最终在iqc.a(iqf)这个方法里面找到了value值生成的地方:
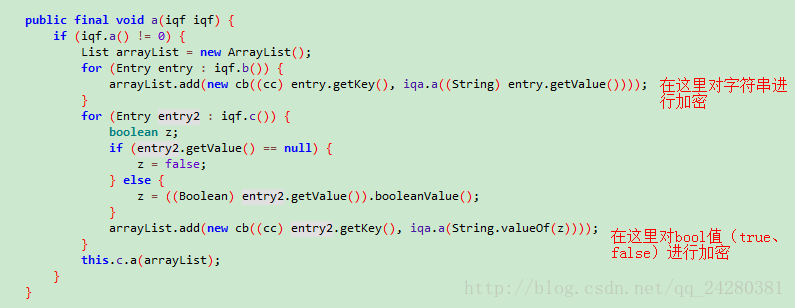
通过iqa.a(String)方法对字符串进行加密:
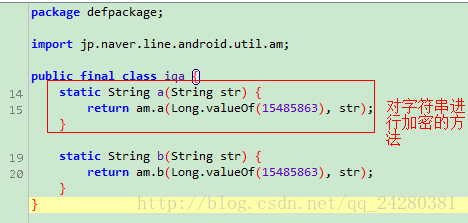
通过iqa.a(String)方法可以看到其调用了am.a(long,String)方法,其中传入了一个long型常量15485863L,可以考虑这个long型常量可能为了生成对称加密的秘钥而传入的。
继续跟踪am.a(long,String)方法,如图:
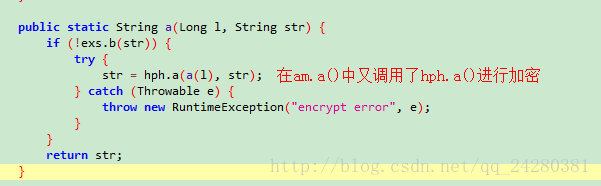
在am.a中调用str = hph.a(a(l),str);
先不看a(l)方法,先看hph.a()方法:
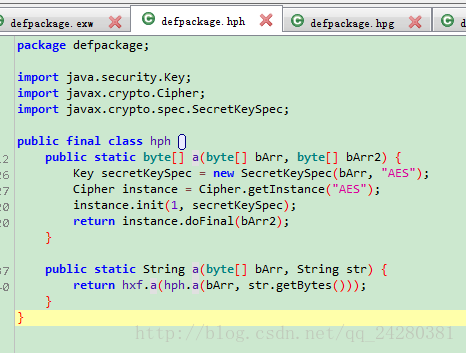
可以很明显的看到hph.a方法使用的是AES对称加密算法对传入的str进行加密,在最后的将加密后的密文作为参数传入hxf.a()方法中,再看hxf.a()方法:
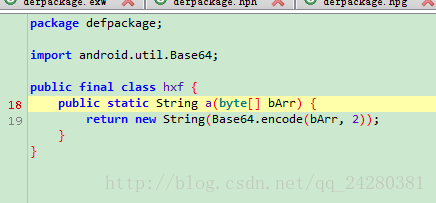
很明显是将最后加密的结果进行了Base64编码,然后返回给程序。
到这里再回到am.a中就可以很明显的知道在调用hph.a(a(l),str)方法时传入的参数a(l)就是AES加密算法的密码,通过这个密码,在hph.a方法中生成AES加密的秘钥。
来看AES加密算法的密码是如何生成的,进入am.a(long)方法:
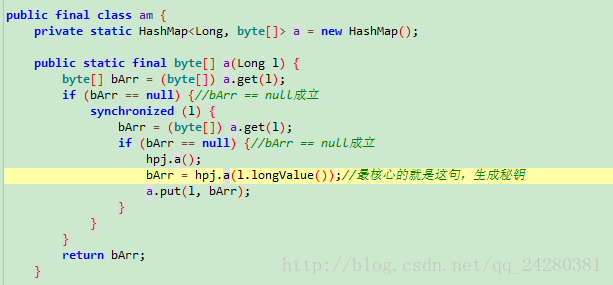
如图,在hpj.a(long)中生成秘钥,进入hpj.a(long)方法:
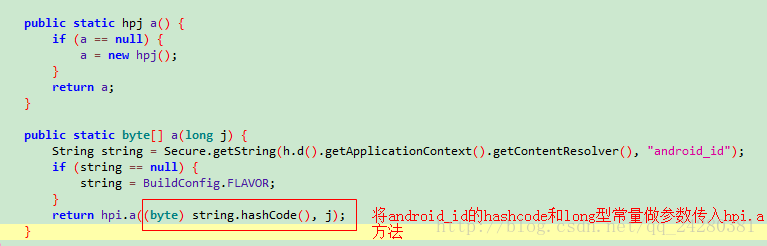
再进入hpi.a(byte,long)方法中:
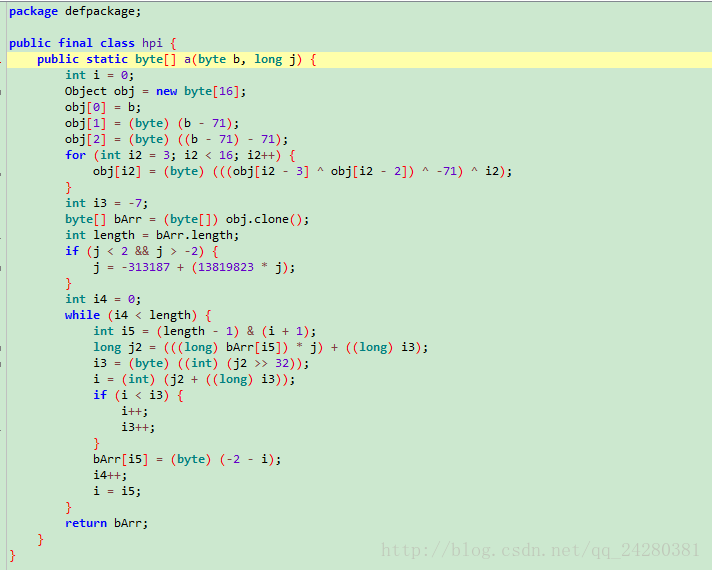
可以看到这里讲android_id的hashcode的byte值与常量long值进行一些底层运算,进而得到秘钥值。
首先在Android Studio中新建一个Project:LineDecrypt

然后新建一个AESDecrypt类用于对密文进行解密:
解密工具类编写完毕后,设置布局文件:
效果如下:

然后编写MainActivity类:
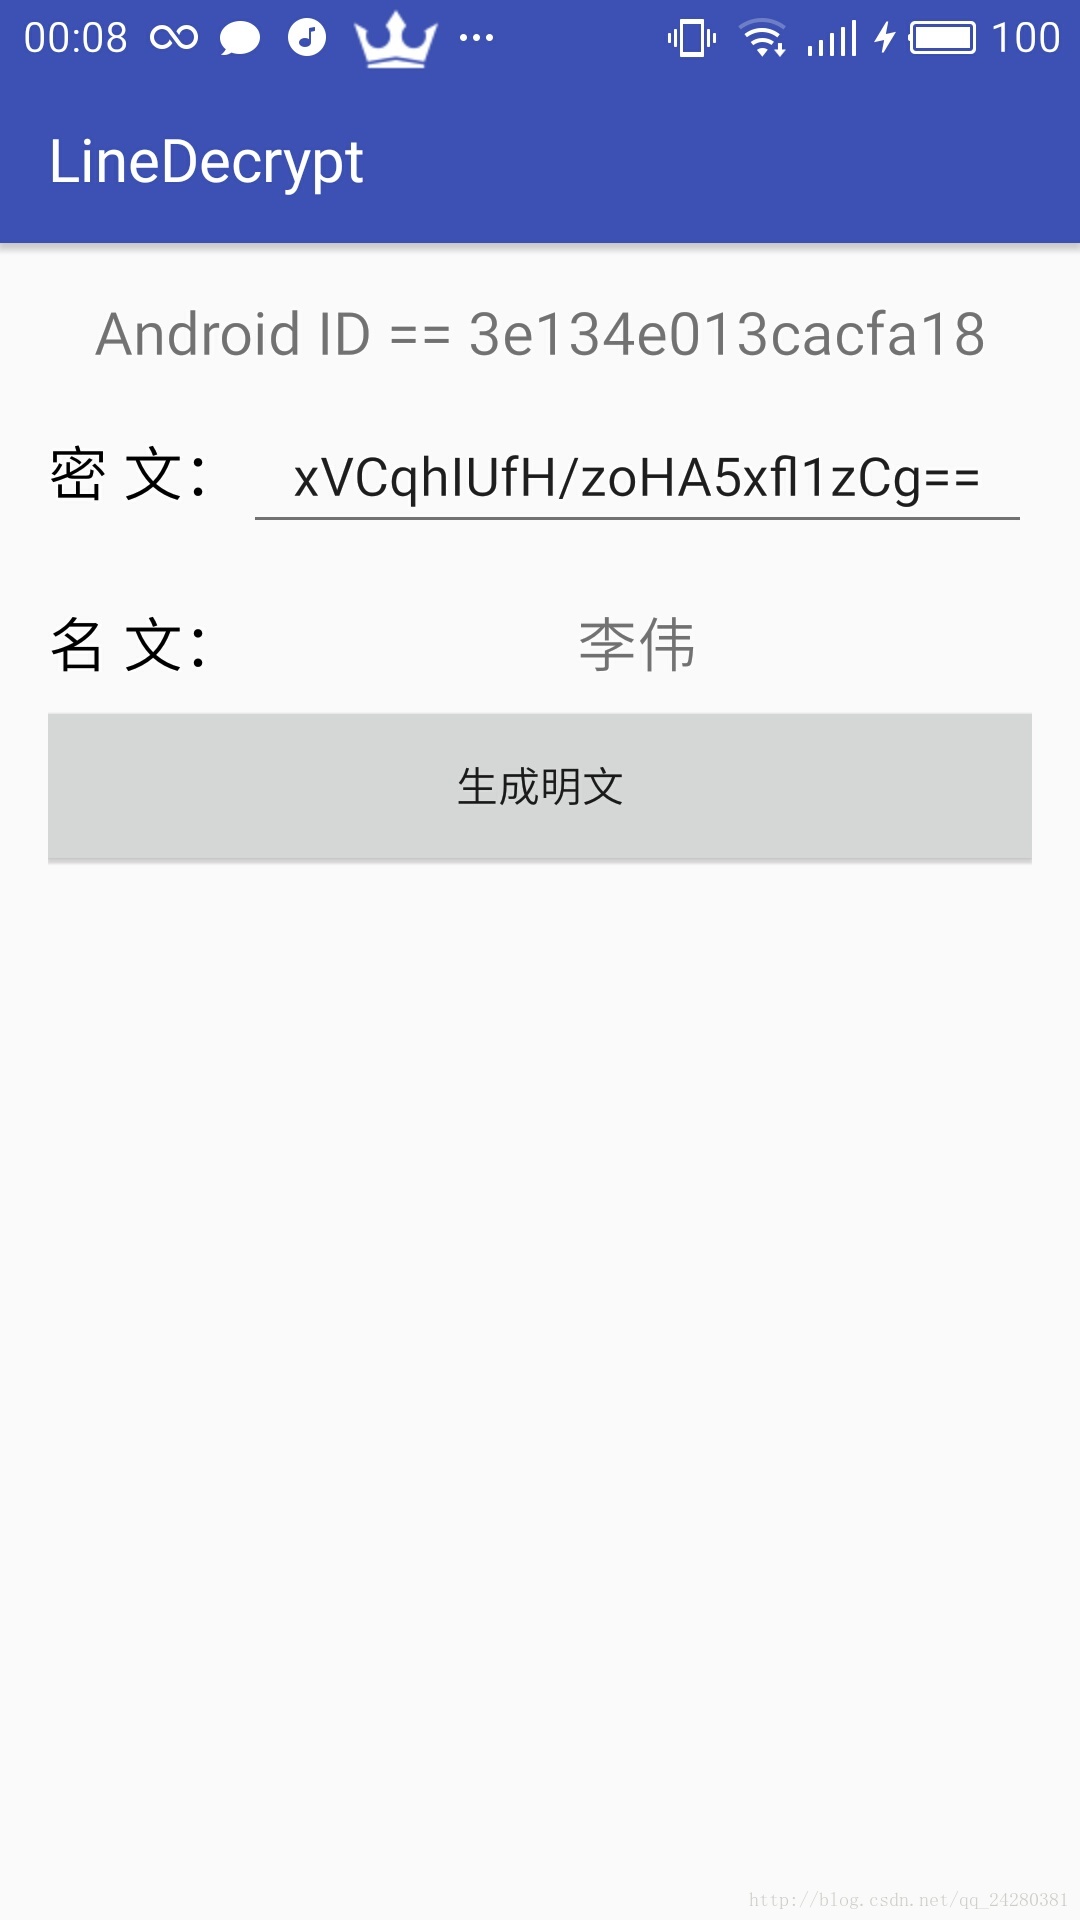
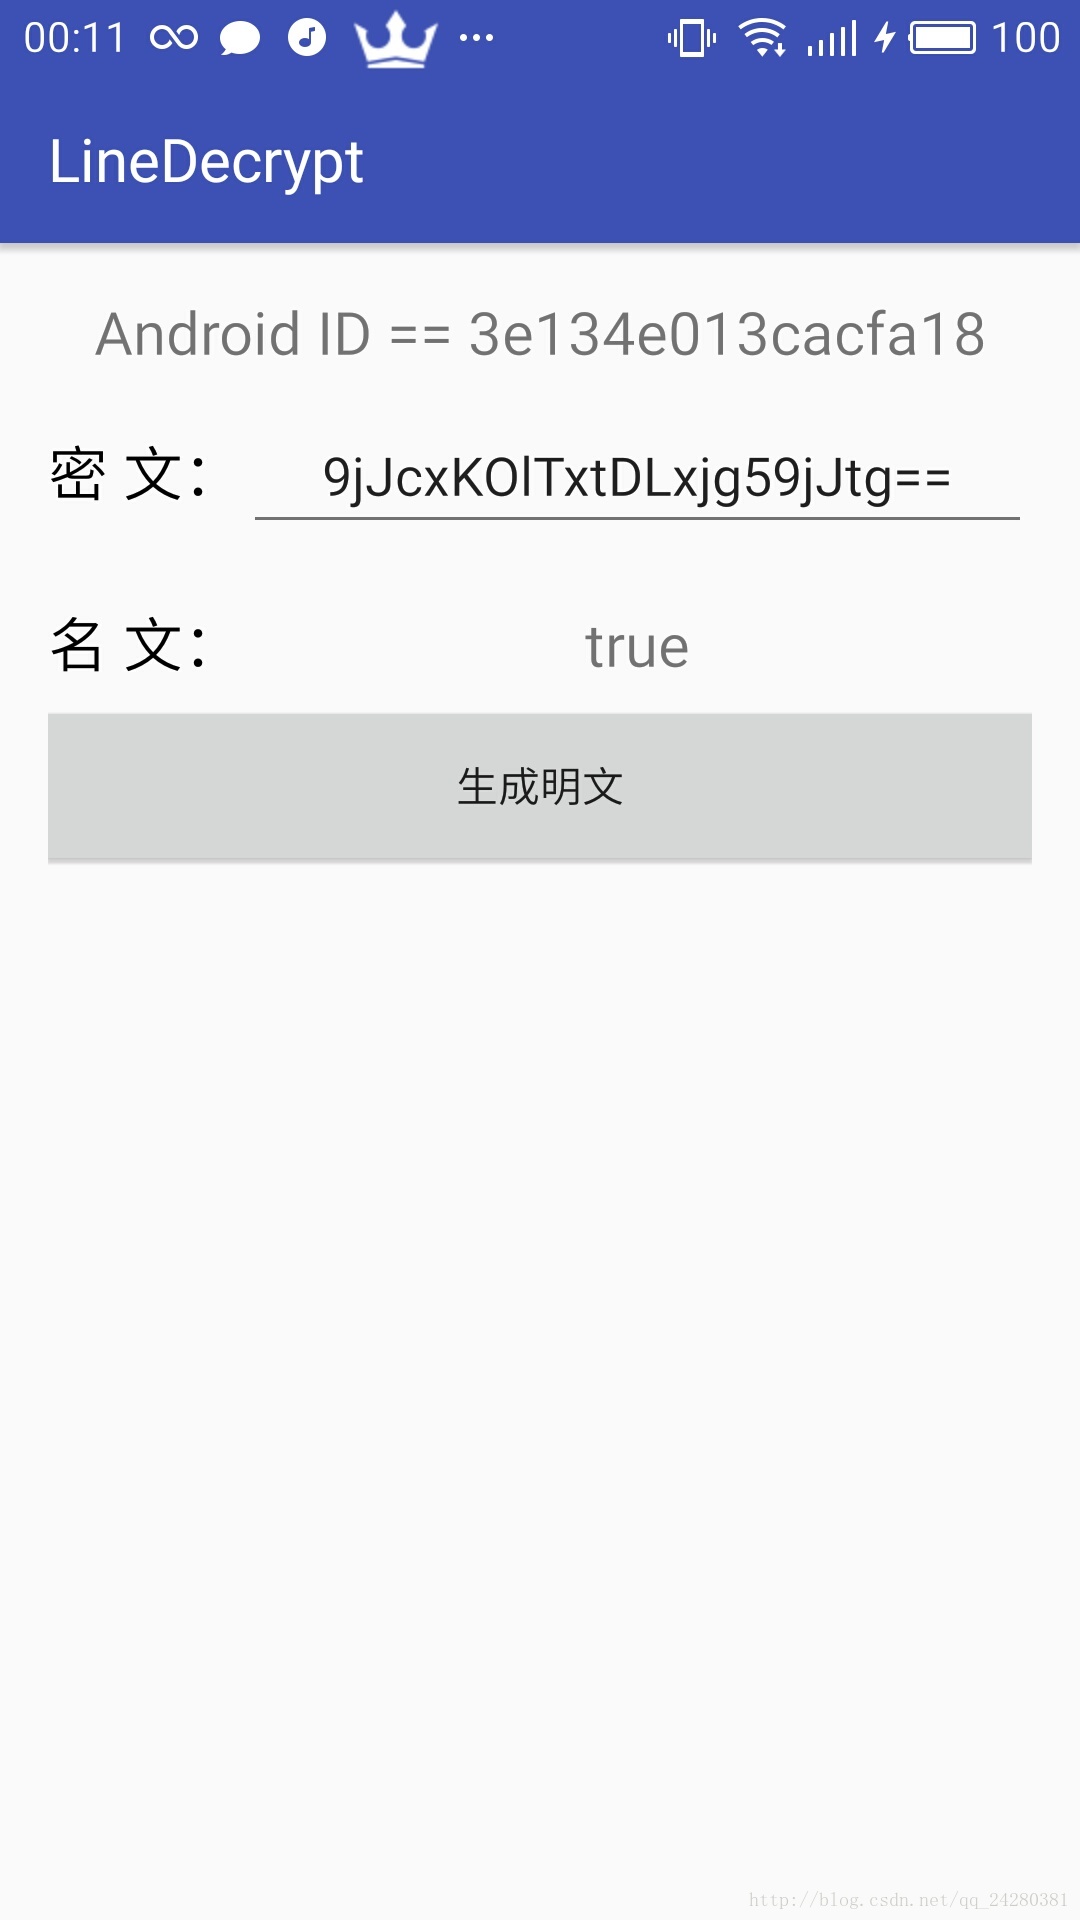
编写完成后运行程序,如图所示:

这里是数据库中存储的相关密文:
输入对应的密文后即可得到对应的明文,如:
在Line的数据库加密的逆向分析中,主要是依靠静态分析与动态调试相结合的逆向分析手段,找准关键点,然后一步一步的分析,最终找到加密的地方。
最后给出DEMO项目地址:https://github.com/zyh16143998882/LineDecrypt
开发环境:
1、测试设备:root手机一部
2、反编译工具:Android Killer或ApkTool
3、静态分析工具:jadx或者jd-gui
4、动态调试工具:Android Studio + smalidea插件
一、下载Line,反编译
1、首先从应用市场下载Line,安装。然后得到APK安装包将其拷贝到电脑中(也可以直接从电脑上下载APK,然后安装到手机中)。使用解压工具将APK文件打开,然后将Line的三个dex文件解压出来:
2、解压出dex文件后使用jadx对将dex文件打开,得到Line的反编译后的java层代码。
3、使用Android Killer对APK进行反编译,得到samli代码:
上图为反编译后的目录结构,其中dex文件反编译后的smali代码保存在上面的3个smali文件中。
4、使用Android Studio导入反编译后的项目,准备动态调试:
导入成功后Project目录结构如下:
然后在Edit Configurations新建一个远程和手机的应用连接进行动态调试:
二、分析Line的java层源码:
在静态分析一个APP时,针对要分析的功能首先应该寻找关键点,找到关键点后通过一步步的静态分析和动态调试,最终得到我们要破解的结果。在这个APP中由于我们要分析对数据库的数据的加解密,这里首先可以从加解密这个关键点作为入口,全局搜索一些与加解密相关的关键字,然后一步一步的分析。也可以从对数据库的操作作为入口:在对数据写入数据库时必然要对写入的明文先加密,从数据库中读取数据时,必然要对读取的密文进行解密,所以可以全局搜索与数据库插入、更新、读取相关的操作的关键字,然后一步步的分析下去,找到核心的加解密方法。
我们这里使用第二种方法,首先我们先打开APP的设置界面,如下:
可以看到有一个”允许他人通过ID添加“的选项,可以对应到数据库中的如下
字段,当打钩时,数据库中存储的信息如下:
当去掉钩时,数据库中存储的信息如下:
可以看到这里的value值只有两种,也就是说这里的这两个值应该就是true和false经过加密后的值。
所以我们分析这个打钩的过程,应该是打钩后将false改为true,然后对true进行加密写入数据库(更新数据库字段)。使用ddms进行method profiling:
该图为method profiling后的结果,先使用文本编辑器将这个trace文件打开,如下:
搜索文本update,得到如下结果:
可以看到这里便是对数据库的数据进行更新的方法。
所以在DDMS中查找update方法,结果如下:
可以看到调用这个update方法的是iec.a方法,在jadx中打开iec类,查看iec.a(SQliteDatabase,cc,String)Z方法:
在该方法前设置断点进行动态调试,如图:
this.k.containsKey(ccVar)的ccVar参数,也就是key值:
可以看到这句话便是得到加密后的value:
得到的str2的值:
同时this.k便是存储要写入到数据库的数据的key-value键值对:
所以需要进行代码跟踪,查找this.k的key == PROFILE_ALLOW_SEARCH_BY_ID的value值的生成的地方,也就是加密的地方。
经过一步步的跟踪,最终在iqc.a(iqf)这个方法里面找到了value值生成的地方:
通过iqa.a(String)方法对字符串进行加密:
通过iqa.a(String)方法可以看到其调用了am.a(long,String)方法,其中传入了一个long型常量15485863L,可以考虑这个long型常量可能为了生成对称加密的秘钥而传入的。
继续跟踪am.a(long,String)方法,如图:
在am.a中调用str = hph.a(a(l),str);
先不看a(l)方法,先看hph.a()方法:
可以很明显的看到hph.a方法使用的是AES对称加密算法对传入的str进行加密,在最后的将加密后的密文作为参数传入hxf.a()方法中,再看hxf.a()方法:
很明显是将最后加密的结果进行了Base64编码,然后返回给程序。
到这里再回到am.a中就可以很明显的知道在调用hph.a(a(l),str)方法时传入的参数a(l)就是AES加密算法的密码,通过这个密码,在hph.a方法中生成AES加密的秘钥。
来看AES加密算法的密码是如何生成的,进入am.a(long)方法:
如图,在hpj.a(long)中生成秘钥,进入hpj.a(long)方法:
再进入hpi.a(byte,long)方法中:
可以看到这里讲android_id的hashcode的byte值与常量long值进行一些底层运算,进而得到秘钥值。
三、编写解密DEMO
知道了数据库加密的原理后我们就可以直接编写出它的解密DEMO了。首先在Android Studio中新建一个Project:LineDecrypt
然后新建一个AESDecrypt类用于对密文进行解密:
package com.zhayh.linedecrypt;

import android.util.Base64;
import android.util.Log;

import java.security.InvalidKeyException;
import java.security.NoSuchAlgorithmException;

import javax.crypto.BadPaddingException;
import javax.crypto.Cipher;
import javax.crypto.IllegalBlockSizeException;
import javax.crypto.NoSu
f59a
chPaddingException;
import javax.crypto.spec.SecretKeySpec;

/**
* Created by zyh16 on 2017/6/5.
*/
public class AESDecryotUtil {
/**
* 对字符串解密函数
* @param paramLong     Long常量15485863L
* @param paramString   要解密的密文
* @param ANDROIDID     adnroid_id的值
* @return              解密后的明文
*/
public static String decrypt(Long paramLong,String paramString,String ANDROIDID){
if(paramLong == null | paramString.equals("") | paramString == null | ANDROIDID == null){
return "参数错误";
}
byte[] bb = operationLong(paramLong,ANDROIDID);

return Base64Decrypt(bb,paramString);
}

/**
* 生成秘钥函数
* @param paramLong Long常量15485863L
* @param androidID adnroid_id的值
* @return          生成的秘钥的byte数组
*/
private static byte[] operationLong(Long paramLong , String androidID){
String str2 = androidID;
String str1 = str2;
if (str2 == null) {
str1 = "";
}
byte strByte = (byte)str1.hashCode();
return getAIDAndLong(strByte, paramLong);
}

/**
* 通过android_id的hashcode的byte值与Long常量15485863L生成秘钥
* @param paramByte android_id的hashcode的byte值
* @param paramLong Long常量15485863L
* @return          生成的秘钥的byte数组
*/
private static byte[] getAIDAndLong(byte paramByte, long paramLong){
int k = 0;
byte[] arrayOfByte = new byte[16];
arrayOfByte[0] = paramByte;
arrayOfByte[1] = ((byte)(paramByte - 71));
arrayOfByte[2] = ((byte)(paramByte - 71 - 71));

int i = 3;
while (i < 16)
{
arrayOfByte[i] = ((byte)(arrayOfByte[(i - 3)] ^ arrayOfByte[(i - 2)] ^ 0xFFFFFFB9 ^ i));
i += 1;
}
i = -7;
arrayOfByte = (byte[])arrayOfByte.clone();
int i2 = arrayOfByte.length;
long l = paramLong;

if (paramLong < 2L)
{

l = paramLong;
if (paramLong > -2L) {
l = -313187L + 13819823L * paramLong;
}
}

int j = 0;
while (j < i2)
{
int m = i2 - 1 & k + 1;
paramLong = arrayOfByte[m] * l + i;

int n = (byte)(int)(paramLong >> 32);
int i1 = (int)(paramLong + n);

k = i1;
i = n;

if (i1 < n)
{
k = i1 + 1;
i = n + 1;
}
arrayOfByte[m] = ((byte)(-2 - k));
j += 1;
k = m;
}
return arrayOfByte;
}

/**
* Base64解码函数,因为在加密时对最后生成的密文进行了Base64编码,所以在解密时先要解码
* @param paramArrayOfByte  秘钥的byte数组
* @param paramString       要解密的密文
* @return                  解密后的明文
*/
private static String Base64Decrypt(byte[] paramArrayOfByte,String paramString ){
byte[] base64 = Base64.decode(paramString,0);
Log.d("jw","base64 decode length == "+base64.length);
for(int i = 0;i<base64.length;i++){
Log.d("jw","base64["+i+"] == "+base64[i]);
}
byte[] paramArrayOfBytes = AESDecrypt(paramArrayOfByte, base64);

Log.d("jw","paramArrayOfBytes == "+paramArrayOfBytes.toString());
return new String(paramArrayOfBytes, 0, paramArrayOfBytes.length);
}

/**
* AES解密算法
* @param paramArrayOfByte1 秘钥
* @param paramArrayOfByte2 密文
* @return                  明文
*/
private static byte[] AESDecrypt(byte[] paramArrayOfByte1, byte[] paramArrayOfByte2){
SecretKeySpec key = new SecretKeySpec(paramArrayOfByte1, "AES");
Cipher localCipher = null;
byte[] bt = null;
try {
localCipher = Cipher.getInstance("AES");
localCipher.init(2, key);
bt =  localCipher.doFinal(paramArrayOfByte2);
} catch (NoSuchAlgorithmException e) {
e.printStackTrace();
} catch (NoSuchPaddingException e) {
e.printStackTrace();
} catch (BadPaddingException e) {
e.printStackTrace();
} catch (IllegalBlockSizeException e) {
e.printStackTrace();
} catch (InvalidKeyException e) {
e.printStackTrace();
}finally {
return bt;
}
}
}
解密工具类编写完毕后,设置布局文件:
<?xml version="1.0" encoding="utf-8"?>
<RelativeLayout xmlns:android="http://schemas.android.com/apk/res/android"
xmlns:tools="http://schemas.android.com/tools"
android:layout_width="match_parent"
android:layout_height="match_parent"
android:paddingBottom="@dimen/activity_vertical_margin"
android:paddingLeft="@dimen/activity_horizontal_margin"
android:paddingRight="@dimen/activity_horizontal_margin"
android:paddingTop="@dimen/activity_vertical_margin"
tools:context="com.zhayh.linedecrypt.MainActivity">
<TextView
android:id="@+id/tv_androidID"
android:layout_width="match_parent"
android:layout_height="wrap_content"
android:text="Android ID == "
android:textSize="20sp"
android:gravity="center"/>

<TextView
android:id="@+id/tv_cipherText"
android:layout_width="wrap_content"
android:layout_height="wrap_content"
android:layout_below="@id/tv_androidID"
android:layout_marginTop="20dp"
android:text="密 文:"
android:textColor="#000"
android:textSize="20sp"/>
<EditText
android:id="@+id/et_cipherText"
android:layout_width="match_parent"
android:layout_height="wrap_content"
android:hint="请输入密文"
android:layout_alignBaseline="@id/tv_cipherText"
android:gravity="center"
android:layout_toRightOf="@id/tv_cipherText"/>

<TextView
android:id="@+id/tv_text"
android:layout_width="wrap_content"
android:layout_height="wrap_content"
android:layout_below="@id/tv_cipherText"
android:layout_marginTop="30dp"
android:text="名 文:"
android:textColor="#000"
android:textSize="20sp" />
<TextView
android:id="@+id/tv_content"
android:layout_width="match_parent"
android:layout_height="wrap_content"
android:text="这里是默认值"
android:textSize="20sp"
android:gravity="center"
android:layout_toRightOf="@id/tv_text"
android:layout_alignBaseline="@id/tv_text"/>

<Button
android:id="@+id/btn_getContent"
android:layout_width="match_parent"
android:layout_height="wrap_content"
android:layout_below="@id/tv_text"
android:layout_marginTop="10dp"
android:text="生成明文"
android:gravity="center" />
</RelativeLayout>
效果如下:
然后编写MainActivity类:
package com.zhayh.linedecrypt;

import android.provider.Settings;
import android.support.v7.app.AppCompatActivity;
import android.os.Bundle;
import android.view.View;
import android.widget.Button;
import android.widget.EditText;
import android.widget.TextView;

public class MainActivity extends AppCompatActivity {
private TextView tv_androidID = null;
private EditText et_cipherText = null;
private TextView tv_content = null;
private Button btn_getContent = null;
private Long longValue = 15485863L;
private String content = null;
private CharSequence cs = null;

@Override
protected void onCreate(Bundle savedInstanceState) {
super.onCreate(savedInstanceState);
setContentView(R.layout.activity_main);

tv_androidID = (TextView) findViewById(R.id.tv_androidID);
et_cipherText = (EditText) findViewById(R.id.et_cipherText);
tv_content = (TextView) findViewById(R.id.tv_content);
btn_getContent = (Button) findViewById(R.id.btn_getContent);

cs = Settings.Secure.getString(this.getContentResolver(),"android_id");
tv_androidID.append(cs.toString());

btn_getContent.setOnClickListener(new View.OnClickListener() {
@Override
public void onClick(View view) {
content = AESDecryotUtil.decrypt(Long.valueOf(longValue),et_cipherText.getText().toString().trim(),cs.toString());
tv_content.setText(content);
}
});
}
}
编写完成后运行程序,如图所示:
这里是数据库中存储的相关密文:
输入对应的密文后即可得到对应的明文,如:
四、总结
OK,关于Line的数据库解密就说到这里。这片文章的主要目的就是通过对Line这个APP的数据库加密过程进行逆向分析,介绍Android数据库加密中的对相关进行加密后写入数据库这种方法。在Line的数据库加密的逆向分析中,主要是依靠静态分析与动态调试相结合的逆向分析手段,找准关键点,然后一步一步的分析,最终找到加密的地方。
最后给出DEMO项目地址:https://github.com/zyh16143998882/LineDecrypt

相关文章推荐
- Android数据库加解密逆向分析(一)
- Android数据库安全解决方案,使用SQLCipher进行加解密
- Android数据库安全解决方案,使用SQLCipher进行加解密
- Android数据库安全解决方案,使用SQLCipher进行加解密
- Android逆向分析案例——某点评APP登陆请求数据解密
- Android逆向分析案例——某点评APP登陆请求数据解密
- android数据库操作 sqlite returned: error code = 14, msg = cannot open file at source line 25502
- Android数据库安全解决方案,使用SQLCipher进行加解密
- Android数据库加解密(SQLCipher)
- Android GreenDao使用总结(包括模型生成、增删改查、修改存储路径、数据库更新升级和加解密数据库)
- android 数据库安全 使用SQLCipher进行加解密
- Android数据库安全解决方案,使用SQLCipher进行加解密
- Android数据库安全解决方案,使用SQLCipher进行加解密
- Android使用SQLCipher对加密数据库文件解密
- Android数据库安全解决方案,使用SQLCipher进行加解密
- Android数据库安全解决方案,使用SQLCipher进行加解密
- Android数据库安全解决方案,使用SQLCipher进行加解密
- Android数据库安全解决方案,使用SQLCipher进行加解密
- Android数据库安全解决方案,使用SQLCipher进行加解密
- Android数据库SQLCipher加密解密