用yum源配合源码包安装openresty、mariadb、php7服务
2017-05-26 14:36
232 查看
在开始部署之前,有必要先简单介绍一下!
OpenResty 是一个基于 Nginx 与 Lua 的高性能 Web 平台,其内部集成了大量精良的 Lua 库、第三方模块以及大多数的依赖项。用于方便地搭建能够处理超高并发、扩展性极高的动态 Web 应用、Web 服务和动态网关。
MariaDB服务器是一个在世界上最流行的数据库服务器。这是由原始开发者的MySQL,并保证保持开放源码。MariaDB是因为它速度快,可扩展性和鲁棒性,具有丰富的生态系统,存储引擎,插件和许多其他工具,使各种各样的用例非常灵活。
PHP,我想就不必再絮叨多少了吧。
那我们就开始新的学习之旅吧!
1、 前期准备(最小化安装的系统)
1.更新系统
yum makecache && yum -y update 2.安装常用基础软件 yum -y install bash-completion vim net-tools bind-utilswget screen 最后别忘了重启 2、 更新yum源(阿里云源:mirrors.aliyun.com)
[root@localhost~]# mv /etc/yum.repos.d/CentOS-Base.repo/etc/yum.repos.d/CentOS-Base.repo.backup
[root@localhost~]# ls /etc/yum.repos.d/
CentOS-Base.repo.backup CentOS-fasttrack.repo CentOS-Vault.repo
CentOS-CR.repo CentOS-Media.repoCentOS-Debuginfo.repo CentOS-Sources.repo先关闭fastestmirror[root@localhostyum.repos.d]# vi /etc/yum/pluginconf.d/fastestmirror.conf (enabled=0)
[root@localhost yum.repos.d]# wget -O/etc/yum.repos.d/CentOS-Base.repo http://mirrors.aliyun.com/repo/Centos-7.repo [root@localhost yum.repos.d]# yumclean all
[root@localhost yum.repos.d]# yum makecache
3、 安装mariadb 1.添加mariadb yum资源库
vi /etc/yum.repos.d/MariaDB.repo [mariadb] name= MariaDB baseurl= http://yum.mariadb.org/10.1/centos7-amd64 gpgkey=https://yum.mariadb.org/RPM-GPG-KEY-MariaDB gpgcheck=1 2.可以使用yum search MariaDB 查看安装包,官方给出的只要安装server和client就行,其他的根据 自己的需要来
这时会出现好多的软件,你只需用yum安装即可[root@localhost ~]# yum -y install MariaDB-backupMariaDB-client MariaDB-common MariaDB-compat MariaDB-connect-engineMariaDB-cracklib-password-check MariaDB-devel MariaDB-gssapi-clientMariaDB-gssapi-server MariaDB-oqgraph-engine MariaDB-server MariaDB-shared MariaDB-test mariadb-benchmariadb-devel mariadb-embedded mariadb-embedded-devel mariadb-libs mariadb 网上也有帖子说是要初始化一下,我也试了,无非就是设置数据库的一些配置,像是否删除测试数据库,是否禁止远程登录数据库,是否删除用命用户什么的,后面可以跟配置项—defaults-file、--datadir、--user等,感觉没多大卵用(废话有点多,回到原题) [root@localhost my.cnf.d]# mysql_secure_installation
3.加入系统服务
[root@localhost ~]# systemctl enable mariadb [root@localhost ~]# systemctl start mariadb.service [root@localhost ~]# systemctl stop mariadb.service
提醒:通过yum装很多东西都是默认的,不像源码编译或者自己DOWN安装包可以各种指定,列
一些比较重要的路径出来
yum 安装会自动创建mysql 用户和用户组 Yum安装会自动创建 /etc/my.cnf 以及/etc/my.cnf.d 文件架(并存放 server.conf client.conf tokudb.conf 等文件) 默认rpm路径basedir =/usr/bindatadir=/var/lib/mysql.h=/usr/include/mysqlplung=/usr/lib64/mysqlshare=/usr/share/mysql(confcharset etc) 4、 安装PHP7 1.先看下yum源 [root@localhost ~]# ls /etc/yum.repos.d/ back webtatic-archive.repo webtatic.repo webtatic-testing.repo
[root@localhost ~]# ls /etc/yum.repos.d/back/
#在/etc/yum.repo.d/目录下,只留webstaic开头的,其他的都放到back目录里【建一个目录back】
CentOS7-Base-163.repo CentOS-CR.repo CentOS-Media.repo epel.repo
CentOS-Base.repo.backup CentOS-Debuginfo.repo CentOS-Sources.repo epel-testing.repo CentOS-Base.repo.backup1 CentOS-fasttrack.repo CentOS-Vault.repo 2.删除之前的PHP版本 [root@localhost ~]#yum remove php* php-common
3.rpm 安装Php7 相应的 yum源: [root@localhost ~]# rpm -Uvh https://mirror.webtatic.com/yum/el7/webtatic-release.rpm
4.直接yum安装php7:
[root@localhost ~]# yum install php70w
5.记得手动装一下php-fpm
[root@localhost ~]#yum –y install php-fpm [root@localhost ~]# ls /etc/php php.d/ php-fpm.conf php-fpm.d/ php.ini php-zts.d/ 6.看下PHP的版本:
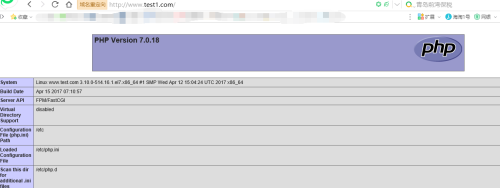
[root@localhost~]# php -v
PHP 7.0.18 (cli) (built: Apr 15 2017 07:09:11) ( NTS )
Copyright (c) 1997-2017 The PHP Group
Zend Engine v3.0.0, Copyright (c) 1998-2017 Zend Technologies
注意:
1、php.ini是php运行核心配置文件:
2、php-fpm.conf是 php-fpm 进程服务的配置文件:
3、配置www.conf(在php-fpm.d目录下)
www.conf这是 php-fpm 进程服务的扩展配置文件:
php服务的一些文件路径在/
5、 安装openresty (编译安装)
1.依赖关系
openresty依赖于perl5.6.1+, libreadline, libpcre, libssl,首先安装依赖关系。
[root@localhost ~]# yum –y install perl 5.6.1+ libreadline libpcre libssl
[root@localhost~]# yum -y install readline-devel pcre-devel openssl-devel gcc
2下载源码 https://openresty.org/download/openresty-1.11.2.3.tar.gz(17年4月份) https://openresty.org/download/openresty-1.11.2.2.tar.gz (16年11月) 使用wget下载(可以登录http://openresty.org查看最新版本) [root@localhost~]# wget https://openresty.org/download/openresty-1.11.2.3.tar.gz
3.解压下载好的压缩包 [root@localhost ~]# tar zxf openresty-1.11.2.3.tar.gz
4.配置./configure
[root@localhost openresty-1.11.2.3]# cd openresty-1.11.2.3/
[root@localhost openresty-1.11.2.3]# ./configure --prefix=/opt/openresty --with-luajit
默认, –prefix=/usr/local/openresty程序会被安装到/usr/local/openresty目录。
我们可以指定各种选项,比如
./configure --prefix=/opt/openresty \ --with-luajit \ --without-http_redis2_module \ --with-http_iconv_module \ --with-http_postgres_module具体用法参考./configure–help 或者官方文档
5. 编译、安装[root@localhostopenresty-1.11.2.3]# gmake && gmake install
6.将nginx添加到系统变量
PATH=/opt/openresty/nginx/sbin:$PATHexport PATH 或者
[root@localhost openresty-1.11.2.3]# echo"export PATH=$PATH:/opt/openresty/nginx/sbin/" >>/etc/profile && source /etc/profile
7.默认项目路径/opt/openresty/nginx/html
8.启动、关闭、重启nginxnginx -c /opt/openresty/nginx/conf/nginx.conf //启动并加载配置文件nginx -s stop //停止nginx -s reload //重启 9.给nginx做语法检测 [root@localhost openresty-1.11.2.3]# nginx -tnginx: the configuration file/opt/openresty/nginx/conf/nginx.conf syntax is oknginx: configuration file/opt/openresty/nginx/conf/nginx.conf test is successful启动nginx服务[root@localhost openresty-1.11.2.3]# nginx给80端口设置防火墙规则:[root@localhost openresty-1.11.2.3]# cd[root@localhost ~]# firewall-cmd--add-port=80/tcp --permanentsuccess[root@localhost ~]# firewall-cmd –reloadSuccess
6、用include指令实现nginx多虚拟主机配置 (nginx文件设置)
1.创建nginx账户和组
[root@localhost~]# groupadd www-data
[root@localhost~]# useradd -g www-data www-data
2.配置nginx.conf文件: 内容如下(程序代码)user www-data;worker_processes 1; error_log/opt/openresty/nginx/logs/error.log crit;pid /opt/openresty/nginx/logs/nginx.pid; events {#使用的网络I/)模型,Linux系统推荐采用epoll模型,FreeBSD系统推荐采用kqueue模型 use epoll; worker_connections 1024;} http { include /opt/openresty/nginx/conf/mime.types; default_type application/octet-stream; charset utf-8; server_names_hash_bucket_size 128; client_header_buffer_size 32k; large_client_header_buffers 4 32k; keepalive_timeout 60; fastcgi_connect_timeout 300; fastcgi_send_timeout 300; fastcgi_read_timeout 300; fastcgi_buffer_size 128k; fastcgi_buffers 4 128k; fastcgi_busy_buffers_size 128k; fastcgi_temp_file_write_size 128k; client_body_temp_path/opt/openresty/nginx/client_body_temp; proxy_temp_path/opt/openresty/nginx/proxy_temp; fastcgi_temp_path/opt/openresty/nginx/fastcgi_temp; gzip on; gzip_min_length 1k; gzip_buffers 4 16k; gzip_http_version 1.0; gzip_comp_level 2; gzip_types text/plain application/x-javascripttext/css application/xml; gzip_vary on; client_header_timeout 10; client_body_timeout 10; send_timeout 10; sendfile on; tcp_nopush on; tcp_nodelay on; #virtual host include /host/nginx/conf/vhost/www_test_com.conf; include /host/nginx/conf/vhost/www_test1_com.conf; include /host/nginx/conf/vhost/www_test2_com.conf;#也可以使用 include /host/nginx/conf/vhost/*.conf 来代替的,这里支持通配符. ###################################################partingline########################################################
# another virtual host using mix of IP-,name-, and port-based configuration # #server { # listen 8000; # listen somename:8080; # server_name somename alias another.alias; # location / { # root html; # index index.html index.htm; # } #} # HTTPS server # #server { # listen 443 ssl; # server_name localhost; # ssl_certificate cert.pem; # ssl_certificate_key cert.key; # ssl_session_cache shared:SSL:1m; # ssl_session_timeout 5m; # ssl_ciphers HIGH:!aNULL:!MD5; # ssl_prefer_server_ciphers on; # location / { # root html; # index index.html index.htm; # } #} } 3.在Nginx的虚拟主机配置(www_test_com.conf, www_test1_com.conf, www_test2_com.conf)文件里,设置access.log,error.log
[root@localhost~]# mkdir -p /host/nginx/logs/test{"",1,2}
4.在conf目录下创建虚拟主机配置文件目录vhost,在vhost目录下分别根据域名建立相应的
www_test_com.conf,www_test1_com.conf,www_test2_com.conf3个文件.
##我把虚拟主机配置文件放在了这个目录下,只不过需要先手动创建目录和.conf文件[root@www test]#ls /host/nginx/conf/vhost/ www_test1_com.conf www_test2_com.conf www_test_com.conf
www_test_com.conf配置代码:
vi /host/nginx/conf/vhost/www_test_com.conf
server {
listen 80; ###换成自个的IP地址(我是基于域名的虚拟主机,所以是相同IP不同端口。
client_max_body_size 100M;
server_name www.test.com; ###换成自个要用的域名
charset utf-8; ###字符集:utf-8
root /var/www/test/; ###站点路径——存放网页的目录
index index.php index.html index.htm; ###追加index.php让nginx服务器默认支持index.php为首页:
autoindex on;
access_log /host/nginx/logs/test/test.access.log;
error_log /host/nginx/logs/test/test.error.log;
if (-d $request_filename) {
rewrite ^/(.*)([^/])$ http://$host/$1$2/ permanent;
}
error_page 404 /404.html;
location = /40x.html {
root /var/www/test/; #你的站点路径
charset on;
}
# redirect server error pages to the static page /50x.html
#
error_page 500 502 503 504 /50x.html;
location = /50x.html {
root /var/www/test/; ###自个的站点路径——网页存放路径
charset on;
}
#将客户端请求装交给fastcgi,老大要求用fpm模块(修改)
location ~ \.php$ {
root /var/www/test/;
fastcgi_pass 127.0.0.1:9000;
fastcgi_index index.php;
fastcgi_param SCRIPT_FILENAME $document_root$fastcgi_script_name;
include fastcgi_params;
}
注意:配置.php请求被传送到后端的php-fpm模块,默认情况下php配置块是被注释的,此时去
掉注释并修改,这里面很多都是默认的,root是配置php程序放置的根目录,主要修改
的就是fastcgi_param中的/scripts为$document_root
例如:fastcgi_param SCRIPT_FILENAME $document_root$fastcgi_script_name;
location~ .*\.(php|php5|php4|shtml|xhtml|phtml)?$ {
fastcgi_pass 127.0.0.1:9000;
include /opt/openresty/nginx/conf/fastcgi_params;
}
#网站的图片较多,更改较少,将它们在浏览器本地缓存15天
location ~ .*\.(gif|jpg|jpeg|png|bmp|swf)$ {
expires 15d;
}
#网站会加载很多JS、CSS,将它们在浏览器本地缓存1天
location ~ .*\.(js|css)?$ {
expires 1d;
}
location /(WEB-INF)/ {
deny all;
}
}
注意:www_test1_com.conf配置代码和www_test2_com.conf配置代码跟www_test_com.conf(除了
和网页存放路径不一样外)一样。
5.创建/var/www/test,/var/www/test1,/var/www/test2这三个目录,并在这三个目录下分别创建 index.php,还要给它们属主和属组权限。
[root@www ~]# ls /var/www/test
test/ test1/ test2/ [root@www ~]# vi/var/www/test/index.php <?php phpinfo(); ?>给网页文档目录/var/www/test{“”,1,2}添加属主和属组权限。[root@localhosttest]# chown -R www-data:www-data /var/www/test{"",1,2}其他两个测试文件(注意目录)一样。
7、php文件配置:
1.php-fpm.conf配置文件
[root@www~]# vi /etc/php-fpm.conf在[global]配置项下,把pid = /var/run/php-fpm/php-fpm.pid前的分号注释去掉,还有就是include=/etc/php-fpm.d/*.conf这一项,设置配置文件路径
2.php-fpm.d/www.conf配置文件[root@www~]# vi /etc/php-fpm.d/www.conf在[www]配置项下有user = ,group= 两配置项,都改了user= www-datagroup= www-data 8、检查nginx配置是否有错
nginx -t启动Nginx服务[root@localhost~]# Nginx ##nginx启动命令启动PHP服务[root@localhost~]# php-fpm ##PHP启动命令启动mariadb服务[root@localhost~]# systemctl enable mariadb
9、配置防火墙规则:
[root@www~]# firewall-cmd --add-port=80/tcp –permanent #nginx:80
[root@www~]# firewall-cmd --add-port=3306/tcp –permanent #mariadb:3306
[root@www~]# firewall-cmd --add-port=3306/tcp –permanent #PHP:9000
[root@www~]# firewall-cmd –reload
10、在windows系统中C:\WINDOWS\system32\drivers\etc下的hosts文件中做域名映射

11、可以查看访问了
OpenResty 是一个基于 Nginx 与 Lua 的高性能 Web 平台,其内部集成了大量精良的 Lua 库、第三方模块以及大多数的依赖项。用于方便地搭建能够处理超高并发、扩展性极高的动态 Web 应用、Web 服务和动态网关。
MariaDB服务器是一个在世界上最流行的数据库服务器。这是由原始开发者的MySQL,并保证保持开放源码。MariaDB是因为它速度快,可扩展性和鲁棒性,具有丰富的生态系统,存储引擎,插件和许多其他工具,使各种各样的用例非常灵活。
PHP,我想就不必再絮叨多少了吧。
那我们就开始新的学习之旅吧!
1、 前期准备(最小化安装的系统)
1.更新系统
yum makecache && yum -y update 2.安装常用基础软件 yum -y install bash-completion vim net-tools bind-utilswget screen 最后别忘了重启 2、 更新yum源(阿里云源:mirrors.aliyun.com)
[root@localhost~]# mv /etc/yum.repos.d/CentOS-Base.repo/etc/yum.repos.d/CentOS-Base.repo.backup
[root@localhost~]# ls /etc/yum.repos.d/
CentOS-Base.repo.backup CentOS-fasttrack.repo CentOS-Vault.repo
CentOS-CR.repo CentOS-Media.repoCentOS-Debuginfo.repo CentOS-Sources.repo先关闭fastestmirror[root@localhostyum.repos.d]# vi /etc/yum/pluginconf.d/fastestmirror.conf (enabled=0)
[root@localhost yum.repos.d]# wget -O/etc/yum.repos.d/CentOS-Base.repo http://mirrors.aliyun.com/repo/Centos-7.repo [root@localhost yum.repos.d]# yumclean all
[root@localhost yum.repos.d]# yum makecache
3、 安装mariadb 1.添加mariadb yum资源库
vi /etc/yum.repos.d/MariaDB.repo [mariadb] name= MariaDB baseurl= http://yum.mariadb.org/10.1/centos7-amd64 gpgkey=https://yum.mariadb.org/RPM-GPG-KEY-MariaDB gpgcheck=1 2.可以使用yum search MariaDB 查看安装包,官方给出的只要安装server和client就行,其他的根据 自己的需要来
yum install MariaDB-server MariaDB-client注意:虽然说是只需添加系统服务,并启动数据库就完事了,但我也有几次还是报错(个人建议使 用我以下的步骤) [root@localhost ~]# yum search mariadb
这时会出现好多的软件,你只需用yum安装即可[root@localhost ~]# yum -y install MariaDB-backupMariaDB-client MariaDB-common MariaDB-compat MariaDB-connect-engineMariaDB-cracklib-password-check MariaDB-devel MariaDB-gssapi-clientMariaDB-gssapi-server MariaDB-oqgraph-engine MariaDB-server MariaDB-shared MariaDB-test mariadb-benchmariadb-devel mariadb-embedded mariadb-embedded-devel mariadb-libs mariadb 网上也有帖子说是要初始化一下,我也试了,无非就是设置数据库的一些配置,像是否删除测试数据库,是否禁止远程登录数据库,是否删除用命用户什么的,后面可以跟配置项—defaults-file、--datadir、--user等,感觉没多大卵用(废话有点多,回到原题) [root@localhost my.cnf.d]# mysql_secure_installation
3.加入系统服务
[root@localhost ~]# systemctl enable mariadb [root@localhost ~]# systemctl start mariadb.service [root@localhost ~]# systemctl stop mariadb.service
提醒:通过yum装很多东西都是默认的,不像源码编译或者自己DOWN安装包可以各种指定,列
一些比较重要的路径出来
yum 安装会自动创建mysql 用户和用户组 Yum安装会自动创建 /etc/my.cnf 以及/etc/my.cnf.d 文件架(并存放 server.conf client.conf tokudb.conf 等文件) 默认rpm路径basedir =/usr/bindatadir=/var/lib/mysql.h=/usr/include/mysqlplung=/usr/lib64/mysqlshare=/usr/share/mysql(confcharset etc) 4、 安装PHP7 1.先看下yum源 [root@localhost ~]# ls /etc/yum.repos.d/ back webtatic-archive.repo webtatic.repo webtatic-testing.repo
[root@localhost ~]# ls /etc/yum.repos.d/back/
#在/etc/yum.repo.d/目录下,只留webstaic开头的,其他的都放到back目录里【建一个目录back】
CentOS7-Base-163.repo CentOS-CR.repo CentOS-Media.repo epel.repo
CentOS-Base.repo.backup CentOS-Debuginfo.repo CentOS-Sources.repo epel-testing.repo CentOS-Base.repo.backup1 CentOS-fasttrack.repo CentOS-Vault.repo 2.删除之前的PHP版本 [root@localhost ~]#yum remove php* php-common
3.rpm 安装Php7 相应的 yum源: [root@localhost ~]# rpm -Uvh https://mirror.webtatic.com/yum/el7/webtatic-release.rpm
4.直接yum安装php7:
[root@localhost ~]# yum install php70w
5.记得手动装一下php-fpm
[root@localhost ~]#yum –y install php-fpm [root@localhost ~]# ls /etc/php php.d/ php-fpm.conf php-fpm.d/ php.ini php-zts.d/ 6.看下PHP的版本:
[root@localhost~]# php -v
PHP 7.0.18 (cli) (built: Apr 15 2017 07:09:11) ( NTS )
Copyright (c) 1997-2017 The PHP Group
Zend Engine v3.0.0, Copyright (c) 1998-2017 Zend Technologies
注意:
1、php.ini是php运行核心配置文件:
2、php-fpm.conf是 php-fpm 进程服务的配置文件:
3、配置www.conf(在php-fpm.d目录下)
www.conf这是 php-fpm 进程服务的扩展配置文件:
php服务的一些文件路径在/
5、 安装openresty (编译安装)
1.依赖关系
openresty依赖于perl5.6.1+, libreadline, libpcre, libssl,首先安装依赖关系。
[root@localhost ~]# yum –y install perl 5.6.1+ libreadline libpcre libssl
[root@localhost~]# yum -y install readline-devel pcre-devel openssl-devel gcc
2下载源码 https://openresty.org/download/openresty-1.11.2.3.tar.gz(17年4月份) https://openresty.org/download/openresty-1.11.2.2.tar.gz (16年11月) 使用wget下载(可以登录http://openresty.org查看最新版本) [root@localhost~]# wget https://openresty.org/download/openresty-1.11.2.3.tar.gz
3.解压下载好的压缩包 [root@localhost ~]# tar zxf openresty-1.11.2.3.tar.gz
4.配置./configure
[root@localhost openresty-1.11.2.3]# cd openresty-1.11.2.3/
[root@localhost openresty-1.11.2.3]# ./configure --prefix=/opt/openresty --with-luajit
默认, –prefix=/usr/local/openresty程序会被安装到/usr/local/openresty目录。
我们可以指定各种选项,比如
./configure --prefix=/opt/openresty \ --with-luajit \ --without-http_redis2_module \ --with-http_iconv_module \ --with-http_postgres_module具体用法参考./configure–help 或者官方文档
5. 编译、安装[root@localhostopenresty-1.11.2.3]# gmake && gmake install
6.将nginx添加到系统变量
PATH=/opt/openresty/nginx/sbin:$PATHexport PATH 或者
[root@localhost openresty-1.11.2.3]# echo"export PATH=$PATH:/opt/openresty/nginx/sbin/" >>/etc/profile && source /etc/profile
7.默认项目路径/opt/openresty/nginx/html
8.启动、关闭、重启nginxnginx -c /opt/openresty/nginx/conf/nginx.conf //启动并加载配置文件nginx -s stop //停止nginx -s reload //重启 9.给nginx做语法检测 [root@localhost openresty-1.11.2.3]# nginx -tnginx: the configuration file/opt/openresty/nginx/conf/nginx.conf syntax is oknginx: configuration file/opt/openresty/nginx/conf/nginx.conf test is successful启动nginx服务[root@localhost openresty-1.11.2.3]# nginx给80端口设置防火墙规则:[root@localhost openresty-1.11.2.3]# cd[root@localhost ~]# firewall-cmd--add-port=80/tcp --permanentsuccess[root@localhost ~]# firewall-cmd –reloadSuccess
6、用include指令实现nginx多虚拟主机配置 (nginx文件设置)
1.创建nginx账户和组
[root@localhost~]# groupadd www-data
[root@localhost~]# useradd -g www-data www-data
2.配置nginx.conf文件: 内容如下(程序代码)user www-data;worker_processes 1; error_log/opt/openresty/nginx/logs/error.log crit;pid /opt/openresty/nginx/logs/nginx.pid; events {#使用的网络I/)模型,Linux系统推荐采用epoll模型,FreeBSD系统推荐采用kqueue模型 use epoll; worker_connections 1024;} http { include /opt/openresty/nginx/conf/mime.types; default_type application/octet-stream; charset utf-8; server_names_hash_bucket_size 128; client_header_buffer_size 32k; large_client_header_buffers 4 32k; keepalive_timeout 60; fastcgi_connect_timeout 300; fastcgi_send_timeout 300; fastcgi_read_timeout 300; fastcgi_buffer_size 128k; fastcgi_buffers 4 128k; fastcgi_busy_buffers_size 128k; fastcgi_temp_file_write_size 128k; client_body_temp_path/opt/openresty/nginx/client_body_temp; proxy_temp_path/opt/openresty/nginx/proxy_temp; fastcgi_temp_path/opt/openresty/nginx/fastcgi_temp; gzip on; gzip_min_length 1k; gzip_buffers 4 16k; gzip_http_version 1.0; gzip_comp_level 2; gzip_types text/plain application/x-javascripttext/css application/xml; gzip_vary on; client_header_timeout 10; client_body_timeout 10; send_timeout 10; sendfile on; tcp_nopush on; tcp_nodelay on; #virtual host include /host/nginx/conf/vhost/www_test_com.conf; include /host/nginx/conf/vhost/www_test1_com.conf; include /host/nginx/conf/vhost/www_test2_com.conf;#也可以使用 include /host/nginx/conf/vhost/*.conf 来代替的,这里支持通配符. ###################################################partingline########################################################
# another virtual host using mix of IP-,name-, and port-based configuration # #server { # listen 8000; # listen somename:8080; # server_name somename alias another.alias; # location / { # root html; # index index.html index.htm; # } #} # HTTPS server # #server { # listen 443 ssl; # server_name localhost; # ssl_certificate cert.pem; # ssl_certificate_key cert.key; # ssl_session_cache shared:SSL:1m; # ssl_session_timeout 5m; # ssl_ciphers HIGH:!aNULL:!MD5; # ssl_prefer_server_ciphers on; # location / { # root html; # index index.html index.htm; # } #} } 3.在Nginx的虚拟主机配置(www_test_com.conf, www_test1_com.conf, www_test2_com.conf)文件里,设置access.log,error.log
[root@localhost~]# mkdir -p /host/nginx/logs/test{"",1,2}
4.在conf目录下创建虚拟主机配置文件目录vhost,在vhost目录下分别根据域名建立相应的
www_test_com.conf,www_test1_com.conf,www_test2_com.conf3个文件.
##我把虚拟主机配置文件放在了这个目录下,只不过需要先手动创建目录和.conf文件[root@www test]#ls /host/nginx/conf/vhost/ www_test1_com.conf www_test2_com.conf www_test_com.conf
www_test_com.conf配置代码:
vi /host/nginx/conf/vhost/www_test_com.conf
server {
listen 80; ###换成自个的IP地址(我是基于域名的虚拟主机,所以是相同IP不同端口。
client_max_body_size 100M;
server_name www.test.com; ###换成自个要用的域名
charset utf-8; ###字符集:utf-8
root /var/www/test/; ###站点路径——存放网页的目录
index index.php index.html index.htm; ###追加index.php让nginx服务器默认支持index.php为首页:
autoindex on;
access_log /host/nginx/logs/test/test.access.log;
error_log /host/nginx/logs/test/test.error.log;
if (-d $request_filename) {
rewrite ^/(.*)([^/])$ http://$host/$1$2/ permanent;
}
error_page 404 /404.html;
location = /40x.html {
root /var/www/test/; #你的站点路径
charset on;
}
# redirect server error pages to the static page /50x.html
#
error_page 500 502 503 504 /50x.html;
location = /50x.html {
root /var/www/test/; ###自个的站点路径——网页存放路径
charset on;
}
#将客户端请求装交给fastcgi,老大要求用fpm模块(修改)
location ~ \.php$ {
root /var/www/test/;
fastcgi_pass 127.0.0.1:9000;
fastcgi_index index.php;
fastcgi_param SCRIPT_FILENAME $document_root$fastcgi_script_name;
include fastcgi_params;
}
注意:配置.php请求被传送到后端的php-fpm模块,默认情况下php配置块是被注释的,此时去
掉注释并修改,这里面很多都是默认的,root是配置php程序放置的根目录,主要修改
的就是fastcgi_param中的/scripts为$document_root
例如:fastcgi_param SCRIPT_FILENAME $document_root$fastcgi_script_name;
location~ .*\.(php|php5|php4|shtml|xhtml|phtml)?$ {
fastcgi_pass 127.0.0.1:9000;
include /opt/openresty/nginx/conf/fastcgi_params;
}
#网站的图片较多,更改较少,将它们在浏览器本地缓存15天
location ~ .*\.(gif|jpg|jpeg|png|bmp|swf)$ {
expires 15d;
}
#网站会加载很多JS、CSS,将它们在浏览器本地缓存1天
location ~ .*\.(js|css)?$ {
expires 1d;
}
location /(WEB-INF)/ {
deny all;
}
}
注意:www_test1_com.conf配置代码和www_test2_com.conf配置代码跟www_test_com.conf(除了
和网页存放路径不一样外)一样。
5.创建/var/www/test,/var/www/test1,/var/www/test2这三个目录,并在这三个目录下分别创建 index.php,还要给它们属主和属组权限。
[root@www ~]# ls /var/www/test
test/ test1/ test2/ [root@www ~]# vi/var/www/test/index.php <?php phpinfo(); ?>给网页文档目录/var/www/test{“”,1,2}添加属主和属组权限。[root@localhosttest]# chown -R www-data:www-data /var/www/test{"",1,2}其他两个测试文件(注意目录)一样。
7、php文件配置:
1.php-fpm.conf配置文件
[root@www~]# vi /etc/php-fpm.conf在[global]配置项下,把pid = /var/run/php-fpm/php-fpm.pid前的分号注释去掉,还有就是include=/etc/php-fpm.d/*.conf这一项,设置配置文件路径
2.php-fpm.d/www.conf配置文件[root@www~]# vi /etc/php-fpm.d/www.conf在[www]配置项下有user = ,group= 两配置项,都改了user= www-datagroup= www-data 8、检查nginx配置是否有错
nginx -t启动Nginx服务[root@localhost~]# Nginx ##nginx启动命令启动PHP服务[root@localhost~]# php-fpm ##PHP启动命令启动mariadb服务[root@localhost~]# systemctl enable mariadb
9、配置防火墙规则:
[root@www~]# firewall-cmd --add-port=80/tcp –permanent #nginx:80
[root@www~]# firewall-cmd --add-port=3306/tcp –permanent #mariadb:3306
[root@www~]# firewall-cmd --add-port=3306/tcp –permanent #PHP:9000
[root@www~]# firewall-cmd –reload
10、在windows系统中C:\WINDOWS\system32\drivers\etc下的hosts文件中做域名映射
11、可以查看访问了

相关文章推荐
- 用yum源配合源码包安装openresty、mariadb、php7服务
- mariadb源码安装
- CentOS源码安装MariaDB全过程
- centos7.2 源码安装mariadb10.1
- 源码包编译安装Mariadb
- 转:CentOS系统yum源配置修改、yum安装软件包源码包出错解决办法!
- MariaDB-5.5.32源码编译安装
- linux-扩展应用:vim编辑技巧、发布网络YUM源、源码编译安装
- Linux下搭建本地yum源,rpm 安装,源码安装
- 源码编译安装mariadb-5.5.48
- 运维之系统服务篇------2.linux扩展应用 、 vim编辑技巧 、 发布网络YUM源 、 源码编译安装
- linux 下mariadb源码包安装
- 源码安装gcc-5.10和MariaDB-10.0.21
- 编译安装MariaDB源码包
- openssl源码安装后,编译nginx-1.9.7或者openresty找不到OpenSSL的解决办法
- MySQL学习笔记之二:源码编译安装和二进制格式安装MariaDB
- CentOS7下源码安装MariaDB10.0.12
- shell脚本和ansible实践MariaDB源码编译自动安装
- Redhat Enterprise Linux 6 (CentOS 6) 用源码包方式安装MariaDB数据库
- linux-扩展应用:vim编辑技巧、发布网络YUM源、源码编译安装