Spring配置及第一个Spring HelloWorld
2017-05-25 14:25
295 查看
转自:http://blog.csdn.net/evankaka/article/details/44784205
本文将主讲了spring在Eclipse下的配置,并用Spring运行了第一个HelloWorld.
这里我们已经配置好Java的运行环境和装好Eclipse了。
下载Spring
下载地址:http://maven.springframework.org/release/org/springframework/spring/
下载commons-logging
下载地址:http://commons.apache.org/proper/commons-logging/download_logging.cgi
将它们下载后解压到自己想放的位置,下载之前记得要看清楚是32位还是64位
1、新建一个工程,就叫SpringHelloworld。
2、添加Spring3.x的包,网上有很多不同的方法。这里我只讲一种。
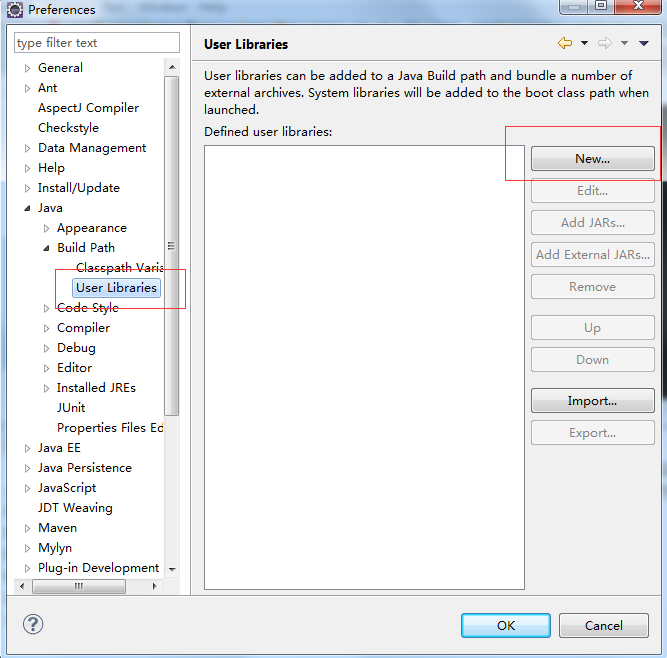
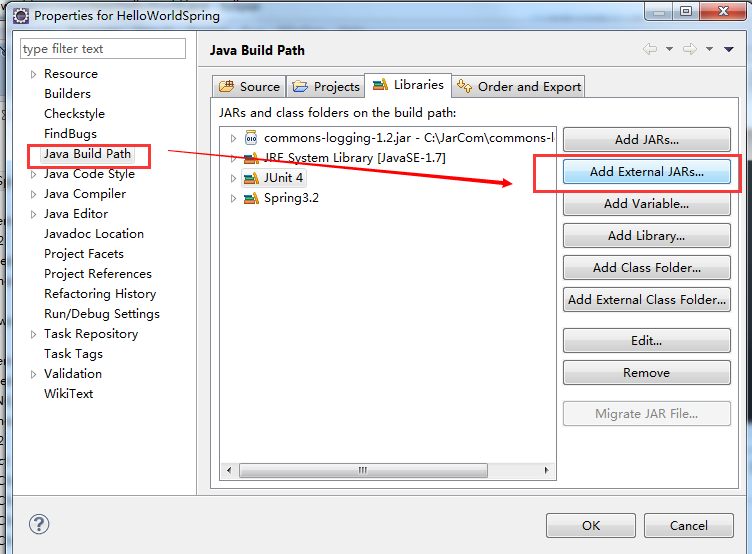
在Window->Preferences->Java->Build Path->User Libraries->New添加一个用户包的库,这里这么做的原因是Spring包比较多,我们这样做,配置一次后,以后每个工程要用直接添加该库就行了
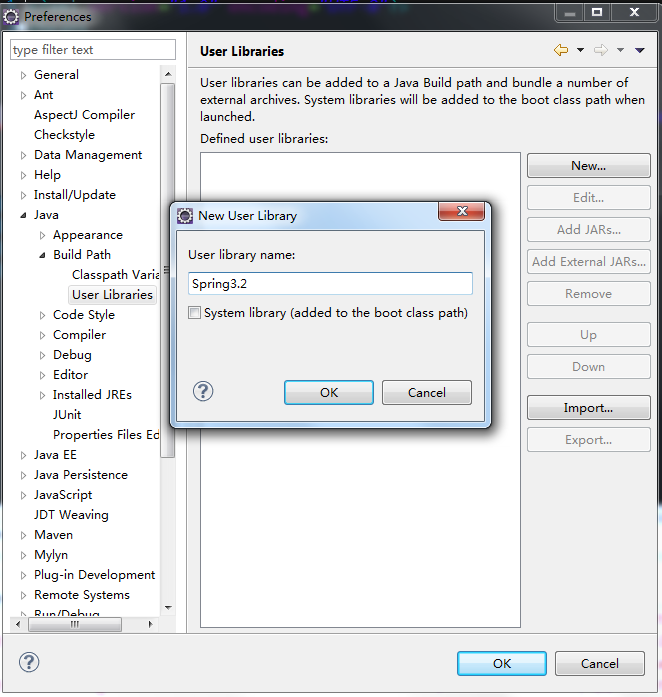
命名为Spring3.2,点击OK
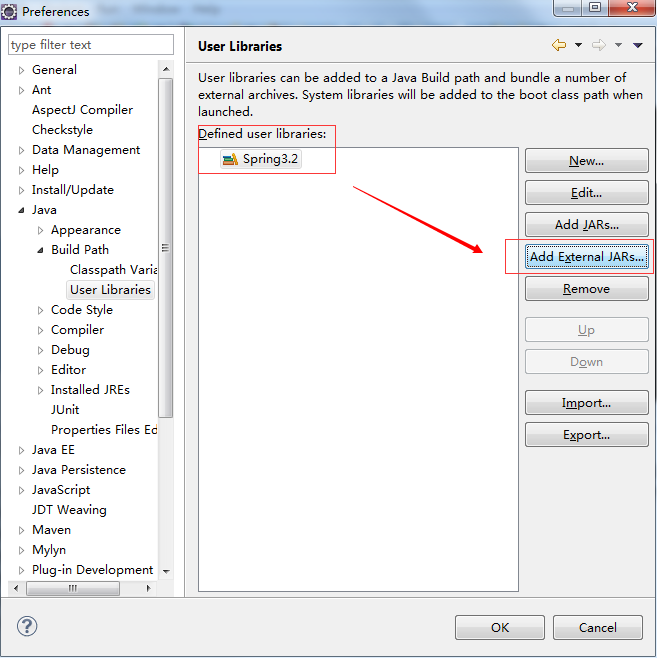
点击Add External JARS.在跳出的窗口中选择Spring libs的包所在的位置(看你的解压位置),把用到的JAR都添加进来

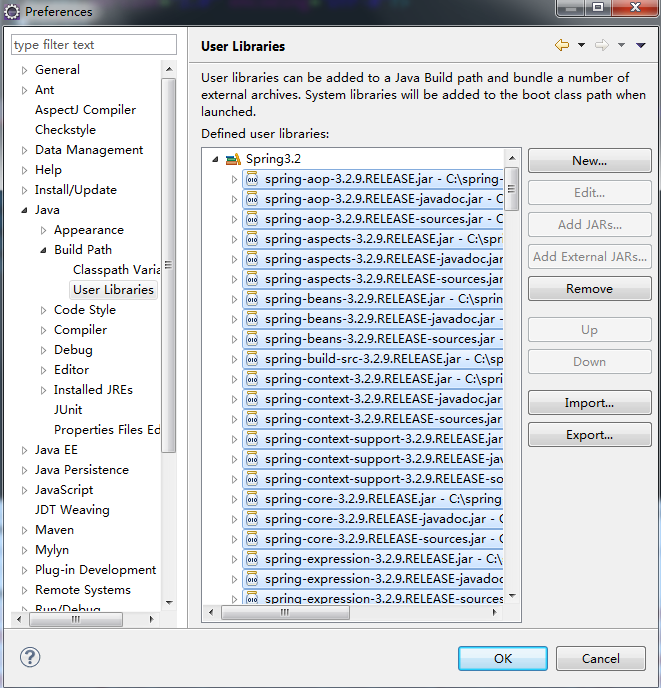
添加成功后
添加到工程中来:
选择新建的工程-》Properties->Java Build Path->Add library
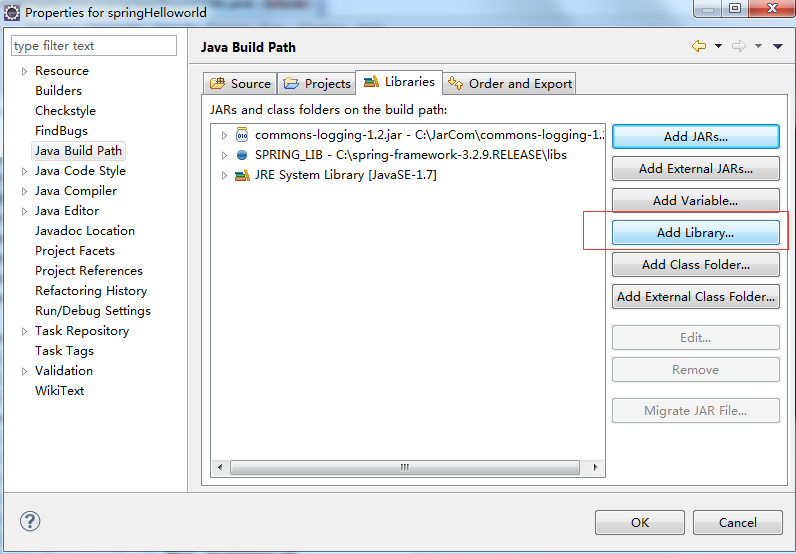
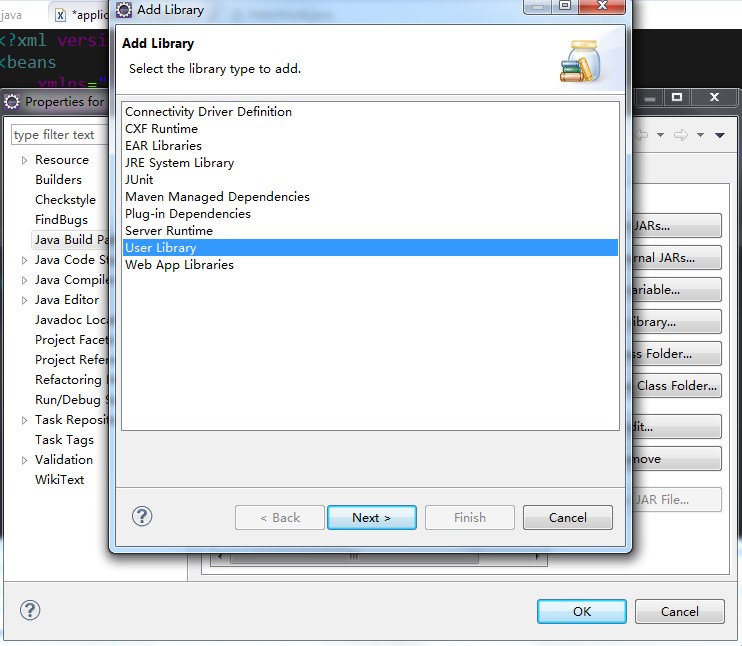
在跳出的窗口中选择User Library
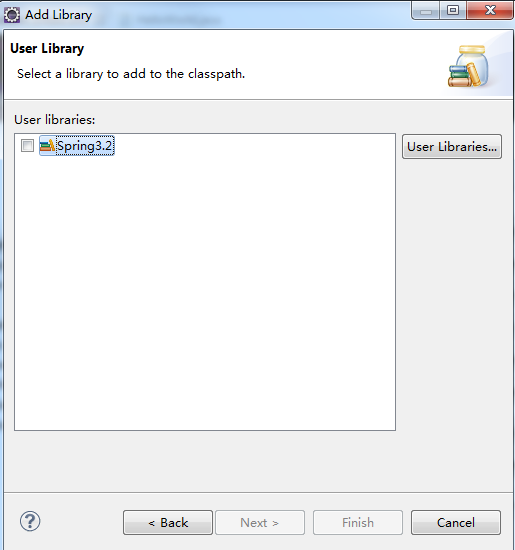
然后又会跳出一个窗口,这时就可以选择我们之前配置的用户库的包Spring3.2了,把沟打上。
添加成功
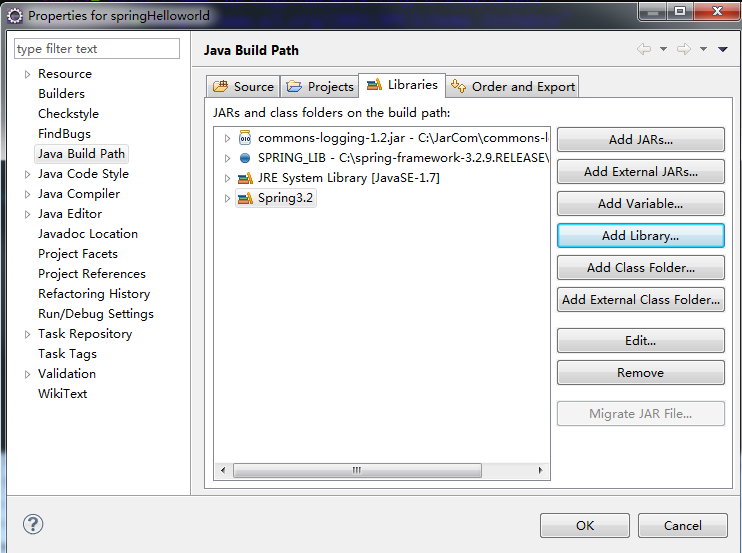
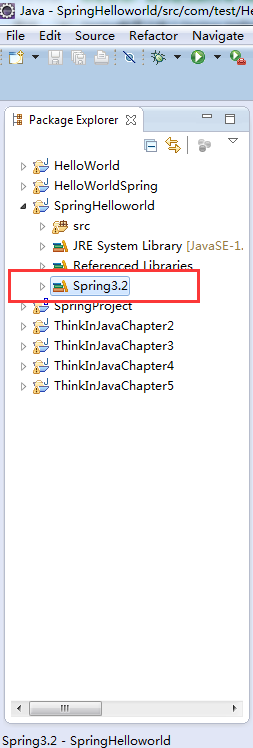
然后工程中就可以看到添加进来的Spring3.2了
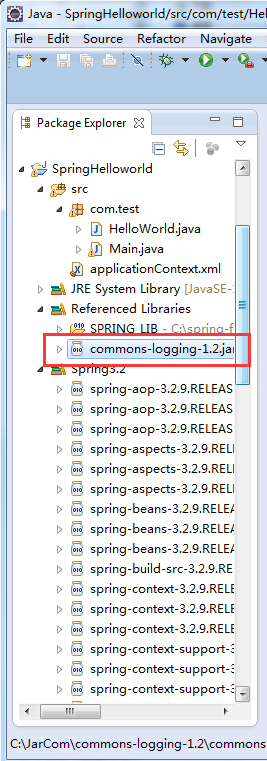
选择工程-》Properties->Java Build Path->Add library
然后选择commons-logging所在的包就可以了

添加成功了
本文工程下载
好了,上面的配置都弄好后,我们就可以开始第一个HelloWorld了
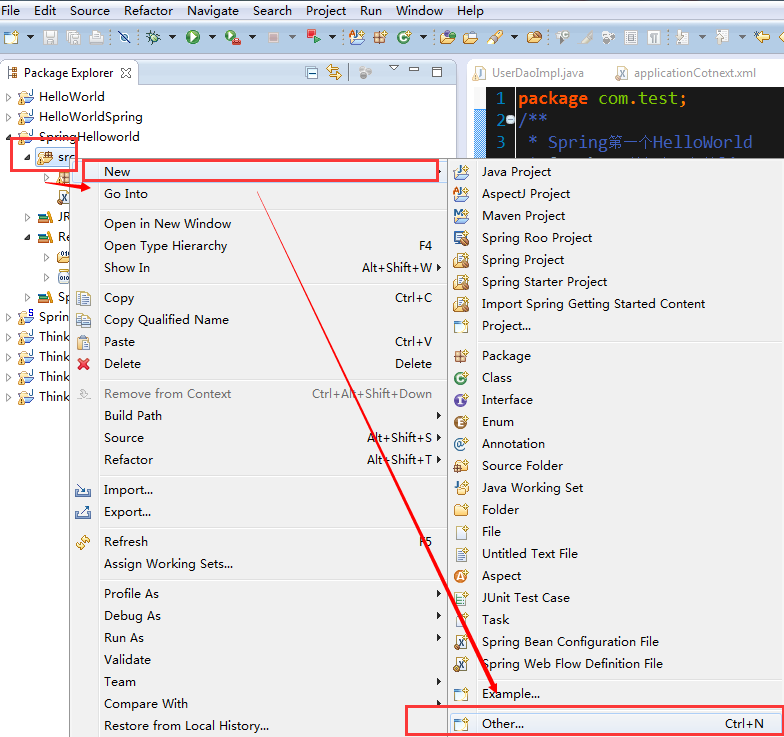
1.首先在当前包下新建一个HelloWorld.java
[java] view
plain copy
package com.test;
/**
* Spring第一个HelloWorld
* @author 林炳文(邮箱ling20081005@126.com 博客:http://blog.csdn.net/evankaka)
* @time 2015.4.1
*/
public class HelloWorld {
private String info;
public String getInfo() {
return info;
}
public void setInfo(String info) {
this.info = info;
}
}
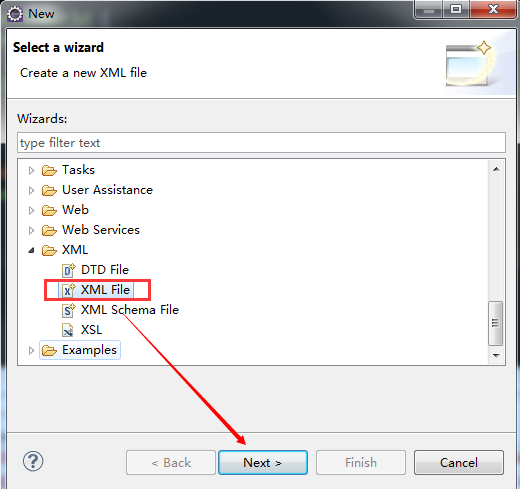
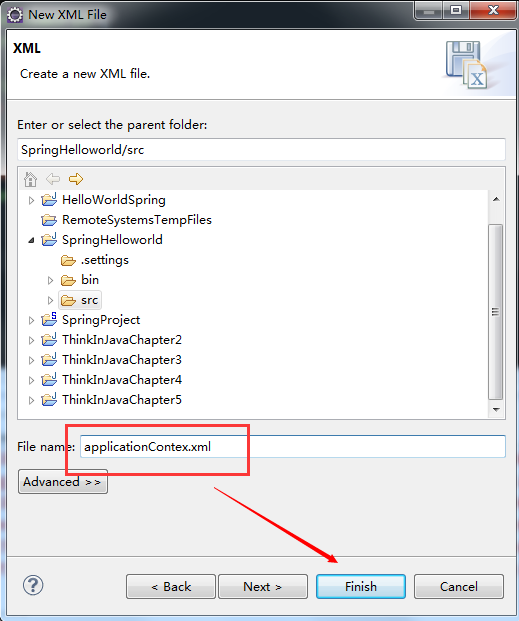
2、编写配置文件applicationContext.xml
注意:因为路径配置的是 ClassPathXmlApplicationContext("applicationContext.xml");所以applicationContext.xml一定要放在src路径下,不要放在他的二级目录
在当前工程下
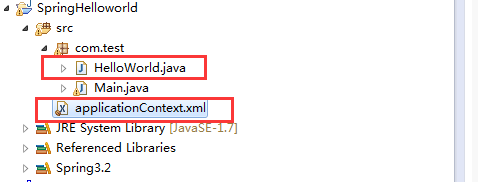
这就是添加成功后的
然后把applicationContext.xml内容改为如下:
[html] view
plain copy
<?xml version="1.0" encoding="UTF-8"?>
<beans
xmlns="http://www.springframework.org/schema/beans"
xmlns:xsi="http://www.w3.org/2001/XMLSchema-instance"
xmlns:p="http://www.springframework.org/schema/p"
xsi:schemaLocation="http://www.springframework.org/schema/beans http://www.springframework.org/schema/beans/spring-beans-3.0.xsd">
<!-- 配置需要被Spring管理的Bean(创建,创建后放在了Spring IOC容器里面)-->
<bean id="hello" class="com.test.HelloWorld">
<!-- 配置该Bean需要注入的属性(是通过属性set方法来注入的) -->
<property name="info" value="Happy New Year!"/>
</bean>
</beans>
3、反转控制开始
在Main.java中添加如下:
[java] view
plain copy
/**
* Spring第一个HelloWorld
* @author 林炳文(邮箱ling20081005@126.com 博客:http://blog.csdn.net/evankaka)
* @time 2015.4.1
*/
package com.test;
import org.springframework.beans.factory.BeanFactory;
import org.springframework.context.support.ClassPathXmlApplicationContext;
public class Main {
private String who = null;
public static void main(String[] args) {
//获取Spring的ApplicationContext配置文件,注入IOC容器中
//(Map: key:String, bean标签的id属性值 ==>value:Object, bean标签class属性所指类的实例)
BeanFactory factory = new ClassPathXmlApplicationContext("applicationContext.xml");
HelloWorld hw1 = (HelloWorld)factory.getBean("hello");//map.get("hello")
System.out.println(hw1.getInfo());
System.out.println(hw1);
}
}
然后选择工程右键:
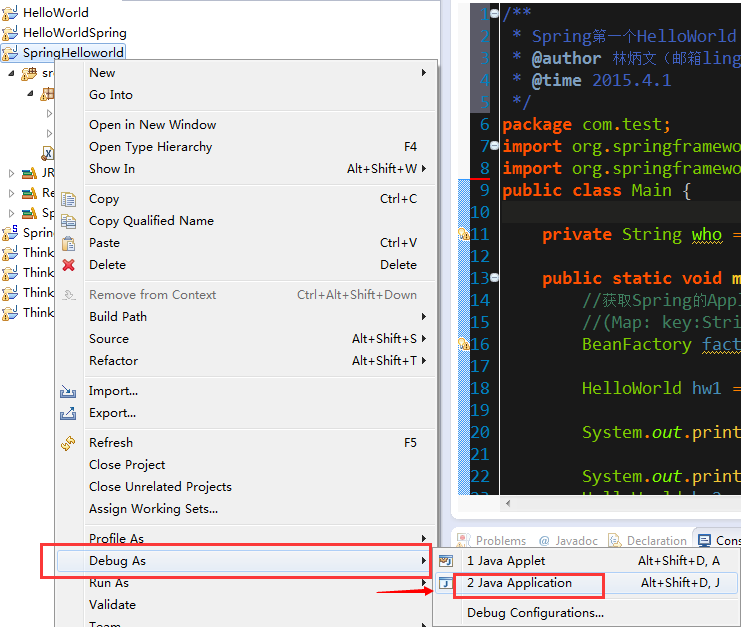
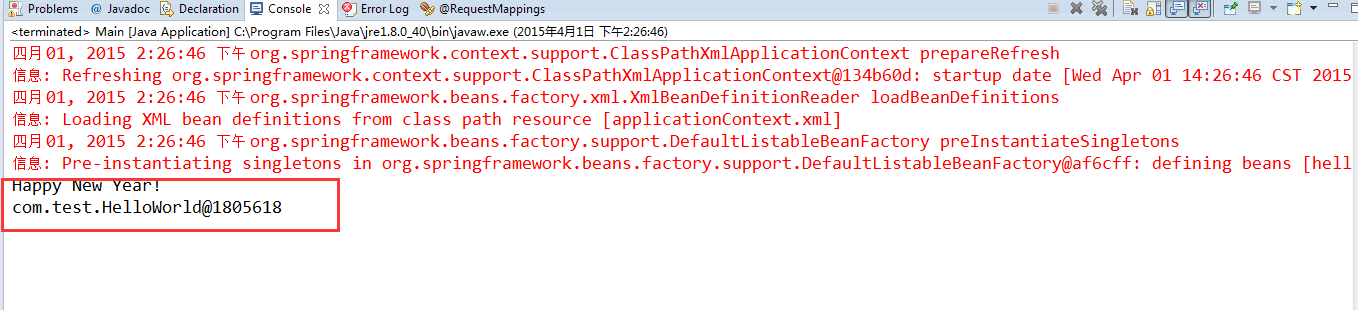
接下来就是输出结果啦:
本文将主讲了spring在Eclipse下的配置,并用Spring运行了第一个HelloWorld.
一、下载需要的文件
这里我们已经配置好Java的运行环境和装好Eclipse了。下载Spring
下载地址:http://maven.springframework.org/release/org/springframework/spring/
下载commons-logging
下载地址:http://commons.apache.org/proper/commons-logging/download_logging.cgi
将它们下载后解压到自己想放的位置,下载之前记得要看清楚是32位还是64位
二、配置Spring
1、新建一个工程,就叫SpringHelloworld。2、添加Spring3.x的包,网上有很多不同的方法。这里我只讲一种。
在Window->Preferences->Java->Build Path->User Libraries->New添加一个用户包的库,这里这么做的原因是Spring包比较多,我们这样做,配置一次后,以后每个工程要用直接添加该库就行了
命名为Spring3.2,点击OK
点击Add External JARS.在跳出的窗口中选择Spring libs的包所在的位置(看你的解压位置),把用到的JAR都添加进来
添加成功后
添加到工程中来:
选择新建的工程-》Properties->Java Build Path->Add library
在跳出的窗口中选择User Library
然后又会跳出一个窗口,这时就可以选择我们之前配置的用户库的包Spring3.2了,把沟打上。
添加成功
然后工程中就可以看到添加进来的Spring3.2了
三、添加commons-logging
选择工程-》Properties->Java Build Path->Add library然后选择commons-logging所在的包就可以了
添加成功了
四、开始Spring编程
本文工程下载好了,上面的配置都弄好后,我们就可以开始第一个HelloWorld了
1.首先在当前包下新建一个HelloWorld.java
[java] view
plain copy
package com.test;
/**
* Spring第一个HelloWorld
* @author 林炳文(邮箱ling20081005@126.com 博客:http://blog.csdn.net/evankaka)
* @time 2015.4.1
*/
public class HelloWorld {
private String info;
public String getInfo() {
return info;
}
public void setInfo(String info) {
this.info = info;
}
}
2、编写配置文件applicationContext.xml
注意:因为路径配置的是 ClassPathXmlApplicationContext("applicationContext.xml");所以applicationContext.xml一定要放在src路径下,不要放在他的二级目录
在当前工程下
这就是添加成功后的
然后把applicationContext.xml内容改为如下:
[html] view
plain copy
<?xml version="1.0" encoding="UTF-8"?>
<beans
xmlns="http://www.springframework.org/schema/beans"
xmlns:xsi="http://www.w3.org/2001/XMLSchema-instance"
xmlns:p="http://www.springframework.org/schema/p"
xsi:schemaLocation="http://www.springframework.org/schema/beans http://www.springframework.org/schema/beans/spring-beans-3.0.xsd">
<!-- 配置需要被Spring管理的Bean(创建,创建后放在了Spring IOC容器里面)-->
<bean id="hello" class="com.test.HelloWorld">
<!-- 配置该Bean需要注入的属性(是通过属性set方法来注入的) -->
<property name="info" value="Happy New Year!"/>
</bean>
</beans>
3、反转控制开始
在Main.java中添加如下:
[java] view
plain copy
/**
* Spring第一个HelloWorld
* @author 林炳文(邮箱ling20081005@126.com 博客:http://blog.csdn.net/evankaka)
* @time 2015.4.1
*/
package com.test;
import org.springframework.beans.factory.BeanFactory;
import org.springframework.context.support.ClassPathXmlApplicationContext;
public class Main {
private String who = null;
public static void main(String[] args) {
//获取Spring的ApplicationContext配置文件,注入IOC容器中
//(Map: key:String, bean标签的id属性值 ==>value:Object, bean标签class属性所指类的实例)
BeanFactory factory = new ClassPathXmlApplicationContext("applicationContext.xml");
HelloWorld hw1 = (HelloWorld)factory.getBean("hello");//map.get("hello")
System.out.println(hw1.getInfo());
System.out.println(hw1);
}
}
然后选择工程右键:
接下来就是输出结果啦:

相关文章推荐
- Spring配置及第一个Spring HelloWorld
- Spring配置及第一个Spring HelloWorld
- Spring环境配置(安装springsource-tool-suite插件)及第一个Spring HelloWorld
- 3、SSM框架-Spring第一个Spring HelloWorld(3)
- Java基础教程1:环境配置及第一个HelloWorld.java
- 越狱开发:用iosOpenDev配置越狱开发环境 编写第一个hello world-b
- springboot开发 第一个案例之hello,world!
- SpringMVC学习笔记(三)使用IntelliJ IDEA开发Spring MVC HelloWorld(注解配置SpringMVC)
- SSM搭建-Spring第一个Spring HelloWorld(2)
- springboot开发 第一个案例之hello,world!
- Spring配置与第一Spring HelloWorld
- 一步一步学Spring.Net——2、第一个程序“Hello,World”
- 基于xml配置的Spring MVC HelloWorld
- 第一个dojo hello world
- 从一个字符串中返回第一个没有重复出现的字符(例如"Hello World",返回"H")
- 第一个Java Applet—hello world 编译及运行运行
- anjuta的安装、配置以及第一个hello程序
- GNUstep Gorm第一个视窗程序,第一个图形界面,第一个helloworld gui(转)
- win32汇编:环境变量配置和Hello,World!例子
- Spring flex 搭建服务 之 编程环境配置和我的第一个程序(第二章,第二节)