spring-cloud-config service使用svn作为远程的例子
2017-05-12 00:00
615 查看
首先是新建项目config-server,在pom文件,加入对应的dependency
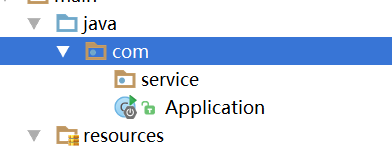
然后新建Application启动类,记住要新建包放进去,否则会报错
加上@EnableConfigServer注解
接着就是配置文件:application.yml
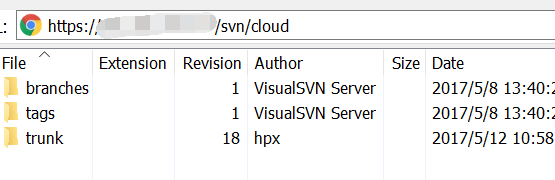
接下来看我svn结构

然后启动Application
打开浏览器,输入http://localhost:8888/service-config/trunk,看到如下内容

换个姿势:http://localhost:8888/service-config.yml

约定如下:
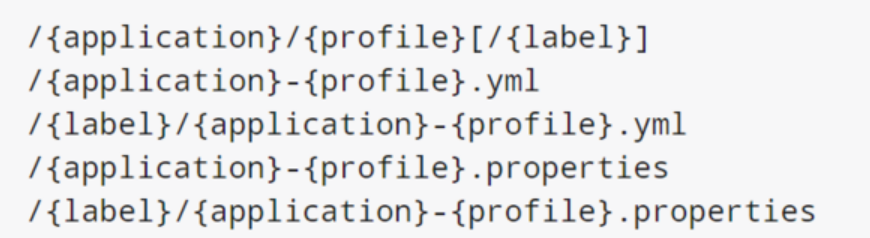
application:配置
profile:环境..比如说你看到我有一个-dev文件否?
label:分支(不知道这么理解对不对)
试试:http://localhost:8888/service-config/dev/trunk
-----------------------------------------------------------------------------------------------------------
接着新建config-client,pom添加如下...
还是我们的application.yml(ps:如果出现注入值失败的情况,可以试下把applicaton rename to bootstarp)
还是Application,标准能启动就行,然后我们写一个Controller
浏览器输入:http://localhost:8882/name
得到结果~Game Over
<project xmlns="http://maven.apache.org/POM/4.0.0" xmlns:xsi="http://www.w3.org/2001/XMLSchema-instance"
xsi:schemaLocation="http://maven.apache.org/POM/4.0.0 http://maven.apache.org/maven-v4_0_0.xsd"> <modelVersion>4.0.0</modelVersion>
<groupId>com.service.config</groupId>
<artifactId>service-config</artifactId>
<packaging>war</packaging>
<version>1.0-SNAPSHOT</version>
<name>service-config Maven Webapp</name>
<url>http://maven.apache.org</url>
<parent>
<groupId>org.springframework.boot</groupId>
<artifactId>spring-boot-starter-parent</artifactId>
<version>1.3.5.RELEASE</version>
<relativePath /> <!-- lookup parent from repository -->
</parent>

<dependencyManagement>
<dependencies>
<dependency>
<groupId>org.springframework.cloud</groupId>
<artifactId>spring-cloud-dependencies</artifactId>
<version>Brixton.RELEASE</version>
<type>pom</type>
<scope>import</scope>
</dependency>
</dependencies>
</dependencyManagement>

<dependencies>
<dependency>
<groupId>org.springframework.cloud</groupId>
<artifactId>spring-cloud-config-server</artifactId>
</dependency>
<dependency>
<groupId>org.springframework.boot</groupId>
<artifactId>spring-boot-starter-web</artifactId>
</dependency>
<dependency>
<groupId>org.tmatesoft.svnkit</groupId>
<artifactId>svnkit</artifactId>
</dependency>
</dependencies>

<build>
<plugins>
<plugin>
<groupId>org.springframework.boot</groupId>
<artifactId>spring-boot-maven-plugin</artifactId>
</plugin>
</plugins>
</build>
</project>
然后新建Application启动类,记住要新建包放进去,否则会报错
加上@EnableConfigServer注解
/**
* Created by hpx on 2017/5/12.
*/
@SpringBootApplication
@EnableConfigServer
public class Application {
public static void main(String[] args) {
SpringApplication.run(Application.class,args);
}
}
接着就是配置文件:application.yml
spring:
application:
name: service-config
profiles:
active: subversion
cloud:
config:
server:
svn:
uri: https://**.***.***.177/svn/cloud default-label: trunk
username:  username
password:  password
server:
port: 8888
接下来看我svn结构
然后启动Application
打开浏览器,输入http://localhost:8888/service-config/trunk,看到如下内容
换个姿势:http://localhost:8888/service-config.yml
约定如下:
application:配置
profile:环境..比如说你看到我有一个-dev文件否?
label:分支(不知道这么理解对不对)
试试:http://localhost:8888/service-config/dev/trunk
-----------------------------------------------------------------------------------------------------------
接着新建config-client,pom添加如下...
<project xmlns="http://maven.apache.org/POM/4.0.0" xmlns:xsi="http://www.w3.org/2001/XMLSchema-instance"
xsi:schemaLocation="http://maven.apache.org/POM/4.0.0 http://maven.apache.org/maven-v4_0_0.xsd"> <modelVersion>4.0.0</modelVersion>
<groupId>com.service.client</groupId>
<artifactId>service-client</artifactId>
<packaging>war</packaging>
<version>1.0-SNAPSHOT</version>
<name>service-client Maven Webapp</name>
<url>http://maven.apache.org</url>
<parent>
<groupId>org.springframework.boot</groupId>
<artifactId>spring-boot-starter-parent</artifactId>
<version>1.3.5.RELEASE</version>
<relativePath /> <!-- lookup parent from repository -->
</parent>

<dependencyManagement>
<dependencies>
<dependency>
<groupId>org.springframework.cloud</groupId>
<artifactId>spring-cloud-dependencies</artifactId>
<version>Brixton.RELEASE</version>
<type>pom</type>
<scope>import</scope>
</dependency>
</dependencies>
</dependencyManagement>

<dependencies>
<dependency>
<groupId>org.springframework.cloud</groupId>
<artifactId>spring-cloud-starter-config</artifactId>
</dependency>

<dependency>
<groupId>org.springframework.boot</groupId>
<artifactId>spring-boot-starter-web</artifactId>
</dependency>
</dependencies>

<build>
<plugins>
<plugin>
<groupId>org.springframework.boot</groupId>
<artifactId>spring-boot-maven-plugin</artifactId>
</plugin>
</plugins>
</build>
</project>
还是我们的application.yml(ps:如果出现注入值失败的情况,可以试下把applicaton rename to bootstarp)
spring:
application:
name: service-config
cloud:
config:
label: trunk
profile: dev
uri:  http://localhost:8888 server:
port: 8882
还是Application,标准能启动就行,然后我们写一个Controller
/**
* Created by hpx on 2017/5/12.
*/
@RestController
@RefreshScope
public class TestController {
@Value("${myconfig.name}")
private String name;

@RequestMapping("/name")
public String getName() {
return name;
}
}
浏览器输入:http://localhost:8882/name
得到结果~Game Over

相关文章推荐
- spring cloud config 学习日记 使用SVN作为仓库
- spring cloud config server使用svn来作为外部配置中心
- 使用Spring Cloud Feign作为HTTP客户端调用远程HTTP服务
- 使用Spring Cloud Feign作为HTTP客户端调用远程HTTP服务
- 使用Spring Cloud Feign作为HTTP客户端调用远程HTTP服务
- 使用Spring Cloud Feign作为HTTP客户端调用远程HTTP服务的方法(推荐)
- 使用Spring Cloud Feign作为HTTP客户端调用远程HTTP服务
- 使用Spring Cloud Feign作为HTTP客户端调用远程HTTP服务
- 使用Spring Cloud Feign作为HTTP客户端调用远程HTTP服务
- 使用Spring Cloud Feign作为HTTP客户端调用远程HTTP服务
- 使用Spring Cloud Feign作为HTTP客户端调用远程HTTP服务
- SpringCloud Config 配置中心 svn使用
- 使用Spring Cloud Feign作为HTTP客户端调用远程HTTP服务
- spring cloud config svn配置多个配置文件
- Spring MVC 使用Servlet原生API作为参数,在 spring boot 、 spring cloud 同样适用。
- spring boot / cloud (八) 使用RestTemplate来构建远程调用服务
- Spring Cloud Config客户端使用
- spring cloud config 用svn做配置文件仓库
- Empty repository的SVN工程在Spring Cloud Config下的问题
- spring cloud config 用svn做配置文件仓库