总结struts2 Action的四种实现方式
2017-05-04 01:20
423 查看
前言:
struts是一个优秀的MVC框架,一路走来,版本不断升级!Action的实现方式也一直在升级,本文章用一个简单的案例,简要介绍Action的几种实现方式!
实现方式可分为两大类:属性驱动和模型驱动!其中属性驱动有三种实现方式(普通pojo类 实现Action接口 继承ActionSupport)
开发工具:
MyEclipse10.0 Tomcat7 jdk 7 Chorm浏览器
案例说明:
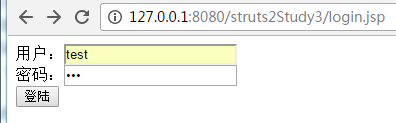
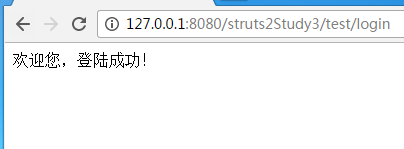
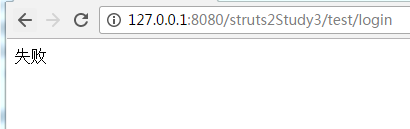
用户在登陆界面(login.jsp),输入账号和密码,点击登陆按钮!如果账号密码匹配,进入欢迎界面(welcome.jsp),如果账号密码出错,进入登陆失败界面(fail.jsp)!LoginAction负责处理用户请求!
①struts2环境搭建:
1.新建工程导入相关jar包
2.配置web.xml
2
3
4
5
6
7
8
9
10
11
12
13
<
4000
li>14
15
16
17

1
2
3
4
5
6
7
8
9
10
11
12
13
14
15
16
17
3.配置struts.xml(没有配置action)
2
3
4
5
6
7
1
2
3
4
5
6
7
4.启动服务器,如果没有报错,证明环境搭建成功!
②编写jsp页面
1.welcome.jsp页面
2
3
4
5
6
7
8
9
10
11
12
13
14
15
16
17
18
19
20
21
22
23
24
25
26
27
1
2
3
4
5
6
7
8
9
10
11
12
13
14
15
16
17
18
19
20
21
22
23
24
25
26
27
2.fail.jsp页面
2
3
4
5
6
7
8
9
10
11
12
13
14
15
16
17
18
19
20
21
22
23
24
25
1
2
3
4
5
6
7
8
9
10
11
12
13
14
15
16
17
18
19
20
21
22
23
24
25
至此!准备工作完成!
下面:开始介绍action的实现方式
方式一:普通pojo类
login.jsp页面
2
3
4
5
6
7
8
9
10
11
12
13
14
15
16
17
18
19
20
21
22
23
24
25
26
27
28
29
30
1
2
3
4
5
6
7
8
9
10
11
12
13
14
15
16
17
18
19
20
21
22
23
24
25
26
27
28
29
30
struts.xml
2
3
4
5
6
7
8
9
10
11
12
1
2
3
4
5
6
7
8
9
10
11
12
LoginAction
/是否包含属性并不重要,重要的是包含 setter和getter方法,因为系统是通过setter和getter方法来处理请求参数的,不是通过属性名来处理请求参数!/
2
3
4
5
6
7
8
9
10
11
12
13
14
15
16
17
18
19
20
21
22
23
24
25
26
27
28
29
30
31
32
33
1
2
3
4
5
6
7
8
9
10
11
12
13
14
15
16
17
18
19
20
21
22
23
24
25
26
27
28
29
30
31
32
33
文件结构:

测试结果:
方式二:实现Action接口(只贴出LoginAction1代码,除struts.xml外其余和方式一完全一样!只需修改struts.xml action元素的class属性的值即可-将action.LoginAction改为action.LoginAction1)
2
3
4
5
6
7
8
9
10
11
12
13
14
15
16
17
18
19
20
21
22
23
24
25
26
27
28
29
30
31
32
33
34
35
1
2
3
4
5
6
7
8
9
10
11
12
13
14
15
16
17
18
19
20
21
22
23
24
25
26
27
28
29
30
31
32
33
34
35
测试结果:和方式一一样!
方式三:继承ActionSupport(只贴出LoginAction2代码,除struts.xml外其余和方式一完全一样!只需修改struts.xml action元素的class属性的值即可-将action.LoginAction改为action.LoginAction2)
2
3
4
5
6
7
8
9
10
11
12
13
14
15
16
17
18
19
20
21
22
23
24
25
26
27
28
29
30
31
32
33
34
35
36
1
2
3
4
5
6
7
8
9
10
11
12
13
14
15
16
17
18
19
20
21
22
23
24
25
26
27
28
29
30
31
32
33
34
35
36
测试结果:测试成功!
方式一,方式二,方式三都属于属性驱动!
什么是属性驱动?
属性驱动就是使用属性作为贯穿MVC流程的信息携带者,依附于Action实例,Action实例封装请求参数和处理结果!
方式四:模型驱动(新建User类,用来封装请求参数!LoginAction实现Action和ModelDriven接口)
关于模型驱动,就是使用单独的JavaBean实例来贯穿整个MVC流程,JavaBean实例封装请求参数和处理结果!
User类
2
3
4
5
6
7
8
9
10
11
12
13
14
15
16
17
18
19
20
21
22
23
24
25
26
27
28
29
30
31
32
33
34
35
36
37
38
39
40
1
2
3
4
5
6
7
8
9
10
11
12
13
14
15
16
17
18
19
20
21
22
23
24
25
26
27
28
29
30
31
32
33
34
35
36
37
38
39
40
LoginAction3类
2
3
4
5
6
7
8
9
10
11
12
13
14
15
16
17
18
19
20
21
22
23
24
25
26
27
28
29
30
31
1
2
3
4
5
6
7
8
9
10
11
12
13
14
15
16
17
18
19
20
21
22
23
24
25
26
27
28
29
30
31
只贴出LoginAction3和User代码,除struts.xml外其余和方式一完全一样!只需修改struts.xml action元素的class属性的值即可-将action.LoginAction改为action.LoginAction3
测试结果:成功!
关于action类中属性种类的介绍:
1.HTTP请求参数!
2.Action的处理结果!
3.通过在Struts2配置文件中进行配置!
struts是一个优秀的MVC框架,一路走来,版本不断升级!Action的实现方式也一直在升级,本文章用一个简单的案例,简要介绍Action的几种实现方式!
实现方式可分为两大类:属性驱动和模型驱动!其中属性驱动有三种实现方式(普通pojo类 实现Action接口 继承ActionSupport)
开发工具:
MyEclipse10.0 Tomcat7 jdk 7 Chorm浏览器
案例说明:
用户在登陆界面(login.jsp),输入账号和密码,点击登陆按钮!如果账号密码匹配,进入欢迎界面(welcome.jsp),如果账号密码出错,进入登陆失败界面(fail.jsp)!LoginAction负责处理用户请求!
①struts2环境搭建:
1.新建工程导入相关jar包
2.配置web.xml
<?xml version="1.0" encoding="UTF-8"?>
<web-app xmlns:xsi="http://www.w3.org/2001/XMLSchema-instance" xmlns="http://java.sun.com/xml/ns/javaee" xmlns:web="http://java.sun.com/xml/ns/javaee/web-app_2_5.xsd" xsi:schemaLocation="http://java.sun.com/xml/ns/javaee http://java.sun.com/xml/ns/javaee/web-app_3_0.xsd" version="3.0">
<display-name></display-name>
<welcome-file-list>
<welcome-file>index.jsp</welcome-file>
</welcome-file-list>
<!-- 配置struts2核心Filter -->
<filter>
<filter-name>struts2</filter-name>
<filter-class>org.apache.struts2.dispatcher.ng.filter.StrutsPrepareAndExecuteFilter</filter-class>
</filter>
<!-- 所有的请求都会被struts2过滤器拦住,相当于引入struts2框架 -->
<filter-mapping>
<filter-name>struts2</filter-name>
<url-pattern>/*</url-pattern>
</filter-mapping>
</web-app>
1
2
3
4
5
6
7
8
9
10
11
12
13
<
4000
li>14
15
16
17
1
2
3
4
5
6
7
8
9
10
11
12
13
14
15
16
17
3.配置struts.xml(没有配置action)
<?xml version="1.0" encoding="UTF-8" ?>
<!DOCTYPE struts PUBLIC
"-//Apache Software Foundation//DTD Struts Configuration 2.3//EN"
"http://struts.apache.org/dtds/struts-2.3.dtd">
<struts>
</struts>
1
2
3
4
5
6
7
1
2
3
4
5
6
7
4.启动服务器,如果没有报错,证明环境搭建成功!
②编写jsp页面
1.welcome.jsp页面
<%@ page language="java" import="java.util.*" pageEncoding="UTF-8"%>
<%
String path = request.getContextPath();
String basePath = request.getScheme()+"://"+request.getServerName()+":"+request.getServerPort()+path+"/";
%>

<!DOCTYPE HTML PUBLIC "-//W3C//DTD HTML 4.01 Transitional//EN">
<html>
<head>
<base href="<%=basePath%>">

<title>登陆成功界面</title>

<meta http-equiv="pragma" content="no-cache">
<meta http-equiv="cache-control" content="no-cache">
<meta http-equiv="expires" content="0">
<meta http-equiv="keywords" content="keyword1,keyword2,keyword3">
<meta http-equiv="description" content="This is my page">
<!--
<link rel="stylesheet" type="text/css" href="styles.css">
-->
</head>
<body>
欢迎您,登陆成功!
</body>
</html>
1
2
3
4
5
6
7
8
9
10
11
12
13
14
15
16
17
18
19
20
21
22
23
24
25
26
27
1
2
3
4
5
6
7
8
9
10
11
12
13
14
15
16
17
18
19
20
21
22
23
24
25
26
27
2.fail.jsp页面
<%@ page language="java" import="java.util.*" pageEncoding="UTF-8"%>
<%
String path = request.getContextPath();
String basePath = request.getScheme()+"://"+request.getServerName()+":"+request.getServerPort()+path+"/";
%>

<!DOCTYPE HTML PUBLIC "-//W3C//DTD HTML 4.01 Transitional//EN">
<html>
<head>
<base href="<%=basePath%>">
<title>登陆失败界面</title>
<meta http-equiv="pragma" content="no-cache">
<meta http-equiv="cache-control" content="no-cache">
<meta http-equiv="expires" content="0">
<meta http-equiv="keywords" content="keyword1,keyword2,keyword3">
<meta http-equiv="description" content="This is my page">
<!--
<link rel="stylesheet" type="text/css" href="styles.css">
-->
</head>
<body>
失败
</body>
</html>
1
2
3
4
5
6
7
8
9
10
11
12
13
14
15
16
17
18
19
20
21
22
23
24
25
1
2
3
4
5
6
7
8
9
10
11
12
13
14
15
16
17
18
19
20
21
22
23
24
25
至此!准备工作完成!
下面:开始介绍action的实现方式
方式一:普通pojo类
login.jsp页面
<%@ page language="java" import="java.util.*" pageEncoding="UTF-8"%>
<%
String path = request.getContextPath();
String basePath = request.getScheme()+"://"+request.getServerName()+":"+request.getServerPort()+path+"/";
%>

<!DOCTYPE HTML PUBLIC "-//W3C//DTD HTML 4.01 Transitional//EN">
<html>
<head>
<base href="<%=basePath%>">

<title>登陆页面</title>

<meta http-equiv="pragma" content="no-cache">
<meta http-equiv="cache-control" content="no-cache">
<meta http-equiv="expires" content="0">
<meta http-equiv="keywords" content="keyword1,keyword2,keyword3">
<meta http-equiv="description" content="This is my page">
<!--
<link rel="stylesheet" type="text/css" href="styles.css">
-->
</head>
<body>
<form action="test/login" method="post">
用户:<input type="text" name="username"><br>
密码:<input type="password" name="password"><br>
<input type="submit" value="登陆"><br>
</form>
</body>
</html>
1
2
3
4
5
6
7
8
9
10
11
12
13
14
15
16
17
18
19
20
21
22
23
24
25
26
27
28
29
30
1
2
3
4
5
6
7
8
9
10
11
12
13
14
15
16
17
18
19
20
21
22
23
24
25
26
27
28
29
30
struts.xml
<?xml version="1.0" encoding="UTF-8" ?>
<!DOCTYPE struts PUBLIC
"-//Apache Software Foundation//DTD Struts Configuration 2.3//EN"
"http://struts.apache.org/dtds/struts-2.3.dtd">
<struts>
<package name="lee" extends="struts-default" namespace="/test">
<action name="login" class="action.LoginAction" method="execute">
<result name="success" type="dispatcher">/welcome.jsp</result>
<result name=<
f976
span class="hljs-value">"error" type="dispatcher">/fail.jsp</result>
</action>
</package>
</struts>
1
2
3
4
5
6
7
8
9
10
11
12
1
2
3
4
5
6
7
8
9
10
11
12
LoginAction
/是否包含属性并不重要,重要的是包含 setter和getter方法,因为系统是通过setter和getter方法来处理请求参数的,不是通过属性名来处理请求参数!/
package action;
/**
* 版本一  普通POJO类
*
*/
public class LoginAction  {
//私有属性
private String username;
private String password;
//struts2的拦截器机制  getter   setter 方法负责解析用户请求参数  并且将请求参数值赋给action对应的属性
public String getUsername() {
return username;
}
public void setUsername(String username) {
this.username = username;
}
public String getPassword() {
return password;
}
public void setPassword(String password) {
this.password = password;
}
//普通的execute方法
public String execute() throws Exception {
if("test".equals(getUsername())&&"123".equals(getPassword())){
return "success";
}else{
return "error";
}

}
}12
3
4
5
6
7
8
9
10
11
12
13
14
15
16
17
18
19
20
21
22
23
24
25
26
27
28
29
30
31
32
33
1
2
3
4
5
6
7
8
9
10
11
12
13
14
15
16
17
18
19
20
21
22
23
24
25
26
27
28
29
30
31
32
33
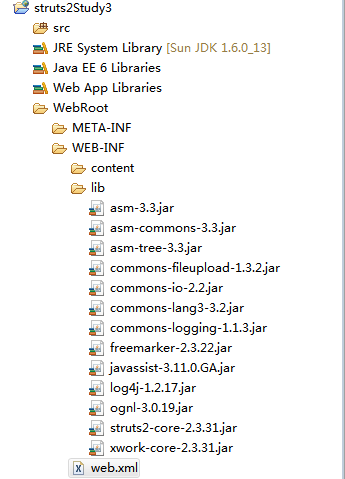
文件结构:
测试结果:
方式二:实现Action接口(只贴出LoginAction1代码,除struts.xml外其余和方式一完全一样!只需修改struts.xml action元素的class属性的值即可-将action.LoginAction改为action.LoginAction1)
package action;

import com.opensymphony.xwork2.Action;

/**
* 版本二  实现Action接口
*
*/
public class LoginAction1 implements Action {
//私有属性
private String username;
private String password;
//struts2的拦截器机制  getter   setter 方法负责解析用户请求参数  并且将请求参数值赋给action对应的属性
public String getUsername() {
return username;
}
public void setUsername(String username) {
this.username = username;
}
public String getPassword() {
return password;
}
public void setPassword(String password) {
this.password = password;
}
//execute方法,和方式一比较“success”变为SUCCESS ERROR变为ERROR
public String execute() throws Exception {
if("test".equals(getUsername())&&"123".equals(getPassword())){
return SUCCESS;
}else{
return ERROR;
}

}
}12
3
4
5
6
7
8
9
10
11
12
13
14
15
16
17
18
19
20
21
22
23
24
25
26
27
28
29
30
31
32
33
34
35
1
2
3
4
5
6
7
8
9
10
11
12
13
14
15
16
17
18
19
20
21
22
23
24
25
26
27
28
29
30
31
32
33
34
35
测试结果:和方式一一样!
方式三:继承ActionSupport(只贴出LoginAction2代码,除struts.xml外其余和方式一完全一样!只需修改struts.xml action元素的class属性的值即可-将action.LoginAction改为action.LoginAction2)
package action;

import com.opensymphony.xwork2.Action;
import com.opensymphony.xwork2.ActionSupport;

/**
* 版本三 继承ActionSupport
*
*/
public class LoginAction2 extends ActionSupport {
//私有属性
private String username;
private String password;
//struts2的拦截器机制  getter   setter 方法负责解析用户请求参数  并且将请求参数值赋给action对应的属性
public String getUsername() {
return username;
}
public void setUsername(String username) {
this.username = username;
}
public String getPassword() {
return password;
}
public void setPassword(String password) {
this.password = password;
}
//execute方法和方式二比较没变
public String execute() throws Exception {
if("test".equals(getUsername())&&"123".equals(getPassword())){
return SUCCESS;
}else{
return ERROR;
}

}
}12
3
4
5
6
7
8
9
10
11
12
13
14
15
16
17
18
19
20
21
22
23
24
25
26
27
28
29
30
31
32
33
34
35
36
1
2
3
4
5
6
7
8
9
10
11
12
13
14
15
16
17
18
19
20
21
22
23
24
25
26
27
28
29
30
31
32
33
34
35
36
测试结果:测试成功!
方式一,方式二,方式三都属于属性驱动!
什么是属性驱动?
属性驱动就是使用属性作为贯穿MVC流程的信息携带者,依附于Action实例,Action实例封装请求参数和处理结果!
方式四:模型驱动(新建User类,用来封装请求参数!LoginAction实现Action和ModelDriven接口)
关于模型驱动,就是使用单独的JavaBean实例来贯穿整个MVC流程,JavaBean实例封装请求参数和处理结果!
User类
package vo;

import java.io.Serializable;

public class User  implements Serializable{
/**
*
*/
private static final long serialVersionUID = 1L;
//私有的请求参数
private String username;
private String password;
//私有的处理结果
public String getUsername() {
return username;
}
public void setUsername(String username) {
this.username = username;
}
public String getPassword() {
return password;
}
public void setPassword(String password) {
this.password = password;
}
public User() {
super();
}
public User(String username, String password) {
super();
this.username = username;
this.password = password;
}
@Override
public String toString() {
return "User [username=" + username + ", password=" + password + "]";
}

}12
3
4
5
6
7
8
9
10
11
12
13
14
15
16
17
18
19
20
21
22
23
24
25
26
27
28
29
30
31
32
33
34
35
36
37
38
39
40
1
2
3
4
5
6
7
8
9
10
11
12
13
14
15
16
17
18
19
20
21
22
23
24
25
26
27
28
29
30
31
32
33
34
35
36
37
38
39
40
LoginAction3类
package action;

import vo.User;

import com.opensymphony.xwork2.Action;
import com.opensymphony.xwork2.ActionSupport;
import com.opensymphony.xwork2.ModelDriven;

/**
* 版本四 模型驱动
*
*/
public class LoginAction3 implements Action,ModelDriven<User> {
//定义用于封装请求参数和处理结果的Model
private User user=new User();
//execute方法和方式二比较没变
public String execute() throws Exception {
if("test".equals(user.getUsername())&&"123".equals(user.getPassword())){
return SUCCESS;
}else{
return ERROR;
}

}
//重写getModel方法
@Override
public User getModel() {
return user;
}
}12
3
4
5
6
7
8
9
10
11
12
13
14
15
16
17
18
19
20
21
22
23
24
25
26
27
28
29
30
31
1
2
3
4
5
6
7
8
9
10
11
12
13
14
15
16
17
18
19
20
21
22
23
24
25
26
27
28
29
30
31
只贴出LoginAction3和User代码,除struts.xml外其余和方式一完全一样!只需修改struts.xml action元素的class属性的值即可-将action.LoginAction改为action.LoginAction3
测试结果:成功!
关于action类中属性种类的介绍:
1.HTTP请求参数!
2.Action的处理结果!
3.通过在Struts2配置文件中进行配置!

相关文章推荐
- 总结struts2 Action的四种实现方式
- Struts2总结---实现Action三种方式(2)
- STRUTS2 ACTION 访问WEB元素的四种方式
- struts2中通过Action以InputStream的下载文件以及在iOS以及Android端接收的实现方式
- Struts2用action方式实现文件下载
- Struts2之Action请求方式与参数传递的方式总结
- struts2使用action方式实现文件下载(支持中文文件名)
- Struts2基于XML配置方式实现对action的所有方法进行输入校验
- Struts2 Action访问Web对象的四种方式
- struts2中jsp页面传值到action方式总结
- struts2使用action方式实现文件下载(支持中文文件名)
- Struts2 基于XML配置方式实现对action的所有方法进行校验
- struts2 Action中取得request,session的四种方式
- struts2中jsp页面传值到action方式总结
- Struts2基于XML配置方式实现对Action方法进行校验
- 复习struts2之基于XML配置方式实现对action的所有方法进行校验
- struts2:lesson three:Annotation配置,实现request,session.application的四种方式,Result类型
- Struts2 入门 三(Struts Action类的实现方式 接收参数的方式 )
- 转载 - Struts2基于XML配置方式实现对action的所有方法进行输入校验
- Struts2中action映射的四种配置方式