CentOS6.4+Nginx1.4.2+MySQL5.6.13+PHP5.5.3+xCache3.03(最新LNMP编译安装过程)
2017-04-26 18:28
513 查看
CentOS 6.4 x86_64
2.软件版本
Nginx1.4.2
MySQL5.6.13
PHP5.5.3
xCache3.03
注,全部是最新版。
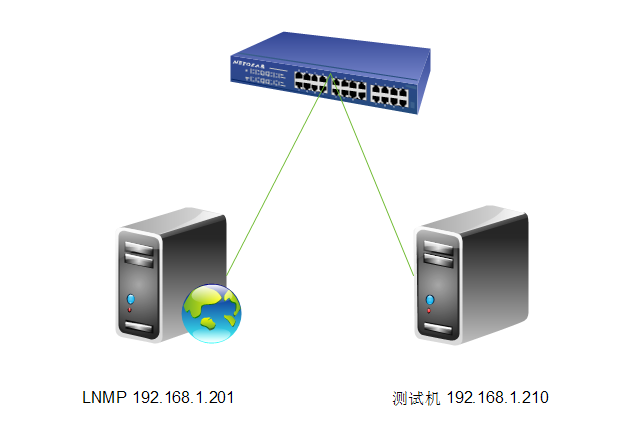
3.实验拓扑
4.时间同步
[root@web ~]# ntpdate 202.120.2.101
5.安装yum源
[root@web ~]# rpm -ivh http://download.fedoraproject.org/pub/epel/6/x86_64/epel-release-6-8.noarch.rpm
6.关闭防火墙与SELinux
[root@web ~]# service iptables stop
[root@web ~]# getenforce
Disabled
三、编译安装Nginx
1.解压源码包
[root@web src]# tar xf nginx-1.4.2.tar.gz
[root@web src]# cd nginx-1.4.2
2.创建软链接
[root@web local]# ln -sv nginx-1.4.2 nginx
"nginx" -> "nginx-1.4.2"
[root@web local]# cd nginx
[root@web nginx]# ll
总用量 588
drwxr-xr-x 6 1001 1001 4096 8月 29 17:32 auto
-rw-r--r-- 1 1001 1001 222366 7月 17 20:51 CHANGES
-rw-r--r-- 1 1001 1001 338680 7月 17 20:51 CHANGES.ru
drwxr-xr-x 2 1001 1001 4096 8月 29 17:32 conf
-rwxr-xr-x 1 1001 1001 2369 7月 17 20:51 configure
drwxr-xr-x 3 1001 1001 4096 8月 29 17:32 contrib
drwxr-xr-x 2 1001 1001 4096 8月 29 17:32 html
-rw-r--r-- 1 1001 1001 1397 7月 17 20:51 LICENSE
drwxr-xr-x 2 1001 1001 4096 8月 29 17:32 man
-rw-r--r-- 1 1001 1001 49 7月 17 20:51 README
drwxr-xr-x 8 1001 1001 4096 8月 29 17:32 src
3.新建nginx用户
[root@web nginx]# groupadd -g 108 -r nginx
[root@web nginx]# useradd -u 108 -r -g 108 nginx
[root@web nginx]# id nginx
uid=108(nginx) gid=108(nginx) 组=108(nginx)
4.修改权限
[root@web nginx]# chown -R root:nginx /usr/local/nginx/*
[root@web nginx]# ll
总用量 588
drwxr-xr-x 6 root nginx 4096 8月 29 17:32 auto
-rw-r--r-- 1 root nginx 222366 7月 17 20:51 CHANGES
-rw-r--r-- 1 root nginx 338680 7月 17 20:51 CHANGES.ru
drwxr-xr-x 2 root nginx 4096 8月 29 17:32 conf
-rwxr-xr-x 1 root nginx 2369 7月 17 20:51 configure
drwxr-xr-x 3 root nginx 4096 8月 29 17:32 contrib
drwxr-xr-x 2 root nginx 4096 8月 29 17:32 html
-rw-r--r-- 1 root nginx 1397 7月 17 20:51 LICENSE
drwxr-xr-x 2 root nginx 4096 8月 29 17:32 man
-rw-r--r-- 1 root nginx 49 7月 17 20:51 README
drwxr-xr-x 8 root nginx 4096 8月 29 17:32 src
5.编译nginx
[root@web nginx]# yum -y install pcre-devel
[root@web nginx-1.4.2]# ./configure \
--prefix=/usr \
--sbin-path=/usr/sbin/nginx \
--conf-path=/etc/nginx/nginx.conf \
--error-log-path=/var/log/nginx/error.log \
--http-log-path=/var/log/nginx/access.log \
--pid-path=/var/run/nginx/nginx.pid \
--lock-path=/var/lock/nginx.lock \
--user=nginx \
--group=nginx \
--with-http_ssl_module \
--with-http_flv_module \
--with-http_stub_status_module \
--with-http_gzip_static_module \
--http-client-body-temp-path=/var/tmp/nginx/client/ \
--http-proxy-temp-path=/var/tmp/nginx/proxy/ \
--http-fastcgi-temp-path=/var/tmp/nginx/fcgi/ \
--http-uwsgi-temp-path=/var/tmp/nginx/uwsgi \
--with-pcre
注,编译过程中会出错,下面是错误信息。
错误1:
./configure: error: SSL modules require the OpenSSL library.
You can either do not enable the modules, or install the OpenSSL library
into the system, or build the OpenSSL library statically from the source
with nginx by using --with-openssl= option.
解决1:
[root@web nginx-1.4.2]# yum install -y openssl-devel
再来编译一下,
[root@web nginx-1.4.2]# ./configure --prefix=/usr --sbin-path=/usr/sbin/nginx --conf-path=/etc/nginx/nginx.conf --error-log-path=/var/log/nginx/error.log --http-log-path=/var/log/nginx/access.log --pid-path=/var/run/nginx/nginx.pid --lock-path=/var/lock/nginx.lock
--user=nginx --group=nginx --with-http_ssl_module --with-http_flv_module --with-http_stub_status_module --with-http_gzip_static_module --http-client-body-temp-path=/var/tmp/nginx/client/ --http-proxy-temp-path=/var/tmp/nginx/proxy/ --http-fastcgi-temp-path=/var/tmp/nginx/fcgi/
--http-uwsgi-temp-path=/var/tmp/nginx/uwsgi --http-scgi-temp-path=/var/tmp/nginx/scgi --with-pcre
出现在下面的选项说明编译成功,
Configuration summary
+ using system PCRE library
+ using system OpenSSL library
+ md5: using OpenSSL library
+ sha1: using OpenSSL library
+ using system zlib library
nginx path prefix: "/usr"
nginx binary file: "/usr/sbin/nginx"
nginx configuration prefix: "/etc/nginx"
nginx configuration file: "/etc/nginx/nginx.conf"
nginx pid file: "/var/run/nginx/nginx.pid"
nginx error log file: "/var/log/nginx/error.log"
nginx http access log file: "/var/log/nginx/access.log"
nginx http client request body temporary files: "/var/tmp/nginx/client/"
nginx http proxy temporary files: "/var/tmp/nginx/proxy/"
nginx http fastcgi temporary files: "/var/tmp/nginx/fcgi/"
nginx http uwsgi temporary files: "/var/tmp/nginx/uwsgi"
nginx http scgi temporary files: "/var/tmp/nginx/scgi"
[root@web nginx-1.4.2]# make && make install
6.为nginx提供SysV init脚本
[root@web nginx-1.4.2]# vim /etc/init.d/nginx
#!/bin/sh
#
# nginx - this script starts and stops the nginx daemon
#
# chkconfig: - 85 15
# description: Nginx is an HTTP(S) server, HTTP(S) reverse \
# proxy and IMAP/POP3 proxy server
# processname: nginx
# config: /etc/nginx/nginx.conf
# config: /etc/sysconfig/nginx
# pidfile: /var/run/nginx.pid
# Source function library.
. /etc/rc.d/init.d/functions
# Source networking configuration.
. /etc/sysconfig/network
# Check that networking is up.
[ "$NETWORKING" = "no" ] && exit 0
nginx="/usr/sbin/nginx"
prog=$(basename $nginx)
NGINX_CONF_FILE="/etc/nginx/nginx.conf"
[ -f /etc/sysconfig/nginx ] && . /etc/sysconfig/nginx
lockfile=/var/lock/subsys/nginx
make_dirs() {
# make required directories
user=`nginx -V 2>&1 | grep "configure arguments:" | sed 's/[^*]*--user=\([^ ]*\).*/\1/g' -`
options=`$nginx -V 2>&1 | grep 'configure arguments:'`
for opt in $options; do
if [ `echo $opt | grep '.*-temp-path'` ]; then
value=`echo $opt | cut -d "=" -f 2`
if [ ! -d "$value" ]; then
# echo "creating" $value
mkdir -p $value && chown -R $user $value
fi
fi
done
}
start() {
[ -x $nginx ] || exit 5
[ -f $NGINX_CONF_FILE ] || exit 6
make_dirs
echo -n $"Starting $prog: "
daemon $nginx -c $NGINX_CONF_FILE
retval=$?
echo
[ $retval -eq 0 ] && touch $lockfile
return $retval
}
stop() {
echo -n $"Stopping $prog: "
killproc $prog -QUIT
retval=$?
echo
[ $retval -eq 0 ] && rm -f $lockfile
return $retval
}
restart() {
configtest || return $?
stop
sleep 1
start
}
reload() {
configtest || return $?
echo -n $"Reloading $prog: "
killproc $nginx -HUP
RETVAL=$?
echo
}
force_reload() {
restart
}
configtest() {
$nginx -t -c $NGINX_CONF_FILE
}
rh_status() {
status $prog
}
rh_status_q() {
rh_status >/dev/null 2>&1
}
case "$1" in
start)
rh_status_q && exit 0
$1
;;
stop)
rh_status_q || exit 0
$1
;;
restart|configtest)
$1
;;
reload)
rh_status_q || exit 7
$1
;;
force-reload)
force_reload
;;
status)
rh_status
;;
condrestart|try-restart)
rh_status_q || exit 0
;;
*)
echo $"Usage: $0 {start|stop|status|restart|condrestart|try-restart|reload|force-reload|configtest}"
exit 2
esac
7.为此脚本赋予执行权限
[root@web ~]# chmod +x /etc/init.d/nginx
8.添加至服务管理列表,并让其开机自动启动
[root@web ~]# chmod +x /etc/init.d/nginx
[root@web ~]# chkconfig --add nginx
[root@web ~]# chkconfig nginx on
[root@web ~]# chkconfig --list nginx
nginx 0:关闭 1:关闭 2:启用 3:启用 4:启用 5:启用 6:关闭
9.启动nginx
[root@web ~]# service nginx start
正在启动 nginx: [确定]
10.查看一下端口号
[root@web ~]# netstat -ntulp
Active Internet connections (only servers)
Proto Recv-Q Send-Q Local Address Foreign Address State PID/Program name
tcp 0 0 0.0.0.0:80 0.0.0.0:* LISTEN 4801/nginx
tcp 0 0 0.0.0.0:22 0.0.0.0:* LISTEN 1033/sshd
tcp 0 0 127.0.0.1:25 0.0.0.0:* LISTEN 1110/master
tcp 0 0 127.0.0.1:6010 0.0.0.0:* LISTEN 1144/sshd
tcp 0 0 127.0.0.1:6011 0.0.0.0:* LISTEN 1203/sshd
tcp 0 0 :::22 :::* LISTEN 1033/sshd
tcp 0 0 ::1:25 :::* LISTEN 1110/master
tcp 0 0 ::1:6010 :::* LISTEN 1144/sshd
tcp 0 0 ::1:6011 :::* LISTEN 1203/sshd
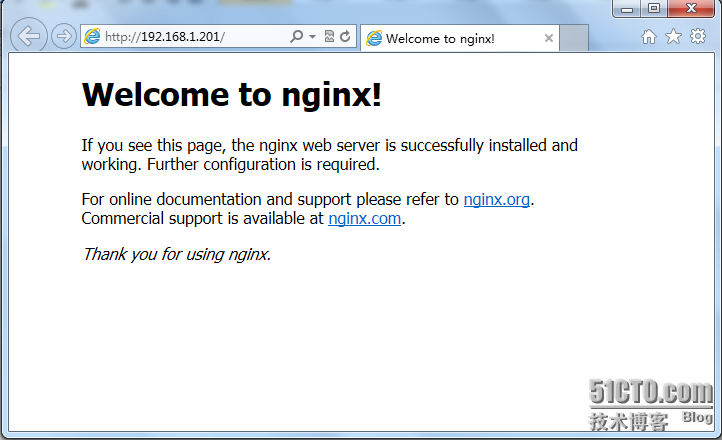
11.测试一下
12.修改一下配置文件(修改主文档目录/data/www)
location / {
root /data/www;
index index.html index.htm;
}
13.提供测试文件
[root@web ~]# mkdir –pv /data/www/
[root@web ~]# cd /data/www/
[root@web www]# ll
总用量 12
-rw-r--r-- 1 nginx nginx 23 8月 29 20:04 index.html
[root@web www]# vim index.html
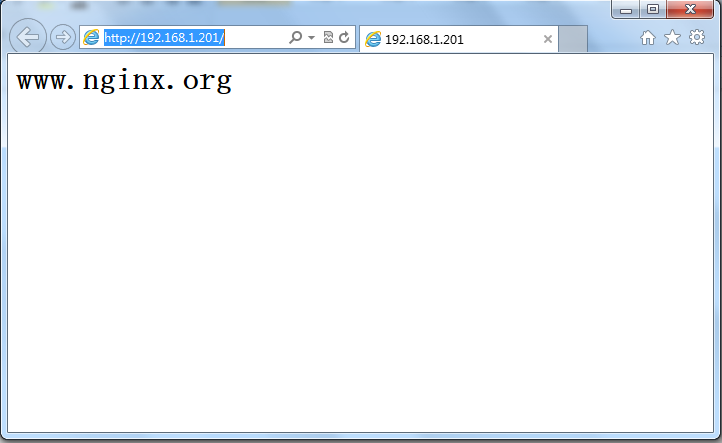
14.再次测试一下
好了,到这里nginx的安装与配置全部完成,下面我们来安装与配置mysql数据库。
四、安装与配置Mysql数据库
1.准备数据存放的文件系统
说明:新建一个逻辑卷,并将其挂载至特定目录即可。这里假设其逻辑卷的挂载目录为/mydata,而后需要创建/mydata/data目录做为mysql数据的存放目录。
(1). 先确认下系统里是否有LVM工具,默认没有安装
[root@web httpd]# rpm -qa | grep lvm
[root@web httpd]# yum install -y lvm2
(2). 查看一下磁盘
[root@web ~]# fdisk -l
Disk /dev/sda: 21.5 GB,
21474836480 bytes
255 heads, 63 sectors/track, 2610 cylinders
Units = cylinders of 16065 * 512 = 8225280 bytes
Sector size (logical/physical): 512 bytes / 512 bytes
I/O size (minimum/optimal): 512 bytes / 512 bytes
Disk identifier: 0x000dfceb
Device Boot Start End Blocks Id System
/dev/sda1 * 1 26 204800 83 Linux
Partition 1 does not end on cylinder boundary.
/dev/sda2 26 1301 10240000 83 Linux
/dev/sda3 1301 1938 5120000 83 Linux
/dev/sda4 1938 2611 5405696 5 Extended
/dev/sda5 1939 2066 1024000 82 Linux swap / Solaris
Disk /dev/sdb: 21.5 GB, 21474836480
bytes
255 heads, 63 sectors/track, 2610 cylinders
Units = cylinders of 16065 * 512 = 8225280 bytes
Sector size (logical/physical): 512 bytes / 512 bytes
I/O size (minimum/optimal): 512 bytes / 512 bytes
Disk identifier: 0x00000000
(3). 创建逻辑分区
[root@web ~]# fdisk /dev/sdb
[root@web ~]# fdisk –l
/dev/sdb1 1 1306 10490413+ 8e Linux LVM #我这里是测试环境就创建了一个10G分区
[root@web ~]# partx -a /dev/sdb #告诉内核有关存在和磁盘上的分区的编号
[root@web ~]# pvcreate /dev/sdb1 ##创建物理卷
Physical volume "/dev/sdb1" successfully created
[root@web ~]# vgcreate myvg /dev/sdb1 #创建卷组
Volume group "myvg" successfully created
[root@web ~]# lvcreate -n mydata -L 5G myvg
#创建一个5G的逻辑卷
Logical volume "mydata" created
[root@web ~]# lvs #查看一下逻辑卷
LV VG Attr LSize Pool Origin Data% Move Log Cpy%Sync Convert
mydata myvg -wi-a---- 5.00g
[root@web ~]# mkfs.ext4 /dev/myvg/mydata #格式化
[root@web ~]# mkdir /mydata #创建挂载目录
[root@web ~]# mount /dev/myvg/mydata /mydata/
#挂载
[root@web ~]# vim /etc/fstab
/dev/myvg/mydata/mydataext4 defaults 0 0 #增加这一行
[root@web ~]# mount –a #测试挂载是否成功
[root@web ~]# mount #查看一下
/dev/sda2on / typeext4 (rw)
proc on /proctypeproc (rw)
sysfs on /systypesysfs (rw)
devpts on /dev/ptstypedevpts (rw,gid=5,mode=620)
tmpfs on /dev/shmtypetmpfs (rw)
/dev/sda1on /boottypeext4 (rw)
/dev/sda3on /datatypeext4 (rw)
none on /proc/sys/fs/binfmt_misctypebinfmt_misc (rw)
/dev/mapper/myvg-mydataon /mydatatypeext4 (rw)
(4). 为了便于管理在/mydata目录下再创建个子目录data用于存放数据
[root@web ~]# mkdir /mydata/data
[root@web ~]# ls /mydata/
data lost+found
[root@web ~]#
2. 新建用户以安全方式运行进程
[root@web ~]# groupadd -r mysql
[root@web ~]# useradd -g mysql -r -s /sbin/nologin -M -d /mydata/data mysql
[root@web ~]# chown -R mysql:mysql /mydata/data
3. 安装并初始化mysql5.6.13
(1). 说明:mysql 安装包有三种式,rpm,源码包,二进制包(已编译好,解压后简单配置一下就可以用),我这里用的就是二进制包
[root@web src]# tar -xf mysql-5.6.12-linux-glibc2.5-x86_64.tar.gz -C /usr/local/ #-C指定解压目录
[root@web local]# ln -sv mysql-5.6.12-linux-glibc2.5-x86_64/ mysql #创建软链接
`mysql' -> `mysql-5.6.12-linux-glibc2.5-x86_64/'
[root@web local]# cd mysql
[root@web mysql]# ls
bin data include lib mysql-testscripts sql-bench
COPYING docs INSTALL-BINARY manREADME share support-files
[root@web mysql]#
[root@web mysql]# chown -R mysql:mysql . #更改属主属组
[root@web mysql]# ll
total 76
drwxr-xr-x 2 mysql mysql 4096 Jun 29 21:12 bin
-rw-r--r-- 1 mysql mysql 17987 May 21 23:18 COPYING
drwxr-xr-x 3 mysql mysql 4096 Jun 29 21:12 data
drwxr-xr-x 2 mysql mysql 4096 Jun 29 21:12 docs
drwxr-xr-x 3 mysql mysql 4096 Jun 29 21:12 include
-rw-r--r-- 1 mysql mysql 7469 May 21 23:18 INSTALL-BINARY
drwxr-xr-x 3 mysql mysql 4096 Jun 29 21:12 lib
drwxr-xr-x 4 mysql mysql 4096 Jun 29 21:12 man
drwxr-xr-x 10 mysql mysql 4096 Jun 29 21:12 mysql-test
-rw-r--r-- 1 mysql mysql 2496 May 21 23:18 README
drwxr-xr-x 2 mysql mysql 4096 Jun 29 21:12 scripts
drwxr-xr-x 28 mysql mysql 4096 Jun 29 21:12 share
drwxr-xr-x 4 mysql mysql 4096 Jun 29 21:12 sql-bench
drwxr-xr-x 3 mysql mysql 4096 Jun 29 21:12 support-files
(2). 执行mysql 初始化的data存放位置的准备
[root@web mysql]# scripts/mysql_install_db
--user=mysql --datadir=/mydata/data #执行mysql 初始化的data存放位置的准备
Installing MySQL system tables..../bin/mysqld: error whileloading shared libraries: libaio.so.1: cannot openshared object file: No such fileor directory
#初始化时报错说缺少libaio.so我们安装一下
[root@web mysql]# yum install libaio
[root@web mysql]# scripts/mysql_install_db
--user=mysql --datadir=/mydata/data #再次执行mysql 初始化的data存放位置的准备
To start mysqld at boot timeyou have to copy
support-files/mysql.server to the right place foryour system
PLEASE REMEMBER TO SET A PASSWORD FOR THE MySQL root USER !
To doso, start the server, thenissue the following commands:
./bin/mysqladmin-u root password 'new-password'
./bin/mysqladmin-u root -h web.test.com password 'new-password'
Alternatively you can run:
./bin/mysql_secure_installation
whichwill also give you the option of removing the test
databases and anonymous user created by default. This is
strongly recommended forproduction servers.
See the manual formoreinstructions.
You can start the MySQL daemon with:
cd. ; ./bin/mysqld_safe&
You can testthe MySQL daemon with mysql-test-run.pl
cdmysql-test; perl mysql-test-run.pl
Please report any problems with the ./bin/mysqlbugscript!
The latest information about MySQL is available on the web at http://www.mysql.com Support MySQL by buying support/licensesat http://shop.mysql.com WARNING: Found existing config file./my.cnf on the system.
Because this filemight be inuse, it was not replaced,
but was used inbootstrap (unless you used --defaults-file)
and when you later start the server.
The new default config filewas created as ./my-new.cnf,
please compare it with your fileand take the changes you need.
WARNING: Default config file/etc/my.cnf exists on the system
This filewill be readby default by the MySQL server
If you donot want to use this, either remove it, or use the
--defaults-fileargument to mysqld_safe when starting the server
[root@web mysql]#
[root@web mysql]# ls /mydata/data/ #查看 data 目录有文件说明初始化成功
ibdata1 ib_logfile0 ib_logfile1 mysql performance_schema test
(3). 初始化完成后mysql中目录文件的属主应改回成root,以免被别人攻破mysql用户密码而带来数据破坏等
[root@web mysql]# cd /usr/local/mysql/
[root@web mysql]# chown root /usr/local/mysql/* -R
[root@web mysql]# ll
total 84
drwxr-xr-x 2 root mysql 4096 Jun 29 21:12 bin
-rw-r--r-- 1 root mysql 17987 May 21 23:18 COPYING
drwxr-xr-x 3 root mysql 4096 Jun 29 21:12 data
drwxr-xr-x 2 root mysql 4096 Jun 29 21:12 docs
drwxr-xr-x 3 root mysql 4096 Jun 29 21:12 include
-rw-r--r-- 1 root mysql 7469 May 21 23:18 INSTALL-BINARY
drwxr-xr-x 3 root mysql 4096 Jun 29 21:12 lib
drwxr-xr-x 4 root mysql 4096 Jun 29 21:12 man
-rw-r--r-- 1 root root 943 Jun 29 21:18 my.cnf
-rw-r--r-- 1 root root 943 Jun 29 21:23 my-new.cnf
drwxr-xr-x 10 root mysql 4096 Jun 29 21:12 mysql-test
-rw-r--r-- 1 root mysql 2496 May 21 23:18 README
drwxr-xr-x 2 root mysql 4096 Jun 29 21:12 scripts
drwxr-xr-x 28 root mysql 4096 Jun 29 21:12 share
drwxr-xr-x 4 root mysql 4096 Jun 29 21:12 sql-bench
drwxr-xr-x 3 root mysql 4096 Jun 29 21:12 support-files
4. 为mysql提供主配置文件
初始化后会自动在当前目录下创建一个my.cnf配置文件,直接修改就可以(在mysql 5.6 以后配置文件自动生成,不需要我们再进行复制)
(1). 查看配置文件
[root@web mysql]# ll
total 84
drwxr-xr-x 2 root mysql 4096 Jun 29 21:12 bin
-rw-r--r-- 1 root mysql 17987 May 21 23:18 COPYING
drwxr-xr-x 3 root mysql 4096 Jun 29 21:12 data
drwxr-xr-x 2 root mysql 4096 Jun 29 21:12 docs
drwxr-xr-x 3 root mysql 4096 Jun 29 21:12 include
-rw-r--r-- 1 root mysql 7469 May 21 23:18 INSTALL-BINARY
drwxr-xr-x 3 root mysql 4096 Jun 29 21:12 lib
drwxr-xr-x 4 root mysql 4096 Jun 29 21:12 man
-rw-r--r-- 1 root root 943 Jun 29 21:18 my.cnf
-rw-r--r-- 1 root root 943 Jun 29 21:23 my-new.cnf
drwxr-xr-x 10 root mysql 4096 Jun 29 21:12 mysql-test
-rw-r--r-- 1 root mysql 2496 May 21 23:18 README
drwxr-xr-x 2 root mysql 4096 Jun 29 21:12 scripts
drwxr-xr-x 28 root mysql 4096 Jun 29 21:12 share
drwxr-xr-x 4 root mysql 4096 Jun 29 21:12 sql-bench
drwxr-xr-x 3 root mysql 4096 Jun 29 21:12 support-files
[root@web mysql]#
[root@web mysql]# cat my.cnf
# For advice on how to change settings please see
# http://dev.mysql.com/doc/refman/5.6/en/server-configuration-defaults.html [mysqld]
# Remove leading # and set to the amount of RAM for the most important data
# cache in MySQL. Start at 70% of total RAM for dedicated server, else 10%.
# innodb_buffer_pool_size = 128M
# Remove leading # to turn on a very important data integrity option: logging
# changes to the binary log between backups.
# log_bin
# These are commonly set, remove the # and set as required.
# basedir = .....
# datadir = .....
# port = .....
# server_id = .....
# socket = .....
# Remove leading # to set options mainly useful for reporting servers.
# The server defaults are faster for transactions and fast SELECTs.
# Adjust sizes as needed, experiment to find the optimal values.
# join_buffer_size = 128M
# sort_buffer_size = 2M
# read_rnd_buffer_size = 2M
sql_mode=NO_ENGINE_SUBSTITUTION,STRICT_TRANS_TABLES
[root@web mysql]#
大家可以看到生成的配置文件很简单,我们得添加一些内容!
(2). 修改配置文件
[root@web mysql]# vim my.cnf
添加内容是:
binlog-format=ROW
log-bin=master-bin.log
log-slave-updates=true
gtid-mode=on
enforce-gtid-consistency=true
master-info-repository=TABLE
relay-log-info-repository=TABLE
sync-master-info=1
slave-parallel-workers=2
binlog-checksum=CRC32
master-verify-checksum=1
slave-sql-verify-checksum=1
binlog-rows-query-log_events=1
server-id=1
report-port=3306
port=3306
datadir=/mydata/data
socket=/tmp/mysql.sock
report-host=master.test.com
5. 为mysql提供sysv服务脚本并启动服务
[root@web mysql]# cp support-files/mysql.server /etc/init.d/mysqld #复制sysv脚本
[root@web mysql]# chkconfig --add mysqld
[root@web mysql]# chkconfig mysqld on #开机自启动
[root@web mysql]# chkconfig mysqld --list
mysqld 0:off 1:off 2:on 3:on 4:on 5:on 6:off
[root@web mysql]# service mysqld start
Starting MySQL.... SUCCESS!
[root@web mysql]# netstat -ntulp
Active Internet connections (only servers)
Proto Recv-Q Send-Q Local Address Foreign Address State PID/Programname
tcp 0 0 0.0.0.0:22 0.0.0.0:* LISTEN 990/sshd
tcp 0 0 127.0.0.1:25 0.0.0.0:* LISTEN 1066/master
tcp 0 0 :::80 :::* LISTEN 37120/httpd
tcp 0 0 :::22 :::* LISTEN 990/sshd
tcp 0 0 ::1:25 :::* LISTEN 1066/master
tcp 0 0 :::3306 :::* LISTEN 37924/mysqld#mysql启动成功
udp 0 0 0.0.0.0:68 0.0.0.0:* 890/dhclient
6. 输出mysql的man手册至man命令的查找路径
[root@web mysql]# vim /etc/man.config
MANPATH /usr/local/mysql/man #增加这一行
7. 输出mysql的头文件至系统头文件路径/usr/include
[root@web mysql]# ln
-sv /usr/local/mysql/include/ /usr/include/mysql #输出mysql的头文件至系统头文件
`/usr/include/mysql' -> `/usr/local/mysql/include/'
[root@web mysql]# cd /usr/include/mysql/
8. 输出mysql的库文件给系统库查找路径
[root@web mysql]# vim /etc/ld.so.conf.d/mysql.conf
/usr/local/mysql/lib#直接新建编辑/etc/ld.so.conf.d/mysql.conf文件,把mysql的库文件路径添加进去就可以了
~
[root@web mysql]# ldconfig –v# 让系统重新读取库文件
/usr/local/mysql/lib:
libtcmalloc_minimal.so.0 -> libtcmalloc_minimal.so (changed)
libmysqlclient.so.18 -> libmysqlclient_r.so.18.0.0
/usr/lib64/mysql:
libmysqlclient.so.16 -> libmysqlclient.so.16.0.0
libmysqlclient_r.so.16 -> libmysqlclient_r.so.16.0
9. 修改PATH环境变量,让系统可以直接使用mysql的相关命令
[root@web mysql]# vim /etc/profile.d/mysql.sh #添加环境变量(与添加httpd是一样的)
exportPATH=$PATH:/usr/local/mysql/bin
[root@web mysql]# source /etc/profile #重新读取一下环境变量
10. 测试并连接mysql
[root@web mysql]# mysql
Welcome to the MySQL monitor. Commands end with ; or \g.
Your MySQL connection idis 1
Server version: 5.6.12-log MySQL Community Server (GPL)
Copyright (c) 2000, 2013, Oracle and/orits affiliates. All rights reserved.
Oracle is a registered trademark of Oracle Corporation and/orits
affiliates. Other names may be trademarks of their respective
owners.
Type 'help;'or '\h'forhelp. Type '\c'to clearthe current input statement.
mysql> SHOW DATABASES;
+--------------------+
| Database |
+--------------------+
| information_schema |
| mysql |
| performance_schema |
| test|
+--------------------+
4 rows inset(0.02 sec)
mysql>
五、编译安装PHP
1、解决依赖关系
[root@web ~]# yum -y groupinstall "Development Tools"
2.如果想让编译的php支持mcrypt、mhash扩展和libevent得用yum安装一下
[root@web ~]# yum -y install libmcrypt
[root@web ~]# yum -y install libmcrypt-devel
[root@web ~]# yum -y install mhash
[root@web ~]# yum -y install mhash-devel
[root@web ~]# yum -y install mcrypt
3.另外,也可以根据需要安装libevent,系统一般会自带libevent,但版本有些低。
[root@web ~]# yum -y install libevent
[root@web ~]# yum -y install libevent-devel
说明:libevent是一个异步事件通知库文件,其API提供了在某文件描述上发生某事件时或其超时时执行回调函数的机制,它主要用来替换事件驱动的网络服务器上的event
loop机制。目前来说, libevent支持/dev/poll、kqueue、select、poll、epoll及Solaris的event ports。
4.若要支持更多的图片格式与字体可以安装以下软件
[root@web ~]# yum -y install gd gd-devel libjpeg libjpeg-devel libpng libpng-devel
freetype freetype-devel
5.安装libxml(扩展标记语言)库
[root@web ~]# yum -y install libxml2 libxml2-devel
6. 安装bzip2压缩库
[root@web ~]# yum install -y bzip2 bzip2-devel
7.安装libcurl传输库
[root@web ~]# yum install -y libcurl libcurl-devel
8.配置php
[root@web php-5.5.3]# ./configure --prefix=/usr/local/php --with-mysql=/usr/local/mysql --with-openssl --enable-fpm --enable-sockets --enable-sysvshm --with-mysqli=/usr/local/mysql/bin/mysql_config
--enable-mbstring --with-freetype-dir --with-jpeg-dir --with-png-dir --with-zlib-dir --with-libxml-dir=/usr/ --enable-xml --with-mhash --with-mcrypt --with-config-file-path=/etc --with-config-file-scan-dir=/etc/php.d --with-bz2 --with-curl
当看到以下代码,说明配置成功:
Generating files
configure: creating ./config.status
creating main/internal_functions.c
creating main/internal_functions_cli.c
+--------------------------------------------------------------------+
| License: |
| This software is subject to the PHP License, available in this |
| distribution in the file LICENSE. By continuing this installation |
| process, you are bound by the terms of this license agreement. |
| If you do not agree with the terms of this license, you must abort |
| the installation process at this point. |
+--------------------------------------------------------------------+
Thank you for using PHP.
config.status: creating php5.spec
config.status: creating main/build-defs.h
config.status: creating scripts/phpize
config.status: creating scripts/man1/phpize.1
config.status: creating scripts/php-config
config.status: creating scripts/man1/php-config.1
config.status: creating sapi/cli/php.1
config.status: creating sapi/fpm/php-fpm.conf
config.status: creating sapi/fpm/init.d.php-fpm
config.status: creating sapi/fpm/php-fpm.service
config.status: creating sapi/fpm/php-fpm.8
config.status: creating sapi/fpm/status.html
config.status: creating sapi/cgi/php-cgi.1
config.status: creating ext/phar/phar.1
config.status: creating ext/phar/phar.phar.1
config.status: creating main/php_config.h
config.status: executing default commands
9.编译安装PHP
[root@web php-5.5.3]# make && make install
10.为php提供配置文件
[root@web php-5.5.3]# cp php.ini-production /etc/php.ini
11.为php-fpm提供Sysv init脚本,并将其添加至服务列表
[root@web php-5.5.3]# cp sapi/fpm/init.d.php-fpm /etc/init.d/php-fpm
[root@web php-5.5.3]# chmod +x /etc/init.d/php-fpm
[root@web php-5.5.3]# chkconfig --add php-fpm
[root@web php-5.5.3]# chkconfig php-fpm on
12.为php-fpm提供配置文件
[root@web ~]# cd /usr/local/php/
[root@web php]# ls
bin etc include lib php sbin var
[root@web php]# cd etc/
[root@web etc]# ls
pear.conf php-fpm.conf.default
[root@web etc]# cp php-fpm.conf.default php-fpm.conf
13.修改php-fpm的配置文件
注,配置fpm的相关选项为你所需要的值,并启用pid文件(如下最后一行)
pm.max_children = 150
pm.start_servers = 8
pm.min_spare_servers = 5
pm.max_spare_servers = 10
pid = /usr/local/php/var/run/php-fpm.pid
14.启动php-fpm
[root@web etc]# service php-fpm start
Starting php-fpm done
15.查看一下
[root@web etc]# ps aux | grep php-fpm
root 12511 0.0 2.1 186620 5144 ? Ss 10:52 0:00 php-fpm: master process (/usr/local/php/etc/php-fpm.conf)
nobody 12512 0.0 1.8 186620 4284 ? S 10:52 0:00 php-fpm: pool www
nobody 12513 0.0 1.8 186620 4284 ? S 10:52 0:00 php-fpm: pool www
nobody 12514 0.0 1.8 186620 4284 ? S 10:52 0:00 php-fpm: pool www
nobody 12515 0.0 1.8 186620 4284 ? S 10:52 0:00 php-fpm: pool www
nobody 12516 0.0 1.8 186620 4284 ? S 10:52 0:00 php-fpm: pool www
nobody 12517 0.0 1.8 186620 4284 ? S 10:52 0:00 php-fpm: pool www
nobody 12518 0.0 1.8 186620 4284 ? S 10:52 0:00 php-fpm: pool www
nobody 12519 0.0 1.8 186620 4284 ? S 10:52 0:00 php-fpm: pool www
好了,到这里PHP这安装配置完成了,下面我们来整合Nginx与PHP。
六、整合Nginx与PHP (FastCGI)
1.什么是 FastCGI
FastCGI是一个可伸缩地、高速地在HTTP server和动态脚本语言间通信的接口。多数流行的HTTP server都支持FastCGI,包括Apache、Nginx和lighttpd等。同时,FastCGI也被许多脚本语言支持,其中就有PHP。
FastCGI是从CGI发展改进而来的。传统CGI接口方式的主要缺点是性能很差,因为每次HTTP服务器遇到动态程序时都需要重新启动脚本解析器来执行解析,然后将结果返回给HTTP服务器。这在处理高并发访问时几乎是不可用的。另外传统的CGI接口方式安全性也很差,现在已经很少使用了。
FastCGI接口方式采用C/S结构,可以将HTTP服务器和脚本解析服务器分开,同时在脚本解析服务器上启动一个或者多个脚本解析守护进程。
当HTTP服务器每次遇到动态程序时,可以将其直接交付给FastCGI进程来执行,然后将得到的结果返回给浏览器。
这种方式可以让HTTP服务器专一地处理静态请求或者将动态脚本服务器的结果返回给客户端,这在很大程度上提高了整个应用系统的性能。
2.Nginx+FastCGI运行原理
Nginx不支持对外部程序的直接调用或者解析,所有的外部程序(包括PHP)必须通过FastCGI接口来调用。
FastCGI接口在Linux下是socket(这个socket可以是文件socket,也可以是ip socket)。为了调用CGI程序,还需要一个FastCGI的wrapper(wrapper可以理解为用于启动另一个程序的程序),这个wrapper绑定在某个固定socket上,如端口或者文件socket。
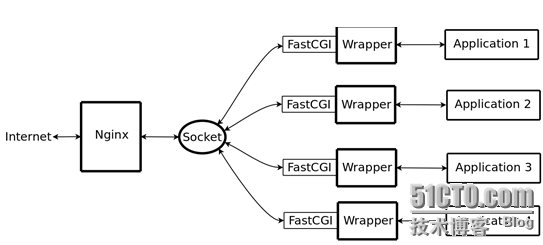
当Nginx将CGI请求发送给这个socket的时候,通过FastCGI接口,wrapper接收到请求,然后派生出一个新的线程,这个线程调用解释器或者外部程序处理脚本并读取返回数据;接着,wrapper再将返回的数据通过FastCGI接口,沿着固定的socket传递给Nginx;最后,Nginx将返回的数据发送给客户端。这就是Nginx+FastCGI的整个运作过程。如下图,
3.spawn-fcgi与PHP-FPM
前面介绍过,FastCGI接口方式在脚本解析服务器上启动一个或者多个守护进程对动态脚本进行解析,这些进程就是FastCGI进程管理器,或者称为FastCGI引擎。
spawn-fcgi与PHP-FPM就是支持PHP的两个FastCGI进程管理器。
下面简单介绍spawn-fcgi与PHP-FPM的异同。
spawn-fcgi是HTTP服务器lighttpd的一部分,目前已经独立成为一个项目,一般与lighttpd配合使用来支持PHP。但是ligttpd的spwan-fcgi在高并发访问的时候,会出现内存泄漏甚至自动重启FastCGI的问题。
Nginx是个轻量级的HTTP server,必须借助第三方的FastCGI处理器才可以对PHP进行解析,因此Nginx+spawn-fcgi的组合也可以实现对PHP的解析,这里不过多讲述。PHP-FPM也是一个第三方的FastCGI进程管理器,它是作为PHP的一个补丁来开发的(PHP从5.3.3以后已将PHP-FPM整合进PHP中,只要在./configure的时候带
--enable-fpm参数即可开启PHP-FPM),在安装的时候也需要和PHP源码一起编译,也就是说PHP-FPM被编译到PHP内核中,因此在处理性能方面更加优秀。同时PHP-FPM在处理高并发方面也比spawn-fcgi引擎好很多,因此,推荐使用Nginx+PHP/PHP-FPM这个组合对PHP进行解析。
FastCGI 的主要优点是把动态语言和HTTP Server分离开来,所以Nginx与PHP/PHP-FPM经常被部署在不同的服务器上,以分担前端Nginx服务器的压力,使Nginx专一处理静态请求和转发动态请求,而PHP/PHP-FPM服务器专一解析PHP动态请求。
4.整合Nginx与PHP (FastCGI)
(1).修改nginx配置文件,启用如下选项。
location ~ \.php$ {
root /data/www;
fastcgi_pass 127.0.0.1:9000;
fastcgi_index index.php;
fastcgi_param SCRIPT_FILENAME /scripts$fastcgi_script_name;
include fastcgi_params;
}
(2).编辑/etc/nginx/fastcgi_params,将其内容更改为如下内容:
fastcgi_param GATEWAY_INTERFACE CGI/1.1;
fastcgi_param SERVER_SOFTWARE nginx;
fastcgi_param QUERY_STRING $query_string;
fastcgi_param REQUEST_METHOD $request_method;
fastcgi_param CONTENT_TYPE $content_type;
fastcgi_param CONTENT_LENGTH $content_length;
fastcgi_param SCRIPT_FILENAME $document_root$fastcgi_script_name;
fastcgi_param SCRIPT_NAME $fastcgi_script_name;
fastcgi_param REQUEST_URI $request_uri;
fastcgi_param DOCUMENT_URI $document_uri;
fastcgi_param DOCUMENT_ROOT $document_root;
fastcgi_param SERVER_PROTOCOL $server_protocol;
fastcgi_param REMOTE_ADDR $remote_addr;
fastcgi_param REMOTE_PORT $remote_port;
fastcgi_param SERVER_ADDR $server_addr;
fastcgi_param SERVER_PORT $server_port;
fastcgi_param SERVER_NAME $server_name;
(3).并在所支持的主页面格式中添加php格式的主页
类似如下:
location / {
root /data/www;
index index.php index.html index.htm;
}
(4).重新加载一下nginx的配置文件
[root@web ~]# service nginx reload
nginx: the configuration file /etc/nginx/nginx.conf syntax is ok
nginx: configuration file /etc/nginx/nginx.conf test is successful
重新载入 nginx: [确定]
5.新建index.php的测试页面,测试php是否能正常工作
[root@web ~]# cd /data/www/
[root@web www]# vim index.php
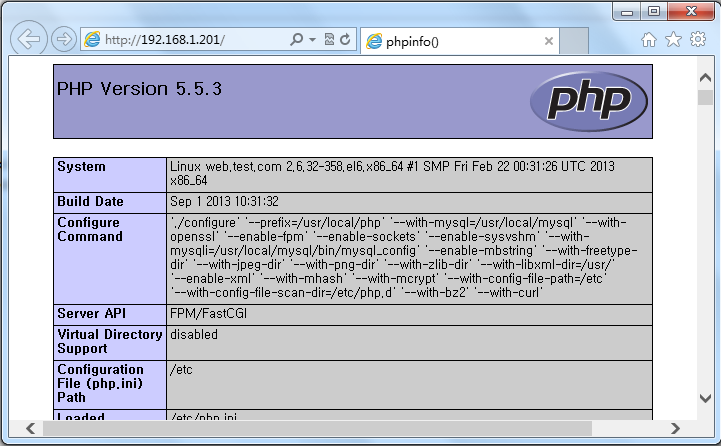
phpinfo();
?>
接着就可以通过浏览器访问此测试页面了,效果如下。
好了,到这里我们的nginx整合php演示全部完成。下面我们来安装xcache加速器。
七、安装与配置xCache加速器
1.安装xcache
[root@web src]# tar xf xcache-3.0.3.tar.gz
[root@web src]# cd xcache-3.0.3
[root@web xcache-3.0.3]# /usr/local/php/bin/phpize
Configuring for:
PHP Api Version: 20121113
Zend Module Api No: 20121212
Zend Extension Api No: 220121212
[root@web xcache-3.0.3]# ./configure --enable-xcache --with-php-config=/usr/local/php/bin/php-config
编译安装时会出错,
AUTOCHECK ERROR: ==== store zend_try_catch_element =================
AUTOCHECK ERROR: ==== store zend_op_array =================
AUTOCHECK ERROR: ==== restore zend_try_catch_element =================
AUTOCHECK ERROR: ==== restore zend_op_array =================
AUTOCHECK ERROR: ==== dprint zend_try_catch_element =================
AUTOCHECK ERROR: ==== dprint zend_op_array =================
AUTOCHECK ERROR: ==== dasm zend_try_catch_element =================
AUTOCHECK ERROR: ==== dasm zend_op_array =================
AUTOCHECK ERROR: ==== asm zend_try_catch_element =================
AUTOCHECK ERROR: ==== asm zend_op_array =================
make: *** [processor.out.c] 错误 1
查询一下官方文档发现XCache暂时不支持PHP5.5X版本,只支持到PHP5.4.X。下面是官方文档,
XCache 是一个又快又稳定的 ?PHP opcode 缓存器. 经过良好的测试并在大流量/高负载的生产机器上稳定运行. 经过(在 linux 上)测试并支持所有现行 ?PHP 分支的最新发布版本, 如 PHP_5_1 PHP_5_2 PHP_5_3 PHP_5_4. 并完美支持线程安全/Windows. 与同类 opcode 缓存器相比更胜一筹, 比如能够快速跟进 ?PHP 版本.
注,我们这里就暂时就不编译Xcache了,等官方出最新版时,再进行补充安装。或者,大家也可以降低PHP的版本,用PHP5.4.x编译安装即可。下面是PHP5.4.x编译方法,
1、安装
# tar xf xcache-3.0.3.tar.gz
# cd xcache-3.0.3
# /usr/local/php/bin/phpize
# ./configure --enable-xcache --with-php-config=/usr/local/php/bin/php-config
# make && make install
安装结束时,会出现类似如下行:
Installing shared extensions: /usr/local/php/lib/php/extensions/no-debug-zts-20100525/
2、编辑php.ini,整合php和xcache:
首先将xcache提供的样例配置导入php.ini
# mkdir /etc/php.d
# cp xcache.ini /etc/php.d
说明:xcache.ini文件在xcache的源码目录中。
接下来编辑/etc/php.d/xcache.ini,找到zend_extension开头的行,修改为如下行:
zend_extension = /usr/local/php/lib/php/extensions/no-debug-zts-20100525/xcache.so
注意:如果php.ini文件中有多条zend_extension指令行,要确保此新增的行排在第一位。
3、重新启动php-fpm
# service php-fpm restart
好了,xcache的安装与配置这说到这里了,下面我们来测试一下连接数据库。
八、配置PHP连接Mysql测试
1.提供测试文件
[root@web ~]# cd /data/www/
[root@web www]# vim index.php
$conn=mysql_connect('localhost','root','');
if ($conn)
echo "Success";
else
echo "Failure";
?>
2.连接测试一下
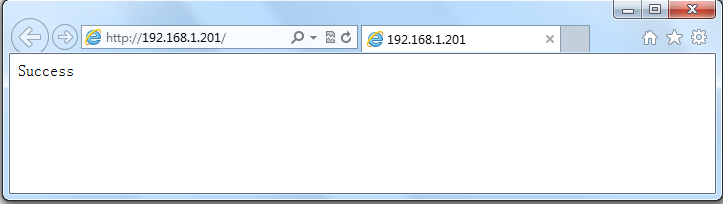
大家可以看到连接测试成功,下面我们来安装测试一下Discuz论坛。
九、安装并测试Discuz论坛
1.授权主机对mysql的访问
mysql> GRANT ALL PRIVILEGES ON *.* TO 'root'@'192.168.%.%' IDENTIFIED BY '123456';
Query OK, 0 rows affected (0.19 sec)
mysql> FLUSH PRIVILEGES;
Query OK, 0 rows affected (0.56 sec)
2.准备Discuz 3.0
[root@web src]# unzip Discuz_X3.0_SC_GBK.zip
[root@web www]# mv upload/* /data/www/
3.安装
2.软件版本
Nginx1.4.2
MySQL5.6.13
PHP5.5.3
xCache3.03
注,全部是最新版。
3.实验拓扑
4.时间同步
[root@web ~]# ntpdate 202.120.2.101
5.安装yum源
[root@web ~]# rpm -ivh http://download.fedoraproject.org/pub/epel/6/x86_64/epel-release-6-8.noarch.rpm
6.关闭防火墙与SELinux
[root@web ~]# service iptables stop
[root@web ~]# getenforce
Disabled
三、编译安装Nginx
1.解压源码包
[root@web src]# tar xf nginx-1.4.2.tar.gz
[root@web src]# cd nginx-1.4.2
2.创建软链接
[root@web local]# ln -sv nginx-1.4.2 nginx
"nginx" -> "nginx-1.4.2"
[root@web local]# cd nginx
[root@web nginx]# ll
总用量 588
drwxr-xr-x 6 1001 1001 4096 8月 29 17:32 auto
-rw-r--r-- 1 1001 1001 222366 7月 17 20:51 CHANGES
-rw-r--r-- 1 1001 1001 338680 7月 17 20:51 CHANGES.ru
drwxr-xr-x 2 1001 1001 4096 8月 29 17:32 conf
-rwxr-xr-x 1 1001 1001 2369 7月 17 20:51 configure
drwxr-xr-x 3 1001 1001 4096 8月 29 17:32 contrib
drwxr-xr-x 2 1001 1001 4096 8月 29 17:32 html
-rw-r--r-- 1 1001 1001 1397 7月 17 20:51 LICENSE
drwxr-xr-x 2 1001 1001 4096 8月 29 17:32 man
-rw-r--r-- 1 1001 1001 49 7月 17 20:51 README
drwxr-xr-x 8 1001 1001 4096 8月 29 17:32 src
3.新建nginx用户
[root@web nginx]# groupadd -g 108 -r nginx
[root@web nginx]# useradd -u 108 -r -g 108 nginx
[root@web nginx]# id nginx
uid=108(nginx) gid=108(nginx) 组=108(nginx)
4.修改权限
[root@web nginx]# chown -R root:nginx /usr/local/nginx/*
[root@web nginx]# ll
总用量 588
drwxr-xr-x 6 root nginx 4096 8月 29 17:32 auto
-rw-r--r-- 1 root nginx 222366 7月 17 20:51 CHANGES
-rw-r--r-- 1 root nginx 338680 7月 17 20:51 CHANGES.ru
drwxr-xr-x 2 root nginx 4096 8月 29 17:32 conf
-rwxr-xr-x 1 root nginx 2369 7月 17 20:51 configure
drwxr-xr-x 3 root nginx 4096 8月 29 17:32 contrib
drwxr-xr-x 2 root nginx 4096 8月 29 17:32 html
-rw-r--r-- 1 root nginx 1397 7月 17 20:51 LICENSE
drwxr-xr-x 2 root nginx 4096 8月 29 17:32 man
-rw-r--r-- 1 root nginx 49 7月 17 20:51 README
drwxr-xr-x 8 root nginx 4096 8月 29 17:32 src
5.编译nginx
[root@web nginx]# yum -y install pcre-devel
[root@web nginx-1.4.2]# ./configure \
--prefix=/usr \
--sbin-path=/usr/sbin/nginx \
--conf-path=/etc/nginx/nginx.conf \
--error-log-path=/var/log/nginx/error.log \
--http-log-path=/var/log/nginx/access.log \
--pid-path=/var/run/nginx/nginx.pid \
--lock-path=/var/lock/nginx.lock \
--user=nginx \
--group=nginx \
--with-http_ssl_module \
--with-http_flv_module \
--with-http_stub_status_module \
--with-http_gzip_static_module \
--http-client-body-temp-path=/var/tmp/nginx/client/ \
--http-proxy-temp-path=/var/tmp/nginx/proxy/ \
--http-fastcgi-temp-path=/var/tmp/nginx/fcgi/ \
--http-uwsgi-temp-path=/var/tmp/nginx/uwsgi \
--with-pcre
注,编译过程中会出错,下面是错误信息。
错误1:
./configure: error: SSL modules require the OpenSSL library.
You can either do not enable the modules, or install the OpenSSL library
into the system, or build the OpenSSL library statically from the source
with nginx by using --with-openssl= option.
解决1:
[root@web nginx-1.4.2]# yum install -y openssl-devel
再来编译一下,
[root@web nginx-1.4.2]# ./configure --prefix=/usr --sbin-path=/usr/sbin/nginx --conf-path=/etc/nginx/nginx.conf --error-log-path=/var/log/nginx/error.log --http-log-path=/var/log/nginx/access.log --pid-path=/var/run/nginx/nginx.pid --lock-path=/var/lock/nginx.lock
--user=nginx --group=nginx --with-http_ssl_module --with-http_flv_module --with-http_stub_status_module --with-http_gzip_static_module --http-client-body-temp-path=/var/tmp/nginx/client/ --http-proxy-temp-path=/var/tmp/nginx/proxy/ --http-fastcgi-temp-path=/var/tmp/nginx/fcgi/
--http-uwsgi-temp-path=/var/tmp/nginx/uwsgi --http-scgi-temp-path=/var/tmp/nginx/scgi --with-pcre
出现在下面的选项说明编译成功,
Configuration summary
+ using system PCRE library
+ using system OpenSSL library
+ md5: using OpenSSL library
+ sha1: using OpenSSL library
+ using system zlib library
nginx path prefix: "/usr"
nginx binary file: "/usr/sbin/nginx"
nginx configuration prefix: "/etc/nginx"
nginx configuration file: "/etc/nginx/nginx.conf"
nginx pid file: "/var/run/nginx/nginx.pid"
nginx error log file: "/var/log/nginx/error.log"
nginx http access log file: "/var/log/nginx/access.log"
nginx http client request body temporary files: "/var/tmp/nginx/client/"
nginx http proxy temporary files: "/var/tmp/nginx/proxy/"
nginx http fastcgi temporary files: "/var/tmp/nginx/fcgi/"
nginx http uwsgi temporary files: "/var/tmp/nginx/uwsgi"
nginx http scgi temporary files: "/var/tmp/nginx/scgi"
[root@web nginx-1.4.2]# make && make install
6.为nginx提供SysV init脚本
[root@web nginx-1.4.2]# vim /etc/init.d/nginx
#!/bin/sh
#
# nginx - this script starts and stops the nginx daemon
#
# chkconfig: - 85 15
# description: Nginx is an HTTP(S) server, HTTP(S) reverse \
# proxy and IMAP/POP3 proxy server
# processname: nginx
# config: /etc/nginx/nginx.conf
# config: /etc/sysconfig/nginx
# pidfile: /var/run/nginx.pid
# Source function library.
. /etc/rc.d/init.d/functions
# Source networking configuration.
. /etc/sysconfig/network
# Check that networking is up.
[ "$NETWORKING" = "no" ] && exit 0
nginx="/usr/sbin/nginx"
prog=$(basename $nginx)
NGINX_CONF_FILE="/etc/nginx/nginx.conf"
[ -f /etc/sysconfig/nginx ] && . /etc/sysconfig/nginx
lockfile=/var/lock/subsys/nginx
make_dirs() {
# make required directories
user=`nginx -V 2>&1 | grep "configure arguments:" | sed 's/[^*]*--user=\([^ ]*\).*/\1/g' -`
options=`$nginx -V 2>&1 | grep 'configure arguments:'`
for opt in $options; do
if [ `echo $opt | grep '.*-temp-path'` ]; then
value=`echo $opt | cut -d "=" -f 2`
if [ ! -d "$value" ]; then
# echo "creating" $value
mkdir -p $value && chown -R $user $value
fi
fi
done
}
start() {
[ -x $nginx ] || exit 5
[ -f $NGINX_CONF_FILE ] || exit 6
make_dirs
echo -n $"Starting $prog: "
daemon $nginx -c $NGINX_CONF_FILE
retval=$?
echo
[ $retval -eq 0 ] && touch $lockfile
return $retval
}
stop() {
echo -n $"Stopping $prog: "
killproc $prog -QUIT
retval=$?
echo
[ $retval -eq 0 ] && rm -f $lockfile
return $retval
}
restart() {
configtest || return $?
stop
sleep 1
start
}
reload() {
configtest || return $?
echo -n $"Reloading $prog: "
killproc $nginx -HUP
RETVAL=$?
echo
}
force_reload() {
restart
}
configtest() {
$nginx -t -c $NGINX_CONF_FILE
}
rh_status() {
status $prog
}
rh_status_q() {
rh_status >/dev/null 2>&1
}
case "$1" in
start)
rh_status_q && exit 0
$1
;;
stop)
rh_status_q || exit 0
$1
;;
restart|configtest)
$1
;;
reload)
rh_status_q || exit 7
$1
;;
force-reload)
force_reload
;;
status)
rh_status
;;
condrestart|try-restart)
rh_status_q || exit 0
;;
*)
echo $"Usage: $0 {start|stop|status|restart|condrestart|try-restart|reload|force-reload|configtest}"
exit 2
esac
7.为此脚本赋予执行权限
[root@web ~]# chmod +x /etc/init.d/nginx
8.添加至服务管理列表,并让其开机自动启动
[root@web ~]# chmod +x /etc/init.d/nginx
[root@web ~]# chkconfig --add nginx
[root@web ~]# chkconfig nginx on
[root@web ~]# chkconfig --list nginx
nginx 0:关闭 1:关闭 2:启用 3:启用 4:启用 5:启用 6:关闭
9.启动nginx
[root@web ~]# service nginx start
正在启动 nginx: [确定]
10.查看一下端口号
[root@web ~]# netstat -ntulp
Active Internet connections (only servers)
Proto Recv-Q Send-Q Local Address Foreign Address State PID/Program name
tcp 0 0 0.0.0.0:80 0.0.0.0:* LISTEN 4801/nginx
tcp 0 0 0.0.0.0:22 0.0.0.0:* LISTEN 1033/sshd
tcp 0 0 127.0.0.1:25 0.0.0.0:* LISTEN 1110/master
tcp 0 0 127.0.0.1:6010 0.0.0.0:* LISTEN 1144/sshd
tcp 0 0 127.0.0.1:6011 0.0.0.0:* LISTEN 1203/sshd
tcp 0 0 :::22 :::* LISTEN 1033/sshd
tcp 0 0 ::1:25 :::* LISTEN 1110/master
tcp 0 0 ::1:6010 :::* LISTEN 1144/sshd
tcp 0 0 ::1:6011 :::* LISTEN 1203/sshd
11.测试一下
12.修改一下配置文件(修改主文档目录/data/www)
location / {
root /data/www;
index index.html index.htm;
}
13.提供测试文件
[root@web ~]# mkdir –pv /data/www/
[root@web ~]# cd /data/www/
[root@web www]# ll
总用量 12
-rw-r--r-- 1 nginx nginx 23 8月 29 20:04 index.html
[root@web www]# vim index.html
www.nginx.org
14.再次测试一下好了,到这里nginx的安装与配置全部完成,下面我们来安装与配置mysql数据库。
四、安装与配置Mysql数据库
1.准备数据存放的文件系统
说明:新建一个逻辑卷,并将其挂载至特定目录即可。这里假设其逻辑卷的挂载目录为/mydata,而后需要创建/mydata/data目录做为mysql数据的存放目录。
(1). 先确认下系统里是否有LVM工具,默认没有安装
[root@web httpd]# rpm -qa | grep lvm
[root@web httpd]# yum install -y lvm2
(2). 查看一下磁盘
[root@web ~]# fdisk -l
Disk /dev/sda: 21.5 GB,
21474836480 bytes
255 heads, 63 sectors/track, 2610 cylinders
Units = cylinders of 16065 * 512 = 8225280 bytes
Sector size (logical/physical): 512 bytes / 512 bytes
I/O size (minimum/optimal): 512 bytes / 512 bytes
Disk identifier: 0x000dfceb
Device Boot Start End Blocks Id System
/dev/sda1 * 1 26 204800 83 Linux
Partition 1 does not end on cylinder boundary.
/dev/sda2 26 1301 10240000 83 Linux
/dev/sda3 1301 1938 5120000 83 Linux
/dev/sda4 1938 2611 5405696 5 Extended
/dev/sda5 1939 2066 1024000 82 Linux swap / Solaris
Disk /dev/sdb: 21.5 GB, 21474836480
bytes
255 heads, 63 sectors/track, 2610 cylinders
Units = cylinders of 16065 * 512 = 8225280 bytes
Sector size (logical/physical): 512 bytes / 512 bytes
I/O size (minimum/optimal): 512 bytes / 512 bytes
Disk identifier: 0x00000000
(3). 创建逻辑分区
[root@web ~]# fdisk /dev/sdb
[root@web ~]# fdisk –l
/dev/sdb1 1 1306 10490413+ 8e Linux LVM #我这里是测试环境就创建了一个10G分区
[root@web ~]# partx -a /dev/sdb #告诉内核有关存在和磁盘上的分区的编号
[root@web ~]# pvcreate /dev/sdb1 ##创建物理卷
Physical volume "/dev/sdb1" successfully created
[root@web ~]# vgcreate myvg /dev/sdb1 #创建卷组
Volume group "myvg" successfully created
[root@web ~]# lvcreate -n mydata -L 5G myvg
#创建一个5G的逻辑卷
Logical volume "mydata" created
[root@web ~]# lvs #查看一下逻辑卷
LV VG Attr LSize Pool Origin Data% Move Log Cpy%Sync Convert
mydata myvg -wi-a---- 5.00g
[root@web ~]# mkfs.ext4 /dev/myvg/mydata #格式化
[root@web ~]# mkdir /mydata #创建挂载目录
[root@web ~]# mount /dev/myvg/mydata /mydata/
#挂载
[root@web ~]# vim /etc/fstab
/dev/myvg/mydata/mydataext4 defaults 0 0 #增加这一行
[root@web ~]# mount –a #测试挂载是否成功
[root@web ~]# mount #查看一下
/dev/sda2on / typeext4 (rw)
proc on /proctypeproc (rw)
sysfs on /systypesysfs (rw)
devpts on /dev/ptstypedevpts (rw,gid=5,mode=620)
tmpfs on /dev/shmtypetmpfs (rw)
/dev/sda1on /boottypeext4 (rw)
/dev/sda3on /datatypeext4 (rw)
none on /proc/sys/fs/binfmt_misctypebinfmt_misc (rw)
/dev/mapper/myvg-mydataon /mydatatypeext4 (rw)
(4). 为了便于管理在/mydata目录下再创建个子目录data用于存放数据
[root@web ~]# mkdir /mydata/data
[root@web ~]# ls /mydata/
data lost+found
[root@web ~]#
2. 新建用户以安全方式运行进程
[root@web ~]# groupadd -r mysql
[root@web ~]# useradd -g mysql -r -s /sbin/nologin -M -d /mydata/data mysql
[root@web ~]# chown -R mysql:mysql /mydata/data
3. 安装并初始化mysql5.6.13
(1). 说明:mysql 安装包有三种式,rpm,源码包,二进制包(已编译好,解压后简单配置一下就可以用),我这里用的就是二进制包
[root@web src]# tar -xf mysql-5.6.12-linux-glibc2.5-x86_64.tar.gz -C /usr/local/ #-C指定解压目录
[root@web local]# ln -sv mysql-5.6.12-linux-glibc2.5-x86_64/ mysql #创建软链接
`mysql' -> `mysql-5.6.12-linux-glibc2.5-x86_64/'
[root@web local]# cd mysql
[root@web mysql]# ls
bin data include lib mysql-testscripts sql-bench
COPYING docs INSTALL-BINARY manREADME share support-files
[root@web mysql]#
[root@web mysql]# chown -R mysql:mysql . #更改属主属组
[root@web mysql]# ll
total 76
drwxr-xr-x 2 mysql mysql 4096 Jun 29 21:12 bin
-rw-r--r-- 1 mysql mysql 17987 May 21 23:18 COPYING
drwxr-xr-x 3 mysql mysql 4096 Jun 29 21:12 data
drwxr-xr-x 2 mysql mysql 4096 Jun 29 21:12 docs
drwxr-xr-x 3 mysql mysql 4096 Jun 29 21:12 include
-rw-r--r-- 1 mysql mysql 7469 May 21 23:18 INSTALL-BINARY
drwxr-xr-x 3 mysql mysql 4096 Jun 29 21:12 lib
drwxr-xr-x 4 mysql mysql 4096 Jun 29 21:12 man
drwxr-xr-x 10 mysql mysql 4096 Jun 29 21:12 mysql-test
-rw-r--r-- 1 mysql mysql 2496 May 21 23:18 README
drwxr-xr-x 2 mysql mysql 4096 Jun 29 21:12 scripts
drwxr-xr-x 28 mysql mysql 4096 Jun 29 21:12 share
drwxr-xr-x 4 mysql mysql 4096 Jun 29 21:12 sql-bench
drwxr-xr-x 3 mysql mysql 4096 Jun 29 21:12 support-files
(2). 执行mysql 初始化的data存放位置的准备
[root@web mysql]# scripts/mysql_install_db
--user=mysql --datadir=/mydata/data #执行mysql 初始化的data存放位置的准备
Installing MySQL system tables..../bin/mysqld: error whileloading shared libraries: libaio.so.1: cannot openshared object file: No such fileor directory
#初始化时报错说缺少libaio.so我们安装一下
[root@web mysql]# yum install libaio
[root@web mysql]# scripts/mysql_install_db
--user=mysql --datadir=/mydata/data #再次执行mysql 初始化的data存放位置的准备
To start mysqld at boot timeyou have to copy
support-files/mysql.server to the right place foryour system
PLEASE REMEMBER TO SET A PASSWORD FOR THE MySQL root USER !
To doso, start the server, thenissue the following commands:
./bin/mysqladmin-u root password 'new-password'
./bin/mysqladmin-u root -h web.test.com password 'new-password'
Alternatively you can run:
./bin/mysql_secure_installation
whichwill also give you the option of removing the test
databases and anonymous user created by default. This is
strongly recommended forproduction servers.
See the manual formoreinstructions.
You can start the MySQL daemon with:
cd. ; ./bin/mysqld_safe&
You can testthe MySQL daemon with mysql-test-run.pl
cdmysql-test; perl mysql-test-run.pl
Please report any problems with the ./bin/mysqlbugscript!
The latest information about MySQL is available on the web at http://www.mysql.com Support MySQL by buying support/licensesat http://shop.mysql.com WARNING: Found existing config file./my.cnf on the system.
Because this filemight be inuse, it was not replaced,
but was used inbootstrap (unless you used --defaults-file)
and when you later start the server.
The new default config filewas created as ./my-new.cnf,
please compare it with your fileand take the changes you need.
WARNING: Default config file/etc/my.cnf exists on the system
This filewill be readby default by the MySQL server
If you donot want to use this, either remove it, or use the
--defaults-fileargument to mysqld_safe when starting the server
[root@web mysql]#
[root@web mysql]# ls /mydata/data/ #查看 data 目录有文件说明初始化成功
ibdata1 ib_logfile0 ib_logfile1 mysql performance_schema test
(3). 初始化完成后mysql中目录文件的属主应改回成root,以免被别人攻破mysql用户密码而带来数据破坏等
[root@web mysql]# cd /usr/local/mysql/
[root@web mysql]# chown root /usr/local/mysql/* -R
[root@web mysql]# ll
total 84
drwxr-xr-x 2 root mysql 4096 Jun 29 21:12 bin
-rw-r--r-- 1 root mysql 17987 May 21 23:18 COPYING
drwxr-xr-x 3 root mysql 4096 Jun 29 21:12 data
drwxr-xr-x 2 root mysql 4096 Jun 29 21:12 docs
drwxr-xr-x 3 root mysql 4096 Jun 29 21:12 include
-rw-r--r-- 1 root mysql 7469 May 21 23:18 INSTALL-BINARY
drwxr-xr-x 3 root mysql 4096 Jun 29 21:12 lib
drwxr-xr-x 4 root mysql 4096 Jun 29 21:12 man
-rw-r--r-- 1 root root 943 Jun 29 21:18 my.cnf
-rw-r--r-- 1 root root 943 Jun 29 21:23 my-new.cnf
drwxr-xr-x 10 root mysql 4096 Jun 29 21:12 mysql-test
-rw-r--r-- 1 root mysql 2496 May 21 23:18 README
drwxr-xr-x 2 root mysql 4096 Jun 29 21:12 scripts
drwxr-xr-x 28 root mysql 4096 Jun 29 21:12 share
drwxr-xr-x 4 root mysql 4096 Jun 29 21:12 sql-bench
drwxr-xr-x 3 root mysql 4096 Jun 29 21:12 support-files
4. 为mysql提供主配置文件
初始化后会自动在当前目录下创建一个my.cnf配置文件,直接修改就可以(在mysql 5.6 以后配置文件自动生成,不需要我们再进行复制)
(1). 查看配置文件
[root@web mysql]# ll
total 84
drwxr-xr-x 2 root mysql 4096 Jun 29 21:12 bin
-rw-r--r-- 1 root mysql 17987 May 21 23:18 COPYING
drwxr-xr-x 3 root mysql 4096 Jun 29 21:12 data
drwxr-xr-x 2 root mysql 4096 Jun 29 21:12 docs
drwxr-xr-x 3 root mysql 4096 Jun 29 21:12 include
-rw-r--r-- 1 root mysql 7469 May 21 23:18 INSTALL-BINARY
drwxr-xr-x 3 root mysql 4096 Jun 29 21:12 lib
drwxr-xr-x 4 root mysql 4096 Jun 29 21:12 man
-rw-r--r-- 1 root root 943 Jun 29 21:18 my.cnf
-rw-r--r-- 1 root root 943 Jun 29 21:23 my-new.cnf
drwxr-xr-x 10 root mysql 4096 Jun 29 21:12 mysql-test
-rw-r--r-- 1 root mysql 2496 May 21 23:18 README
drwxr-xr-x 2 root mysql 4096 Jun 29 21:12 scripts
drwxr-xr-x 28 root mysql 4096 Jun 29 21:12 share
drwxr-xr-x 4 root mysql 4096 Jun 29 21:12 sql-bench
drwxr-xr-x 3 root mysql 4096 Jun 29 21:12 support-files
[root@web mysql]#
[root@web mysql]# cat my.cnf
# For advice on how to change settings please see
# http://dev.mysql.com/doc/refman/5.6/en/server-configuration-defaults.html [mysqld]
# Remove leading # and set to the amount of RAM for the most important data
# cache in MySQL. Start at 70% of total RAM for dedicated server, else 10%.
# innodb_buffer_pool_size = 128M
# Remove leading # to turn on a very important data integrity option: logging
# changes to the binary log between backups.
# log_bin
# These are commonly set, remove the # and set as required.
# basedir = .....
# datadir = .....
# port = .....
# server_id = .....
# socket = .....
# Remove leading # to set options mainly useful for reporting servers.
# The server defaults are faster for transactions and fast SELECTs.
# Adjust sizes as needed, experiment to find the optimal values.
# join_buffer_size = 128M
# sort_buffer_size = 2M
# read_rnd_buffer_size = 2M
sql_mode=NO_ENGINE_SUBSTITUTION,STRICT_TRANS_TABLES
[root@web mysql]#
大家可以看到生成的配置文件很简单,我们得添加一些内容!
(2). 修改配置文件
[root@web mysql]# vim my.cnf
添加内容是:
binlog-format=ROW
log-bin=master-bin.log
log-slave-updates=true
gtid-mode=on
enforce-gtid-consistency=true
master-info-repository=TABLE
relay-log-info-repository=TABLE
sync-master-info=1
slave-parallel-workers=2
binlog-checksum=CRC32
master-verify-checksum=1
slave-sql-verify-checksum=1
binlog-rows-query-log_events=1
server-id=1
report-port=3306
port=3306
datadir=/mydata/data
socket=/tmp/mysql.sock
report-host=master.test.com
5. 为mysql提供sysv服务脚本并启动服务
[root@web mysql]# cp support-files/mysql.server /etc/init.d/mysqld #复制sysv脚本
[root@web mysql]# chkconfig --add mysqld
[root@web mysql]# chkconfig mysqld on #开机自启动
[root@web mysql]# chkconfig mysqld --list
mysqld 0:off 1:off 2:on 3:on 4:on 5:on 6:off
[root@web mysql]# service mysqld start
Starting MySQL.... SUCCESS!
[root@web mysql]# netstat -ntulp
Active Internet connections (only servers)
Proto Recv-Q Send-Q Local Address Foreign Address State PID/Programname
tcp 0 0 0.0.0.0:22 0.0.0.0:* LISTEN 990/sshd
tcp 0 0 127.0.0.1:25 0.0.0.0:* LISTEN 1066/master
tcp 0 0 :::80 :::* LISTEN 37120/httpd
tcp 0 0 :::22 :::* LISTEN 990/sshd
tcp 0 0 ::1:25 :::* LISTEN 1066/master
tcp 0 0 :::3306 :::* LISTEN 37924/mysqld#mysql启动成功
udp 0 0 0.0.0.0:68 0.0.0.0:* 890/dhclient
6. 输出mysql的man手册至man命令的查找路径
[root@web mysql]# vim /etc/man.config
MANPATH /usr/local/mysql/man #增加这一行
7. 输出mysql的头文件至系统头文件路径/usr/include
[root@web mysql]# ln
-sv /usr/local/mysql/include/ /usr/include/mysql #输出mysql的头文件至系统头文件
`/usr/include/mysql' -> `/usr/local/mysql/include/'
[root@web mysql]# cd /usr/include/mysql/
8. 输出mysql的库文件给系统库查找路径
[root@web mysql]# vim /etc/ld.so.conf.d/mysql.conf
/usr/local/mysql/lib#直接新建编辑/etc/ld.so.conf.d/mysql.conf文件,把mysql的库文件路径添加进去就可以了
~
[root@web mysql]# ldconfig –v# 让系统重新读取库文件
/usr/local/mysql/lib:
libtcmalloc_minimal.so.0 -> libtcmalloc_minimal.so (changed)
libmysqlclient.so.18 -> libmysqlclient_r.so.18.0.0
/usr/lib64/mysql:
libmysqlclient.so.16 -> libmysqlclient.so.16.0.0
libmysqlclient_r.so.16 -> libmysqlclient_r.so.16.0
9. 修改PATH环境变量,让系统可以直接使用mysql的相关命令
[root@web mysql]# vim /etc/profile.d/mysql.sh #添加环境变量(与添加httpd是一样的)
exportPATH=$PATH:/usr/local/mysql/bin
[root@web mysql]# source /etc/profile #重新读取一下环境变量
10. 测试并连接mysql
[root@web mysql]# mysql
Welcome to the MySQL monitor. Commands end with ; or \g.
Your MySQL connection idis 1
Server version: 5.6.12-log MySQL Community Server (GPL)
Copyright (c) 2000, 2013, Oracle and/orits affiliates. All rights reserved.
Oracle is a registered trademark of Oracle Corporation and/orits
affiliates. Other names may be trademarks of their respective
owners.
Type 'help;'or '\h'forhelp. Type '\c'to clearthe current input statement.
mysql> SHOW DATABASES;
+--------------------+
| Database |
+--------------------+
| information_schema |
| mysql |
| performance_schema |
| test|
+--------------------+
4 rows inset(0.02 sec)
mysql>
五、编译安装PHP
1、解决依赖关系
[root@web ~]# yum -y groupinstall "Development Tools"
2.如果想让编译的php支持mcrypt、mhash扩展和libevent得用yum安装一下
[root@web ~]# yum -y install libmcrypt
[root@web ~]# yum -y install libmcrypt-devel
[root@web ~]# yum -y install mhash
[root@web ~]# yum -y install mhash-devel
[root@web ~]# yum -y install mcrypt
3.另外,也可以根据需要安装libevent,系统一般会自带libevent,但版本有些低。
[root@web ~]# yum -y install libevent
[root@web ~]# yum -y install libevent-devel
说明:libevent是一个异步事件通知库文件,其API提供了在某文件描述上发生某事件时或其超时时执行回调函数的机制,它主要用来替换事件驱动的网络服务器上的event
loop机制。目前来说, libevent支持/dev/poll、kqueue、select、poll、epoll及Solaris的event ports。
4.若要支持更多的图片格式与字体可以安装以下软件
[root@web ~]# yum -y install gd gd-devel libjpeg libjpeg-devel libpng libpng-devel
freetype freetype-devel
5.安装libxml(扩展标记语言)库
[root@web ~]# yum -y install libxml2 libxml2-devel
6. 安装bzip2压缩库
[root@web ~]# yum install -y bzip2 bzip2-devel
7.安装libcurl传输库
[root@web ~]# yum install -y libcurl libcurl-devel
8.配置php
[root@web php-5.5.3]# ./configure --prefix=/usr/local/php --with-mysql=/usr/local/mysql --with-openssl --enable-fpm --enable-sockets --enable-sysvshm --with-mysqli=/usr/local/mysql/bin/mysql_config
--enable-mbstring --with-freetype-dir --with-jpeg-dir --with-png-dir --with-zlib-dir --with-libxml-dir=/usr/ --enable-xml --with-mhash --with-mcrypt --with-config-file-path=/etc --with-config-file-scan-dir=/etc/php.d --with-bz2 --with-curl
当看到以下代码,说明配置成功:
Generating files
configure: creating ./config.status
creating main/internal_functions.c
creating main/internal_functions_cli.c
+--------------------------------------------------------------------+
| License: |
| This software is subject to the PHP License, available in this |
| distribution in the file LICENSE. By continuing this installation |
| process, you are bound by the terms of this license agreement. |
| If you do not agree with the terms of this license, you must abort |
| the installation process at this point. |
+--------------------------------------------------------------------+
Thank you for using PHP.
config.status: creating php5.spec
config.status: creating main/build-defs.h
config.status: creating scripts/phpize
config.status: creating scripts/man1/phpize.1
config.status: creating scripts/php-config
config.status: creating scripts/man1/php-config.1
config.status: creating sapi/cli/php.1
config.status: creating sapi/fpm/php-fpm.conf
config.status: creating sapi/fpm/init.d.php-fpm
config.status: creating sapi/fpm/php-fpm.service
config.status: creating sapi/fpm/php-fpm.8
config.status: creating sapi/fpm/status.html
config.status: creating sapi/cgi/php-cgi.1
config.status: creating ext/phar/phar.1
config.status: creating ext/phar/phar.phar.1
config.status: creating main/php_config.h
config.status: executing default commands
9.编译安装PHP
[root@web php-5.5.3]# make && make install
10.为php提供配置文件
[root@web php-5.5.3]# cp php.ini-production /etc/php.ini
11.为php-fpm提供Sysv init脚本,并将其添加至服务列表
[root@web php-5.5.3]# cp sapi/fpm/init.d.php-fpm /etc/init.d/php-fpm
[root@web php-5.5.3]# chmod +x /etc/init.d/php-fpm
[root@web php-5.5.3]# chkconfig --add php-fpm
[root@web php-5.5.3]# chkconfig php-fpm on
12.为php-fpm提供配置文件
[root@web ~]# cd /usr/local/php/
[root@web php]# ls
bin etc include lib php sbin var
[root@web php]# cd etc/
[root@web etc]# ls
pear.conf php-fpm.conf.default
[root@web etc]# cp php-fpm.conf.default php-fpm.conf
13.修改php-fpm的配置文件
注,配置fpm的相关选项为你所需要的值,并启用pid文件(如下最后一行)
pm.max_children = 150
pm.start_servers = 8
pm.min_spare_servers = 5
pm.max_spare_servers = 10
pid = /usr/local/php/var/run/php-fpm.pid
14.启动php-fpm
[root@web etc]# service php-fpm start
Starting php-fpm done
15.查看一下
[root@web etc]# ps aux | grep php-fpm
root 12511 0.0 2.1 186620 5144 ? Ss 10:52 0:00 php-fpm: master process (/usr/local/php/etc/php-fpm.conf)
nobody 12512 0.0 1.8 186620 4284 ? S 10:52 0:00 php-fpm: pool www
nobody 12513 0.0 1.8 186620 4284 ? S 10:52 0:00 php-fpm: pool www
nobody 12514 0.0 1.8 186620 4284 ? S 10:52 0:00 php-fpm: pool www
nobody 12515 0.0 1.8 186620 4284 ? S 10:52 0:00 php-fpm: pool www
nobody 12516 0.0 1.8 186620 4284 ? S 10:52 0:00 php-fpm: pool www
nobody 12517 0.0 1.8 186620 4284 ? S 10:52 0:00 php-fpm: pool www
nobody 12518 0.0 1.8 186620 4284 ? S 10:52 0:00 php-fpm: pool www
nobody 12519 0.0 1.8 186620 4284 ? S 10:52 0:00 php-fpm: pool www
好了,到这里PHP这安装配置完成了,下面我们来整合Nginx与PHP。
六、整合Nginx与PHP (FastCGI)
1.什么是 FastCGI
FastCGI是一个可伸缩地、高速地在HTTP server和动态脚本语言间通信的接口。多数流行的HTTP server都支持FastCGI,包括Apache、Nginx和lighttpd等。同时,FastCGI也被许多脚本语言支持,其中就有PHP。
FastCGI是从CGI发展改进而来的。传统CGI接口方式的主要缺点是性能很差,因为每次HTTP服务器遇到动态程序时都需要重新启动脚本解析器来执行解析,然后将结果返回给HTTP服务器。这在处理高并发访问时几乎是不可用的。另外传统的CGI接口方式安全性也很差,现在已经很少使用了。
FastCGI接口方式采用C/S结构,可以将HTTP服务器和脚本解析服务器分开,同时在脚本解析服务器上启动一个或者多个脚本解析守护进程。
当HTTP服务器每次遇到动态程序时,可以将其直接交付给FastCGI进程来执行,然后将得到的结果返回给浏览器。
这种方式可以让HTTP服务器专一地处理静态请求或者将动态脚本服务器的结果返回给客户端,这在很大程度上提高了整个应用系统的性能。
2.Nginx+FastCGI运行原理
Nginx不支持对外部程序的直接调用或者解析,所有的外部程序(包括PHP)必须通过FastCGI接口来调用。
FastCGI接口在Linux下是socket(这个socket可以是文件socket,也可以是ip socket)。为了调用CGI程序,还需要一个FastCGI的wrapper(wrapper可以理解为用于启动另一个程序的程序),这个wrapper绑定在某个固定socket上,如端口或者文件socket。
当Nginx将CGI请求发送给这个socket的时候,通过FastCGI接口,wrapper接收到请求,然后派生出一个新的线程,这个线程调用解释器或者外部程序处理脚本并读取返回数据;接着,wrapper再将返回的数据通过FastCGI接口,沿着固定的socket传递给Nginx;最后,Nginx将返回的数据发送给客户端。这就是Nginx+FastCGI的整个运作过程。如下图,
3.spawn-fcgi与PHP-FPM
前面介绍过,FastCGI接口方式在脚本解析服务器上启动一个或者多个守护进程对动态脚本进行解析,这些进程就是FastCGI进程管理器,或者称为FastCGI引擎。
spawn-fcgi与PHP-FPM就是支持PHP的两个FastCGI进程管理器。
下面简单介绍spawn-fcgi与PHP-FPM的异同。
spawn-fcgi是HTTP服务器lighttpd的一部分,目前已经独立成为一个项目,一般与lighttpd配合使用来支持PHP。但是ligttpd的spwan-fcgi在高并发访问的时候,会出现内存泄漏甚至自动重启FastCGI的问题。
Nginx是个轻量级的HTTP server,必须借助第三方的FastCGI处理器才可以对PHP进行解析,因此Nginx+spawn-fcgi的组合也可以实现对PHP的解析,这里不过多讲述。PHP-FPM也是一个第三方的FastCGI进程管理器,它是作为PHP的一个补丁来开发的(PHP从5.3.3以后已将PHP-FPM整合进PHP中,只要在./configure的时候带
--enable-fpm参数即可开启PHP-FPM),在安装的时候也需要和PHP源码一起编译,也就是说PHP-FPM被编译到PHP内核中,因此在处理性能方面更加优秀。同时PHP-FPM在处理高并发方面也比spawn-fcgi引擎好很多,因此,推荐使用Nginx+PHP/PHP-FPM这个组合对PHP进行解析。
FastCGI 的主要优点是把动态语言和HTTP Server分离开来,所以Nginx与PHP/PHP-FPM经常被部署在不同的服务器上,以分担前端Nginx服务器的压力,使Nginx专一处理静态请求和转发动态请求,而PHP/PHP-FPM服务器专一解析PHP动态请求。
4.整合Nginx与PHP (FastCGI)
(1).修改nginx配置文件,启用如下选项。
location ~ \.php$ {
root /data/www;
fastcgi_pass 127.0.0.1:9000;
fastcgi_index index.php;
fastcgi_param SCRIPT_FILENAME /scripts$fastcgi_script_name;
include fastcgi_params;
}
(2).编辑/etc/nginx/fastcgi_params,将其内容更改为如下内容:
fastcgi_param GATEWAY_INTERFACE CGI/1.1;
fastcgi_param SERVER_SOFTWARE nginx;
fastcgi_param QUERY_STRING $query_string;
fastcgi_param REQUEST_METHOD $request_method;
fastcgi_param CONTENT_TYPE $content_type;
fastcgi_param CONTENT_LENGTH $content_length;
fastcgi_param SCRIPT_FILENAME $document_root$fastcgi_script_name;
fastcgi_param SCRIPT_NAME $fastcgi_script_name;
fastcgi_param REQUEST_URI $request_uri;
fastcgi_param DOCUMENT_URI $document_uri;
fastcgi_param DOCUMENT_ROOT $document_root;
fastcgi_param SERVER_PROTOCOL $server_protocol;
fastcgi_param REMOTE_ADDR $remote_addr;
fastcgi_param REMOTE_PORT $remote_port;
fastcgi_param SERVER_ADDR $server_addr;
fastcgi_param SERVER_PORT $server_port;
fastcgi_param SERVER_NAME $server_name;
(3).并在所支持的主页面格式中添加php格式的主页
类似如下:
location / {
root /data/www;
index index.php index.html index.htm;
}
(4).重新加载一下nginx的配置文件
[root@web ~]# service nginx reload
nginx: the configuration file /etc/nginx/nginx.conf syntax is ok
nginx: configuration file /etc/nginx/nginx.conf test is successful
重新载入 nginx: [确定]
5.新建index.php的测试页面,测试php是否能正常工作
[root@web ~]# cd /data/www/
[root@web www]# vim index.php
phpinfo();
?>
接着就可以通过浏览器访问此测试页面了,效果如下。
好了,到这里我们的nginx整合php演示全部完成。下面我们来安装xcache加速器。
七、安装与配置xCache加速器
1.安装xcache
[root@web src]# tar xf xcache-3.0.3.tar.gz
[root@web src]# cd xcache-3.0.3
[root@web xcache-3.0.3]# /usr/local/php/bin/phpize
Configuring for:
PHP Api Version: 20121113
Zend Module Api No: 20121212
Zend Extension Api No: 220121212
[root@web xcache-3.0.3]# ./configure --enable-xcache --with-php-config=/usr/local/php/bin/php-config
编译安装时会出错,
AUTOCHECK ERROR: ==== store zend_try_catch_element =================
AUTOCHECK ERROR: ==== store zend_op_array =================
AUTOCHECK ERROR: ==== restore zend_try_catch_element =================
AUTOCHECK ERROR: ==== restore zend_op_array =================
AUTOCHECK ERROR: ==== dprint zend_try_catch_element =================
AUTOCHECK ERROR: ==== dprint zend_op_array =================
AUTOCHECK ERROR: ==== dasm zend_try_catch_element =================
AUTOCHECK ERROR: ==== dasm zend_op_array =================
AUTOCHECK ERROR: ==== asm zend_try_catch_element =================
AUTOCHECK ERROR: ==== asm zend_op_array =================
make: *** [processor.out.c] 错误 1
查询一下官方文档发现XCache暂时不支持PHP5.5X版本,只支持到PHP5.4.X。下面是官方文档,
XCache 是一个又快又稳定的 ?PHP opcode 缓存器. 经过良好的测试并在大流量/高负载的生产机器上稳定运行. 经过(在 linux 上)测试并支持所有现行 ?PHP 分支的最新发布版本, 如 PHP_5_1 PHP_5_2 PHP_5_3 PHP_5_4. 并完美支持线程安全/Windows. 与同类 opcode 缓存器相比更胜一筹, 比如能够快速跟进 ?PHP 版本.
注,我们这里就暂时就不编译Xcache了,等官方出最新版时,再进行补充安装。或者,大家也可以降低PHP的版本,用PHP5.4.x编译安装即可。下面是PHP5.4.x编译方法,
1、安装
# tar xf xcache-3.0.3.tar.gz
# cd xcache-3.0.3
# /usr/local/php/bin/phpize
# ./configure --enable-xcache --with-php-config=/usr/local/php/bin/php-config
# make && make install
安装结束时,会出现类似如下行:
Installing shared extensions: /usr/local/php/lib/php/extensions/no-debug-zts-20100525/
2、编辑php.ini,整合php和xcache:
首先将xcache提供的样例配置导入php.ini
# mkdir /etc/php.d
# cp xcache.ini /etc/php.d
说明:xcache.ini文件在xcache的源码目录中。
接下来编辑/etc/php.d/xcache.ini,找到zend_extension开头的行,修改为如下行:
zend_extension = /usr/local/php/lib/php/extensions/no-debug-zts-20100525/xcache.so
注意:如果php.ini文件中有多条zend_extension指令行,要确保此新增的行排在第一位。
3、重新启动php-fpm
# service php-fpm restart
好了,xcache的安装与配置这说到这里了,下面我们来测试一下连接数据库。
八、配置PHP连接Mysql测试
1.提供测试文件
[root@web ~]# cd /data/www/
[root@web www]# vim index.php
$conn=mysql_connect('localhost','root','');
if ($conn)
echo "Success";
else
echo "Failure";
?>
2.连接测试一下
大家可以看到连接测试成功,下面我们来安装测试一下Discuz论坛。
九、安装并测试Discuz论坛
1.授权主机对mysql的访问
mysql> GRANT ALL PRIVILEGES ON *.* TO 'root'@'192.168.%.%' IDENTIFIED BY '123456';
Query OK, 0 rows affected (0.19 sec)
mysql> FLUSH PRIVILEGES;
Query OK, 0 rows affected (0.56 sec)
2.准备Discuz 3.0
[root@web src]# unzip Discuz_X3.0_SC_GBK.zip
[root@web www]# mv upload/* /data/www/
3.安装

相关文章推荐
- CentOS6.4+Nginx1.4.2+MySQL5.6.13+PHP5.5.3+xCache3.03(最新LNMP编译安装过程)
- CentOS6.4+httpd2.4.4+mysql5.6.12+php5.4.16+xcache3.03(最新LAMP编译安装过程)
- CentOS 7 搭建 LNMP 架构详细过程 + Discuz 论坛安装 (手工编译)
- radhat 6.4/centos 6.4 下编译安装 最新ruby 2.1.5
- 编译安装LNMP(在centos6.4系统下)
- CentOS-6.4 源码包编译安装LNMP +Discuz开源论坛(mysql-5.6.14 +PHP-5.4.21+nginx-1.4.2)
- Centos 6.4编译安装LNMP
- CentOS 6.4编译安装LNMP+Discuz
- 基于CentOS 6.8平台最新源代码包编译安装LNMP环境搭建(Nginx+MySQL+PHP)
- CentOS 6.4系统下编译安装LNMP和配置PHP环境具体步骤
- Centos下lnmp编译安装详细过程
- CentOS 6.4编译安装LNMP+Discuz
- CentOS6.4+Nginx1.4.2+MySQL5.6.13+PHP5.5.3+xCache3
- CentOS 6.4 linux下编译安装 LNMP环境
- 编译安装LNMP红帽6.4(64位)Nginx1.4.1+mysql5.6.+php5.4.4
- CentOS 6.4安装配置LNMP服务器(Nginx+PHP+MySQL)
- CentOS 6.3 编译安装搭建LNMP
- CentOS 6.4 编译安装LLVM3.3,Clang和Libc++
- CentOS 6.4 编译安装 gcc 4.8.1
- Centos6.4 源码安装nginx之LNMP