Node.js 切近实战(三) 之图书管理系统(图书信息录入)
2017-04-24 13:33
645 查看
上一节我们讲了图书管理系统的登录,相信大家对jade模板和angular js也有了了解,今天的话我们来看一下图书信息录入。在这里我们准备使用Nosql数据库,本篇博客中使用的是MongoDB。OK。Mongo DB的安装我就不多说了,那么Node.js平台使用mongoDB我们使用什么扩展包好呢,我觉得还是mongoose比较合适,封装了好多针对mongodb的方法,简单易用。
首先我们来看一下图书model的设计bookInfo.js。
首先在代码中我们看到引用了mongoose扩展包,在VS中我们可以这样引用扩展包。
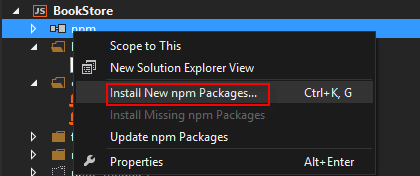
点击Install New npm Packages

搜索mongoose,找到后点击Install Package或者你用命令行安装也行。
OK,此时我们require('mongoose')加载mongoose模块。接着我们定义了一个bookSchema,定义了一些字段,type是它的类型,index是否支持索引,required是否可以为空,类似于sqlserver的is not null,unique是不重复约束,default默认值,
ObjectId是该条数据唯一标识,类似SqlServer的主键,格式类似于GUID。在这里我们发现Image这个字段是一个ObjectId,说明这是一个外部唯一标识,类似于SqlServer的外键。接下来是strict:true,这个意思是必须是我们定义的字段才能存到mongodb中,未经过schema定义的字段是存不进去的。OK,Schema定义好之后,我们给bookSchema定义了一个virtual字段,virtual字段就是虚拟的,意思是在查询返回时,可以在返回结果中包含这个虚拟字段。但是这个字段本身不是mongodb
schema中的。
另外上面的toJson和ToObject都是针对这个virtual字段的,如果为false,则不论是返回Json还是Object都不会包含这个virtual字段。
接下来我们给Schema定义了method,saveBookInfo,先将主键值生成,再走save方法,save方法是mongoose提供的,mongoose提供了一系列增删改查的方法,单个批量都支持,非常方便。
最后我们设置collection的名称,并定义model,并将bookModel 模块公开。
好了,到这里,关于Schema的定义就说完了,接下来我们要给客户端页面提供rest api了,先链接mongodb,代码如下
initMongoose就是连接使用mongoose api 连接mongodb,连接上之后,再进入我们的controller代码bookmng.js。
在这里我们引入刚才定义的schema文件,拿到公开的bookModel模块。我们公开一个bookSave方法,参数为req,res,从这个名称我们都能看出这个是http request和http response。方法中先对传入的字段进行验证,验证我们使用的validator扩展包,还是像引mongoose那样去安装。验证不通过,想客户端输出json,注意这里的buildJsonErrorRes,方法如下。
这里使用的Validator有很多验证方法
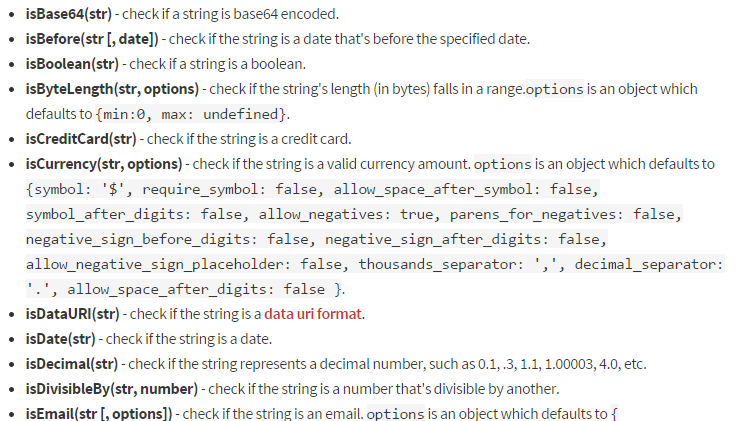
详情请看:https://www.npmjs.com/package/validator
OK,验证通过之后,我们直接将客户端传递的json数据转化成model,在这里只要客户端的字段和服务端schema的一致,就没有问题,你就想反序列化。最后我们调用booModel的saveBookInfo方法,结束。在这里需要注意,如果是post方式提交,则需要用req.body取值,如果是get?xx=xxx,就是req.query,如果是get/:id,则取值就是req.params.id。至此,我们的controller就写完了,那么我们现在将它公开称为rest api。
那么在客户端只需要调用/book就可以了。
看一下客户端的页面代码以及js。
一个很简单的页面,使用了kendo的datepicker控件,AngularJS的绑定,用一个book对象绑定,angular数字及非空,正则表达式验证, 很简单,就不多说了,看一下js。
弹出消息我们使用messager,在保存的时候,先检查客户端check有没有通过,通过了,直接将Book对象post到rest api /book,ok,到此,代码就全部完成了。注意最后一句,我们都知道angularjs只有一个启动入口,在这里我每点一个菜单,都会加载一个新页面,所以假如之前的这个页面已经被注入成启动页面,我们再将其设置为启动页面就会报错,所以我们先将该页面注入设置为空,再将该页面设置为启动页面就不会报错。
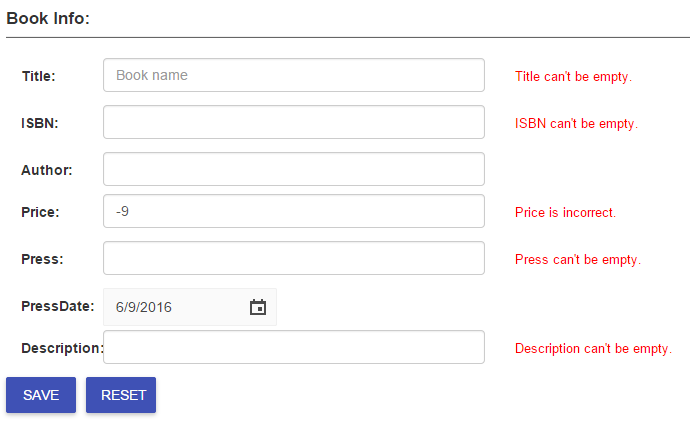
最后,我们看一下运行结果。

kendo控件还是很好看的,很很多套皮肤,验证效果如下
更多精彩,请看下节分享。唉,软通只给我8k,怎么办,还要继续努力。
原文转自:乐搏学院http://www.learnbo.com/front/article/cmsIndex
首先我们来看一下图书model的设计bookInfo.js。
| 1 2 3 4 5 6 7 8 9 10 11 12 13 14 15 16 17 18 19 20 21 22 23 24 25 26 27 28 29 30 31 32 33 34 35 | var mongoose = require( 'mongoose' ); var Schema = mongoose.Schema; var bookSchema = new Schema({_id: Schema.Types.ObjectId, Title: { type: String, index: true , required: true }, ISBN: { type: String, required: true , unique: true }, Author: { type: String },Price: { type: Number, min: 0.1, max: 99999 },Press: { type: String, required: true }, PressDate: { type: Date, default : Date.now }, Description: { type: String, required: true }, Image: { type: Schema.ObjectId }}, {strict: true , toObject: {virtuals: true }, toJSON: {virtuals: true } }); bookSchema.virtual( 'bookFullName' ).get( function () {return this .title + '(' + ( this .author? this .author: '' ) + ')' ; }); bookSchema.methods.saveBookInfo = function (callback) {this ._id = new mongoose.Types.ObjectId; this .save(callback); } bookSchema.set( 'collection' , 'books' ); var bookModel = mongoose.model( "books" , bookSchema); exports.bookModel = bookModel; |
点击Install New npm Packages
搜索mongoose,找到后点击Install Package或者你用命令行安装也行。
OK,此时我们require('mongoose')加载mongoose模块。接着我们定义了一个bookSchema,定义了一些字段,type是它的类型,index是否支持索引,required是否可以为空,类似于sqlserver的is not null,unique是不重复约束,default默认值,
ObjectId是该条数据唯一标识,类似SqlServer的主键,格式类似于GUID。在这里我们发现Image这个字段是一个ObjectId,说明这是一个外部唯一标识,类似于SqlServer的外键。接下来是strict:true,这个意思是必须是我们定义的字段才能存到mongodb中,未经过schema定义的字段是存不进去的。OK,Schema定义好之后,我们给bookSchema定义了一个virtual字段,virtual字段就是虚拟的,意思是在查询返回时,可以在返回结果中包含这个虚拟字段。但是这个字段本身不是mongodb
schema中的。
另外上面的toJson和ToObject都是针对这个virtual字段的,如果为false,则不论是返回Json还是Object都不会包含这个virtual字段。
接下来我们给Schema定义了method,saveBookInfo,先将主键值生成,再走save方法,save方法是mongoose提供的,mongoose提供了一系列增删改查的方法,单个批量都支持,非常方便。
最后我们设置collection的名称,并定义model,并将bookModel 模块公开。
好了,到这里,关于Schema的定义就说完了,接下来我们要给客户端页面提供rest api了,先链接mongodb,代码如下
| 1 2 3 4 5 6 7 8 9 10 11 12 13 14 15 16 17 18 19 20 21 | #!/usr/bin/env node var debug = require( 'debug' )( 'ChinaBook' ); var mongoose = require( 'mongoose' ); initMongoose(); var app = require( '../app' ); app.set( 'port' , process.env.PORT || 3000); var server = app.listen(app.get( 'port' ), function () {debug( 'Express server listening on port ' + server.address().port); }); function initMongoose(){mongoose.connect( 'localhost:27017/ChinaBook' , function (err, db){if (err) {console.log( 'Unable to connect to the mongoDB server. Error:' , err); } else {console.log( 'Connection established to' , 'localhost:27017/ChinaBook' ); } }); } |
| 1 2 3 4 5 6 7 8 9 10 11 12 13 14 15 16 17 18 19 20 21 22 23 24 25 26 27 28 29 30 31 32 33 34 35 36 37 38 39 40 41 42 | var bookSchemas = require( '../model/bookinfo.js' ); var bookMsgRes = require( '../framework/message/book_msg.js' ); var validator = require( 'validator' ); var mongoose = require( 'mongoose' ); var bookModel = bookSchemas.bookModel; exports.bookSave = function (req, res) {if (validator.isNull(req.body.Title)) {res.json(bookMsgRes.buildJsonErrorRes( 'BookTitleEmpty' )); return ; } if (!validator.isISBN(req.body.ISBN)) {res.json(bookMsgRes.buildJsonErrorRes( 'ISBNInCorrect' )); return ; } if (!validator.isFloat(req.body.Price, { min: 0.01, max: 999999 })) {res.json(bookMsgRes.buildJsonErrorRes( e328 'PriceInCorrect' )); return ; } if (validator.isNull(req.body.Press)) {res.json(bookMsgRes.buildJsonErrorRes( 'PressEmpty' )); return ; } if (validator.isNull(req.body.Description)) {res.json(bookMsgRes.buildJsonErrorRes( 'DescriptionEmpty' )); return ; } var bookEntity = new bookModel(req.body); bookEntity.saveBookInfo( function (error, doc) {if (error) {res.json({ isSuc: false , msg: error.message }); } else {res.json({ isSuc: true }); } }); } |
| 1 2 3 4 5 6 7 8 9 10 11 12 13 14 15 | var msg = {TitleEmpty: 'Book Title Can\'t be empty!' , ISBNInCorrect: 'ISBN is incorrect!' , PriceInCorrect: 'The price is incorrect,it must bwtween 0.1 and 99999!' , PressEmpty: 'Press can\'t be empty!' , DescriptionEmpty: 'Description can\'t be empty!' } exports.buildJsonErrorRes = function (key) {return { isSuc: false , msg: msg[key] }; } exports.buildJsonSucRes = function (key) {return { isSuc: false , msg: msg[key] }; } |
详情请看:https://www.npmjs.com/package/validator
OK,验证通过之后,我们直接将客户端传递的json数据转化成model,在这里只要客户端的字段和服务端schema的一致,就没有问题,你就想反序列化。最后我们调用booModel的saveBookInfo方法,结束。在这里需要注意,如果是post方式提交,则需要用req.body取值,如果是get?xx=xxx,就是req.query,如果是get/:id,则取值就是req.params.id。至此,我们的controller就写完了,那么我们现在将它公开称为rest api。
| 1 2 | var router = express.Router(); router.post( '/book' , bookRoutes.bookSave); |
看一下客户端的页面代码以及js。
| 1 2 3 4 5 6 7 8 9 10 11 12 13 14 15 16 17 18 19 20 21 22 23 24 25 26 27 28 29 30 31 32 33 34 35 36 37 38 39 40 41 42 43 44 45 46 47 48 49 50 51 52 53 54 55 56 57 58 59 60 61 62 63 64 | #book_typeIn(ng-controller='bookTypeInCtrl') label(style='font-size:17px') Book Info: hr.panel-line form(name='bookForm') .row.row-middle-height .col-md-12 .col-md-1 label Title: .col-md-5 input.form-control(name='title' type='text' maxlength='50' placeholder='Book name' ng-model='Book.Title' required) .col-md-6 p.error-message(ng-show='submitted && bookForm.title.$error.required') Title can't be empty. .row.row-margin.row-middle-height .col-md-12 .col-md-1 label ISBN: .col-md-5 input.form-control(name='ISBN' type='text' ng-model='Book.ISBN' maxlength ='30' required) .col-md-6 p.error-message(ng-show='submitted && bookForm.ISBN.$error.required') ISBN can't be empty. .row.row-margin.row-middle-height .col-md-12 .col-md-1 label Author: .col-md-5 input.form-control(type='text' maxlength ='30' ng-model='Book.Author') .row.row-margin.row-middle-height .col-md-12 .col-md-1 label Price: .col-md-5 input.form-control.tooltip-show(name='price' type='text' maxlength='10' ng-model='Book.Price' data-toggle='tooltip' data-placement='top' ng-pattern='/^[0-9]+(.[0-9]{2})?$/' title='Two decimal places').col-md-6 p.error-message(ng-show='submitted && bookForm.price.$error.pattern') Price is incorrect. .row.row-margin.row-middle-height .col-md-12 .col-md-1 label Press: .col-md-5 input.form-control(name='press' type='text' maxlength='50' ng-model='Book.Press' required) .col-md-6 p.error-message(ng-show='submitted && bookForm.press.$error.required') Press can't be empty. .row.row-margin.row-middle-height .col-md-12 .col-md-1 label PressDate: .col-md-5 kendo-date-picker(name='pressDate' ng-model='Book.PressDate' k-format='yyyy-MM-dd' onkeydown='return false;' required) .col-md-6 p.error-message(ng-show='submitted && bookForm.pressDate.$error.required') PressDate can't be empty. .row.row-margin.row-middle-height .col-md-12 .col-md-1 label Description: .col-md-5 input.form-control(name='description' type='text' maxlength='200' ng-model='Book.Description' required) .col-md-6 p.error-message(ng-show='submitted && bookForm.description.$error.required') Description can't be empty. .row-margin button.k-button.k-primary.btn-width-70(type='button' ng-click='bookInfoSave()') Save button.k-button.k-primary.btn-width-70(type='button' ng-click='bookInfoReset()' style='margin-left:10px') Reset block scripts script(type='text/javascript' src='/javascripts/local/book/bookTypeIn.js') |
| 1 2 3 4 5 6 7 8 9 10 11 12 13 14 15 16 17 18 19 20 21 22 23 24 25 26 27 28 29 30 31 32 33 34 35 36 37 38 39 40 41 42 43 44 45 46 47 48 49 50 51 52 53 54 55 56 57 58 | var appModule = angular.module( 'bookTypeInModule' , [ "kendo.directives" ]); appModule.config( function ($locationProvider) {$locationProvider.html5Mode( true ); }); appModule.controller( 'bookTypeInCtrl' , function ($scope, $http, $location) {angular.element( '.tooltip-show' ).tooltip( 'show' ); Messenger.options = {extraClasses: 'messenger-fixed messenger-on-top messenger-on-center' , theme: 'flat' } var now = new Date(); $scope.Book = {};$scope.bookInfoSave = function () {$scope.submitted = true ; if (!$scope.bookForm.$valid) {return ; } $http({method: "post" , url: "/book" , headers: { 'Content-Type' : 'application/json' }, data: $scope.Book }).success( function (data) {if (data.isSuc) {$scope.bookInfoReset(); $scope.showMsg( 'success' , 'Saved successfully!' ); } else {$scope.showMsg( 'error' , data.msg); } }); } $scope.bookInfoReset = function () {$scope.Book = {};$scope.submitted = false ; } $scope.showMsg = function (type, msg) {Messenger().post({message: msg, type: type, hideAfter: 2, showCloseButton: true }); } $scope.onError = function (error) { $scope.UploadError = error; } }); angular.element( '#book_typeIn' ).data( '$injector' , '' ); angular.bootstrap(angular.element( '#book_typeIn' ), [ 'bookTypeInModule' ]); |
最后,我们看一下运行结果。
kendo控件还是很好看的,很很多套皮肤,验证效果如下
更多精彩,请看下节分享。唉,软通只给我8k,怎么办,还要继续努力。
原文转自:乐搏学院http://www.learnbo.com/front/article/cmsIndex

相关文章推荐
- Node.js 切近实战(三) 之图书管理系统(图书信息录入)
- Node.js 切近实战(四) 之图书管理系统(图书查询)
- Node.js 切近实战(五) 之图书管理系统(图书Gallery)
- Node.js 切近实战(四) 之图书管理系统(图书查询)
- Node.js 切近实战(二) 之图书管理系统(登录)
- Node.js 切近实战(五) 之图书管理系统(图书Gallery)
- (实战)Liferay系统管理中观察系统信息仪表盘的更新 推荐
- 课程设计(图书信息管理系统)
- Nodejs+express 实战,实现系统监控功能
- Extjs视频教程_Extjs5.0从入门到实战开发信息管理系统
- 学习实战一:学生信息管理系统
- java-第三章-升级我行我素购物管理系统,实现会员信息录入的功能
- [零基础学JAVA]Java SE实战开发-37.MIS信息管理系统实战开发[JDBC](1) 推荐
- [零基础学JAVA]Java SE实战开发-37.MIS信息管理系统实战开发[JDBC](2) 推荐
- 3个基于Node.js的内容管理系统
- Extjs视频教程_Extjs5.0从入门到实战开发信息管理系统
- 使用node.js抓取有路网图书信息(原创)
- Nodejs+express 实战,实现系统监控功能
- 图书信息管理系统设计
- C链表和文件操作实战--图书管理系统