webpack开发和生产两个环境的配置详解
2017-04-21 16:35
926 查看
目录
webpack.base.conf.jswebpack.dev.conf.js
webpack.prod.conf.js
一开始在接触webpack 的时候,简直痛不欲生,现在回头看,做个注释,
当然参考了很多文章。这是一个关于vue 开发的webpack 架构会列举出来
webpack 系列教程
Webpack——令人困惑的地方
Express结合Webpack的全栈自动刷新
Webpack傻瓜式指南(一)
Webpack资源总结
启动指令
"scripts": {
"dev": "node build/dev-server.js", //
"build": "node build/build.js",// 打包
"lint": "eslint --ext .js,.vue src"
},
webpack.base.conf.js
webpack基本配置var path = require('path')
var config = require('../config')
var utils = require('./utils')
var projectRoot = path.resolve(__dirname, '../')
var env = process.env.NODE_ENV
// check env & config/index.js to decide whether to enable CSS source maps for the
// various preprocessor loaders added to vue-loader at the end of this file
var cssSourceMapDev = (env === 'development' && config.dev.cssSourceMap)
var cssSourceMapProd = (env === 'production' && config.build.productionSourceMap)
var useCssSourceMap = cssSourceMapDev || cssSourceMapProd
// 配置文件的内容需要通过module.exports暴露
module.exports = {
// 配置需要打包的入口文件,值可以是字符串、数组、对象。
// 1. 字符串: entry: './entry'
// 2. 字符串: entry:[ './entry1','entry2'] (多入口)
// 3. 对象: entry: {alert/index': path.resolve(pagesDir, `./alert/index/page`)}
// 多入口书写的形式应为object,因为object,的key在webpack里相当于此入口的name,
entry: {
app: './src/main.js'
},
output: {
// 输出文件配置,output 输出有自己的一套规则,常用的参数基本就是这三个
// path: 表示生成文件的根目录 需要一个**绝对路径** path仅仅告诉Webpack结果存储在哪里
path: config.build.assetsRoot,
// publicPath 参数表示的是一个URL 路径(指向生成文件的跟目录),用于生成css/js/图片/字体文件
// 等资源的路径以确保网页能正确地加载到这些资源.
// “publicPath”项则被许多Webpack的插件用于在生产模式下更新内嵌到css、html文件里的url值.
// 例如,在localhost(即本地开发模式)里的css文件中边你可能用“./test.png”这样的url来加载图片,
// 但是在生产模式下“test.png”文件可能会定位到CDN上并且你的Node.js服务器可能是运行在HeroKu上边的。
// 这就意味着在生产环境你必须手动更新所有文件里的url为CDN的路径。
//开发环境:Server和图片都是在localhost(域名)下
//.image {
// background-image: url('./test.png');
//}
// 生产环境:Server部署下HeroKu但是图片在CDN上
//.image {
// background-image: url('https://someCDN/test.png');
//}
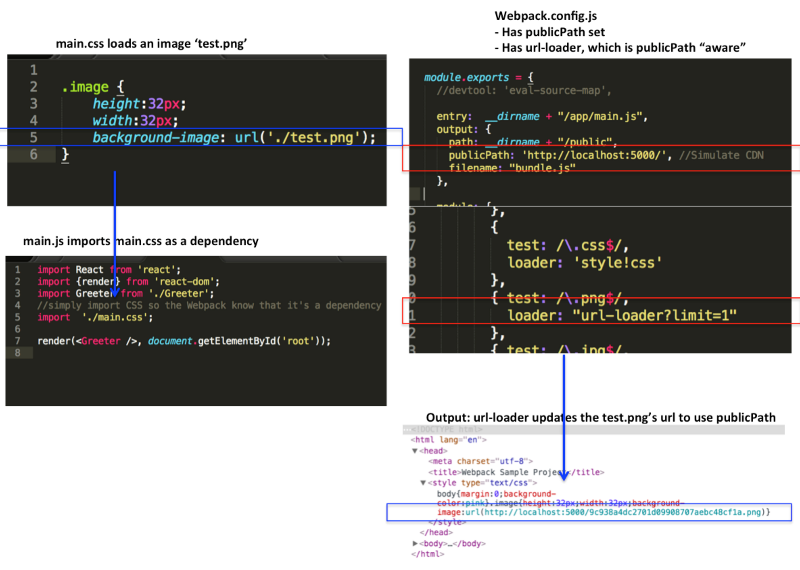
publicPath: process.env.NODE_ENV === 'production' ? config.build.assetsPublicPath : config.dev.assetsPublicPath,
// filename 属性表示的是如何命名出来的入口文件,规则是一下三种:
// [name] 指代入口文件的name,也就是上面提到的entry参数的key,因此,我们可以在name里利用/,即可达到控制文件目录结构的效果。
// [hash],指代本次编译的一个hash版本,值得注意的是,只要是在同一次编译过程中生成的文件,这个[hash].js
//的值就是一样的;在缓存的层面来说,相当于一次全量的替换。
filename: '[name].js'
},
// 用来配置依赖文件的匹配,如依赖文件的别名配置、模块的查找目录、默认查找的
// 文件后缀名
// resolve.root 该选型用来制定模块查找的根路径,必须为**绝对路径**,值可以
// 是路径字符串或者路径数组若是数组,则会依次查找
resolve: {
extensions: ['', '.js', '.vue', '.json'],
fallback: [path.join(__dirname, '../node_modules')],
// 用来配置依赖文件的别名,值是一个对,该对象的键是别名,值是实际路径
alias: {
'vue$': 'vue/dist/vue.common.js',
'src': path.resolve(__dirname, '../src'),
'assets': path.resolve(__dirname, '../src/assets'),
'components': path.resolve(__dirname, '../src/components')
}
},
resolveLoader: {
fallback: [path.join(__dirname, '../node_modules')]
},
// 用来进行模块加载相关的配置
module: {
preLoaders: [
{
test: /\.vue$/,
loader: 'eslint',
include: projectRoot,
exclude: /node_modules/
},
{
test: /\.js$/,
loader: 'eslint',
include: projectRoot,
exclude: /node_modules/
}
],
loaders: [
// webpack拥有一个类似于插件的机制,名为Loader,通过Loader,webpack能够针对每一种特定的资源做出相应的处理
// 1.test参数用来指示当前配置项针对哪些资源,该值应是一个条件值(condition)。
// 2.exclude参数用来剔除掉需要忽略的资源,该值应是一个条件值(condition)。
// 3.include参数用来表示本loader配置仅针对哪些目录/文件,该值应是一个条件值(condition)。
// 而include参数则用来指示目录;注意同时使用这两者的时候,实际上是and的关系。
// 4.loader/loaders参数,用来指示用哪个或哪些loader来处理目标资源,这俩货
// 表达的其实是一个意思,只是写法不一样,我个人推荐用loader写成一行,多个
// loader间使用!分割,这种形式类似于管道的概念,又或者说是函数式编程。形
// 如loader: 'css?!postcss!less',可以很明显地看出,目标资源先经less-loader
// 处理过后将结果交给postcss-loader作进一步处理,然后最后再交给css-loader。
{
test: /\.vue$/,
loader: 'vue'
},
{
test: /\.js$/,
loader: 'babel',
include: projectRoot,
exclude: /node_modules/
},
{
test: /\.json$/,
loader: 'json'
},
{
test: /\.(png|jpe?g|gif|svg)(\?.*)?$/,
loader: 'url',
query: {
limit: 10000,
name: utils.assetsPath('img/[name].[hash:7].[ext]')
}
},
{
test: /\.(woff2?|eot|ttf|otf)(\?.*)?$/,
loader: 'url',
query: {
limit: 10000,
name: utils.assetsPath('fonts/[name].[hash:7].[ext]')
}
},
// expose-loader,这个loader的作用是,将指定js模块export的变量声明为全局变量
{
test: require.resolve('jquery'), // 此loader配置项的目标是NPM中的jquery
loader: 'expose?$!expose?jQuery', // 先把jQuery对象声明成为全局变量`jQuery`,再通过管道进一步又声明成为全局变量`$`
},
]
},
eslint: {
formatter: require('eslint-friendly-formatter')
},
vue: {
loaders: utils.cssLoaders({ sourceMap: useCssSourceMap }),
// 解决.vue中文件style的部分一些特性解析,比如scoped
postcss: [
require('autoprefixer')({
browsers: ['last 2 versions']
})
]
}
}
webpack.dev.conf.js
var config = require('../config')
var webpack = require('webpack')
var merge = require('webpack-merge')
var utils = require('./utils')
var baseWebpackConfig = require('./webpack.base.conf')
var HtmlWebpackPlugin = require('html-webpack-plugin')

// add hot-reload related code to entry chunks
Object.keys(baseWebpackConfig.entry).forEach(function (name) {
baseWebpackConfig.entry[name] = ['./build/dev-client'].concat(baseWebpackConfig.entry[name])
})

module.exports = merge(baseWebpackConfig, {
module: {
loaders: utils.styleLoaders({ sourceMap: config.dev.cssSourceMap })
},
// eval-source-map is faster for development
devtool: '#eval-source-map',
plugins: [
// DefinePlugin 是webpack 的内置插件,该插件可以在打包时候替换制定的变量
//
new webpack.DefinePlugin({
'process.env': config.dev.env
}),
// https://github.com/glenjamin/webpack-hot-middleware#installation--usage new webpack.optimize.OccurrenceOrderPlugin(),
new webpack.HotModuleReplacementPlugin(),
new webpack.NoErrorsPlugin(),
// https://github.com/ampedandwired/html-webpack-plugin new HtmlWebpackPlugin({
filename: 'index.html',
template: 'index.html',
inject: true
}),
// 可以自动加载当前模块依赖的其他模块并已制定别名注入到当前的模块中,引入jq
// 在网上看到的文章,救了我的命 ProvidePlugin + expose-loader 引入jq
//
// 如果你把jQuery看做是一个普通的js模块来加载(要用到jQuery的模块统统先require
// 后再使用),那么,当你加载老式jQuery插件时,往往会提示找不到jQuery实例
// 有时候是提示找不到$),这是为啥呢?
// 要解释这个问题,就必须先稍微解释一下jQuery插件的机制:jQuery插件是通过
// jQuery提供的jQuery.fn.extend(object)和jQuery.extend(object)这俩方法,来
// 把插件本身实现的方法挂载到jQuery(也即$)这个对象上的。传统引用jQuery及
// 其插件的方式是先用<script>加载jQuery本身,然后再用同样的方法来加载其插件;
// jQuery会把jQuery对象设置为全局变量(当然也包括了$),既然是全局变量,那么
// 插件们很容易就能找到jQuery对象并挂载自身的方法了。
//
// 而webpack作为一个遵从模块化原则的构建工具,自然是要把各模块的上下文环境给
// 分隔开以减少相互间的影响;而jQuery也早已适配了AMD/CMD等加载方式,换句话说,
// 我们在require jQuery的时候,实际上并不会把jQuery对象设置为全局变量。说到
// 这里,问题也很明显了,jQuery插件们找不到jQuery对象了,因为在它们各自的上下
// 文环境里,既没有局部变量jQuery(因为没有适配AMD/CMD,所以就没有相应的requi
// re语句了),也没有全局变量jQuery。
//
// A: ProvidePlugin的机制是:当webpack加载到某个js模块里,出现了未定义且名称符合
// (字符串完全匹配)配置中key的变量时,会自动require配置中value所指定的js模块
// expose-loader,这个loader的作用是,将指定js模块export的变量声明为全局变量。
//
// B:externals 调用jq
// externals是webpack配置中的一项,用来将某个全局变量“伪装”成某个js模块的exports,
// 如下面这个配置:
// externals: {'jquery': 'window.jQuery',},
// 那么,当某个js模块显式地调用var $ = require('jquery')的时候,就会把window,
// jQuery返回给它,与上述ProvidePlugin + expose-loader的方案相反,此方案是先用
// <script>加载的jQuery满足老式jQuery插件的需要,再通过externals将其转换成符合
// 模块化要求的exports。
new webpack.ProvidePlugin({
$: "jquery",
jQuery: "jquery",
"window.jQuery": "jquery",
'window.$': 'jquery',
})
]
})
webpack.prod.conf.js
var path = require('path')
var config = require('../config')
var utils = require('./utils')
var webpack = require('webpack')
var merge = require('webpack-merge')
var baseWebpackConfig = require('./webpack.base.conf')
var ExtractTextPlugin = require('extract-text-webpack-plugin')
var HtmlWebpackPlugin = require('html-webpack-plugin')
var env = config.build.env

var webpackConfig = merge(baseWebpackConfig, {
module: {
loaders: utils.styleLoaders({ sourceMap: config.build.productionSourceMap, extract: true })
},
devtool: config.build.productionSourceMap ? '#source-map' : false,
output: {
path: config.build.assetsRoot,
filename: utils.assetsPath('js/[name].[chunkhash].js'),
chunkFilename: utils.assetsPath('js/[id].[chunkhash].js')
},
vue: {
loaders: utils.cssLoaders({
sourceMap: config.build.productionSourceMap,
extract: true
})
},

// webpack插件位置,有固定的用法
// 1. 利用Plugin的初始方法并传入Plugin预设的参数进行初始化,生成一个实例。
// 2. 将此实例插入到webpack配置文件中的plugins参数(数组类型)里即可。
//
// 1.
plugins: [
// http://vuejs.github.io/vue-loader/en/workflow/production.html new webpack.DefinePlugin({
'process.env': env
}),
new webpack.optimize.UglifyJsPlugin({
compress: {
warnings: false
}
}),
new webpack.optimize.OccurrenceOrderPlugin(),
// extract css into its own file
new ExtractTextPlugin(utils.assetsPath('css/[name].[contenthash].css')),
// generate dist index.html with correct asset hash for caching.
// you can customize output by editing /index.html
// see https://github.com/ampedandwired/html-webpack-plugin new HtmlWebpackPlugin({

// filename 生成网页的HTML名字,可以使用/来控制文件文件的目录结构,最
// 终生成的路径是基于webpac配置的output.path的
filename: config.build.index,
template: 'index.html',
inject: true,
// inject,指示把加载js文件用的<script>插入到哪里,默认是插到<body>
// 的末端,如果设置为'head',则把<script>插入到<head>里。
minify: {
removeComments: true,
collapseWhitespace: true,
removeAttributeQuotes: true
// more options:
// https://github.com/kangax/html-minifier#options-quick-reference },
// necessary to consistently work with multiple chunks via CommonsChunkPlugin
chunksSortMode: 'dependency'
}),

// 如果文件是多入口的文件,可能存在,重复代码,把公共代码提取出来,又不会重复下载公共代码了
// (多个页面间会共享此文件的缓存)
// CommonsChunkPlugin的初始化常用参数有解析?
// name: 这个给公共代码的chunk唯一的标识
// filename,如何命名打包后生产的js文件,也是可以用上[name]、[hash]、[chunkhash]
// minChunks,公共代码的判断标准:某个js模块被多少个chunk加载了才算是公共代码
new webpack.optimize.CommonsChunkPlugin({
name: 'vendor',
minChunks: function (module, count) {
// any required modules inside node_modules are extracted to vendor
return (
module.resource &&
/\.js$/.test(module.resource) &&
module.resource.indexOf(
path.join(__dirname, '../node_modules')
) === 0
)
}
}),
// extract webpack runtime and module manifest to its own file in order to
// prevent vendor hash from being updated whenever app bundle is updated
new webpack.optimize.CommonsChunkPlugin({
name: 'manifest',
chunks: ['vendor']
})
]
})

if (config.build.productionGzip) {
var CompressionWebpackPlugin = require('compression-webpack-plugin')

webpackConfig.plugins.push(
new CompressionWebpackPlugin({
asset: '[path].gz[query]',
algorithm: 'gzip',
test: new RegExp(
'\\.(' +
config.build.productionGzipExtensions.join('|') +
')$'
),
threshold: 10240,
minRatio: 0.8
})
)
}

module.exports = webpackConfig

相关文章推荐
- webpack开发和生产两个环境的配置详解
- Webpack配置开发环境和生产环境
- webpack4.x开发环境配置详解
- 分离Webpack开发环境与生产环境的配置
- 从零搭建前端开发环境(零)——基础篇:2.webpack生产与开发环境配置
- vue-cli项目开发/生产环境代理实现跨域请求+webpack配置开发/生产环境的接口地址
- webpack开发环境和生产环境切换原理
- VUE 利用 webpack 给生产环境和发布环境配置不同的接口地址
- vue-cli webpack 开发环境跨域详解
- React + Typescript + Webpack 开发环境配置
- Java Web开发环境配置详解
- webpack配置es6开发环境
- webpack开发环境配置
- react+webpack开发环境配置
- VUE 利用webpack 给生产环境和发布环境配置不同的接口地址
- webpack手动配置React开发环境的步骤
- Webpack中的sourcemap以及如何在生产和开发环境中合理的设置sourcemap的类型
- WebPack安装-使用-Loader-配置-插件-环境-排错详解(下扩展)
- 详解基于webpack和vue.js搭建开发环境
- React+webpack 的开发环境配置步骤(二)