[TensorFlow]入门学习笔记(2)-卷积神经网络mnist手写识别
2017-04-19 22:59
846 查看
1.手写识别案例
Mnist手写图片识别是TensorFlow的经典案例。从from tensorflow.examples.tutorials.mnist import input_data,这里,mnist是一个轻量级的类。它以Numpy数组的形式存储着训练、校验和测试数据集。同时提供了一个函数,用于在迭代中获得minibatch,后面我们将会用到。2.重点概念阐述
在实现使用卷积神经网络做mnist手写识别之前,先对使用过程中的重点概念进行梳理,理解。2.1卷积神经网络
卷积神经网络是近年发展起来,并引起广泛重视的一种高效识别方法。20世纪60年代,Hubel和Wiesel在研究猫脑皮层中用于局部敏感和方向选择的神经元时发现其独特的网络结构可以有效地降低反馈神经网络的复杂性,继而提出了卷积神经网络(Convolutional Neural Networks-简称CNN)。现在,CNN已经成为众多科学领域的研究热点之一,特别是在模式分类领域,由于该网络避免了对图像的复杂前期预处理,可以直接输入原始图像,因而得到了更为广泛的应用。 K.Fukushima在1980年提出的新识别机是卷积神经网络的第一个实现网络。感知野
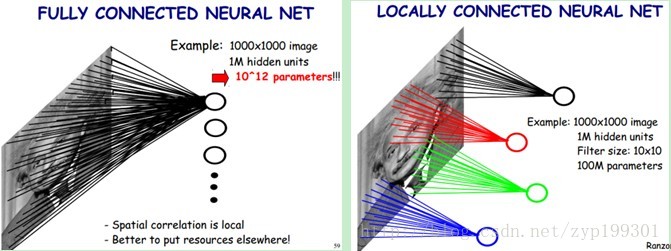
可以降低参数数目。一般认为人对外界的认知是从局部到全局的,而图像的空间联系也是局部的像素联系较为紧密,而距离较远的像素相关性则较弱。因而,每个神经元其实没有必要对全局图像进行感知,只需要对局部进行感知,然后在更高层将局部的信息综合起来就得到了全局的信息。网络部分连通的思想,也是受启发于生物学里面的视觉系统结构。视觉皮层的神经元就是局部接受信息的(即这些神经元只响应某些特定区域的刺激)。如下图所示:左图为全连接,右图为局部连接。
参数共享
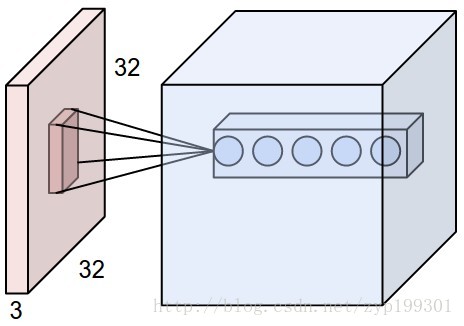
直观一些,当从一个大尺寸图像中随机选取一小块,比如说 8x8 作为样本,并且从这个小块样本中学习到了一些特征,这时我们可以把从这个 8x8 样本中学习到的特征作为探测器,应用到这个图像的任意地方中去。特别是,我们可以用从 8x8 样本中所学习到的特征跟原本的大尺寸图像作卷积,从而对这个大尺寸图像上的任一位置获得一个不同特征的激活值。
2.1.1卷积层
卷积层最重要的部分称为过滤器,长和宽为人为指定,还有一个需要人为指定的为深度。尺寸指的是过滤器输入节点矩阵的大小,深度指的是输出单位节点矩阵的深度。在过滤器不为1*1时,向前传播的尺寸小于当前层矩阵的尺寸。如果要避免尺寸的变化,有几个措施。
加入全0填充(zero-padding)。填充可以填充一层,也可以填充若干层。为了保证窗口的滑动能从头刚好到尾。在tensorflow中,提供了两种填充的方法,一种是’SAME’,一种是’VALID’.前者全0填充,后者不添加。
设置过滤器移动的步长。窗口滑动步长设定越小,两次滑动取得的数据,重叠部分越多,但是窗口停留的次数也会越多,运算律大一些;窗口滑动步长设定越长,两次滑动取得的数据,重叠部分越少,窗口停留次数也越少,运算量小,但是从一定程度上说数据信息不如上面丰富了。
计算的公式
全0填充outlength=⌈inlength/stridelength⌉
outwidth=⌈inwidth/stridewidth⌉
不使用全0填充
outlength=⌈(inlength−filterlength+1)/stridelength⌉
outwidth=⌈(inwidth−filterwidth+1)/stridewidth⌉
池化层
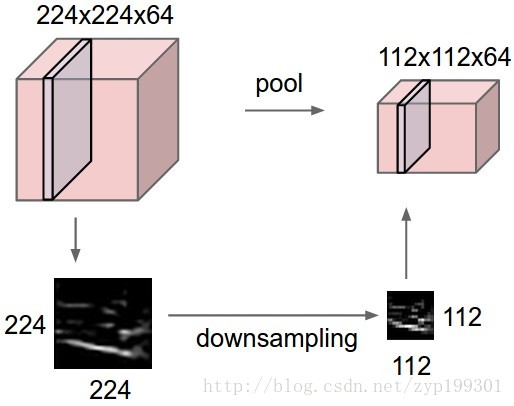
在卷积神经网络中,Pooling层是夹在连续的卷积层中间的层。它的作用也非常简单,就是逐步地压缩/减少数据和参数的量,也在一定程度上减小过拟合的现象。Pooling层做的操作也非常简单,就是将原数据上的区域压缩成一个值(区域最大值/MAX或者平均值/AVERAGE),最常见的Pooling设定是,将原数据切成2*2的小块,每块里面取最大值作为输出,这样我们就自然而然减少了75%的数据量。需要提到的是,除掉MAX和AVERAGE的Pooling方式,其实我们也可以设定别的pooling方式,比如L2范数pooling。说起来,历史上average pooling用的非常多,但是近些年热度降了不少,工程师们在实践中发现max pooling的效果相对好一些。一个池化层的基本过程:
池化过程:
卷积数目
说起来,每一层的大小(神经元个数和排布)并没有严格的数字规则,但是我们有一些通用的工程实践经验和系数:对于输入层(图像层),我们一般把数据归一化成2的次方的长宽像素值。比如CIFAR-10是32*32*3,STL-10数据集是64*64*3,而ImageNet是224*224*3或者512*512*3。
卷积层通常会把每个[滤子/filter/神经元]对应的上层滑动数据窗口设为3*3或者5*5,滑动步长stride设为1(工程实践结果表明stride设为1虽然比较密集,但是效果比较好,步长拉太大容易损失太多信息),zero-padding就不用了。
Pooling层一般采用max-pooling,同时设定采样窗口为2*2。偶尔会见到设定更大的采样窗口,但是那意味着损失掉比较多的信息了。
比较重要的是,我们得预估一下内存,然后根据内存的情况去设定合理的值。我们举个例子,在ImageNet分类问题中,图片是224*224*3的,我们跟在数据层后面3个3*3『视野窗』的卷积层,每一层64个filter/神经元,把padding设为1,那么最后每个卷积层的output都是[224*224*64],大概需要1000万次对output的激励计算(非线性activation),大概花费72MB内存。而工程实践里,一般训练都在GPU上进行,GPU的内存比CPU要吃紧的多,所以也许我们要稍微调动一下参数。比如AlexNet用的是11*11的的视野窗,滑动步长为4。
网络优化过程
网络结构:con1-pool1-con2-pool2-fc1-softmaxpass 优化过程下次详尽写
inference-train-eval过程
inference
import tensorflow as tf
import numpy as np
from tensorflow.examples.tutorials.mnist import input_data

#dataset params
INPUT_NODE = 784
OUTPUT_NODE = 10

#cnns params
IMAGE_SIZE = 28
NUM_CHANNELS =1
NUM_LABELS =10

DROP_PROB = 0.5

CON1_DEEP = 32
CON1_SIZE = 5

CON2_DEEP = 64
CON2_SIZE = 5

FC1_SIZE = 1024

#inference structure
def inference(input_tensor,train,regularizer):
#first layer
with tf.variable_scope('layer1-conv1'):
conv1_W = tf.get_variable("weight",[CON1_SIZE,CON1_SIZE,NUM_CHANNELS,CON1_DEEP]
,initializer=tf.truncated_normal_initializer(stddev=0.1))
conv1_b = tf.get_variable("bias",[CON1_DEEP],initializer=tf.constant_initializer(0.1))

#5 * 5 patch ,step 1 ,fill 0
conv1 = tf.nn.conv2d(input_tensor,conv1_W,strides=[1,1,1,1],padding='SAME')
relu1 = tf.nn.relu(tf.nn.bias_add(conv1,conv1_b))

with tf.variable_scope('layer1-max_pool'):
pool1 = tf.nn.max_pool(relu1,ksize=[1,2,2,1],strides=[1,2,2,1],padding='SAME')

#second layer
with tf.variable_scope('layer2-conv2'):
conv2_W = tf.get_variable("weight",[CON2_SIZE,CON2_SIZE,CON1_DEEP,CON2_DEEP],
initializer=tf.truncated_normal_initializer(stddev=0.1))
conv2_b = tf.get_variable("bias",[CON2_DEEP],initializer=tf.constant_initializer(0.1))

#5*5 patch,step 1 ,fill 0
conv2 = tf.nn.conv2d(pool1,conv2_W,strides=[1,1,1,1],padding='SAME')
relu2 = tf.nn.relu(tf.nn.bias_add(conv2,conv2_b))

with tf.variable_scope('layer2-max_pool'):
pool2 = tf.nn.max_pool(relu2,ksize=[1,2,2,1],strides=[1,2,2,1],padding='SAME')

#fc1 layer
pool_shape = pool2.get_shape().as_list()
nodes = pool_shape[1] * pool_shape[2] * pool_shape[3]
reshaped = tf.reshape(pool2,[-1,nodes])
with tf.variable_scope('layer3-fc1'):
fc1_W = tf.get_variable("weight",[nodes,FC1_SIZE],
initializer=tf.truncated_normal_initializer(stddev=0.1))
#regularizer
if regularizer != None:
tf.add_to_collection('losses',regularizer(fc1_W))
fc1_b = tf.get_variable("bias",[FC1_SIZE],initializer=tf.constant_initializer(0.1))
fc1 = tf.nn.relu(tf.matmul(reshaped,fc1_W)+fc1_b)
if train:
fc1 = tf.nn.dropout(fc1,0.5)

with tf.variable_scope('layer3-softmax'):
fc2_W = tf.get_variable("weight",[FC1_SIZE,NUM_LABELS],
initializer=tf.truncated_normal_initializer(stddev=0.1))
if regularizer != None:
tf.add_to_collection('losses',regularizer(fc2_W))
fc2_b = tf.get_variable("bias",[NUM_LABELS],initializer=tf.constant_initializer(0.1))
y_conv = tf.nn.softmax(tf.matmul(fc1,fc2_W)+fc2_b)

return y_conv
train
#encoding:utf-8
import os
import numpy as np
import tensorflow as tf
from tensorflow.examples.tutorials.mnist import input_data

import mnist_inference

#data params
BATCH_SIZE = 100
LEARNING_RATE_BASE = 0.8
LEARNING_RATE_DECAY = 0.99
REGULARAZTION_RATE = 0.0001
TRAINING_STEPS = 20000
MOVING_AVERAGE_DECAY = 0.99

#model save path and name
MODEL_SAVE_PATH = "path/model/"
MODEL_NAME = "model.ckpt"

def train(mnist):
x = tf.placeholder(tf.float32,[BATCH_SIZE,mnist_inference.IMAGE_SIZE,
mnist_inference.IMAGE_SIZE,mnist_inference.NUM_CHANNELS],name='x-input')
y_ = tf.placeholder(tf.float32,[None,mnist_inference.OUTPUT_NODE],name='y-input')

regularizer = tf.contrib.layers.l2_regularizer(REGULARAZTION_RATE)

y = mnist_inference.inference(x,1,regularizer)

#step to control the delay
global_step = tf.Variable(0,trainable=False)

variable_averages = tf.train.ExponentialMovingAverage(MOVING_AVERAGE_DECAY,global_step)
variable_averages_op = variable_averages.apply(tf.trainable_variables())

#cross entropy and add the regularization
# cross_entropy = -tf.reduce_sum(y_*tf.log(y))
cross_entropy = tf.nn.sparse_softmax_cross_entropy_with_logits(logits=y,labels=tf.argmax(y_,1))
cross_entropy_mean = tf.reduce_mean(cross_entropy)
loss = cross_entropy_mean + tf.add_n(tf.get_collection('losses'))

learning_rate = tf.train.exponential_decay(LEARNING_RATE_BASE,global_step,
mnist.train.num_examples/BATCH_SIZE,
LEARNING_RATE_DECAY)

# tf.scalar_summary('learning_rate', learning_rate)
train_step = tf.train.GradientDescentOptimizer(learning_rate).minimize(loss,global_step=global_step)

#updata the W and variable average at the same time
with tf.control_dependencies([train_step,variable_averages_op]):
train_op = tf.no_op(name='train')

#save the model
saver = tf.train.Saver()
with tf.Session() as sess:
sess.run(tf.global_variables_initializer())

for i in range(TRAINING_STEPS):
xs,ys = mnist.train.next_batch(BATCH_SIZE)
reshaped_xs = np.reshape(xs,(BATCH_SIZE,mnist_inference.IMAGE_SIZE,
mnist_inference.IMAGE_SIZE,mnist_inference.NUM_CHANNELS))
_, loss_value,step = sess.run([train_op, loss,global_step], feed_dict={x: reshaped_xs, y_: ys})
if i % 1000 == 0:
# print "step %d, training accuracy %g" % (i, train_accuracy)
print "step %d,loss is  %g" % (step,loss_value)
saver.save(sess,os.path.join(MODEL_SAVE_PATH,MODEL_NAME),global_step=global_step)

def main(argv=None):
mnist = input_data.read_data_sets("MNIST_data/", one_hot=True)
train(mnist)

if __name__=='__main__':
tf.app.run()
eval
import time
import tensorflow as tf
from tensorflow.examples.tutorials.mnist import input_data
import numpy as np
import mnist_inference
import mnist_train

EVAL_INTERVAL_SECS = 10

def evaluate(mnist):
with tf.Graph().as_default() as g:
x = tf.placeholder(tf.float32, [None, mnist_inference.IMAGE_SIZE,
mnist_inference.IMAGE_SIZE, mnist_inference.NUM_CHANNELS], name='x-input')
y_ = tf.placeholder(tf.float32,[None,mnist_inference.OUTPUT_NODE],
name='y-input')
xs = mnist.test.images
reshaped_xs = np.reshape(xs, (-1, mnist_inference.IMAGE_SIZE,
mnist_inference.IMAGE_SIZE, mnist_inference.NUM_CHANNELS))
test_feed = {x:reshaped_xs,y_:mnist.test.labels}

y = mnist_inference.inference(x,None,None)

correct_prediction = tf.equal(tf.argmax(y,1),tf.argmax(y_,1))
accuracy = tf.reduce_mean(tf.cast(correct_prediction,tf.float32))

variable_averages = tf.train.ExponentialMovingAverage(mnist_train.MOVING_AVERAGE_DECAY)
variable_to_restore = variable_averages.variables_to_restore()
saver = tf.train.Saver(variable_to_restore)

while True:
with tf.Session() as sess:
ckpt = tf.train.get_checkpoint_state(mnist_train.MODEL_SAVE_PATH)
if ckpt and ckpt.model_checkpoint_path:
saver.restore(sess,ckpt.model_checkpoint_path)

global_stop = ckpt.model_checkpoint_path.split('/')[-1].split('-')[-1]

accuracy_score = sess.run(accuracy,feed_dict=test_feed)
print "step %s ,accuracy is %g" %(global_stop,accuracy_score)

else:
print "NOT FOUND FILE"
return
time.sleep(EVAL_INTERVAL_SECS)

def main(argv=None):
mnist = input_data.read_data_sets("MNIST_data/", one_hot=True)
evaluate(mnist)

if __name__=='__main__':
tf.app.run()

相关文章推荐
- tensorflow 学习笔记9 卷积神经网络(CNN)实现mnist手写识别
- TensorFlow学习_02_CNN卷积神经网络_Mnist手写数字识别
- 学习笔记(五)Tensorflow实现Soft Regression简单识别MNIST手写数字
- tensorflow 学习笔记12 循环神经网络RNN LSTM结构实现MNIST手写识别
- tensorflow 学习笔记7 普通神经网络实现mnist手写识别
- 深度学习-CNN卷积神经网络使用TensorFlow框架实现MNIST手写数字识别
- TensorFlow学习笔记【二】 手写数字识别入门
- Deep Learning-TensorFlow (1) CNN卷积神经网络_MNIST手写数字识别代码实现
- tensorflow学习笔记五:mnist实例--卷积神经网络(CNN)(Deep MNIST for Experts)
- 用MXnet入门实战深度学习之一:安装GPU版mxnet并跑一个MNIST手写数字识别
- TensorFlow官方教程学习笔记(三)——MNIST入门(续)
- Deep Learning-TensorFlow (1) CNN卷积神经网络_MNIST手写数字识别代码实现详解
- 深度学习笔记(四)用Torch实现MNIST手写数字识别
- 用MXnet入门实战深度学习之一:安装GPU版mxnet并跑一个MNIST手写数字识别
- 用MXnet入门实战深度学习之一:安装GPU版mxnet并跑一个MNIST手写数字识别
- 用MXnet入门实战深度学习之一:安装GPU版mxnet并跑一个MNIST手写数字识别
- TensorFlow学习笔记之源码分析(2)----手写数字识别mnist example
- 用MXnet入门实战深度学习之一:安装GPU版mxnet并跑一个MNIST手写数字识别
- 用MXnet入门实战深度学习之一:安装GPU版mxnet并跑一个MNIST手写数字识别
- 用MXnet入门实战深度学习之一:安装GPU版mxnet并跑一个MNIST手写数字识别