深度学习算法之AlexNet和VGGNet
2017-04-17 15:42
309 查看
AlexNet:
1 模型特性
该模型主要的特性如下:
1.1 激活函数——ReLU
(1)激活函数使用ReLU,解决了梯度弥散问题;
什么是梯度弥散?同样还有一个概念叫做梯度爆炸?
直观的解释:

可以看出sigmod函数在靠近0的附近的时候梯度变化比较明显,到靠近1的地方梯度逐渐趋近与0,根据梯度下降算法,此时权值等参数变化不明显,函数很难收敛。
本质的解释:
假设一个简单的结构,输入层节点表示为h1,其后节点分别为h2,h3,h4,输出为C,各节点间权值为w2,w3,w4。
根据前向计算:
假设第一层输入为z1,那么其输出为a1=σ(z1),其余各层依次类推。
根据反向计算:
∂L∂z0=∂L∂a4⋅∂a4∂z4⋅∂z4∂a3⋅∂a3∂z3⋅∂z3∂a2⋅∂a2∂z1⋅∂z1∂a1⋅∂a1∂z0
其中∂ai∂zi−1=wi
当h1有小变化时,
∂L∂z0≈ΔLΔz0
有:
Δa1Δz0=∂a1∂z0
故:
Δa1=∂a1∂z0⋅Δz0
以此类推:
ΔL=∂L∂a4⋅∂a4∂z4⋅∂z4∂a3⋅∂a3∂z3⋅∂z3∂a2⋅∂a2∂z1⋅∂z1∂a1⋅∂a1∂z0⋅Δz0
因为wi<1,sigmod函数导数最大值为1/4。
所以梯度后向传播,层数越多,传递回来的梯度值越小。
相反,对于正向传播,如果初始化的参数过大,有可能在最后数值出现overflow,也就是梯度爆炸NAN。
所以本质上仍然是由于链式规则导致多项乘积,导致网络越深乘积结果偏离理想情况。
ReLU为什么可以避免梯度消失
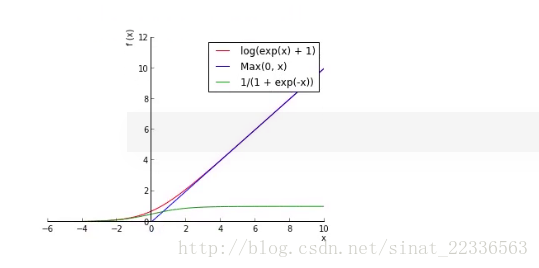
从图中看出ReLU函数梯度不会随着x的增大而减小。
(2)ReLU本质上是分段线性模型,前向计算非常简单,无需指数之类操作,其偏导求解更简单,无需指数或者除法运算。
(3)ReLU在x<0的情况下,输出都是0,也就是隐藏层输出为0,表明网络结构变得稀疏了,减少了模型的复杂性。
1.2 dropout
使用Dropout随机忽略部分神经元,避免过拟合。
每次进行权值更新时,dropout保证了隐含节点是以一定概率随机出现,因此2个隐含节点每次不一定同时出现,这样权值的更新不再依赖于有固定关系隐含节点的共同作用,阻止了某些特征仅仅在其它特定特征下才有效果的情况。
dropout可以看做是一种bagging的情况,也就是对于每个样本,其所对应的网络结构不一样,相当于对应不同的模型。
1.3 最大池化
使用重叠的最大池化,一方面是保留最显著的特征,一方面重叠可以提升特征的丰富性。
1.4 LRN层。
LRN对于网络的效果不明显,同时还会降低收敛速度,得不偿失。
1.5 CUDA加速计算。
该模型使用两块GPU进行训练,每个GPU存储一般的学习参数,GPU之间的通信高效方便。
1.6 数据增强
随机的对原始图像进行翻转,裁剪。等价于增大数据量。
常用的方法有:
水平翻转
随机裁剪、平移变换
颜色、光照变换
2 模型结构
2.1 论文所述结构
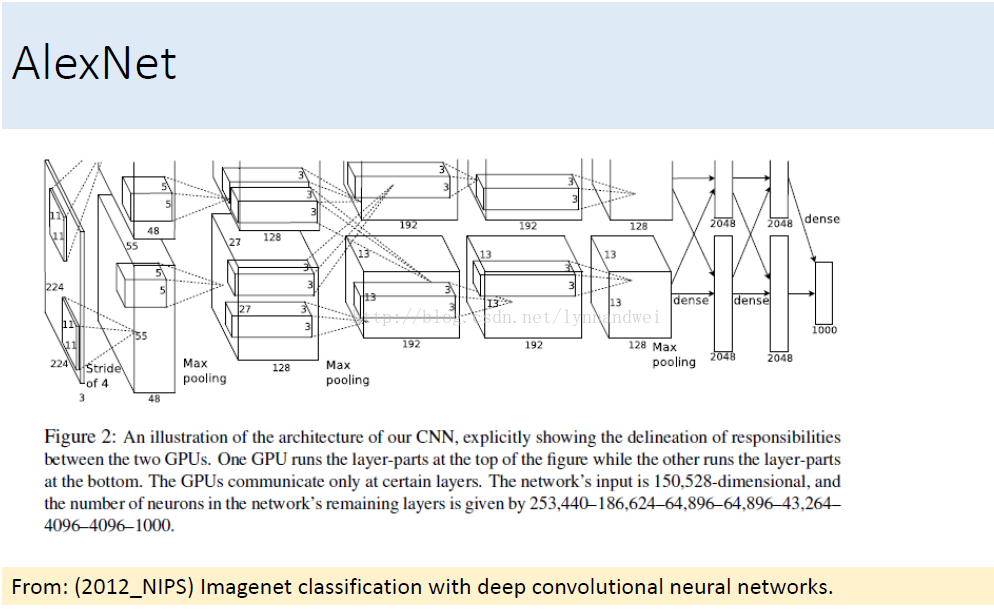
由图看出前五层为卷积层,有的卷积层后跟最大池化层,而最后三层为全连接层,分类用softmax。
2.2 AlexNet的caffe实现
2.2.1数据层
数据增强:AlexNet首次在输入之前对数据进行镜像,翻转,随机剪裁等预处理,主要是为了增加数据量。训练时随机从256*256的原始图像中随机截取224*224的区域,可以得到(256-224)^2*2=2048倍的数据量,极大地减轻了模型的过拟合。
测试的时候裁剪则是固定的。
裁剪出多个图片,对他们进行预测最后对结果求均值。
batch_size:训练时256,测试时50
2.2.2 卷积部分
卷积部分包含:卷积核层,LNR层,激活函数,池化三部分。
第一个使用的是较大的11*11,步长为4,总数为96的卷积核;后跟LNR层和一个3*3的池化层,步长为2。
第二个使用的则是5*5,步长为1的卷积核,步长为1表面扫描输入图片的所有像素点。池化仍然是3*3,步长为2.
第三个则是三个3*3的卷积核串联,后跟最大池化3*3,步长不变。
2.2.3 全连接层
一个完整的全连接层的第一层为内积层:就是计算两个矩阵的内积,属于全连接神经网络。第二层就是ReLU激活函数,第三层则是Dropout层。
整个全连接部分有两个上述部分。
2.2.4 分类层
分类使用softmax
VGGNet
看下面19层的VGGNet可以很容易看出,其实VGGNet就是AlexNet的加深版本。

1 模型特性
VGGNet探索了神经网络的深度与性能之间的关系,表明在结构相似的情况下,网络越深性能越好。

* 卷积核*
该模型中大量使用3*3的卷积核的串联,构造出16到19层的网络。
2个3*3的卷积核的串联相当于5*5的卷积核。
3个3*3的卷积核的串联相当于7*7的卷积核。
其意义在于7*7所需要的参数为49,3个3*3的卷积核参数为27个,几乎减少了一半。
在C中还是用了1*1的卷积核,而且输出通道和输入通道数并没有发生改变,只是起到了线性变换的作用,其意义在VGG中其实意义不大。
1 模型特性
该模型主要的特性如下:
1.1 激活函数——ReLU
(1)激活函数使用ReLU,解决了梯度弥散问题;
什么是梯度弥散?同样还有一个概念叫做梯度爆炸?
直观的解释:
可以看出sigmod函数在靠近0的附近的时候梯度变化比较明显,到靠近1的地方梯度逐渐趋近与0,根据梯度下降算法,此时权值等参数变化不明显,函数很难收敛。
本质的解释:
假设一个简单的结构,输入层节点表示为h1,其后节点分别为h2,h3,h4,输出为C,各节点间权值为w2,w3,w4。
根据前向计算:
假设第一层输入为z1,那么其输出为a1=σ(z1),其余各层依次类推。
根据反向计算:
∂L∂z0=∂L∂a4⋅∂a4∂z4⋅∂z4∂a3⋅∂a3∂z3⋅∂z3∂a2⋅∂a2∂z1⋅∂z1∂a1⋅∂a1∂z0
其中∂ai∂zi−1=wi
当h1有小变化时,
∂L∂z0≈ΔLΔz0
有:
Δa1Δz0=∂a1∂z0
故:
Δa1=∂a1∂z0⋅Δz0
以此类推:
ΔL=∂L∂a4⋅∂a4∂z4⋅∂z4∂a3⋅∂a3∂z3⋅∂z3∂a2⋅∂a2∂z1⋅∂z1∂a1⋅∂a1∂z0⋅Δz0
因为wi<1,sigmod函数导数最大值为1/4。
所以梯度后向传播,层数越多,传递回来的梯度值越小。
相反,对于正向传播,如果初始化的参数过大,有可能在最后数值出现overflow,也就是梯度爆炸NAN。
所以本质上仍然是由于链式规则导致多项乘积,导致网络越深乘积结果偏离理想情况。
ReLU为什么可以避免梯度消失
从图中看出ReLU函数梯度不会随着x的增大而减小。
(2)ReLU本质上是分段线性模型,前向计算非常简单,无需指数之类操作,其偏导求解更简单,无需指数或者除法运算。
(3)ReLU在x<0的情况下,输出都是0,也就是隐藏层输出为0,表明网络结构变得稀疏了,减少了模型的复杂性。
1.2 dropout
使用Dropout随机忽略部分神经元,避免过拟合。
每次进行权值更新时,dropout保证了隐含节点是以一定概率随机出现,因此2个隐含节点每次不一定同时出现,这样权值的更新不再依赖于有固定关系隐含节点的共同作用,阻止了某些特征仅仅在其它特定特征下才有效果的情况。
dropout可以看做是一种bagging的情况,也就是对于每个样本,其所对应的网络结构不一样,相当于对应不同的模型。
1.3 最大池化
使用重叠的最大池化,一方面是保留最显著的特征,一方面重叠可以提升特征的丰富性。
1.4 LRN层。
LRN对于网络的效果不明显,同时还会降低收敛速度,得不偿失。
1.5 CUDA加速计算。
该模型使用两块GPU进行训练,每个GPU存储一般的学习参数,GPU之间的通信高效方便。
1.6 数据增强
随机的对原始图像进行翻转,裁剪。等价于增大数据量。
常用的方法有:
水平翻转
随机裁剪、平移变换
颜色、光照变换
2 模型结构
2.1 论文所述结构
由图看出前五层为卷积层,有的卷积层后跟最大池化层,而最后三层为全连接层,分类用softmax。
2.2 AlexNet的caffe实现
2.2.1数据层
数据增强:AlexNet首次在输入之前对数据进行镜像,翻转,随机剪裁等预处理,主要是为了增加数据量。训练时随机从256*256的原始图像中随机截取224*224的区域,可以得到(256-224)^2*2=2048倍的数据量,极大地减轻了模型的过拟合。
测试的时候裁剪则是固定的。
裁剪出多个图片,对他们进行预测最后对结果求均值。
batch_size:训练时256,测试时50
name: "AlexNet"
layer {
name: "data"
type: "Data"
top: "data"
top: "label"
include {
phase: TRAIN
}
transform_param {
mirror: true//镜像
crop_size: 227//裁剪尺寸
mean_file: "data/ilsvrc12/imagenet_mean.binaryproto"
}
data_param {
source: "examples/imagenet/ilsvrc12_train_lmdb"
batch_size: 256
backend: LMDB
}
}
layer {
name: "data"
type: "Data"
top: "data"
top: "label"
include {
phase: TEST
}
transform_param {
mirror: false
crop_size: 227
mean_file: "data/ilsvrc12/imagenet_mean.binaryproto"
}
data_param {
source: "examples/imagenet/ilsvrc12_val_lmdb"
batch_size: 50
backend: LMDB
}
}
2.2.2 卷积部分
卷积部分包含:卷积核层,LNR层,激活函数,池化三部分。
第一个使用的是较大的11*11,步长为4,总数为96的卷积核;后跟LNR层和一个3*3的池化层,步长为2。
第二个使用的则是5*5,步长为1的卷积核,步长为1表面扫描输入图片的所有像素点。池化仍然是3*3,步长为2.
第三个则是三个3*3的卷积核串联,后跟最大池化3*3,步长不变。
layer {
name: "conv1"
type: "Convolution"
bottom: "data"
top: "conv1"

param {
lr_mult: 1//学习率,但是最终的学习率需要乘以 solver.prototxt 配置文件中的 base_lr .

//如果有两个 lr_mult, 则第一个表示 weight 的学习率,第二个表示 bias 的学习率
//一般 bias 的学习率是 weight 学习率的2倍

decay_mult: 1//权值衰减,为了避免模型的over-fitting,需要对cost function加入规范项
}
param {
lr_mult: 2
decay_mult: 0
}
convolution_param {
num_output: 96 //卷积核个数,也是feature map个数
kernel_size: 11 //卷积核尺寸
stride: 4       //步长
weight_filler {
type: "gaussian"
std: 0.01
}
bias_filler {
type: "constant"
value: 0
}
}
}
layer {//激活函数ReLU
name: "relu1"
type: "ReLU"
bottom: "conv1"
top: "conv1"
}
layer {//LRN
name: "norm1"
type: "LRN"
bottom: "conv1"
top: "norm1"
lrn_param {
local_size: 5
alpha: 0.0001
beta: 0.75
}
}
layer {
name: "pool1"
type: "Pooling"
bottom: "norm1"
top: "pool1"
pooling_param {
pool: MAX    //池化类型:最大池化
kernel_size: 3//池化核的大小
stride: 2     //步长
}
}
layer {
name: "conv2"
type: "Convolution"
bottom: "pool1"
top: "conv2"
param {
lr_mult: 1
decay_mult: 1
}
param {
lr_mult: 2
decay_mult: 0
}
convolution_param {
num_output: 256
pad: 2
kernel_size: 5
group: 2
weight_filler {
type: "gaussian"
std: 0.01
}
bias_filler {
type: "constant"
value: 0.1
}
}
}
layer {
name: "relu2"
type: "ReLU"
bottom: "conv2"
top: "conv2"
}
layer {
name: "norm2"
type: "LRN"
bottom: "conv2"
top: "norm2"
lrn_param {
local_size: 5
alpha: 0.0001
beta: 0.75
}
}
layer {
name: "pool2"
type: "Pooling"
bottom: "norm2"
top: "pool2"
pooling_param {
pool: MAX
kernel_size: 3
stride: 2
}
}
layer {
name: "conv3"
type: "Convolution"
bottom: "pool2"
top: "conv3"
param {
lr_mult: 1
decay_mult: 1
}
param {
lr_mult: 2
decay_mult: 0
}
convolution_param {
num_output: 384
pad: 1
kernel_size: 3
weight_filler {
type: "gaussian"
std: 0.01
}
bias_filler {
type: "constant"
value: 0
}
}
}
layer {
name: "relu3"
type: "ReLU"
bottom: "conv3"
top: "conv3"
}
layer {
name: "conv4"
type: "Convolution"
bottom: "conv3"
top: "conv4"
param {
lr_mult: 1
decay_mult: 1
}
param {
lr_mult: 2
decay_mult: 0
}
convolution_param {
num_output: 384
pad: 1
kernel_size: 3
group: 2
weight_filler {
type: "gaussian"
std: 0.01
}
bias_filler {
type: "constant"
value: 0.1
}
}
}
layer {
name: "relu4"
type: "ReLU"
bottom: "conv4"
top: "conv4"
}
layer {
name: "conv5"
type: "Convolution"
bottom: "conv4"
top: "conv5"
param {
lr_mult: 1
decay_mult: 1
}
param {
lr_mult: 2
decay_mult: 0
}
convolution_param {
num_output: 256
pad: 1
kernel_size: 3
group: 2
weight_filler {
type: "gaussian"
std: 0.01
}
bias_filler {
type: "constant"
value: 0.1
}
}
}
layer {
name: "relu5"
type: "ReLU"
bottom: "conv5"
top: "conv5"
}
layer {
name: "pool5"
type: "Pooling"
bottom: "conv5"
top: "pool5"
pooling_param {
pool: MAX
kernel_size: 3
stride: 2
}
}
2.2.3 全连接层
一个完整的全连接层的第一层为内积层:就是计算两个矩阵的内积,属于全连接神经网络。第二层就是ReLU激活函数,第三层则是Dropout层。
整个全连接部分有两个上述部分。
layer {
name: "fc6"
type: "InnerProduct"
bottom: "pool5"
top: "fc6"
param {
lr_mult: 1
decay_mult: 1
}
param {
lr_mult: 2
decay_mult: 0
}
inner_product_param {
num_output: 4096
weight_filler {
type: "gaussian"
std: 0.005
}
bias_filler {
type: "constant"
value: 0.1
}
}
}
layer {
name: "relu6"
type: "ReLU"
bottom: "fc6"
top: "fc6"
}
layer {
name: "drop6"
type: "Dropout"
bottom: "fc6"
top: "fc6"
dropout_param {
dropout_ratio: 0.5
}
}
layer {
name: "fc7"
type: "InnerProduct"
bottom: "fc6"
top: "fc7"
param {
lr_mult: 1
decay_mult: 1
}
param {
lr_mult: 2
decay_mult: 0
}
inner_product_param {
num_output: 4096
weight_filler {
type: "gaussian"
std: 0.005
}
bias_filler {
type: "constant"
value: 0.1
}
}
}
layer {
name: "relu7"
type: "ReLU"
bottom: "fc7"
top: "fc7"
}
layer {
name: "drop7"
type: "Dropout"
bottom: "fc7"
top: "fc7"
dropout_param {
dropout_ratio: 0.5
}
}
}
2.2.4 分类层
分类使用softmax
layer {
name: "fc8"
type: "InnerProduct"
bottom: "fc7"
top: "fc8"
param {
lr_mult: 1
decay_mult: 1
}
param {
lr_mult: 2
decay_mult: 0
}
inner_product_param {
num_output: 1000
weight_filler {
type: "gaussian"
std: 0.01
}
bias_filler {
type: "constant"
value: 0
}
}
}
layer {
name: "accuracy"
type: "Accuracy"
bottom: "fc8"
bottom: "label"
top: "accuracy"
include {
phase: TEST
}
}
layer {
name: "loss"
type: "SoftmaxWithLoss"
bottom: "fc8"
bottom: "label"
top: "loss"
}
VGGNet
看下面19层的VGGNet可以很容易看出,其实VGGNet就是AlexNet的加深版本。
1 模型特性
VGGNet探索了神经网络的深度与性能之间的关系,表明在结构相似的情况下,网络越深性能越好。
* 卷积核*
该模型中大量使用3*3的卷积核的串联,构造出16到19层的网络。
2个3*3的卷积核的串联相当于5*5的卷积核。
3个3*3的卷积核的串联相当于7*7的卷积核。
其意义在于7*7所需要的参数为49,3个3*3的卷积核参数为27个,几乎减少了一半。
在C中还是用了1*1的卷积核,而且输出通道和输入通道数并没有发生改变,只是起到了线性变换的作用,其意义在VGG中其实意义不大。

相关文章推荐
- 深度学习算法之AlexNet和VGGNet
- 深度学习算法之AlexNet和VGGNet
- 深度学习算法之AlexNet和VGGNet
- 深度学习算法之AlexNet和VGGNet
- 深度学习算法之AlexNet和VGGNet
- 深度学习算法之AlexNet和VGGNet
- 深度学习算法之AlexNet和VGGNet
- 深度学习算法之AlexNet和VGGNet
- 深度学习算法之AlexNet和VGGNet
- 深度学习算法之AlexNet和VGGNet
- 深度学习算法之AlexNet和VGGNet
- 深度学习 典型卷积神经网络CNN:LeNet,ZFNet,AlexNet,GoogleNet,VggNet,
- keras实现常用深度学习模型LeNet,AlexNet,ZFNet,VGGNet,GoogleNet,Resnet
- keras实现常用深度学习模型LeNet,AlexNet,ZFNet,VGGNet,GoogleNet,Resnet
- Netflix工程总监眼中的分类算法:深度学习优先级最低
- Netflix工程总监眼中的分类算法:深度学习优先级最低
- 【转】Netflix工程总监眼中的分类算法:深度学习优先级最低
- Recommending music on Spotify with deep learning 采用深度学习算法为Spotify做基于内容的音乐推荐
- 深度学习(Deep Learning)算法简介
- [caffe]深度学习之图像分类模型AlexNet解读