基于eclipse+servlet+jsp+jdbc+mysql登录注册功能(纯净版)
2017-04-14 00:00
686 查看
摘要: 非常适合刚入门的小白交流学习,望各路大神多批评指教!
(备注:本案例使用的是mysql数据库,所以别忘记导入mysql-connector-java-5.1.8.jar)
到此后台基本上处理完了,该收拾前台页面了!
**_
web.xml文件的配置如下:
OVER,让项目飞起来!!!
1、 建表
/*
Navicat MySQL Data Transfer

Source Server         : test
Source Server Version : 50717
Source Host           : localhost:3306
Source Database       : test

Target Server Type    : MYSQL
Target Server Version : 50717
File Encoding         : 65001

Date: 2017-04-14 11:12:39
*/

SET FOREIGN_KEY_CHECKS=0;

-- ----------------------------
-- Table structure for `user`
-- ----------------------------
DROP TABLE IF EXISTS `user`;
CREATE TABLE `user` (
`id` int(11) NOT NULL AUTO_INCREMENT,
`username` varchar(16) NOT NULL,
`password` varchar(16) NOT NULL,
`repassword` varchar(16) NOT NULL,
PRIMARY KEY (`id`)
) ENGINE=InnoDB AUTO_INCREMENT=0 DEFAULT CHARSET=utf8;
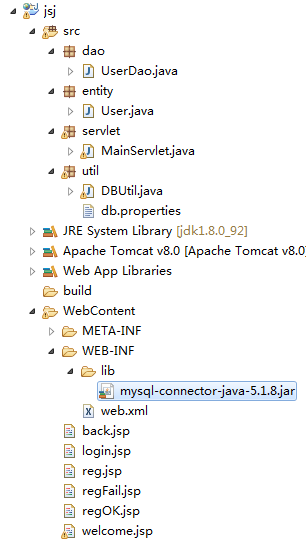
2、话不多说,先上项目目录结构
(备注:本案例使用的是mysql数据库,所以别忘记导入mysql-connector-java-5.1.8.jar)
3、在src下新建util工具包,专门用来存放工具类,本案例的该包中主要存放jdbc数据库连接类以及数据库相关的配置文件,在util包中新建DBUtil类,代码如下:
package util;

import java.io.IOException;
import java.io.InputStream;
import java.sql.Connection;
import java.sql.ResultSet;
import java.sql.SQLException;
import java.sql.Statement;
import java.util.List;
import java.util.Properties;
import org.apache.tomcat.dbcp.dbcp2.BasicDataSource;

/**
*	管理连接的工具类,带有连接池,
*	适用于多线程的场景。
*/
public class DBUtil {
private static BasicDataSource ds;
//加载连接参数
static {
Properties p = new Properties();
try {
InputStream is = DBUtil.class.getClassLoader().getResourceAsStream("util/db.properties");
p.load(is);
is.close();
//读取连接参数
String driver = p.getProperty("jdbc.driver");
String url = p.getProperty("jdbc.url");
String user =p.getProperty("jdbc.user");
String pwd = p.getProperty("jdbc.pwd");
String initSize = p.getProperty("ds.initSize");
String maxSize = p.getProperty("ds.maxSize");
//创建连接池
ds = new BasicDataSource();
//设置连接参数(必须设置)
ds.setDriverClassName(driver);
ds.setUrl(url);
ds.setUsername(user);
ds.setPassword(pwd);
//设置连接池管理参数(有默认值)
//初始化连接数
ds.setInitialSize(new Integer(initSize));
//最大连接数
ds.setMaxIdle(new Integer(maxSize));
} catch (IOException e) {
e.printStackTrace();
throw new RuntimeException("加载配置文件失败", e);
}
}

/**
* 连接池创建的连接,不是原始的连接,
* 而是它重新封装后的连接。典型的特征
* 是其关闭方法是归还连接。
*/
public static Connection getConnection() {
try {
return ds.getConnection();
} catch (SQLException e) {
e.printStackTrace();
throw new RuntimeException("创建连接失败", e);
}
}

/**
* 若连接由连接池创建,则关闭连接
* 就是将其归还给连接池,该连接的
* 状态会变成空闲,可以继续复用。
*/
public static void close(
Connection con, Statement smt) {
try {
if(smt != null) {
smt.close();
}
if(con != null) {
con.close();
}
} catch (SQLException e) {
e.printStackTrace();
throw new RuntimeException("释放资源失败", e);
}
}

public static void close(Connection con,Statement smt,ResultSet rs) {
try {
if(rs != null) {
rs.close();
}
if(smt != null) {
smt.close();
}
if(con != null) {
con.close();
}
} catch (SQLException e) {
e.printStackTrace();
throw new RuntimeException("释放资源失败", e);
}
}

public static void main(String[] args) {
Connection con = DBUtil.getConnection();
System.out.println(con.getClass());
DBUtil.close(con, null);
}

}
4、在util包中新建一个db.properties文件,文件配置如下:
jdbc.driver=com.mysql.jdbc.Driver
jdbc.url=jdbc:mysql://localhost:3306/test
jdbc.user=root
jdbc.pwd=root
ds.initSize=3
ds.maxSize=5
5、在src下新建entity包,在entity包中新建实体类User,代码如下:
package entity;

import java.io.Serializable;

public class User implements Serializable{

private static final long serialVersionUID = 1L;

private int id;
private String username;
private String password;
private String repassword;
public int getId() {
return id;
}
public void setId(int id) {
this.id = id;
}
public String getUsername() {
return username;
}
public void setUsername(String username) {
this.username = username;
}
public String getPassword() {
return password;
}
public void setPassword(String password) {
this.password = password;
}
public String getRepassword() {
return repassword;
}
public void setRepassword(String repassword) {
this.repassword = repassword;
}

}
6、在src下新建dao包,在dao包中新建一个UserDao类,代码如下:
package dao;

import java.sql.Connection;
import java.sql.PreparedStatement;
import java.sql.ResultSet;
import java.sql.SQLException;

import entity.User;
import util.DBUtil;

public class UserDao {

private Connection conn=null;
private PreparedStatement ps=null;
private ResultSet rs=null;
private String sql="";

/*
* 用户登录
*/
public boolean login(User user) throws SQLException {
boolean returnValue = false;
conn = DBUtil.getConnection();
sql="select * from user where username=? and password=?";
ps = conn.prepareStatement(sql);
ps.setString(1,user.getUsername());
ps.setString(2,user.getPassword());
rs=ps.executeQuery();
if(rs.next()){
returnValue=true;
rs.close();
ps.close();
}else{
returnValue=false;
rs.close();
ps.close();
}
conn.close();
return returnValue;
}
/*
* 用户注册
*/
public boolean reg(User user) throws SQLException{
boolean flag=false;
conn=DBUtil.getConnection();
sql="insert into user(username, password, repassword) values (?, ?, ?)";
int result = -1;// 表示当用户执行添加删除和修改的时候所影响数据库的行数
try {
ps = conn.prepareStatement(sql);
if(user == null) {
return false;
}
ps.setObject(1, user.getUsername());
ps.setObject(2, user.getPassword());
ps.setObject(3, user.getRepassword());
result = ps.executeUpdate();
} catch (SQLException e) {
e.printStackTrace();
}
flag = result > 0 ? true : false;
return flag;
}

/*
* 判断用户名在数据库中是否存在
*/
public boolean userIsExist(String username) throws SQLException{
// 获取数据库连接Connection对象
conn = DBUtil.getConnection();
// 根据指定用户名查询用户信息
String sql = "select * from user where username = ?";
try {
// 获取PreparedStatement对象
PreparedStatement ps = conn.prepareStatement(sql);
// 对用户对象属性赋值
ps.setString(1, username);
// 执行查询获取结果集
ResultSet rs = ps.executeQuery();
// 判断结果集是否有效
if(!rs.next()){
// 如果无效则证明此用户名可用
return true;
}
// 释放此 ResultSet 对象的数据库和 JDBC 资源
rs.close();
// 释放此 PreparedStatement 对象的数据库和 JDBC 资源
ps.close();
} catch (SQLException e) {
e.printStackTrace();
}finally{
// 关闭数据库连接
conn.close();
}
return false;
}
}
7、在src下新建一个servlet包,在包中新建MainServlet,代码如下:
package servlet;

import java.io.IOException;
import java.io.PrintWriter;
import java.sql.SQLException;

import javax.servlet.ServletException;
import javax.servlet.http.HttpServlet;
import javax.servlet.http.HttpServletRequest;
import javax.servlet.http.HttpServletResponse;

import dao.UserDao;
import entity.User;

public class MainServlet extends HttpServlet{

private static final long serialVersionUID = 1L;

@Override
protected void service(HttpServletRequest req, HttpServletResponse res) throws ServletException, IOException {
String path=req.getServletPath();
if(path.equals("/toLogin.do")){
//打开登录页
toLogin(req,res);
}else if(path.equals("/toReg.do")){
//打开注册页
toReg(req,res);
}else if(path.equals("/login.do")){
//登录验证
login(req,res);
}else if(path.equals("/reg.do")){
//注册验证
try {
reg(req,res);
} catch (SQLException e) {
// TODO Auto-generated catch block
e.printStackTrace();
}
}else{
throw new RuntimeException("404:页面不存在!!!");
}
}
/*
* 打开登录页
*/
private void toLogin(HttpServletRequest req, HttpServletResponse res) throws ServletException, IOException {
String url="login.jsp";
req.getRequestDispatcher(url).forward(req, res);
}

/*
* 打开注册页
*/
private void toReg(HttpServletRequest req, HttpServletResponse res) throws ServletException, IOException {
String url="reg.jsp";
req.getRequestDispatcher(url).forward(req, res);
}

/*
* 登录验证
*/
private void login(HttpServletRequest req, HttpServletResponse res) throws IOException {
res.setCharacterEncoding("utf-8");
res.setContentType("text/html");
PrintWriter out=res.getWriter();
String name=new String(req.getParameter("username"));
String pwd=new String(req.getParameter("password"));
User user=new User();
user.setUsername(name);
user.setPassword(pwd);
UserDao dao=new UserDao();
boolean isLogin;
try {
isLogin=dao.login(user);
if(isLogin){
req.getSession().setAttribute("name", name);
res.sendRedirect("welcome.jsp");
}else{
res.sendRedirect("back.jsp");
}
} catch (SQLException e) {
e.printStackTrace();
}
}

/*
* 注册验证
*/
private void reg(HttpServletRequest req, HttpServletResponse res) throws IOException, SQLException {
String path=req.getContextPath();
res.setCharacterEncoding("utf-8");
res.setContentType("text/html");
PrintWriter out=res.getWriter();
String username=req.getParameter("username");
String password=req.getParameter("password");
String repassword=req.getParameter("repassword");
System.out.println("username:"+username+",password:"+password+",repassword:"+repassword);
User user = new User();
user.setUsername(username);
user.setPassword(password);
user.setRepassword(repassword);
UserDao userDao=new UserDao();
if(userDao.userIsExist(username)){
boolean flag=userDao.reg(user);
System.out.println("注册成功!");
req.getSession().setAttribute("username", username);
res.sendRedirect("regOK.jsp");
}
else{
System.out.println("注册失败(用户名已存在)!");
res.sendRedirect("regFail.jsp");
}
out.flush();
out.close();
}
}
到此后台基本上处理完了,该收拾前台页面了!
8、本案例一共有6个页面,分别是:
用来登录的页面login.jsp,代码如下:<%@ page language="java" contentType="text/html; charset=utf-8"
pageEncoding="utf-8"%>
<!DOCTYPE html PUBLIC "-//W3C//DTD HTML 4.01 Transitional//EN" "http://www.w3.org/TR/html4/loose.dtd">
<html>
<head>
<meta http-equiv="Content-Type" content="text/html; charset=utf-8">
<script type="text/javascript">
function checkLogin(){
var flag=true;
var name=document.getElementById("name").value;
var pwd=document.getElementById("pwd").value;
if(""==name){
alert("用户名不能为空!");
flag=false;
return false;
}else if(""==pwd){
alert("密码不能为空!");
flag=false;
return false;
}if(flag==true){
return true;
}
}
</script>
<title>登录页面</title>
</head>
<body>
<center>欢迎登录</center><br/>
<center>
<form action="login.do" method="post">
用户名:<input type="text" name="username" id="name" /><br />
密 码:<input type="password" name="password" id="pwd" /><span style="color:red" id="pwdMsg"></span><br /> <br />
<input type="submit" value="登录" onclick="return checkLogin();"/>
<input type="button" value="注册" onclick="location='reg.jsp'"/>
</form>
</center>
</body>
</html>- 用来显示登录成功的页面welcome.jsp,代码如下:
<%@ page import="java.util.*" language="java"
contentType="text/html; charset=utf-8" pageEncoding="utf-8"%>
<!DOCTYPE html PUBLIC "-//W3C//DTD HTML 4.01 Transitional//EN" "http://www.w3.org/TR/html4/loose.dtd">
<html>
<head>
<meta http-equiv="Content-Type" content="text/html; charset=utf-8">
<title>登录成功</title>
</head>
<body>
<center><font color="red">${sessionScope.name },欢迎你!登陆成功!</font><br>
<%
Date today = new Date();
int d = today.getDay();
int h = today.getHours();
String s = "";
if (h > 0 && h < 12)
s = "上午好";
else if (h >= 12)
s = "下午好";
String day[] = { "日", "一", "二", "三", "四", "五", "六" };
out.println(s + ",今天是星期" + day[d]);
%>
</center>
</body>
</html>
- 用来显示登录失败的页面back.jsp,代码如下:
<%@ page language="java" contentType="text/html; charset=utf-8"
pageEncoding="utf-8"%>
<!DOCTYPE html PUBLIC "-//W3C//DTD HTML 4.01 Transitional//EN" "http://www.w3.org/TR/html4/loose.dtd">
<html>
<head>
<meta http-equiv="Content-Type" content="text/html; charset=utf-8">
<title>登录失败</title>
</head>
<body>
<center>登录失败</center>
<center>用户名或密码错误,单击<a href="login.jsp"><font color="red">这里</font></a>返回</center>
</body>
</html>
- 用来实现注册的页面reg.jsp,代码如下:
<%@ page language="java" contentType="text/html; charset=utf-8"
pageEncoding="utf-8"%>
<!DOCTYPE html PUBLIC "-//W3C//DTD HTML 4.01 Transitional//EN" "http://www.w3.org/TR/html4/loose.dtd">
<html>
<head>
<meta http-equiv="Content-Type" content="text/html; charset=utf-8">
<script type="text/javascript">
function checkReg(){
var flag=true;
var name=document.getElementById("name").value;
var pwd=document.getElementById("pwd").value;
var rePwd=document.getElementById("rePwd").value;
if(""==name){
alert("用户名不能为空!");
flag=false;
return false;
}else if(""==pwd){
alert("密码不能为空!");
flag=false;
return false;
}else if(""==rePwd){
alert("请再次输入密码以确认!");
flag=false;
return false;
}else if(pwd!=rePwd){
alert("两次输入的密码不一样,请重新输入!");
flag=false;
return false;
}if(flag==true){
return true;
}
}
</script>
<title>注册页面</title>
</head>
<body>
<center>欢迎注册</center><br/>
<center>
<form action="reg.do" method="post">
用户名:<input type="text" name="username" id="name" /><br />
密    码:<input type="password" name="password" id="pwd" /><br />
重复密码:<input type="password" name="repassword" id="rePwd"/><br/><br/>
<input type="submit" value="提交" onclick="return checkReg();"/>
<input type="button" value="返回" onclick="location='login.jsp'"/>
</form>
</center>
</body>
</html>
- 用来显示注册成功页面regOK.jsp,代码如下:
<%@page import="java.util.*" language="java"
contentType="text/html; charset=utf-8" pageEncoding="utf-8"%>
<!DOCTYPE html PUBLIC "-//W3C//DTD HTML 4.01 Transitional//EN" "http://www.w3.org/TR/html4/loose.dtd">
<html>
<head>
<meta http-equiv="Content-Type" content="text/html; charset=utf-8">
<title>注册成功</title>
</head>
<body>
<center><font color="red">恭喜你,${sessionScope.username }!注册成功!</font></center><br/>
<center><a href="login.jsp">立即登录!</a></center>
</body>
</html>
-用来显示注册失败页面regFail.jsp,代码如下:
<%@page import="java.util.*" language="java"
contentType="text/html; charset=utf-8" pageEncoding="utf-8"%>
<!DOCTYPE html PUBLIC "-//W3C//DTD HTML 4.01 Transitional//EN" "http://www.w3.org/TR/html4/loose.dtd">
<html>
<head>
<meta http-equiv="Content-Type" content="text/html; charset=utf-8">
<title>注册失败</title>
</head>
<body>
<center><font color="red">注册失败:用户名已存在!</font></center><br/>
<center><a href="reg.jsp">重新注册!</a></center>
</body>
</html>
**_
OK,到此整个项目就算完结啦, 但千万别忘了,要想让其跑起来,还有我们非常重要的web.xml文件的配置哦!
_**web.xml文件的配置如下:
<?xml version="1.0" encoding="UTF-8"?>
<web-app xmlns:xsi="http://www.w3.org/2001/XMLSchema-instance" xmlns="http://xmlns.jcp.org/xml/ns/javaee" xsi:schemaLocation="http://xmlns.jcp.org/xml/ns/javaee http://xmlns.jcp.org/xml/ns/javaee/web-app_3_1.xsd" id="WebApp_ID" version="3.1">
<display-name>jsj</display-name>
<welcome-file-list>
<welcome-file>login.jsp</welcome-file>
</welcome-file-list>
<servlet>
<servlet-name>MainServlet</servlet-name>
<servlet-class>servlet.MainServlet</servlet-class>
</servlet>
<servlet-mapping>
<servlet-name>MainServlet</servlet-name>
<url-pattern>*.do</url-pattern>
</servlet-mapping>
</web-app>
OVER,让项目飞起来!!!

相关文章推荐
- JDBC+Servlet+JSP+Mysql写的一个简单的登录注册
- 基于Servlet、JSP、JDBC、MySQL的一个简单的用户注册模块(附完整源码)
- jsp+javabean+servlet+Mysql实现MVC模式下的注册登录留言功能
- 基于Servlet、JSP、JDBC、MySQL的登录模块(含过滤器的使用和配置)
- JavaWeb实现用户登录注册功能实例代码(基于Servlet+JSP+JavaBean模式)
- 基于Servlet、JSP、JDBC、MySQL登录模块(包括使用的过滤器和配置)
- 基于Servlet、JSP、JDBC、MySQL的一个简单的用户注册模块(附完整源码)
- Servlet+JavaBean+JSP打造Java Web注册与登录功能
- 登录注册 (java jdbc servlet jsp)
- jsp+servlet+mysql 实现简单的银行登录转账功能
- javaweb学习总结(二十二)——基于Servlet+JSP+JavaBean开发模式的用户登录注册
- javaweb学习总结(二十二)——基于Servlet+JSP+JavaBean开发模式的用户登录注册
- 用户注册登录测试版(jsp+servlet+mysql)
- 基于Servlet、JSP、JDBC、MySQL的一个简单的用户注冊模块(附完整源代码)
- 用户注册登录测试版(jsp+servlet+mysql)
- 基于Servlet+JSP+JavaBean开发模式的用户登录注册
- JSP+JavaBean+Servlet技术实现某网站用户注册和登录功能
- javaweb学习总结(二十二)——基于Servlet+JSP+JavaBean开发模式的用户登录注册
- 对基于Servlet+JSP+JavaBean开发模式的用户登录注册的升级
- javaweb学习总结(二十二)——基于Servlet+JSP+JavaBean开发模式的用户登录注册