mongodb集群分片+副本模式操作+javaCode
2017-04-11 17:36
731 查看
mongodb集群分片+副本模式操作
百度云:jarOrzip项目/mongodb/mongodb分片+副本集Java端调用
本人规划的三个节点分别为192.168.46.133(mongo1) 192.168.46.134(mongo2) 192.168.46.135(mongo3)
下载mongodb3.4.3.tgz,并解压到指定目录下(安装参考前面的单机部署)
下载链接: http://www.mongodb.org/downloads
单机部署:http://blog.csdn.net/u011191463/article/details/68484263
常见操作指令
show collections 查看当前数据库下的所有集合
db.dropDataBase() 删除当前数据库
db.blog.drop() 删除blog集合
db.blog.remove({}) 清空blog集合的所有数据
db.blog.stats() 查看当前集合的所有分片数据
show dbs 查看所有的数据库
rs.status() 在primary节点上查看节点健康信息等
sh.enableSharding("mytest") 设置mytest数据库支持分片
sh.shardCollection("mytest.blog",{userId:1}) 集合blog支持按照userId升序分片
sh.shardCollection("mytest.blog",{userId:"hashed"}) 集合blog支持哈希方式分片
sh.status() 查看所有数据库的所有信息
sh.getBalancerstate() 平衡状态
sh.isBalancerRunning() 是否正在均衡过程中
sh.setBalancerState(true/false) 是否开启均衡
Java端调用
注:服务器端对集合进行如:
sh.enableSharding("mytest");'
sh.shardCollection("mytest.blog",{userId:"hashed"})
分片设置后,java端执行数据存储才有效
副本集选举最重要的一个特性是: 集合中的成员一定要有大部分成员(即超过一半数量)是保持正常在线状态,3个成员的副本集,需要至少2个从属节点是正常状态(如果一个从属节点挂掉,那么当主节点down掉产生故障切换时,由于副本集中只有一个节点是正常的,少于一半,则选举失败),4个成员的副本集,则需要3个成员是正常状态,(先关闭一个从属节点,然后再关闭主节点,产生故障切换,此时副本集中只有2个节点正常,则无法成功选举出新主节点)
环境搭建参考实现:http://blog.csdn.net/vellin/article/details/53994014
数据压力大到机器支撑不了的时候能否做到自动扩展?
在系统早期,数据量还小的时候不会引起太大的问题,但是随着数据量持续增多,后续迟早会出现一台机器硬件瓶颈问题的。而MongoDB主打的就是海量数据架构,他不能解决海量数据怎么行!不行!“分片”就用这个来解决这个问题。
传统数据库怎么做海量数据读写?其实一句话概括:分而治之。上图看看就清楚了,如下
taobao岳旭强在infoq中提到的 架构图:
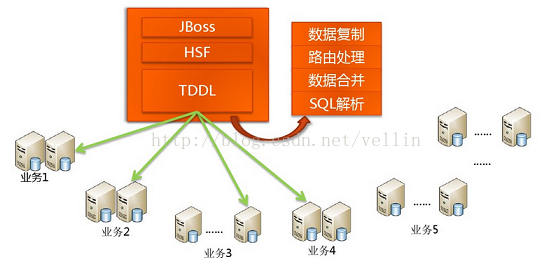
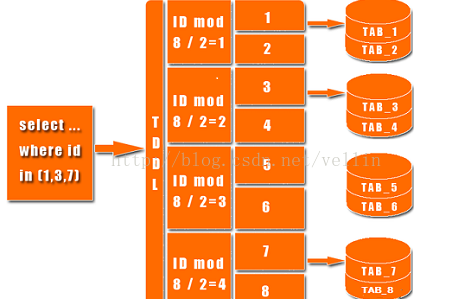
上图中有个TDDL,是taobao的一个数据访问层组件,他主要的作用是SQL解析、路由处理。根据应用的请求的功能解析当前访问的sql判断是在哪个业务数据库、哪个表访问查询并返回数据结果。具体如图:
说了这么多传统数据库的架构,那Nosql怎么去做到了这些呢?MySQL要做到自动扩展需要加一个数据访问层用程序去扩展,数据库的增加、删除、备份还需要程序去控制。一但数据库的节点一多,要维护起来也是非常头疼的。不过mongodb所有的这一切通过他自己的内部机制就可以搞定!还是上图看看mongodb通过哪些机制实现路由、分片:
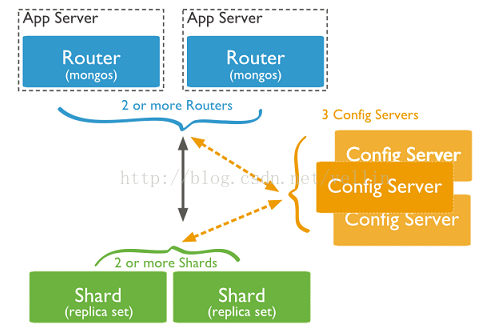
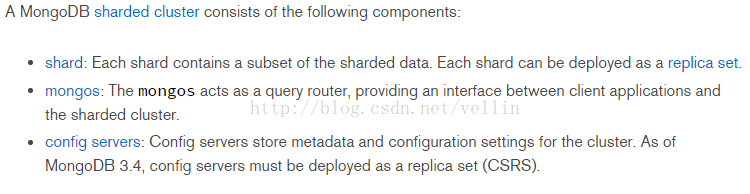
从图中可以看到有四个组件:mongos、config server、shard、replica set。
mongos:数据库集群请求的入口,所有的请求都通过mongos进行协调,不需要在应用程序添加一个路由选择器,mongos自己就是一个请求分发中心,它负责把对应的数据请求请求转发到对应的shard服务器上。在生产环境通常有多mongos作为请求的入口,防止其中一个挂掉所有的mongodb请求都没有办法操作。
config server:顾名思义为配置服务器,存储所有数据库元信息(路由、分片)的配置。mongos本身没有物理存储分片服务器和数据路由信息,只是缓存在内存里,配置服务器则实际存储这些数据。mongos第一次启动或者关掉重启就会从 config server 加载配置信息,以后如果配置服务器信息变化会通知到所有的 mongos 更新自己的状态,这样 mongos 就能继续准确路由。在生产环境通常有多个 config server 配置服务器,因为它存储了分片路由的元数据,这个可不能丢失!就算挂掉其中一台,只要还有存货,
mongodb集群就不会挂掉。
shard:这就是传说中的分片了。上面提到一个机器就算能力再大也有天花板,就像军队打仗一样,一个人再厉害喝血瓶也拼不过对方的一个师。俗话说三个臭皮匠顶个诸葛亮,这个时候团队的力量就凸显出来了。在互联网也是这样,一台普通的机器做不了的多台机器来做,如下图:
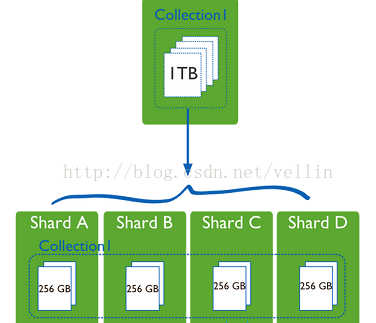
一台机器的一个数据表 Collection1 存储了 1T 数据,压力太大了!在分给4个机器后,每个机器都是256G,则分摊了集中在一台机器的压力。也许有人问一台机器硬盘加大一点不就可以了,为什么要分给四台机器呢?不要光想到存储空间,实际运行的数据库还有硬盘的读写、网络的IO、CPU和内存的瓶颈。在mongodb集群只要设置好了分片规则,通过mongos操作数据库就能自动把对应的数据操作请求转发到对应的分片机器上。在生产环境中分片的片键可要好好设置,这个影响到了怎么把数据均匀分到多个分片机器上,不要出现其中一台机器分了1T,其他机器没有分到的情况,这样还不如不分片!
replica set:前面已经详细讲过了这个东东,怎么这里又来凑热闹!其实上图4个分片如果没有 replica set 是个不完整架构,假设其中的一个分片挂掉那四分之一的数据就丢失了,所以在高可用性的分片架构还需要对于每一个分片构建 replica set 副本集保证分片的可靠性。生产环境通常是 2个副本 + 1个仲裁。
说了这么多,还是来实战一下如何搭建高可用的mongodb集群:
首先确定各个组件的数量,mongos 3个, config server 3个,数据分3片 shard server 3个,每个shard 有一个副本一个仲裁也就是 3 * 2 = 6 个,总共需要部署15个实例。这些实例可以部署在独立机器也可以部署在一台机器,我们这里测试资源有限,只准备了
3台机器,在同一台机器只要端口不同就可以,看一下物理部署图:
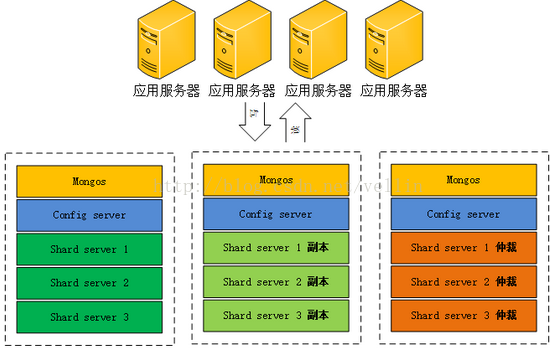
1、准备机器,IP分别设置为: 192.168.4.200、192.168.4.201、192.168.4.202,并分别创建mongos 、config 、 shard1 、shard2、shard3对应目录
2、规划5个组件对应的端口号,由于一个机器需要同时部署 mongos、config server
、shard1、shard2、shard3,所以需要用端口进行区分。
这个端口可以自由定义,在本文 mongos为 20000, config server 为 21000, shard1为 22001 , shard2为22002, shard3为22003.
3、在每一台服务器分别启动配置服务器(后台运行)
/home/weixla/mongodb-3.4.0/bin

连接到任意一台配置服务器上
/home/weixla/mongodb-3.4.0/bin/mongo
--host 192.168.4.200 --port 21000

创建配置服务器副本集
rs.initiate({_id:"cfgReplSet",configsvr:true,members:[{_id:0,host:"192.168.4.200:21000"},{_id:1,host:"192.168.4.201:21000"},{_id:2,host:"192.168.4.202:21000"}]})

4、在每一台服务器分别启动分片及副本集。(后台运行)
在每一台服务器分别以副本集方式启动分片1
/home/weixla/mongodb-3.4.0/bin/mongod --shardsvr --replSet shard1ReplSet --port 22001 --dbpath /data/mongodbtest/shard1/data --logpath /data/mongodbtest/shard1/log/shard1.log --fork --nojournal

连接任意一台分片服务器
/home/weixla/mongodb-3.4.0/bin/mongo --host 192.168.4.200 --port 22001

创建副本集并初始化
rs.initiate({_id:"shard1ReplSet",members:[{_id:0,host:"192.168.4.200:22001"},{_id:1,host:"192.168.4.201:22001"},{_id:2,host:"192.168.4.202:22001"}]})

同样操作shar2 shard3
/home/weixla/mongodb-3.4.0/bin/mongod --shardsvr --replSet shard2ReplSet --port 22002 --dbpath /data/mongodbtest/shard2/data --logpath /data/mongodbtest/shard2/log/shard2.log --fork --nojournal
/home/weixla/mongodb-3.4.0/bin/mongod --shardsvr --replSet shard3ReplSet --port 22003 --dbpath /data/mongodbtest/shard3/data
--logpath /data/mongodbtest/shard3/log/shard3.log --fork --nojournal
5、选择一台服务器启动mongos路由服务。
/home/weixla/mongodb-3.4.0/bin/mongos --configdb cfgReplSet/192.168.4.200:21000,192.168.4.201:21000,192.168.4.202:21000
--port 20000 --logpath /data/mongodbtest/mongos/log/mongos.log --fork

登录路由服务客户端
/home/weixla/mongodb-3.4.0/bin/mongo --host 192.168.4.200 --port 20000

添加分片到集群
sh.addShard("shard1ReplSet/192.168.4.200:22001,192.168.4.201:22001,192.168.4.202:22001")

依次添加shard2 shard3
sh.addShard("shard2ReplSet/192.168.4.200:22002,192.168.4.201:22002,192.168.4.202:22002")
sh.addShard("shard3ReplSet/192.168.4.200:22003,192.168.4.201:22003,192.168.4.202:22003")
6、Enable Sharding for a Database
sh.enableSharding("test")

7、Shard a Collection
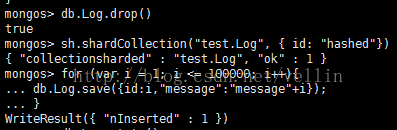
sh.shardCollection("test.Log", { id: 1})

8、测试
use test
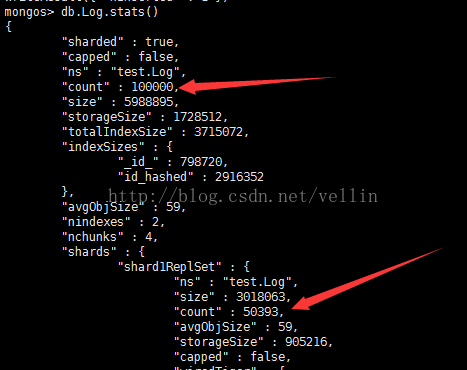
从这个结果看来,1个分片 保存了1条,另一个分片保存了剩下的所有记录,这是shard key的策略造成的,让我们看下官方图
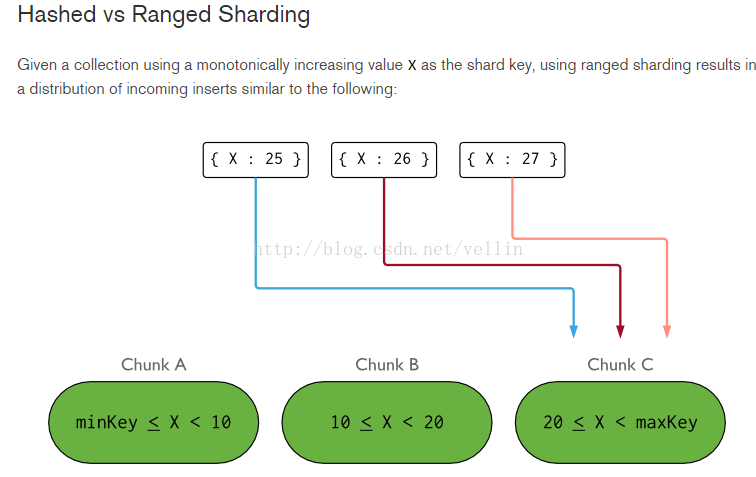

那我们修改一下sharding key的策略为hashed,重新插入数据
结果如下
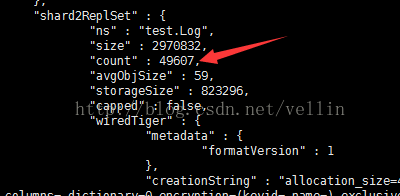
这里基本保持了数据的均衡。
百度云:jarOrzip项目/mongodb/mongodb分片+副本集Java端调用
本人规划的三个节点分别为192.168.46.133(mongo1) 192.168.46.134(mongo2) 192.168.46.135(mongo3)
下载mongodb3.4.3.tgz,并解压到指定目录下(安装参考前面的单机部署)
下载链接: http://www.mongodb.org/downloads
单机部署:http://blog.csdn.net/u011191463/article/details/68484263
规划5个组件对应的端口号,由于一个机器需要同时部署 mongos、config server 、shard1、shard2、shard3,所以需要用端口进行区分。
这个端口可以自由定义,在本文 mongos为 20000, config server 为 21000, shard1为 22001 , shard2为22002, shard3为22003.

首先修改主机名分别为mongo1 mongo2 mongo3 并在/etc/hosts文件中添加

192.168.46.133  mongo1
192.168.46.134  mongo2
192.168.46.135  mongo3

关闭每台服务器的防火墙 service iptables stop

#分别在每个服务器上创建目录日志目录和分片目录

mkdir -p /data/mongodbtest/mongos/log;mkdir -p /data/mongodbtest/config/data;mkdir -p /data/mongodbtest/config/log;mkdir -p /data/mongodbtest/shard1/data;mkdir -p /data/mongodbtest/shard1/log

mkdir -p /data/mongodbtest/shard2/data;mkdir -p /data/mongodbtest/shard2/log;mkdir -p /data/mongodbtest/shard3/data;mkdir -p /data/mongodbtest/shard3/log

第一次启动时需要初始化

//在三台机器上都执行这条命令
bin/mongod --configsvr --replSet cfgReplSet --dbpath /data/mongodbtest/config/data --port 21000 --logpath /data/mongodbtest/config/log/config.log --fork

bin/mongo --host 192.168.46.133 --port 21000

//创建配置服务器副本集
rs.initiate({_id:"cfgReplSet",configsvr:true,members:[{_id:0,host:"192.168.46.133:21000"},{_id:1,host:"192.168.46.134:21000"},{_id:2,host:"192.168.46.135:21000"}]})

//三台机器分别执行
//分片一 在三台机器上都执行这条命令
bin/mongod --shardsvr --replSet shard1ReplSet --port 22001 --dbpath /data/mongodbtest/shard1/data  --logpath /data/mongodbtest/shard1/log/shard1.log --fork --nojournal
//任选一台机器运行
bin/mongo --host 192.168.46.133 --port 22001

//初始化分片一
rs.initiate({_id:"shard1ReplSet",members:[{_id:0,host:"192.168.46.133:22001"},{_id:1,host:"192.168.46.134:22001"},{_id:2,host:"192.168.46.135:22001"}]})

//分片二 在三台机器上都执行这条命令
bin/mongod --shardsvr --replSet shard2ReplSet --port 22002 --dbpath /data/mongodbtest/shard2/data  --logpath /data/mongodbtest/shard2/log/shard2.log --fork --nojournal
//任选一台机器运行
bin/mongo --host 192.168.46.133 --port 22002

//初始化分片二
rs.initiate({_id:"shard2ReplSet",members:[{_id:0,host:"192.168.46.133:22002"},{_id:1,host:"192.168.46.134:22002"},{_id:2,host:"192.168.46.135:22002"}]})
//分片三 在三台机器上都执行这条命令
bin/mongod --shardsvr --replSet shard3ReplSet --port 22003 --dbpath /data/mongodbtest/shard3/data  --logpath /data/mongodbtest/shard3/log/shard3.log --fork --nojournal
//任选一台机器运行
bin/mongo --host 192.168.46.133 --port 22003

//初始化分片三
rs.initiate({_id:"shard3ReplSet",members:[{_id:0,host:"192.168.46.133:22003"},{_id:1,host:"192.168.46.134:22003"},{_id:2,host:"192.168.46.135:22003"}]})

//mongos服务启动
bin/mongos  --configdb cfgReplSet/192.168.46.133:21000,192.168.46.134:21000,192.168.46.135:21000 --port  20000  --logpath  /data/mongodbtest/mongos/log/mongos.log --fork

//mongos调用
bin/mongo --host 192.168.46.133 --port 20000

//添加分片
sh.addShard("shard1ReplSet/192.168.46.133:22001,192.168.46.134:22001,192.168.46.135:22001")
sh.addShard("shard2ReplSet/192.168.46.133:22002,192.168.46.134:22002,192.168.46.135:22002")
sh.addShard("shard3ReplSet/192.168.46.133:22003,192.168.46.134:22003,192.168.46.135:22003")

非第一次启动时,执行以下命令即可

//在三台机器上都执行这条命令
bin/mongod --configsvr --replSet cfgReplSet --dbpath /data/mongodbtest/config/data --port 21000 --logpath /data/mongodbtest/config/log/config.log --fork

/三台机器分别执行
//分片一 在三台机器上都执行这条命令
bin/mongod --shardsvr --replSet shard1ReplSet --port 22001 --dbpath /data/mongodbtest/shard1/data  --logpath /data/mongodbtest/shard1/log/shard1.log --fork --nojournal

//分片二 在三台机器上都执行这条命令
bin/mongod --shardsvr --replSet shard2ReplSet --port 22002 --dbpath /data/mongodbtest/shard2/data  --logpath /data/mongodbtest/shard2/log/shard2.log --fork --nojournal

//分片三 在三台机器上都执行这条命令
bin/mongod --shardsvr --replSet shard3ReplSet --port 22003 --dbpath /data/mongodbtest/shard3/data  --logpath /data/mongodbtest/shard3/log/shard3.log --fork --nojournal

//mongos服务启动
bin/mongos  --configdb cfgReplSet/192.168.46.133:21000,192.168.46.134:21000,192.168.46.135:21000 --port  20000  --logpath  /data/mongodbtest/mongos/log/mongos.log --fork

bin/mongo --host 192.168.46.133 --port 20000

//执行完成后测试

//保证数据库为分片模式
sh.enableSharding("mytest")

//创建mytest数据库下的log集合,并按升序或者hash进行分片
sh.shardCollection("mytest.log", { id: 1})
或
sh.shardCollection("mytest.log", { id: "hashed"})

哈希方式每个分片的上的数量比较均匀,而升序方式造成某个分片数据量大,另外的分片上没有数据

此处分片可以根据需要按照id或者其他字段进行分片

8、测试
use test
for(var i = 1; i <= 100000; i++){
db.log.save({id:i,"message":"message"+i});
}

//用户创建授权

db.createUser(
...   {
...     user: "mongo",
...     pwd: "mongo",
...     roles: [ { role: "readWrite", db: "mytest" } ]
...   }
... )
//切换到当前数据库验证
db.auth('mongo','mongo')
常见操作指令
show collections 查看当前数据库下的所有集合
db.dropDataBase() 删除当前数据库
db.blog.drop() 删除blog集合
db.blog.remove({}) 清空blog集合的所有数据
db.blog.stats() 查看当前集合的所有分片数据
show dbs 查看所有的数据库
rs.status() 在primary节点上查看节点健康信息等
sh.enableSharding("mytest") 设置mytest数据库支持分片
sh.shardCollection("mytest.blog",{userId:1}) 集合blog支持按照userId升序分片
sh.shardCollection("mytest.blog",{userId:"hashed"}) 集合blog支持哈希方式分片
sh.status() 查看所有数据库的所有信息
sh.getBalancerstate() 平衡状态
sh.isBalancerRunning() 是否正在均衡过程中
sh.setBalancerState(true/false) 是否开启均衡
Java端调用
package Test;

import com.google.gson.Gson;
import com.mongodb.*;
import com.mongodb.client.FindIterable;
import com.mongodb.client.MongoCollection;
import com.mongodb.client.MongoDatabase;
import com.mongodb.client.model.Filters;
import com.mongodb.client.model.Projections;
import org.bson.BsonType;
import org.bson.Document;

import java.text.ParseException;
import java.util.ArrayList;
import java.util.Arrays;
import java.util.List;

import static com.mongodb.client.model.Filters.*;
import static com.mongodb.client.model.Projections.*;
import static com.mongodb.client.model.Sorts.ascending;
import static com.mongodb.client.model.Sorts.descending;

public class MongodbExample {

public static void main(String[] args) throws ParseException {

//20000端口为分片后集群的mongos端口,不添加验证直接执行下面一句创建连接
//        MongoClient mongoClient = new MongoClient("192.168.46.133", 20000);

//添加验证模式
List seeds = new ArrayList();
ServerAddress address1 = new ServerAddress("192.168.46.133" , 20000);
seeds.add(address1);
//给mongodb增加验证
MongoCredential credentials = MongoCredential.createScramSha1Credential("mongo", "mytest", "mongo".toCharArray());
List credentialsList = new ArrayList();
credentialsList.add(credentials);
MongoClient mongoClient = new MongoClient(seeds,credentialsList);

MongoDatabase database = mongoClient.getDatabase("mytest");
MongodbExample client = new MongodbExample(database);
client.show();
mongoClient.close();
}

private MongoDatabase database;

public MongodbExample(MongoDatabase database) {
this.database = database;
}
private static Gson gson = new Gson();
public void show() {
MongoCollection mc = database.getCollection("blog");
/*    Foo foo;
for(int i=1;i<=10000;i++) {
foo = new Foo();
foo.setId(i);
foo.setName("name"+i);
mc.insertOne(Document.parse(gson.toJson(foo)));
}*/
//每次执行前清空集合以方便重复运行
//        mc.drop();
for(int i=0;i<10000;i++) {
//插入用于测试的文档
/*  Document doc1 = new Document("title", "good day"+i).append("owner", "tom" + i).append("words", 300+i)
.append("comments", Arrays.asList(new Document("author", "joe" + i).append("score", 3).append("comment", "good" + i), new Document("author", "white" + i).append("score", 1).append("comment", "oh no" + i)));
Document doc2 = new Document("title", "good"+i).append("owner", "john"+i).append("words", 400)
.append("comments", Arrays.asList(new Document("author", "william"+i).append("score", 4).append("comment", "good"+i), new Document("author", "white"+i).append("score", 6).append("comment", "very good"+i)));
Document doc3 = new Document("title", "good night"+i).append("owner", "mike"+i).append("words", 200)
.append("tag", Arrays.asList(1, 2, 3, 4));
Document doc4 = new Document("title", "happiness"+i).append("owner", "tom"+i).append("words", 1480)
.append("tag", Arrays.asList(2, 3, 4));
Document doc5 = new Document("title", "a good thing"+i).append("owner", "tom"+i).append("words", 180)
.append("tag", Arrays.asList(1, 2, 3, 4, 5));
mc.insertMany(Arrays.asList(doc1, doc2, doc3, doc4, doc5));*/

Document doc = new Document("userId",i).append("name","lihua").append("age",12+i);
mc.insertOne(doc);
}

//测试: 查询全部
FindIterable iterable = mc.find();
printResult("find all", iterable);

//        toShow(mc);
//TODO: 将在这里填充更多查询示例
}

//打印查询的结果集
public void printResult(String doing, FindIterable iterable) {
System.out.println(doing);
iterable.forEach(new Block() {
public void apply(final Document document) {
System.out.println(document);
//                System.out.println(document.get("userId"));
}
});
System.out.println("------------------------------------------------------");
System.out.println();
}

public void toShow(MongoCollection mc) {
//创建单字段索引
mc.createIndex(new Document("words", 1));
//创建组合索引(同样遵循最左前缀原则)
mc.createIndex(new Document("title", 1).append("owner", -1));
//创建全文索引
mc.createIndex(new Document("title", "text"));

//查询全部
FindIterable iterable = mc.find();
printResult("find all", iterable);

//查询title=good
iterable = mc.find(new Document("title", "good"));
printResult("find title=good", iterable);

//查询title=good and owner=tom
iterable = mc.find(new Document("title", "good").append("owner", "tom"));
printResult("find title=good and owner=tom", iterable);

//查询title like %good% and owner=tom
iterable = mc.find(and(regex("title", "good"), eq("owner", "tom")));
printResult("find title like %good% and owner=tom", iterable);

//查询全部按title排序
iterable = mc.find().sort(ascending("title"));
printResult("find all and ascending title", iterable);

//查询全部按owner,title排序
iterable = mc.find().sort(ascending("owner", "title"));
printResult("find all and ascending owner,title", iterable);

//查询全部按words倒序排序
iterable = mc.find().sort(descending("words"));
printResult("find all and descending words", iterable);

//查询owner=tom or words>350
iterable = mc.find(new Document("$or", Arrays.asList(new Document("owner", "tom"), new Document("words", new Document("$gt", 350)))));
printResult("find owner=tom or words>350", iterable);

//返回title和owner字段
iterable = mc.find().projection(include("title", "owner"));
printResult("find all include (title,owner)", iterable);

//返回除title外的其他字段
iterable = mc.find().projection(exclude("title"));
printResult("find all exclude title", iterable);

//不返回_id字段
iterable = mc.find().projection(excludeId());
printResult("find all excludeId", iterable);

//返回title和owner字段且不返回_id字段
iterable = mc.find().projection(fields(include("title", "owner"), excludeId()));
printResult("find all include (title,owner) and excludeId", iterable);

//内嵌文档匹配
iterable = mc.find(new Document("comments.author", "joe"));
printResult("find comments.author=joe", iterable);

//一个错误的示例, 想查询评论中包含作者是white且分值>2的, 返回结果不符合预期
iterable = mc.find(new Document("comments.author", "white").append("comments.score", new Document("$gt", 2)));
printResult("find comments.author=white and comments.score>2 (wrong)", iterable);

//上面的需求正确的写法
iterable = mc.find(Projections.elemMatch("comments", Filters.and(Filters.eq("author", "white"), Filters.gt("score", 2))));
printResult("find comments.author=white and comments.score>2 using elemMatch", iterable);

//查找title以good开头的, 并且comments只保留一个元素
iterable = mc.find(Filters.regex("title", "^good")).projection(slice("comments", 1));
printResult("find regex ^good and slice comments 1", iterable);

//全文索引查找
iterable = mc.find(text("good"));
printResult("text good", iterable);

//用Filters构建的title=good
iterable = mc.find(eq("title", "good"));
printResult("Filters: title eq good", iterable);

//$in 等同于sql的in
iterable = mc.find(in("owner", "joe", "john", "william"));
printResult("Filters: owner in joe,john,william", iterable);

//$nin 等同于sql的not in
iterable = mc.find(nin("owner", "joe", "john", "tom"));
printResult("Filters: owner nin joe,john,tom", iterable);

//查询内嵌文档
iterable = mc.find(in("comments.author", "joe", "tom"));
printResult("Filters: comments.author in joe,tom", iterable);

//$ne 不等于
iterable = mc.find(ne("words", 300));
printResult("Filters: words ne 300", iterable);

//$and 组合条件
iterable = mc.find(and(eq("owner", "tom"), gt("words", 300)));
printResult("Filters: owner eq tom and words gt 300", iterable);

//较复杂的组合
iterable = mc.find(and(or(eq("words", 300), eq("words", 400)), or(eq("owner", "joe"), size("comments", 2))));
printResult("Filters: (words=300 or words=400) and (owner=joe or size(comments)=2)", iterable);

//查询第2个元素值为2的数组
iterable = mc.find(eq("tag.1", 2));
printResult("Filters: tag.1 eq 2", iterable);

//查询匹配全部值的数组
iterable = mc.find(all("tag", Arrays.asList(1, 2, 3, 4)));
printResult("Filters: tag match all (1, 2, 3, 4)", iterable);

//$exists
iterable = mc.find(exists("tag"));
printResult("Filters: exists tag", iterable);

iterable = mc.find(type("words", BsonType.INT32));
printResult("Filters: type words is int32", iterable);
}

}
注:服务器端对集合进行如:
sh.enableSharding("mytest");'
sh.shardCollection("mytest.blog",{userId:"hashed"})
分片设置后,java端执行数据存储才有效
副本集选举最重要的一个特性是: 集合中的成员一定要有大部分成员(即超过一半数量)是保持正常在线状态,3个成员的副本集,需要至少2个从属节点是正常状态(如果一个从属节点挂掉,那么当主节点down掉产生故障切换时,由于副本集中只有一个节点是正常的,少于一半,则选举失败),4个成员的副本集,则需要3个成员是正常状态,(先关闭一个从属节点,然后再关闭主节点,产生故障切换,此时副本集中只有2个节点正常,则无法成功选举出新主节点)
环境搭建参考实现:http://blog.csdn.net/vellin/article/details/53994014
数据压力大到机器支撑不了的时候能否做到自动扩展?
在系统早期,数据量还小的时候不会引起太大的问题,但是随着数据量持续增多,后续迟早会出现一台机器硬件瓶颈问题的。而MongoDB主打的就是海量数据架构,他不能解决海量数据怎么行!不行!“分片”就用这个来解决这个问题。
传统数据库怎么做海量数据读写?其实一句话概括:分而治之。上图看看就清楚了,如下
taobao岳旭强在infoq中提到的 架构图:
上图中有个TDDL,是taobao的一个数据访问层组件,他主要的作用是SQL解析、路由处理。根据应用的请求的功能解析当前访问的sql判断是在哪个业务数据库、哪个表访问查询并返回数据结果。具体如图:
说了这么多传统数据库的架构,那Nosql怎么去做到了这些呢?MySQL要做到自动扩展需要加一个数据访问层用程序去扩展,数据库的增加、删除、备份还需要程序去控制。一但数据库的节点一多,要维护起来也是非常头疼的。不过mongodb所有的这一切通过他自己的内部机制就可以搞定!还是上图看看mongodb通过哪些机制实现路由、分片:
从图中可以看到有四个组件:mongos、config server、shard、replica set。
mongos:数据库集群请求的入口,所有的请求都通过mongos进行协调,不需要在应用程序添加一个路由选择器,mongos自己就是一个请求分发中心,它负责把对应的数据请求请求转发到对应的shard服务器上。在生产环境通常有多mongos作为请求的入口,防止其中一个挂掉所有的mongodb请求都没有办法操作。
config server:顾名思义为配置服务器,存储所有数据库元信息(路由、分片)的配置。mongos本身没有物理存储分片服务器和数据路由信息,只是缓存在内存里,配置服务器则实际存储这些数据。mongos第一次启动或者关掉重启就会从 config server 加载配置信息,以后如果配置服务器信息变化会通知到所有的 mongos 更新自己的状态,这样 mongos 就能继续准确路由。在生产环境通常有多个 config server 配置服务器,因为它存储了分片路由的元数据,这个可不能丢失!就算挂掉其中一台,只要还有存货,
mongodb集群就不会挂掉。
shard:这就是传说中的分片了。上面提到一个机器就算能力再大也有天花板,就像军队打仗一样,一个人再厉害喝血瓶也拼不过对方的一个师。俗话说三个臭皮匠顶个诸葛亮,这个时候团队的力量就凸显出来了。在互联网也是这样,一台普通的机器做不了的多台机器来做,如下图:
一台机器的一个数据表 Collection1 存储了 1T 数据,压力太大了!在分给4个机器后,每个机器都是256G,则分摊了集中在一台机器的压力。也许有人问一台机器硬盘加大一点不就可以了,为什么要分给四台机器呢?不要光想到存储空间,实际运行的数据库还有硬盘的读写、网络的IO、CPU和内存的瓶颈。在mongodb集群只要设置好了分片规则,通过mongos操作数据库就能自动把对应的数据操作请求转发到对应的分片机器上。在生产环境中分片的片键可要好好设置,这个影响到了怎么把数据均匀分到多个分片机器上,不要出现其中一台机器分了1T,其他机器没有分到的情况,这样还不如不分片!
replica set:前面已经详细讲过了这个东东,怎么这里又来凑热闹!其实上图4个分片如果没有 replica set 是个不完整架构,假设其中的一个分片挂掉那四分之一的数据就丢失了,所以在高可用性的分片架构还需要对于每一个分片构建 replica set 副本集保证分片的可靠性。生产环境通常是 2个副本 + 1个仲裁。
说了这么多,还是来实战一下如何搭建高可用的mongodb集群:
首先确定各个组件的数量,mongos 3个, config server 3个,数据分3片 shard server 3个,每个shard 有一个副本一个仲裁也就是 3 * 2 = 6 个,总共需要部署15个实例。这些实例可以部署在独立机器也可以部署在一台机器,我们这里测试资源有限,只准备了
3台机器,在同一台机器只要端口不同就可以,看一下物理部署图:
1、准备机器,IP分别设置为: 192.168.4.200、192.168.4.201、192.168.4.202,并分别创建mongos 、config 、 shard1 、shard2、shard3对应目录
、shard1、shard2、shard3,所以需要用端口进行区分。
这个端口可以自由定义,在本文 mongos为 20000, config server 为 21000, shard1为 22001 , shard2为22002, shard3为22003.
3、在每一台服务器分别启动配置服务器(后台运行)
/home/weixla/mongodb-3.4.0/bin
/
mongod
--configsvr
--replSet cfgReplSet
--dbpath
/data/mongodbtest/config/data
--port
21000
--logpath
/data/mongodbtest/config/log/config
.log
--fork
连接到任意一台配置服务器上
/home/weixla/mongodb-3.4.0/bin/mongo
--host 192.168.4.200 --port 21000
创建配置服务器副本集
rs.initiate({_id:"cfgReplSet",configsvr:true,members:[{_id:0,host:"192.168.4.200:21000"},{_id:1,host:"192.168.4.201:21000"},{_id:2,host:"192.168.4.202:21000"}]})
4、在每一台服务器分别启动分片及副本集。(后台运行)
在每一台服务器分别以副本集方式启动分片1
/home/weixla/mongodb-3.4.0/bin/mongod --shardsvr --replSet shard1ReplSet --port 22001 --dbpath /data/mongodbtest/shard1/data --logpath /data/mongodbtest/shard1/log/shard1.log --fork --nojournal
连接任意一台分片服务器
/home/weixla/mongodb-3.4.0/bin/mongo --host 192.168.4.200 --port 22001
创建副本集并初始化
rs.initiate({_id:"shard1ReplSet",members:[{_id:0,host:"192.168.4.200:22001"},{_id:1,host:"192.168.4.201:22001"},{_id:2,host:"192.168.4.202:22001"}]})
同样操作shar2 shard3
/home/weixla/mongodb-3.4.0/bin/mongod --shardsvr --replSet shard2ReplSet --port 22002 --dbpath /data/mongodbtest/shard2/data --logpath /data/mongodbtest/shard2/log/shard2.log --fork --nojournal
/home/weixla/mongodb-3.4.0/bin/mongod --shardsvr --replSet shard3ReplSet --port 22003 --dbpath /data/mongodbtest/shard3/data
--logpath /data/mongodbtest/shard3/log/shard3.log --fork --nojournal
5、选择一台服务器启动mongos路由服务。
/home/weixla/mongodb-3.4.0/bin/mongos --configdb cfgReplSet/192.168.4.200:21000,192.168.4.201:21000,192.168.4.202:21000
--port 20000 --logpath /data/mongodbtest/mongos/log/mongos.log --fork
登录路由服务客户端
/home/weixla/mongodb-3.4.0/bin/mongo --host 192.168.4.200 --port 20000
添加分片到集群
sh.addShard("shard1ReplSet/192.168.4.200:22001,192.168.4.201:22001,192.168.4.202:22001")
依次添加shard2 shard3
sh.addShard("shard2ReplSet/192.168.4.200:22002,192.168.4.201:22002,192.168.4.202:22002")
sh.addShard("shard3ReplSet/192.168.4.200:22003,192.168.4.201:22003,192.168.4.202:22003")
6、Enable Sharding for a Database
sh.enableSharding("test")
7、Shard a Collection
sh.shardCollection("test.Log", { id: 1})
8、测试
use test
for
(var
i = 1; i <= 100000; i++){
db.Log.save({id
:i,
"message"
:"message"+i
});[/code]
}
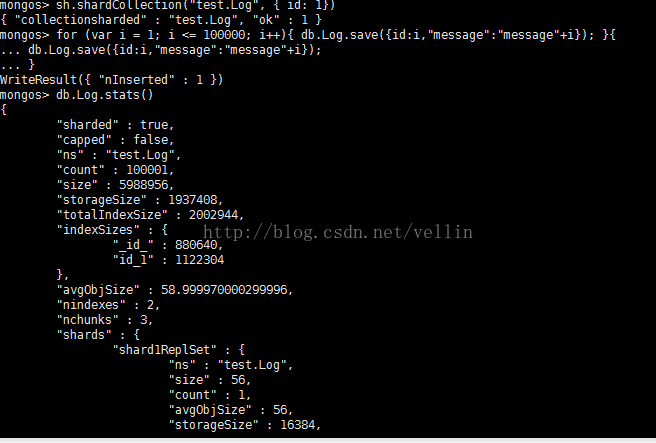
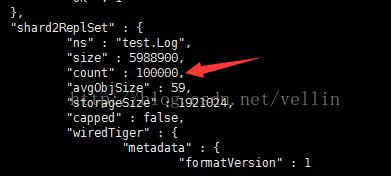
从这个结果看来,1个分片 保存了1条,另一个分片保存了剩下的所有记录,这是shard key的策略造成的,让我们看下官方图
那我们修改一下sharding key的策略为hashed,重新插入数据
结果如下
这里基本保持了数据的均衡。

相关文章推荐
- mongodb集群模式(主从模式,副本集模式,分片模式)
- 基于linux的mongodb3.2副本集+分片集群搭建
- mongodb 分片集群切换单个分片副本集primary的正确步骤
- centos7下安装部署mongodb集群(副本集模式)
- MongoDB分片集群常用操作
- MongoDB主从 副本集 分片集群安装
- mongodb 分片集群 删除片键 code : 20 sharding already enabled for collection
- mongodb 集群搭建 分片+副本集
- 搭建mongodb副本集群,keyfile和ssl方式,用户认证模式
- Mongodb 副本集+分片集群搭建
- MongoDB 3.2.7 基于keyFile的认证在副本集+集群分片中的使用
- MongoDB 副本集分片集群一分片config库主机断电导致该分片config库无法启动
- MongoDB健壮集群——用副本集做分片
- mongodb 分片集群 在线添加副本集实例并升级成primay主库
- 在Docker上部署mongodb分片副本集群。
- MongoDB学习(四)安全和认证、主从集群、副本集和分片操作
- 在分片集群中追踪MongoDB的操作日志
- mongodb集群——分片+副本集
- Java实战操作MongoDB集群(副本集)
- Mongodb主从复制 及 副本集+分片集群梳理