CentOS7 安装Memcached及ownCloud9.1配置Memcached
2017-03-25 22:21
489 查看
ownCloud安装配置完成后,进入管理页面,一般情况下的警告有两个,一个是未启用https,另一个是未配置memcache。本文内容针对解决第二种情况。
阅览官方文档可知ownCloud支持4中memcache,
APC A local cache for systems running PHP 5.4.
APCu, APCu 4.0.6 and up required.A local cache for systems running PHP 5.5 and up.
Memcached Distributed cache for multi-server ownCloud installations.
Redis, PHP module 2.2.6 and up required.For distributed caching.
官方推荐使用APCu 和Redis,我使用memcached。
首先安装memcached和php-pecl-memcached,由于我之前用的是通配符安装的php所以我系统中已有php-pecl-memcached,下面是安装memcached的代码。
memcached安装后执行以下代码,这段代码的意思是:-b 指定memcached运行模式为守护进程模式,-l 指定IP地址为127.0.0.1 ,-p 指定端口号为11211,-m 指定分配给memcached的内存大小(M)为150M,-u 指定启动memcached的用户为root
把memcached服务加入开机启动
检查memcached服务是否正确安装并运行成功。
运行
ps ax | grep memcached
输出
4038 ? Ssl 0:00 /usr/bin/memcached -u memcached -p 11211 -m
64 -c 1024 4718 pts/0 S+ 0:00 grep –color=auto memcached
运行
输出
memcached
如果以上代码全部通过,说明memcached已经成功安装并运行。在写个PHP文件检验一下PHP能否正确使用memcache。打开一个新文件
写入一下内容并保存
打开浏览器,访问这个文件,如果输出memcached就说明没问题了。
接下来配置ownCloud。打开/owncloud/config/config.php,在文件末尾”);”之前,即$CONFIG=array()内加入以下的配置信息。
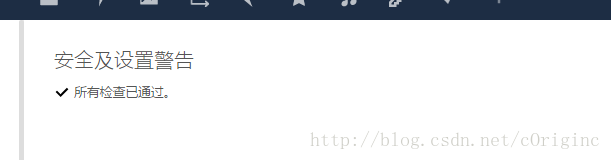
这几句代码是为ownCloud设置一个本地Mencached缓存,memcached缓存服务器的地址是本机,端口为11211。配置完成后,打开浏览器检查配置是否正确。
ownCloud还支持分布式缓存,也可以同时配置本地缓存和分布式缓存,更多的信息参考官网文件。
ownCloud关于Caching的地址:
https://doc.owncloud.org/server/9.1/admin_manual/configuration_server/caching_configuration.html
阅览官方文档可知ownCloud支持4中memcache,
APC A local cache for systems running PHP 5.4.
APCu, APCu 4.0.6 and up required.A local cache for systems running PHP 5.5 and up.
Memcached Distributed cache for multi-server ownCloud installations.
Redis, PHP module 2.2.6 and up required.For distributed caching.
官方推荐使用APCu 和Redis,我使用memcached。
首先安装memcached和php-pecl-memcached,由于我之前用的是通配符安装的php所以我系统中已有php-pecl-memcached,下面是安装memcached的代码。
yum install memcached
memcached安装后执行以下代码,这段代码的意思是:-b 指定memcached运行模式为守护进程模式,-l 指定IP地址为127.0.0.1 ,-p 指定端口号为11211,-m 指定分配给memcached的内存大小(M)为150M,-u 指定启动memcached的用户为root
/usr/bin/memcached -b -l 127.0.0.1 -p 11211 -m 150 -u root
把memcached服务加入开机启动
systemctl enable memcached
检查memcached服务是否正确安装并运行成功。
运行
ps ax | grep memcached
输出
4038 ? Ssl 0:00 /usr/bin/memcached -u memcached -p 11211 -m
64 -c 1024 4718 pts/0 S+ 0:00 grep –color=auto memcached
运行
’php -m|grep memcached
输出
memcached
如果以上代码全部通过,说明memcached已经成功安装并运行。在写个PHP文件检验一下PHP能否正确使用memcache。打开一个新文件
vim /var/www/html/m.php
写入一下内容并保存
<?php
$m = new Memcached;
$m->addServer('127.0.0.1',11211);
$m->set('foo',"memcached");
$val = $m->get('foo');
echo $val;
?>
打开浏览器,访问这个文件,如果输出memcached就说明没问题了。
接下来配置ownCloud。打开/owncloud/config/config.php,在文件末尾”);”之前,即$CONFIG=array()内加入以下的配置信息。
'memcache.local' => '\OC\Memcache\Memcached',
'memcached' => array(
'host' => 'localhost',
'port' => 11211,
),
这几句代码是为ownCloud设置一个本地Mencached缓存,memcached缓存服务器的地址是本机,端口为11211。配置完成后,打开浏览器检查配置是否正确。
ownCloud还支持分布式缓存,也可以同时配置本地缓存和分布式缓存,更多的信息参考官网文件。
ownCloud关于Caching的地址:
https://doc.owncloud.org/server/9.1/admin_manual/configuration_server/caching_configuration.html

相关文章推荐
- centos7安装配置memcached
- centos7安装配置memcached
- CentOS7安装配置redis-3.0.0
- 在Windows平台下安装与配置Memcached
- 如何在Windows平台下安装配置Memcached
- centos7系统下安装配置jdk、tomcat教程
- memcache/memcached/memcachedb 配置、安装<转>
- Redis(Windows安装方法与Java调用实例 & 配置文件参数说明 & Java使用Redis所用Jar包 & Redis与Memcached区别 & redis-cli.exe命令及示例)
- CentOS7安装、配置PostgreSQL
- 腾讯云(centos7)上安装并配置PHP
- CentOS7编译安装LAMP(CentOS7、httpd-2.4、php-7.1、mariadb-10.2、memcached-3.0.4)
- Centos7上安装postgis 并配置环境外网访问
- centos7系统下安装php-memcached拓展及简单使用
- Centos7 安装memcached
- centos7安装memcached
- Centos7 下cobbler安装及配置
- CentOS7 安装配置DNS服务器
- centos7配置lamp成功安装过
- CentOS7安装与配置Tomcat-8
- CentOS7安装及配置vsftpd (FTP服务器)