hexo与github搭建个人博客
2017-03-21 11:28
375 查看
一直在csdn上传自己的记录,慢慢感觉不能满足自己,于是就查询资料搭建了个人博客。尝试了很多方法,最终发现hexo,与github可以很好的结合搭建自己的小窝,网上也有很多大神提供了很多参考,自己是window系统,在这里把搭建的过程记录一下,希望可以帮助到需要的小伙伴。
写的太过杂乱,感觉也就自己看看,推荐大家查看:
自己看的感觉不错的文章,大家可以看看- - - -
hexo安装散文
next主题官方
域名绑定
1.安装软件基础
Node.js:
作用:node.js用来创建hexo博客框架的,我的安装版本为:node -v v5.20
github账号:
1.注册账号
用户名,密码,邮箱要记录一下,会用到
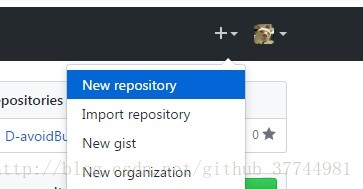
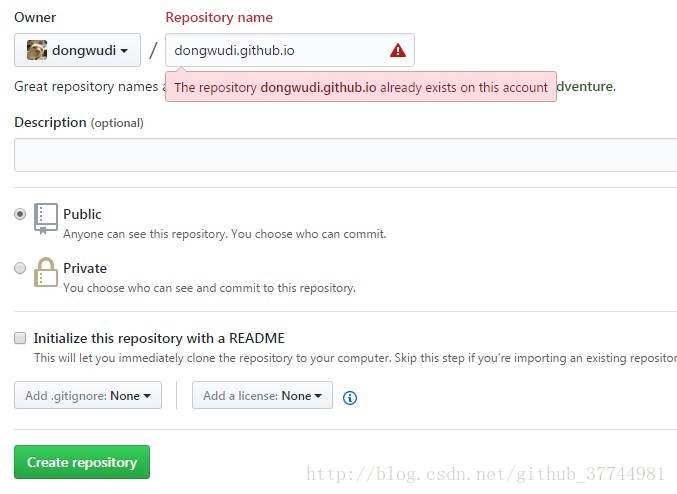
2.创建repository
这是关键的一个过程,创建仓库,放置自己的代码。
名字的格式: 我的是由于创建过了,所以报红。
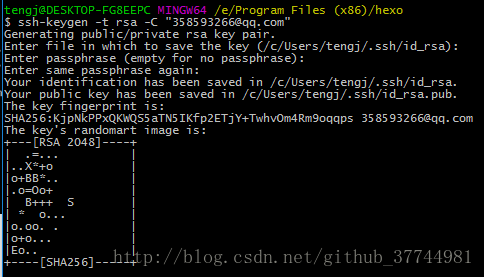
由于搭建过程中需要上传,就需要配置SSH,我的很早就配置了,对于第一次配置的小伙伴,需要生成:
如何查看自己是否配置过呢:配置过就会在c目录下生成,可以删除再次生成。
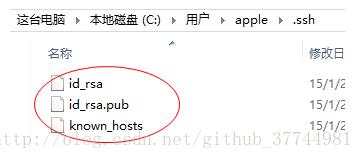
如何创建密钥:
设置页面中:
成功:
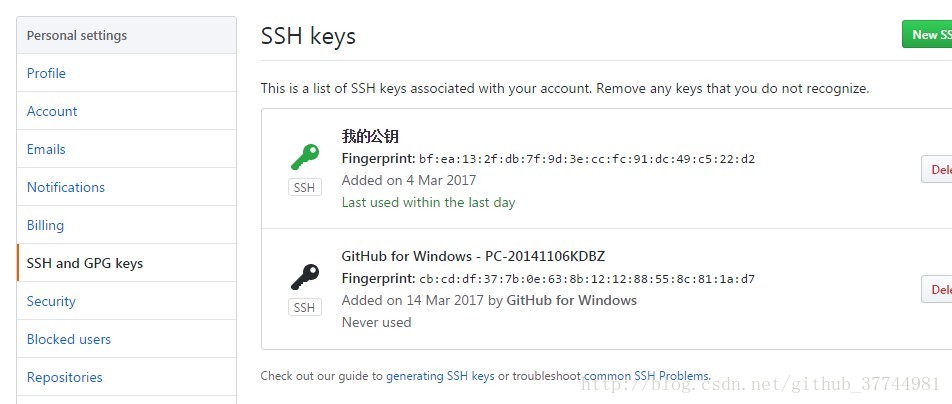
最后就是添加密钥了,在github中的设置界面:
安装hexo
基本命令:
输入安装hexo命令:
建一个blog文件夹:执行指令,生成文件
安装依赖包:
最后执行:
在localhost:4000就可以看到初步的博客了。
发表文章
1.在Git Bash执行命令:
使用md写自己的文章:
主题更换:
我使用的是jacman主题:
启用:
在这里说下,有两个config.yml文件,一个在根目录,一个在主题themes目录
更新:
基本机构如图:

其中的文件配置:中文注释很详细,对照即可
根:
主题下的配置:
主题中提供了添加导航栏,如何添加:
其中根配置,已经对github进行了关联。
一切搞定后,如何提交呢?
有时候我发现自己更新后,在本地服务器没有问题,提交后github上并没有及时更新,后来才知道需要清除缓存:
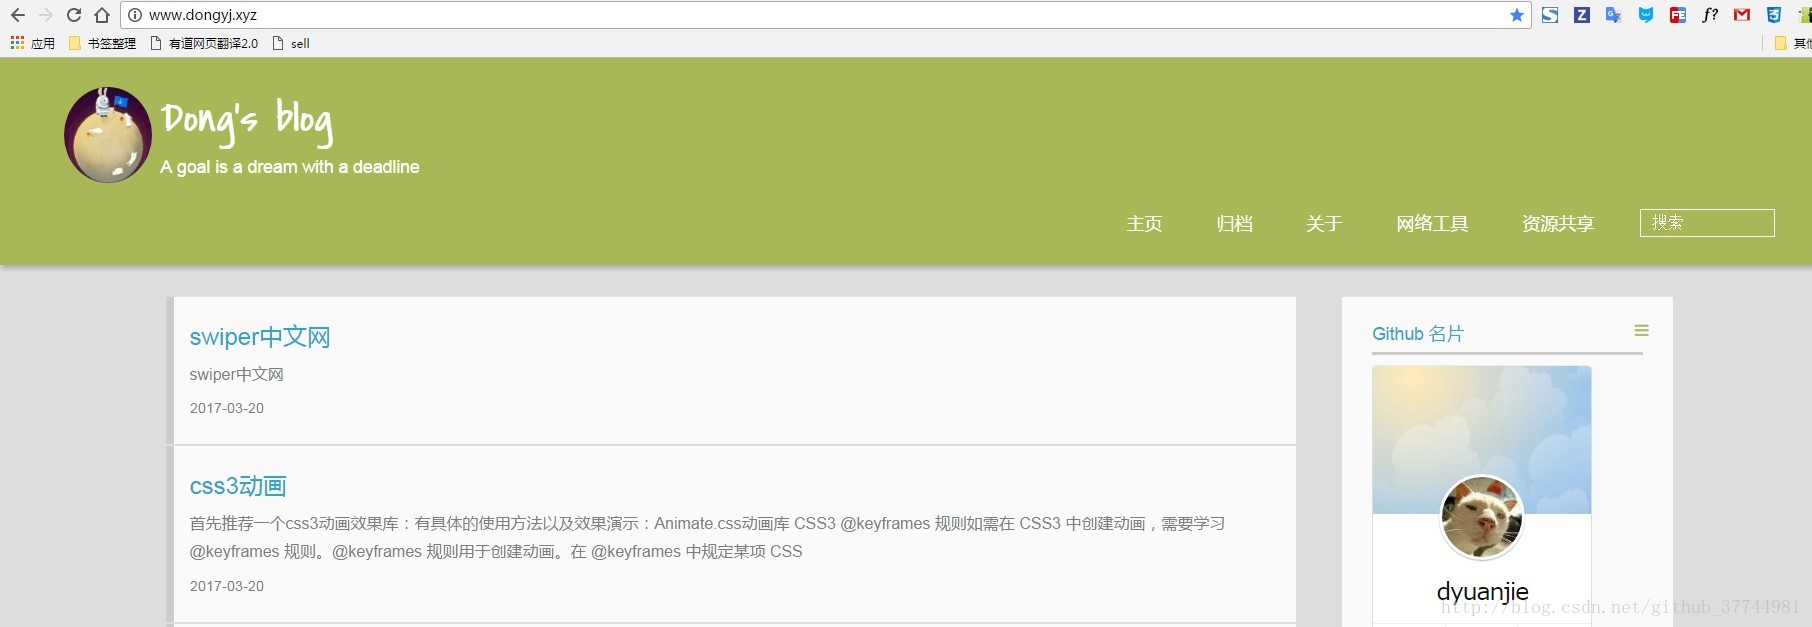
这样就基本的同步到了自己的github上,可以在github上进行查看了,其中github提供了域名绑定的服务。有需求的小伙伴也可以绑定在自己的域名下,就可以拥有自己域名下的个人博客了。

在此设置下:custom domain添加自己的域名

基本就完成了,功能完善会后续添加。
写的太过杂乱,感觉也就自己看看,推荐大家查看:
自己看的感觉不错的文章,大家可以看看- - - -
hexo安装散文
next主题官方
域名绑定
1.安装软件基础
Node.js:
作用:node.js用来创建hexo博客框架的,我的安装版本为:node -v v5.20
github账号:
1.注册账号
用户名,密码,邮箱要记录一下,会用到
2.创建repository
这是关键的一个过程,创建仓库,放置自己的代码。
名字的格式: 我的是由于创建过了,所以报红。
由于搭建过程中需要上传,就需要配置SSH,我的很早就配置了,对于第一次配置的小伙伴,需要生成:
如何查看自己是否配置过呢:配置过就会在c目录下生成,可以删除再次生成。
如何创建密钥:
设置页面中:
a)  ssh-keygen –t rsa
b)  生成文件在User 下的 .ssh   /c/Users/Administrator/.ssh
c)  在github 上设置添加公钥
成功:
最后就是添加密钥了,在github中的设置界面:
安装hexo
基本命令:
hexo g #完整命令为hexo generate,用于生成静态文件
hexo s #完整命令为hexo server,用于启动服务器,主要用来本地预览
hexo d #完整命令为hexo deploy,用于将本地文件发布到github上
hexo n #完整命令为hexo new,用于新建一篇文章
输入安装hexo命令:
npm install -g hexo
建一个blog文件夹:执行指令,生成文件
hexo init
安装依赖包:
npm install
最后执行:
hexo g
hexo s
在localhost:4000就可以看到初步的博客了。
发表文章
1.在Git Bash执行命令:
hexo new "my new page"
使用md写自己的文章:
title: my new post #可以改成中文的,如“新文章”
date: 2016-02-21 16:04:09 #发表日期,一般不改动
categories: blog #文章文类
tags: [文章] #文章标签,多于一项时用这种格式,只有一项时使用tags: blog
---
#这里是正文,用markdown写,你可以选择写一段显示在首页的简介后,加上
<!--more-->,在<!--more-->之前的内容会显示在首页,之后的内容会被隐藏,当游客点击Read more才能看到。
主题更换:
我使用的是jacman主题:
$ git clone https://github.com/wuchong/jacman.git themes/jacman
启用:
在这里说下,有两个config.yml文件,一个在根目录,一个在主题themes目录
修改博客根目录下的config.yml配置文件中的theme属性,将其设置为jacman。
更新:
cd themes/jacman
git pull
hexo server -g #生成加预览
基本机构如图:
其中的文件配置:中文注释很详细,对照即可
根:
# Hexo Configuration
## Docs: https://hexo.io/docs/configuration.html ## Source: https://github.com/hexojs/hexo/
# Site
title: Dong's blog
subtitle: A goal is a dream with a deadline
description:  给自己一个更好的理由!
author: Dongwudi
language: zh-CN
timezone:

# URL
## If your site is put in a subdirectory, set url as 'http://yoursite.com/child' and root as '/child/'
url: dongwudi.github.io
root: /
permalink: :year/:month/:day/:title/
permalink_defaults:

# Directory
source_dir: source
public_dir: public
tag_dir: tags
archive_dir: archives
category_dir: categories
code_dir: downloads/code
i18n_dir: :lang
skip_render:

# Writing
new_post_name: :title.md # File name of new posts
default_layout: post
titlecase: false # Transform title into titlecase
external_link: true # Open external links in new tab
filename_case: 0
render_drafts: false
post_asset_folder: false
relative_link: false
future: true
highlight:
enable: true
line_number: true
auto_detect: false
tab_replace:

# Category & Tag
default_category: uncategorized
category_map:
tag_map:

# Date / Time format
## Hexo uses Moment.js to parse and display date
## You can customize the date format as defined in
## http://momentjs.com/docs/#/displaying/format/ date_format: YYYY-MM-DD
time_format: HH:mm:ss

# Pagination
## Set per_page to 0 to disable pagination
per_page: 10
pagination_dir: page

# Extensions
## Plugins: https://hexo.io/plugins/ ## Themes: https://hexo.io/themes/ theme: jacman

feed:
type: atom
path: atom.xml
limit: 20
hub:

# Deployment
## Docs: https://hexo.io/docs/deployment.html deploy:  ##关键,关联到github上
type: git
repository: git@github.com:dongwudi/dongwudi.github.io
branch: master
主题下的配置:
##### Menu
menu:   #导航栏
主页: /
归档: /archives
关于: /about  #介绍一下你自己
网络工具: /tools  #自己添加
资源共享: /share  #自己添加
## you can create `tags` and `categories` folders in `../source`.
## And create a `index.md` file in each of them.
## set `front-matter`as
## layout: tags (or categories)
## title: tags (or categories)
## ---

#### Widgets
widgets:
- github-card
- category
- tag
- tagcloud  #标签云(也可以选用标签,上面显示数值)
- links
- douban
- rss
- weibo
## provide eight widgets:github-card,category,tag,rss,archive,tagcloud,links,weibo

# widgets:  ## 右边的零部件,jacman主题提供了7个:category、tag、rss、archive、tagcloud、links、weibo、douban,可以根据自己喜好增减
# - category  #目录
# - tagcloud  #标签云(也可以选用标签,上面显示数值)
# - links  #友情链接,需要自己添加,下一篇再说
# - rss  #RSS你们都知道的
# - weibo  #微博秀,需要在微博上开通,下一篇再说

#### RSS
rss: /atom.xml  ## RSS address.

#### Image
imglogo:
enable: true             ## display image logo true/false.
src: img/head.jpg    ## `.svg` and `.png` are recommended,please put image into the theme folder `/jacman/source/img`.
favicon: img/bitbug_favicon.ico   ## size:32px*32px,`.ico` is recommended,please put image into the theme folder `/jacman/source/img`.
apple_icon: img/head.jpg ## size:114px*114px,please put image into the theme folder `/jacman/source/img`.
author_img: img/me.jpg ## size:220px*220px.display author avatar picture.if don't want to display,please don't set this.
banner_img: #img/banner.jpg ## size:1920px*200px+. Banner Picture
### Theme Color
theme_color:
theme: 'rgba(157,175,54,0.8)'    ##the defaut theme color is blue

# 代码高亮主题
# available: default | night
highlight_theme: default

#### index post is expanding or not
index:
expand: false          ## default is unexpanding,so you can only see the short description of each post.
excerpt_link: Read More

close_aside: false  #close sidebar in post page if true
mathjax: false      #enable mathjax if true

### Creative Commons License Support, see http://creativecommons.org/ ### you can choose: by , by-nc , by-nc-nd , by-nc-sa , by-nd , by-sa , zero
creative_commons: none

#### Author information
author:
intro_line1:  "A goal is a dream with a deadline."    ## your introduction on the bottom of the page
intro_line2:  "This is my blog,Try to do better."  ## the 2nd line
weibo: u/5372951987    ## e.g. wuchong1014 or 2176287895 for http://weibo.com/2176287895 weibo_verifier: 29b59629  ##b3593ceb    ## e.g. b3593ceb Your weibo-show widget verifier ,if you use weibo-show it is needed.
tsina: 5372951987     ## e.g. 2176287895  Your weibo ID,It will be used in share button.
douban: ##159334959    ## e.g. wuchong1014 or your id for https://www.douban.com/people/wuchong1014 zhihu:    dong-yuan-jie-24  ## e.g. jark  for http://www.zhihu.com/people/jark email:  dongwudia@gmail.com    ## e.g. imjark@gmail.com
twitter:    ## e.g. jarkwu for https://twitter.com/jarkwu github: dongwudi    ## e.g. wuchong for https://github.com/wuchong facebook:   ## e.g. imjark for https://facebook.com/imjark linkedin:   ## e.g. wuchong1014 for https://www.linkedin.com/in/wuchong1014 google_plus:    ## e.g. "111190881341800841449" for https://plus.google.com/u/0/111190881341800841449, the "" is needed!
stackoverflow:  ## e.g. 3222790 for http://stackoverflow.com/users/3222790/jark ## if you set them, the corresponding  share button will show on the footer

#### Toc 目录
toc:
article: true   ## show contents in article.
aside: true     ## show contents in aside.
## you can set both of the value to true of neither of them.
## if you don't want display contents in a specified post,you can modify `front-matter` and add `toc: false`.

#### Links
links:
my CSDN : http://blog.csdn.net/github_37744981
#### Comment
duoshuo_shortname:  dongwudi  ## e.g. wuchong   your duoshuo short name.
disqus_shortname:     ## e.g. wuchong   your disqus short name.

#### Share button
jiathis:
enable: false ## if you use jiathis as your share tool,the built-in share tool won't be display.
id:    ## e.g. 1889330 your jiathis ID.
tsina: ## e.g. 2176287895 Your weibo id,It will be used in share button.

#### Analytics
google_analytics:
enable: false
id:        ## e.g. UA-46321946-2 your google analytics ID.
site:      ## e.g. wuchong.me your google analytics site or set the value as auto.
## You MUST upgrade to Universal Analytics first!
## https://developers.google.com/analytics/devguides/collection/upgrade/?hl=zh_CN baidu_tongji:
enable: true
sitecode: e6d1f421bbc9962127a50488f9ed37d1 ## e.g. e6d1f421bbc9962127a50488f9ed37d1 your baidu tongji site code
cnzz_tongji:
enable: false
siteid:    ## e.g. 1253575964 your cnzz tongji site id

#### Miscellaneous
ShowCustomFont: true  ## you can change custom font in `variable.styl` and `font.styl` which in the theme folder `/jacman/source/css`.
fancybox: true        ## if you use gallery post or want use fancybox please set the value to true.
totop: true           ## if you want to scroll to top in every post set the value to true

#### Custom Search 自定义搜索
google_cse:
enable: false
cx:   ## e.g. 018294693190868310296:abnhpuysycw your Custom Search ID.
## https://www.google.com/cse/ ## To enable the custom search You must create a "search" folder in '/source' and a "index.md" file
## set the 'front-matter' as
## layout: search
## title: search
## ---
baidu_search:     ## http://zn.baidu.com/ enable: true
id:   13715462450667150667  ## e.g. "783281470518440642"  for your baidu search id
site: http://zhannei.baidu.com/cse/search  ## your can change to your site instead of the default site

tinysou_search:     ## http://tinysou.com/ enable: false
id:  ## e.g. "4ac092ad8d749fdc6293" for your tiny search id
主题中提供了添加导航栏,如何添加:
$ hexo new page "名字"
其中根配置,已经对github进行了关联。
一切搞定后,如何提交呢?
$ hexo d
有时候我发现自己更新后,在本地服务器没有问题,提交后github上并没有及时更新,后来才知道需要清除缓存:
$ hexo clean
$ hexo d
这样就基本的同步到了自己的github上,可以在github上进行查看了,其中github提供了域名绑定的服务。有需求的小伙伴也可以绑定在自己的域名下,就可以拥有自己域名下的个人博客了。
在此设置下:custom domain添加自己的域名
基本就完成了,功能完善会后续添加。

相关文章推荐
- 搭建个人博客-hexo+github
- 收获:如何使用github和hexo搭建个人博客
- 基于Github&Hexo的个人博客搭建过程
- 使用 GitHub+Hexo 搭建个人博客
- GitHubPages+Hexo搭建免费个人博客(windows平台)
- Hexo+github搭建个人博客(1)
- Hexo+Github Pages搭建个人博客教程(maupassant主题)
- 使用Hexo+GitHub搭建及配置个人博客
- GithubPages+Hexo搭建个人博客
- Hexo + Github 之搭建个人博客
- GitHub+Hexo搭建个人静态博客
- 使用GitHub + Hexo搭建个人博客(五)- Ubuntu升级后hexo命令失效
- Hexo&Github-Pages搭建个人博客
- GitHub+hexo+gitment搭建一个具有评论功能的个人博客(入门级)
- GitHub上搭建Hexo个人博客
- 利用Github Pages+Hexo搭建个人博客
- github Pages + Hexo搭建个人博客(二) 提升篇
- github+hexo搭建个人博客
- hexo github搭建个人博客 最新版!