spring配置中id和name属性的区别
2017-03-14 17:45
375 查看
可能大家在网上都应该搜索过在 Spring 配置中 id 和 name 属性的区别,可能你会搜索到有一大堆的区别,不过在我这里可能不一样了。
我这里 Spring 的版本为 3.2.4,区别不是很大,这里总结一下。
1.id 和 name 的命名规范不是很严格。
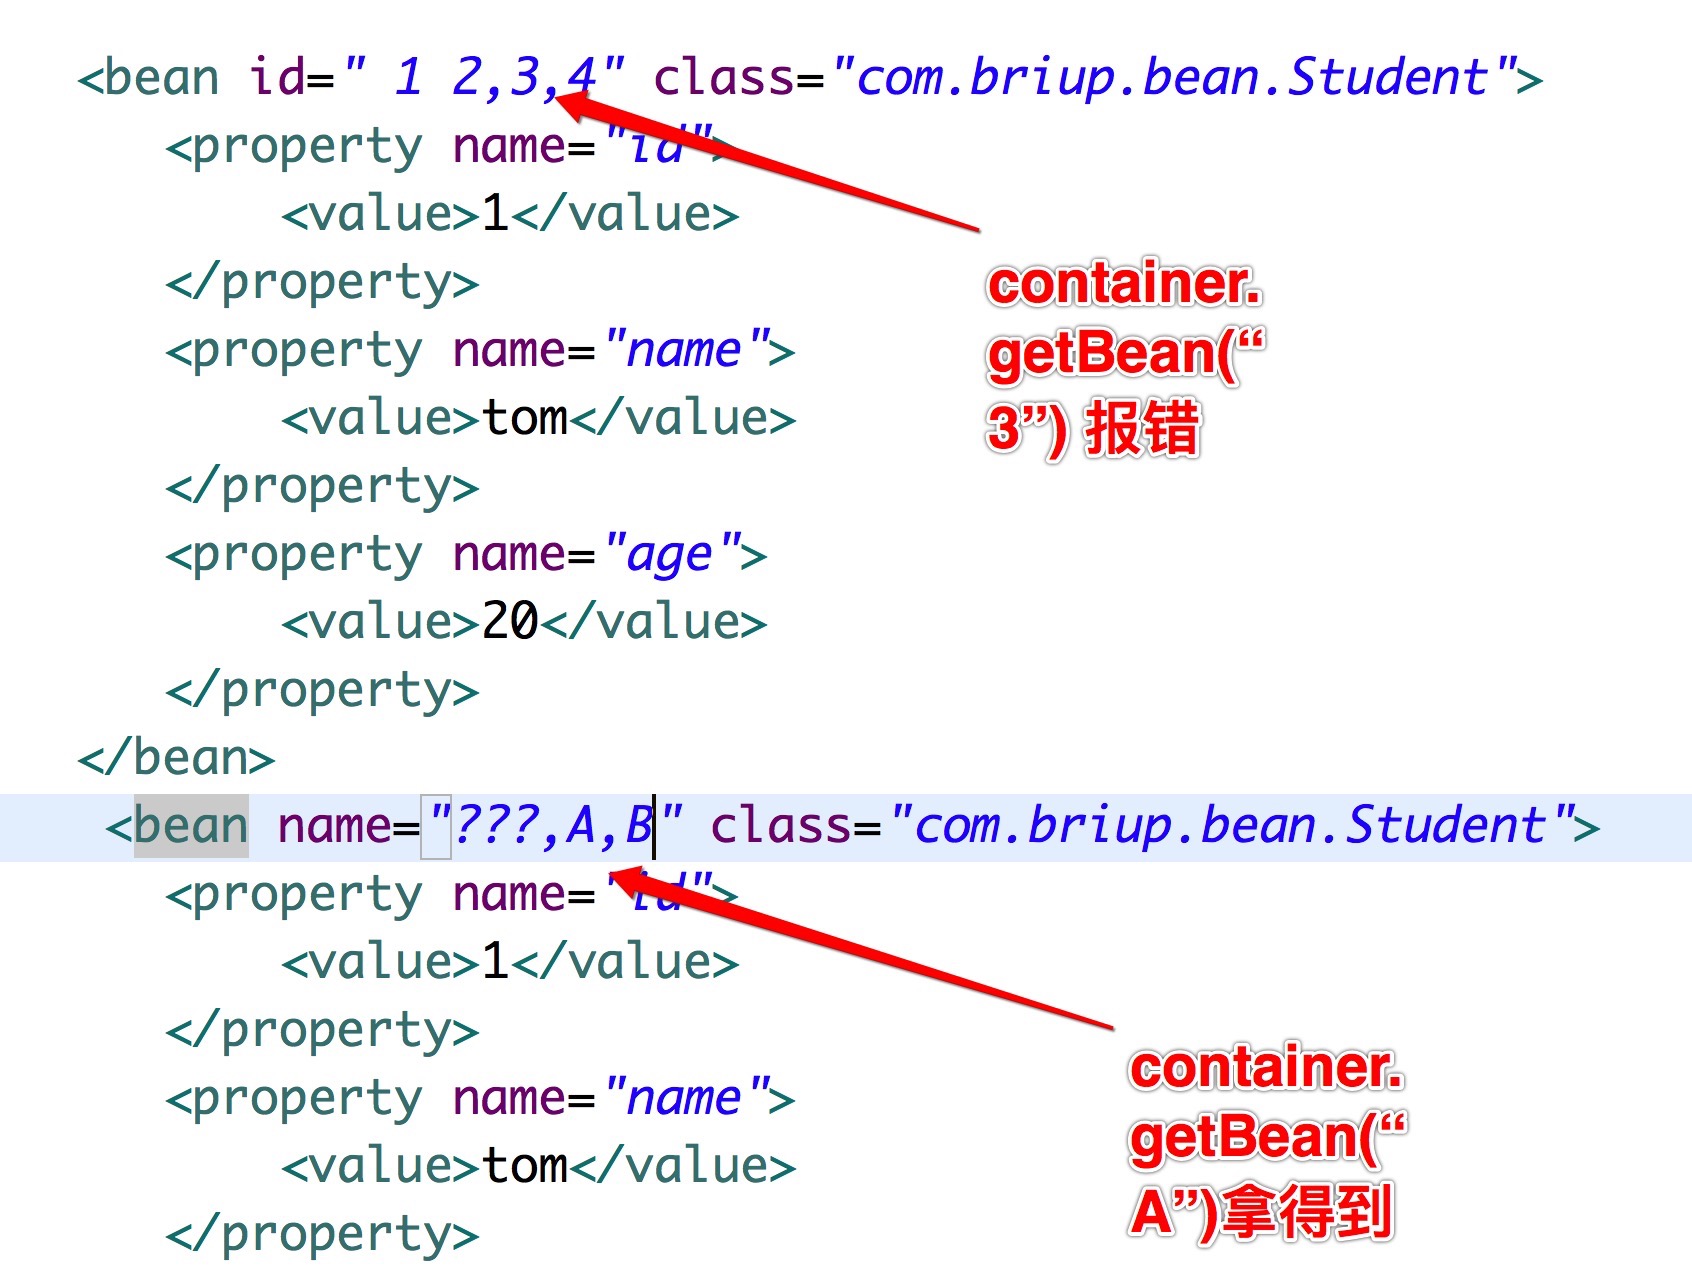
2.id的时候用分号(“;”)、空格(“ ”)或逗号(“,”)分隔开就只能当成一个标识,name的时候用分号(“;”)、空格(“ ”)或逗号(“,”)分隔开就要当成分开来的多个标识(相当于别名 alias 的作用)。
如:
name=“1 2 3 4”等同于 name=“1,2,3,4” 这样写相当于有 1 2 3 4(4个)个标识符标识当前bean
id=“1 2 3 4” 这样写相当于有 “1 2 3 4”(1个)个标识符标识当前bean
3.配置两个相同的 id 或者 name 都不能通过。
4.如果既配置了 id ,也配置了 name ,则两个都生效。
5.如果id和name都没有指定,则用类全名作为name,如
6.如果存在多个id和name都没有指定,且实例类都一样的,如:
代码
2
3
4
5
1
2
3
4
5
则第一个bean通过getBean(“com.stamen.BeanLifeCycleImpl”)获得,
第二个bean通过getBean(“com.stamen.BeanLifeCycleImpl#1”)获得,
第三个bean通过getBean(“com.stamen.BeanLifeCycleImpl#2”)获得,以此类推。
7.注解和配置文件都存在的时候
如果配置基本类的时候,注解和配置文件都使用的时候,注解和配置文件中 name 不相同的时候, 则两个不冲突,都能够生效。
如果配置基本类的时候,注解和配置文件都使用的时候,注解和配置文件中 name 相同的时候, 则两个冲突,配置文件生效。
例子1:
2
3
4
5
6
7
8
9
10
11
12
13
14
15
16
17
18
19
20
21
22
23
24
25
26
27
28
29
30
31
32
33
34
35
1
2
3
4
5
6
7
8
9
10
11
12
13
14
15
16
17
18
19
20
21
22
23
24
25
26
27
28
29
30
31
32
33
34
35
annotation.xml
2
3
4
5
6
7
8
9
10
11
12
13
14
15
16
17
18
19
20
1
2
3
4
5
6
7
8
9
10
11
12
13
14
15
16
17
18
19
20
当然这两个都能够得到的。
2
1
2
例子2:
2
3
4
5
6
7
8
9
10
11
12
13
14
15
16
17
18
19
20
21
22
23
24
25
26
27
28
29
30
31
32
33
34
35
36
1
2
3
4
5
6
7
8
9
10
11
12
13
14
15
16
17
18
19
20
21
22
23
24
25
26
27
28
29
30
31
32
33
34
35
36
annotation.xml
2
3
4
5
6
7
8
9
10
11
12
13
14
15
16
17
18
19
20
1
2
3
4
5
6
7
8
9
10
11
12
13
14
15
16
17
18
19
20
main:
2
3
4
5
6
1
2
3
4
5
6
结果:
如果该类作为引用类的时候,并且自动注入的时候,注解和配置文件都配置的时候,如果 name 相同的话,配置文件生效。
如果该类作为引用类的时候,并且自动注入的时候,注解和配置文件都配置的时候,如果 name 不相同的话,就按照 Autowired 的匹配规则去匹配。(不清楚 Autowired 的用法的同学去看我 Spring(2) 这篇文章的介绍)
例子:
2
3
4
5
6
7
8
9
10
11
12
13
14
15
16
17
18
19
20
21
22
23
24
25
26
27
28
29
30
31
32
33
34
35
36
37
38
39
40
41
42
43
44
45
46
47
48
1
2
3
4
5
6
7
8
9
10
11
12
13
14
15
16
17
18
19
20
21
22
23
24
25
26
27
28
29
30
31
32
33
34
35
36
37
38
39
40
41
42
43
44
45
46
47
48

2
3
4
5
6
7
8
9
10
11
12
13
14
15
16
17
18
19
20
21
22
23
24
25
26
27
28
29
30
31
32
33
34
35
1
2
3
4
5
6
7
8
9
10
11
12
13
14
15
16
17
18
19
20
21
22
23
24
25
26
27
28
29
30
31
32
33
34
35
annotation.xml
2
3
4
5
6
7
8
9
10
11
12
13
14
15
16
17
18
19
1
2
3
4
5
6
7
8
9
10
11
12
13
14
15
16
17
18
19
main
2
3
4
5
6
1
2
3
4
5
6
结果:
此时得到的是配置文件中的配置的。
当然注解和配置文件同时配置的几率不大。
我这里 Spring 的版本为 3.2.4,区别不是很大,这里总结一下。
1.id 和 name 的命名规范不是很严格。
2.id的时候用分号(“;”)、空格(“ ”)或逗号(“,”)分隔开就只能当成一个标识,name的时候用分号(“;”)、空格(“ ”)或逗号(“,”)分隔开就要当成分开来的多个标识(相当于别名 alias 的作用)。
如:
name=“1 2 3 4”等同于 name=“1,2,3,4” 这样写相当于有 1 2 3 4(4个)个标识符标识当前bean
id=“1 2 3 4” 这样写相当于有 “1 2 3 4”(1个)个标识符标识当前bean
3.配置两个相同的 id 或者 name 都不能通过。
4.如果既配置了 id ,也配置了 name ,则两个都生效。
5.如果id和name都没有指定,则用类全名作为name,如
<bean class="com.stamen.BeanLifeCycleImpl">,则你可以通过
getBean("com.stamen.BeanLifeCycleImpl")返回该实例。6.如果存在多个id和name都没有指定,且实例类都一样的,如:
代码
<bean class="com.stamen.BeanLifeCycleImpl"/>

<bean class="com.stamen.BeanLifeCycleImpl"/>

<bean class="com.stamen.BeanLifeCycleImpl"/>
1
2
3
4
5
1
2
3
4
5
则第一个bean通过getBean(“com.stamen.BeanLifeCycleImpl”)获得,
第二个bean通过getBean(“com.stamen.BeanLifeCycleImpl#1”)获得,
第三个bean通过getBean(“com.stamen.BeanLifeCycleImpl#2”)获得,以此类推。
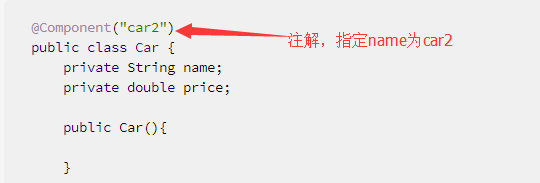
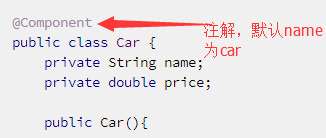
7.注解和配置文件都存在的时候
如果配置基本类的时候,注解和配置文件都使用的时候,注解和配置文件中 name 不相同的时候, 则两个不冲突,都能够生效。
如果配置基本类的时候,注解和配置文件都使用的时候,注解和配置文件中 name 相同的时候, 则两个冲突,配置文件生效。
例子1:
@Component("car2")
public class Car {
private String name;
private double price;

public Car(){

}

public Car(double price, String name) {
this.price = price;
this.name = name;
}

public double getPrice() {
return price;
}
public void setPrice(double price) {
this.price = price;
}

public String getName() {
return name;
}

public void setName(String name) {
this.name = name;
}

@Override
public String toString() {
return "Car [name=" + name + ", price=" + price + "]";
}

}12
3
4
5
6
7
8
9
10
11
12
13
14
15
16
17
18
19
20
21
22
23
24
25
26
27
28
29
30
31
32
33
34
35
1
2
3
4
5
6
7
8
9
10
11
12
13
14
15
16
17
18
19
20
21
22
23
24
25
26
27
28
29
30
31
32
33
34
35
annotation.xml
<?xml version="1.0" encoding="UTF-8"?>
<beans xmlns="http://www.springframework.org/schema/beans"
xmlns:xsi="http://www.w3.org/2001/XMLSchema-instance"
xmlns:context="http://www.springframework.org/schema/context"
xsi:schemaLocation=" http://www.springframework.org/schema/beans http://www.springframework.org/schema/beans/spring-beans-3.2.xsd http://www.springframework.org/schema/context http://www.springframework.org/schema/context/spring-context-3.2.xsd">

<!--  <context:annotation-config/> Spring版本更新后就不需要这个了-->
<!-- 设置扫描的包 -->
<context:component-scan base-package="com.briup.ioc.annotation" />

<bean name="car" class="com.briup.ioc.annotation.Car">
<property name="name">
<value>宝马</value>
</property>
</bean>
</beans>
1
2
3
4
5
6
7
8
9
10
11
12
13
14
15
16
17
18
19
20
1
2
3
4
5
6
7
8
9
10
11
12
13
14
15
16
17
18
19
20
当然这两个都能够得到的。
getBean("car");
getBean("car2")12
1
2
例子2:
@Component
public class Car {
private String name;
private double price;

public Car(){

}

public Car(double price, String name) {
this.price = price;
this.name = name;
}

public double getPrice() {
return price;
}
public void setPrice(double price) {
this.price = price;
}

public String getName() {
return name;
}

public void setName(String name) {
this.name = name;
}

@Override
public String toString() {
return "Car [name=" + name + ", price=" + price + "]";
}

}12
3
4
5
6
7
8
9
10
11
12
13
14
15
16
17
18
19
20
21
22
23
24
25
26
27
28
29
30
31
32
33
34
35
36
1
2
3
4
5
6
7
8
9
10
11
12
13
14
15
16
17
18
19
20
21
22
23
24
25
26
27
28
29
30
31
32
33
34
35
36
annotation.xml
<?xml version="1.0" encoding="UTF-8"?>
<beans xmlns="http://www.springframework.org/schema/beans"
xmlns:xsi="http://www.w3.org/2001/XMLSchema-instance"
xmlns:context="http://www.springframework.org/schema/context"
xsi:schemaLocation=" http://www.springframework.org/schema/beans http://www.springframework.org/schema/beans/spring-beans-3.2.xsd http://www.springframework.org/schema/context http://www.springframework.org/schema/context/spring-context-3.2.xsd">

<!--  <context:annotation-config/> Spring版本更新后就不需要这个了-->
<!-- 设置扫描的包 -->
<context:component-scan base-package="com.briup.ioc.annotation" />

<bean name="car" class="com.briup.ioc.annotation.Car">
<property name="name">
<value>宝马</value>
</property>
</bean>
</beans>
1
2
3
4
5
6
7
8
9
10
11
12
13
14
15
16
17
18
19
20
1
2
3
4
5
6
7
8
9
10
11
12
13
14
15
16
17
18
19
20
main:
public void ioc_annotation() {
String path = "com/briup/ioc/annotation/annotation.xml";
ApplicationContext ac = new ClassPathXmlApplicationContext(path);
Car car = (Car) ac.getBean("car");
System.out.println(car);
}12
3
4
5
6
1
2
3
4
5
6
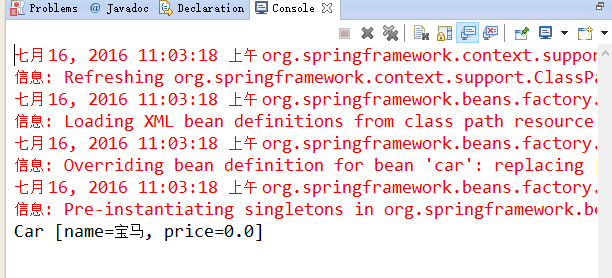
结果:
如果该类作为引用类的时候,并且自动注入的时候,注解和配置文件都配置的时候,如果 name 相同的话,配置文件生效。
如果该类作为引用类的时候,并且自动注入的时候,注解和配置文件都配置的时候,如果 name 不相同的话,就按照 Autowired 的匹配规则去匹配。(不清楚 Autowired 的用法的同学去看我 Spring(2) 这篇文章的介绍)
例子:
@Component("b")
public class Boss {
private String name;
@Autowired
private Car car;
public Boss(){
}
public Boss(String name, Car car, Office office) {
this.name = name;
this.car = car;
this.office = office;
}
public Boss( Car car, Office office) {
this.car = car;
this.office = office;
}
public String getName() {
return name;
}
public void setName(String name) {
this.name = name;
}
public Car getCar() {
return car;
}
public void setCar(Car car) {
this.car = car;
}
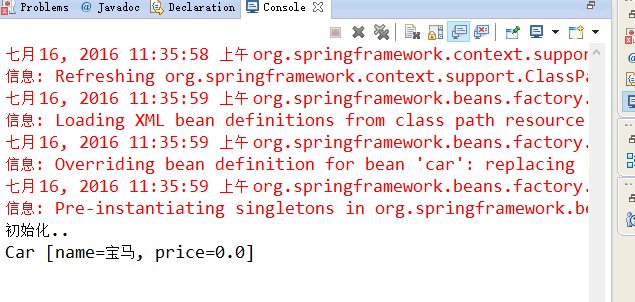
@PostConstruct
public void init(){
System.out.println("初始化..");
}
@PreDestroy
public void destroy(){
System.out.println("销毁");
}
@Override
public String toString() {
return "Boss [name=" + name + ", car=" + car + "
+ "]";
}
}12
3
4
5
6
7
8
9
10
11
12
13
14
15
16
17
18
19
20
21
22
23
24
25
26
27
28
29
30
31
32
33
34
35
36
37
38
39
40
41
42
43
44
45
46
47
48
1
2
3
4
5
6
7
8
9
10
11
12
13
14
15
16
17
18
19
20
21
22
23
24
25
26
27
28
29
30
31
32
33
34
35
36
37
38
39
40
41
42
43
44
45
46
47
48
@Component
public class Car {
private String name;
private double price;

public Car(){

}

public Car(double price, String name) {
this.price = price;
this.name = name;
}

public double getPrice() {
return price;
}
public void setPrice(double price) {
this.price = price;
}

public String getName() {
return name;
}

public void setName(String name) {
this.name = name;
}

@Override
public String toString() {
return "Car [name=" + name + ", price=" + price + "]";
}

}12
3
4
5
6
7
8
9
10
11
12
13
14
15
16
17
18
19
20
21
22
23
24
25
26
27
28
29
30
31
32
33
34
35
1
2
3
4
5
6
7
8
9
10
11
12
13
14
15
16
17
18
19
20
21
22
23
24
25
26
27
28
29
30
31
32
33
34
35
annotation.xml
<?xml version="1.0" encoding="UTF-8"?>
<beans xmlns="http://www.springframework.org/schema/beans"
xmlns:xsi="http://www.w3.org/2001/XMLSchema-instance"
xmlns:context="http://www.springframework.org/schema/context"
xsi:schemaLocation=" http://www.springframework.org/schema/beans http://www.springframework.org/schema/beans/spring-beans-3.2.xsd http://www.springframework.org/schema/context http://www.springframework.org/schema/context/spring-context-3.2.xsd">

<!--  <context:annotation-config/> Spring版本更新后就不需要这个了-->
<!-- 设置扫描的包 -->
<context:component-scan base-package="com.briup.ioc.annotation" />
<bean name="car" class="com.briup.ioc.annotation.Car">
<property name="name">
<value>宝马</value>
</property>
</bean>
</beans>
1
2
3
4
5
6
7
8
9
10
11
12
13
14
15
16
17
18
19
1
2
3
4
5
6
7
8
9
10
11
12
13
14
15
16
17
18
19
main
public void ioc_annotation() {
String path = "com/briup/ioc/annotation/annotation.xml";
ApplicationContext ac = new ClassPathXmlApplicationContext(path);
Car car = (Car) ac.getBean("car");
System.out.println(car);
}12
3
4
5
6
1
2
3
4
5
6
结果:
此时得到的是配置文件中的配置的。
当然注解和配置文件同时配置的几率不大。

相关文章推荐
- spring配置文件中bean的属性name与id的区别
- Spring配置中<bean>的id和name属性区别
- spring配置文件中<bean>的id和name属性区别,以及identifier和aliases
- spring配置中id和name属性的区别
- Spring 配置文件中Bean 属性id和name的区别
- Spring中applicationContext.xml的bean里的id和name属性区别
- Spring配置中<bean>的id和name属性区分
- spring 配置时 bean id 与bean name 的区别
- spring 配置时 bean id 与bean name 的区别
- spring配置文件中Bean中的id和name的区别
- Spring中applicationContext.xml的bean里的id和name属性区别
- 谈谈Spring配置中<bean>的id和name属性的花拳秀腿
- Spring学习笔记之Spring中applicationContext.xml的bean里的id和name属性区别
- spring 配置时 bean id 与bean name 的区别
- Spring配置中<bean>的id和name属性区分
- 在配置spring标签是name和id的区别
- spring配置文件中Bean中的id和name的区别
- Spring配置中<bean>的id和name属性区分
- 在配置spring标签是name和id的区别
- 在配置spring标签是name和id的区别