ActiveMQ介绍及Spring整合实例
2017-03-10 10:36
387 查看
前言
ActiveMQ 是Apache出品,最流行的,能力强劲的开源消息总线。ActiveMQ 是一个完全支持JMS1.1和J2EE 1.4规范的 JMS Provider实现。主要解决进场通讯,应用耦合,流量削锋。实现高性能,高可用,可伸缩和最终一致性架构。异步消息是一个应用程序向另外一个应用程序间接发送消息的一种方式,这种方式无需等待对方的相应。比如用户注册之后发送短信,秒杀程序的流量削锋,聊天室的消息通讯,复杂耗时的程序的而无须立即返回的结果的程序之间的通讯。消息模型
ActiveMQ遵循了JMS规范,有两种消息模型,点对点和发布订阅模型。点对点:在点对点模型中,每一条消息都会有一个发送者和一个接受者。当消息代理得到消息时,它将消息放入一个队列中。当接收者请求队列中的下一条消息时,消息会从队列中取出,并投递给接收者。因为消息投递后会从队列删除,这样就可以保证消息只能投递给一个接收者。如图:

尽管消息队列中每一条消息只被投递给一个接收者,但是并不意味着只能使用一个接收者从队列中获取消息。通常可以使用几个接收者来处理队列中的消息,有点像银行办理业务,自己的业务就是一个消息,选取一个空闲的窗口办理业务。
发布-订阅模型:消息会发生给一个主题。与队列类似,多个接收者都可以监听一个主题。但是,与队列不同的是,消息不再是只投递给一个接收者,而是主题的所有订阅者都会接收到此消息的副本。如图:
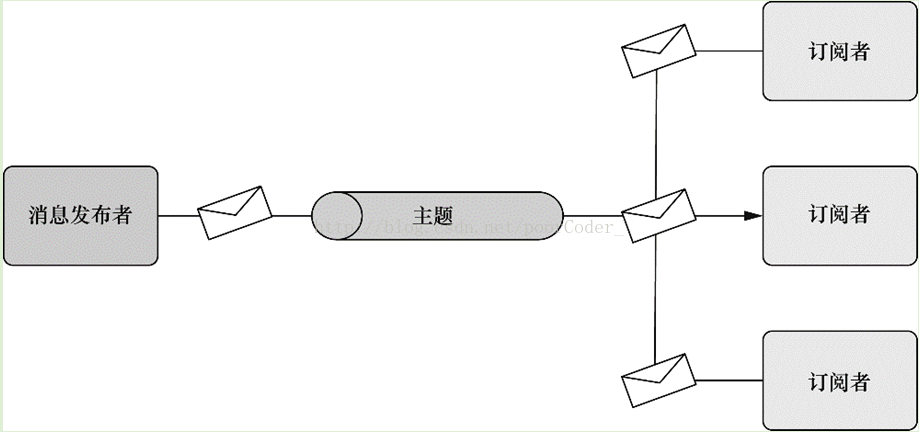
有点像杂志的发行商和杂志订阅者的关系。
ActiveMQ下载
下载地址http://activemq.apache.org/download.html注意:Java Runtime Environment (JRE) JRE 1.7 (1.6 for version <=5.10.0)
5.10以上的版本需要java1.7以上的环境。
安装后在http://localhost:8161 (本机)可查看控制台
下面来代码整合。
maven配置
<dependencies>
<dependency>
<groupId>org.springframework</groupId>
<artifactId>spring-jms</artifactId>
<version>${spring.version}</version>
</dependency>
<dependency>
<groupId>org.springframework</groupId>
<artifactId>spring-jms</artifactId>
<version>${spring.version}</version>
</dependency>
<dependency>
<groupId>org.springframework</groupId>
<artifactId>spring-messaging</artifactId>
<version>${spring.version}</version>
</dependency>
<dependency>
<groupId>org.springframework</groupId>
<artifactId>spring-tx</artifactId>
<version>${spring.version}</version>
</dependency>

<dependency>
<groupId>org.apache.activemq</groupId>
<artifactId>activemq-all</artifactId>
<version>5.14.4</version>
</dependency>

<dependency>
<groupId>junit</groupId>
<artifactId>junit</artifactId>
<version>${junit.version}</version>
<scope>test</scope>
</dependency>
<!--spring单元测试依赖 -->
<dependency>
<groupId>org.springframework</groupId>
<artifactId>spring-test</artifactId>
<version>${spring.version}</version>
<scope>test</scope>
</dependency>

</dependencies>
实体类
package com.study.entity;

import java.io.Serializable;

public class TestMessage implements Serializable{

private static final long serialVersionUID = -2132582539599141027L;

private Integer id;
private String msg;
public Integer getId() {
return id;
}
public void setId(Integer id) {
this.id = id;
}
public String getMsg() {
return msg;
}
public void setMsg(String msg) {
this.msg = msg;
}
@Override
public String toString() {
return "TestMessage [id=" + id + ", msg=" + msg + "]";
}

}
ActiveMQ配置
ActiveMQ有自己的spring配置文件命名空间。<?xml version="1.0" encoding="UTF-8"?> <beans xmlns="http://www.springframework.org/schema/beans" xmlns:context="http://www.springframework.org/schema/context" xmlns:xsi="http://www.w3.org/2001/XMLSchema-instance" xmlns:amq="http://activemq.apache.org/schema/core" xmlns:jms="http://www.springframework.org/schema/jms" xsi:schemaLocation="http://www.springframework.org/schema/beans http://www.springframework.org/schema/beans/spring-beans-4.3.xsd http://www.springframework.org/schema/context http://www.springframework.org/schema/context/spring-context-4.3.xsd http://www.springframework.org/schema/jms http://www.springframework.org/schema/jms/spring-jms-4.3.xsd http://activemq.apache.org/schema/core http://activemq.apache.org/schema/core/activemq-core-5.14.4.xsd"> <context:component-scan base-package="com.study"></context:component-scan> <!-- 声明连接工厂 --> <amq:connectionFactory id="targetConnectionFactory" brokerURL="tcp://localhost:61616" userName="admin" password="admin" trustAllPackages="true" /> <!-- Spring用于管理真正的ConnectionFactory的ConnectionFactory --> <bean id="connectionFactory" class="org.springframework.jms.connection.SingleConnectionFactory"> <!-- 目标ConnectionFactory对应真实的可以产生JMS Connection的ConnectionFactory --> <property name="targetConnectionFactory" ref="targetConnectionFactory"/> </bean> <!-- Spring提供的JMS工具类,它可以进行消息发送、接收等 --> <bean id="jmsTemplate" class="org.springframework.jms.core.JmsTemplate"> <!-- 这个connectionFactory对应的是我们定义的Spring提供的那个ConnectionFactory对象 --> <property name="connectionFactory" ref="connectionFactory"/> </bean> <!-- 消息监听器容器 --> <jms:listener-container connection-factory="connectionFactory"> <jms:listener destination="study.queue.simple" ref="consumerService" method="receiveMessage"/> <jms:listener destination="study.queue.simple" ref="consumerService" method="receiveMessage2"/> <jms:listener destination="study.queue.object" ref="consumerService" method="receiveObject" /> </jms:listener-container> <jms:listener-container connection-factory="connectionFactory" destination-type="topic"> <jms:listener destination="study.topic.simple" ref="consumerService" method="receiveTopicMessage"/> <jms:listener destination="study.topic.simple" ref="consumerService" method="receiveTopicMessage2"/> </jms:listener-container> </beans>
Spring提供了JmsTemplate来简化JMS的开发。所以需要声明JmsTemplate的bean,已经所依赖的connectionFactory。
上面brokerURL需填写activeMQ安装的地址,因为我是本地安装,所以这么写。消息监听器容器中声明了接收者其中destination声明一个queue或者topic名称。ref声明接收者的类 ,method声明方法。如果该类继承了MessageListener则可以不用写method方法,会默认调用onMessage()方法来接收消息。
Producer代码
package com.study.producer;

import com.study.entity.TestMessage;

public interface ProducerService {
/**
* 发送queue文本消息
* @param destination
* @param message
*/
public void sendMessage(String destinationName,String message);
/**
* 发送queue对象消息
* @param destinationName
* @param testMessage
*/
public void sendMessage(String destinationName,TestMessage testMessage);
/**
* 发送topic文本消息
* @param destinationName
* @param message
*/
public void sendTopicMessage(String destinationName, String message);

}
package com.study.producer.impl;
import javax.annotation.Resource;
import javax.jms.JMSException;
import javax.jms.Message;
import javax.jms.Session;
import org.springframework.jms.core.JmsTemplate;
import org.springframework.jms.core.MessageCreator;
import org.springframework.stereotype.Component;
import com.study.entity.TestMessage;
import com.study.producer.ProducerService;
@Component
public class ProducerServiceImpl implements ProducerService{
@Resource
private JmsTemplate jmsTemplate;
public void sendMessage(String destinationName, final String message) {
System.out.println("生产方发送字符串消息:"+message);
jmsTemplate.send(destinationName, new MessageCreator() {
public Message createMessage(Session session) throws JMSException {
return session.createTextMessage(message);
}
});
}
public void sendMessage(String destinationName, final TestMessage testMessage) {
System.out.println("生产方发送对象消息:"+testMessage);
/*jmsTemplate.send(destinationName, new MessageCreator() {
public Message createMessage(Session session) throws JMSException {
return session.createObjectMessage(testMessage);
}
});*/
jmsTemplate.convertAndSend(destinationName, testMessage);
}
public void sendTopicMessage(String destinationName, String message){
System.out.println("生产方发送文本消息:"+message);
jmsTemplate.setPubSubDomain(true);
jmsTemplate.convertAndSend(destinationName, message);
}
}上面代码中使用了jmsTemplate.send()和jmsTemplate.convertAndSend()方法。JMS在发送消息的时候,传送的对象是Message对象,MessageCreator提付了自定义消息与Message的转换。而convertAndSend()会内置消息转换器,所以不用传入MessageCreator作为参数。默认的消息转换器是SimpleMessageConverter,可以自己实现或者使用spring提供的其他转换器来配置消息的转换。
Consumer代码
package com.study.consumer;

import com.study.entity.TestMessage;

public interface ConsumerService {
/**
* 消费方 接受字符串
* @param message
*/
public void receiveMessage(String message);
/**
* 消费方 接受对象
* @param message
*/
public void receiveObject(TestMessage testMessage);

/**
* 消费方 topic 接受字符串
* @param message
*/
public void receiveTopicMessage(String message);

/**
* 消费方 topic 接受字符串
* @param message
*/
public void receiveTopicMessage2(String message);

}
package com.study.consumer.impl;
import org.springframework.stereotype.Component;
import com.study.consumer.ConsumerService;
import com.study.entity.TestMessage;
@Component("consumerService")
public class ConsumerServiceImpl implements ConsumerService{
public void receiveMessage(String message) {
System.out.println("消费方接收消息1:"+message);
}
public void receiveMessage2(String message) {
System.out.println("消费方接收消息2:"+message);
}
public void receiveObject(TestMessage testMessage) {
System.out.println("消费方接收对象:"+ testMessage);
}
public void receiveTopicMessage(String message) {
System.out.println("topic消费方接收消息1:"+message);
}
public void receiveTopicMessage2(String message) {
System.out.println("topic消费方接收消息2:"+message);
}
}将接受的类型放入接收者方法参数里面就可直接获取到消息,并且完成转换。
测试类
package com.test;

import org.junit.runner.RunWith;
import org.springframework.test.context.ContextConfiguration;
import org.springframework.test.context.junit4.AbstractJUnit4SpringContextTests;
import org.springframework.test.context.junit4.SpringJUnit4ClassRunner;

@ContextConfiguration(locations = { "classpath:activemq.xml" })
@RunWith(SpringJUnit4ClassRunner.class)
public class SpringTestCase extends AbstractJUnit4SpringContextTests {

}
package com.test;
import javax.annotation.Resource;
import org.junit.Test;
import com.study.entity.TestMessage;
import com.study.producer.ProducerService;
public class ActivemqTest extends SpringTestCase{
@Resource
private ProducerService producerService;
@Test
public void simpleSend(){
producerService.sendMessage("study.queue.simple", "简单文本消息测试");
}
@Test
public void ObjectSend(){
TestMessage testMessage = new TestMessage();
testMessage.setId(1);
testMessage.setMsg("对象消息。。。");
producerService.sendMessage("study.queue.object", testMessage);
}
@Test
public void simpleTopicSend(){
producerService.sendTopicMessage("study.topic.simple", "topic简单文本消息测试");
}
}测试simpleSend()方法。发送一条文本消息,发送的目的是study.queue.simple。从我们的avtivemq.xml配置文件中可以看到
<jms:listener destination="study.queue.simple" ref="consumerService" method="receiveMessage"/>
<jms:listener destination="study.queue.simple" ref="consumerService" method="receiveMessage2"/>
study.queue.simple有两个接受者,而jmsTemplate发送默认是点对点模型,所以是receiveMessage与receiveMessage2随机获取到消息。多次执行simpleSend()查看结果:


好吧,我试了好几次,刚开始一直是2
测试ObjectSend() 方法发送了我们的自定义对象。发送目的是study.queue.object执行结果如图:

可以看到接收方直接获取到对象。
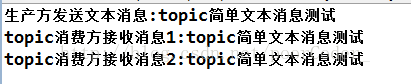
测试simpleTopicSend(),发送目的是study.topic.simple,配置文件中接收方配置
<jms:listener-container connection-factory="connectionFactory" destination-type="topic">
<jms:listener destination="study.topic.simple" ref="consumerService" method="receiveTopicMessage"/>
<jms:listener destination="study.topic.simple" ref="consumerService" method="receiveTopicMessage2"/>
</jms:listener-container>
而且在发送的时候声明了发布订阅消息模型
jmsTemplate.setPubSubDomain(true);
jmsTemplate.convertAndSend(destinationName, message);
接收者有两个,并且是发布订阅模型,所以这两个接收者都应该接收到消息,执行结果如图:
本例子是单元测试的例子,对应jmsTemplate只使用了一个,每次执行单元测试都是重新运行,所以默认点对点模型没问题,但是因为spring的单例的原因,项目集成时,对应jmsTemplate应该手动声明相应消息模型,或配置多个jmsTemplate。
代码下载:http://download.csdn.net/detail/poorcoder_/9776505
转载请标明出处:http://blog.csdn.net/poorcoder_/article/details/61192791

相关文章推荐
- Spring ActiveMQ整合实例
- spring整合activemq发送MQ消息[Topic模式]实例,activemqmq
- JMS ActiveMQ简单介绍+简单实例
- 基于maven的Spring+ActiveMQ整合Demo
- Spring ActiveMQ整合+注解消息监听
- Spring ActiveMQ整合+注解消息监听
- Spring ActiveMQ 整合(五): 死信队列
- SPRING+ACTIVEMQ+TOMCAT整合
- 消息队列ActiveMQ+Spring整合
- Spring整合ActiveMQ:spring+JMS+ActiveMQ+Tomcat
- part2: maven 工程整合spring+activemq
- spring+activemq整合
- Spring+SpringMVC+mybatis+easyui整合实例(一)实例介绍
- springMVC+activemq整合注解方式
- JMS与Spring的整合实例(基于Apache ActiveMQ)JMS的介绍
- Spring+SpringMVC+mybatis+easyui整合实例(一)实例介绍
- activemq spring整合 以及虚拟主题设置
- spring activemq quartz 整合
- Activemq API使用(不整合spring)
- Spring ActiveMQ 整合(三): 确认机制ACK(收到消息后,应该有一个回应也就是确认答复)