Install Oracle 11G Release 2 (11.2) on Oracle Linux 7 (OEL7),备忘
2017-03-09 10:57
2341 查看
Install Oracle 11G Release 2 (11.2) on Oracle Linux 7 (OEL7)
Posted on May 3, 2014 This article presents how to install Oracle 11G on Oracle Enterprise Linux 7 (OEL7).Read following article how to install Oracle Enterprise Linux 7: Install Oracle Linux 7 (OEL7) (for comfort set 2G memory for your virtual machine before proceeding with Oracle software installation).
Installation software is available on OTN version 11.2.0.1 or metalink 11.2.0.4. In this installation I’m presenting installation for 11.2.0.4 but for previous version 11.2.0.X it shouldn’t be different.
Oracle software which I verified
release 11.2.0.4p13390677_112040_Linux-x86-64_1of7.zip
p13390677_112040_Linux-x86-64_2of7.zip
OS configuration and preparation
OS configuration is executed as root. To login as root just execute following command in terminal.su - rootAdd groups--required groups
/usr/sbin/groupadd -g 501 oinstall
/usr/sbin/groupadd -g 502 dba
/usr/sbin/groupadd -g 503 operAdd user Oracle
/usr/sbin/useradd -u 502 -g oinstall -G dba,oper oracleChange password for userpasswd oracleAdd kernel parameters to /etc/sysctl.conf
kernel.shmmni = 4096
kernel.shmmax = 4398046511104
kernel.shmall = 1073741824
kernel.sem = 250 32000 100 128

fs.aio-max-nr = 1048576
fs.file-max = 6815744
net.ipv4.ip_local_port_range = 9000 65500
net.core.rmem_default = 262144
net.core.rmem_max = 4194304
net.core.wmem_default = 262144
net.core.wmem_max = 1048586
Apply kernel parameters/sbin/sysctl -pAdd following lines to set shell limits for user oracle in file /etc/security/limits.conforacle soft nproc 131072
oracle hard nproc 131072
oracle soft nofile 131072
oracle hard nofile 131072
oracle soft core unlimited
oracle hard core unlimited
oracle soft memlock 50000000
oracle hard memlock 50000000The “/etc/hosts” file must contain a fully qualified name for the server.<IP-address> <fully-qualified-machine-name> <machine-name>For example.127.0.0.1 oel7 oel7.dbaora.com localhost localhost.localdomainModify .bash_profile for user oracle in his home directory# Oracle Settings
export TMP=/tmp
export ORACLE_HOSTNAME=oel7.dbaora.com
export ORACLE_UNQNAME=ORA11G
export ORACLE_BASE=/ora01/app/oracle
export ORACLE_HOME=$ORACLE_BASE/product/11.2.0/db_1
export ORACLE_SID=ORA11G
PATH=/usr/sbin:$PATH:$ORACLE_HOME/bin
export LD_LIBRARY_PATH=$ORACLE_HOME/lib:/lib:/usr/lib;
export CLASSPATH=$ORACLE_HOME/jlib:$ORACLE_HOME/rdbms/jlib;
alias cdob='cd $ORACLE_BASE'
alias cdoh='cd $ORACLE_HOME'
alias tns='cd $ORACLE_HOME/network/admin'
alias envo='env | grep ORACLE'
umask 022Check which packages are installed and which are missingrpm -q --qf '%{NAME}-%{VERSION}-%{RELEASE}(%{ARCH})\n' binutils \
elfutils-libelf \
elfutils-libelf-devel \
gcc \
gcc-c++ \
glibc \
glibc-common \
glibc-devel \
glibc-headers \
ksh \
libaio \
libaio-devel \
libgcc \
libstdc++ \
libstdc++-devel \
make \
sysstat \
unixODBC \
unixODBC-develIn my case it returns followingbinutils-2.23.52.0.1-12.el7(x86_64)
elfutils-libelf-0.157-2.el7(x86_64)
package elfutils-libelf-devel is not installed
gcc-4.8.2-3.el7(x86_64)
gcc-c++-4.8.2-3.el7(x86_64)
glibc-2.17-36.el7(x86_64)
glibc-common-2.17-36.el7(x86_64)
glibc-devel-2.17-36.el7(x86_64)
glibc-headers-2.17-36.el7(x86_64)
package ksh is not installed
libaio-0.3.109-9.el7(x86_64)
package libaio-devel is not installed
libgcc-4.8.2-3.el7(x86_64)
libstdc++-4.8.2-3.el7(x86_64)
libstdc++-devel-4.8.2-3.el7(x86_64)
make-3.82-19.el7(x86_64)
sysstat-10.1.5-1.el7(x86_64)
package unixODBC is not installed
package unixODBC-devel is not installedThere are two options to install missing packages
You need to install missing from dvd. Just mount it and install missing packages using rpm -Uvh command from directory <mount dvd>/Packages.
NOTE – I’m using x86_64 version of packagesrpm -Uvh elfutils-libelf-devel*.x86_64.rpm
rpm -Uvh libaio-devel*.x86_64.rpm
rpm -Uvh unixODBC*.x86_64.rpm
rpm -Uvh ksh*.x86_64.rpmRun yum install command for missing packages
--example howto install many packages
yum install elfutils-libelf-devel \
ksh \
libaio-devel \
unixODBC*
Create directory structure for database software
ORACLE_BASE – /ora01/app/oracle
ORACLE_HOME – /ora01/app/oracle/product/11.2.0/db_1
mkdir -p /ora01/app/oracle/product/11.2.0/db_1
chown oracle:oinstall -R /ora01
Disable secure linux by editing the “/etc/selinux/config” file, making sure the SELINUX flag is set as follows. It requires REBOOT to be effective !!!SELINUX=permissiveIn Oracle Enterprise Linux 7 /tmp data is stored on tmpfs which consumes memory and is too small. To revert it back to storage just run following command and REBOOT machine to be effective.systemctl mask tmp.mountInstall database software
Let’s start with database software installation as oracle user.su - oracle
--unzip software 11.2.0.4
unzip p13390677_112040_Linux-x86-64_1of7.zip
unzip p13390677_112040_Linux-x86-64_2of7.zip
--I defined 4 aliases in .bash_profile of user oracle to make
--administration heaven :)
[oracle@oel7 ~]$ alias envo cdob cdoh tns
alias envo='env | grep ORACLE'
alias cdob='cd $ORACLE_BASE'
alias cdoh='cd $ORACLE_HOME'
alias tns='cd $ORACLE_HOME/network/admin'
--run alias command envo to display environment settings
envo
ORACLE_UNQNAME=ORA11G
ORACLE_SID=ORA11G
ORACLE_BASE=/ora01/app/oracle
ORACLE_HOSTNAME=oel7.dbaora.com
ORACLE_HOME=/ora01/app/oracle/product/11.2.0/db_1
--run alias command cdob and cdoh to check ORACLE_BASE, ORACLE_HOME
[oracle@oel7 ~]$ cdob
[oracle@oel7 oracle]$ pwd
/ora01/app/oracle
[oracle@oel7 db_1]$ cdoh
[oracle@oel7 db_1]$ pwd
/ora01/app/oracle/product/11.2.0/db_1
--run installation
./runInstall1. Uncheck checkbox “I wish to receive security updates via My Oracle Support” and then click “Next” button.

2. Ignore following message and click “Yes” button.

3. Select “Skip software updates” and click “Next” button.

4. Select “Create and configure a database” then click “Next” button.

5. Select “Server Class” then click “Next” button.

6. Select “Single instance database installation” and click “Next” button.

7. Select “Typical Install” and click “Next” button.

8. Enter database name, administration password for user and click “Next” button.

9. Just click “Next” button.

10. Check checkbox “Ignore All” to ignore this error. Then click “Next” button.

11. Just click “Yes” button to continue with installation.

12. Summary screen just before installation. Click “Install” button.

13. Boring installation …

14. I received following error during linking binaries

To fix this error edit $ORACLE_HOME/sysman/lib/ins_emagent.mk, search for the line $(MK_EMAGENT_NMECTL)and replace the line with$(MK_EMAGENT_NMECTL) -lnnz11then click “Retry” button
15. Database Configuration will start and create database for you.

16. You should see summary screen for your new database. Click “OK” button to continue with installation.

17. In the “middle” of installation you will be asked to run 2 scripts as user root. when scripts are executed just click “OK” button. Installation will proceed.
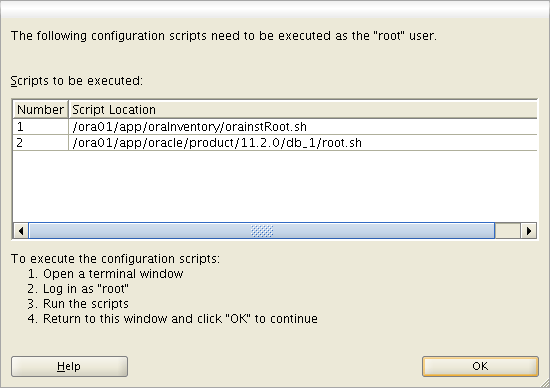
--execute scripts
/ora01/app/oraInventory/orainstRoot.sh
/ora01/app/oracle/product/11.2.0/db_1/root.sh18. Installation completed. Just click “Close” button.

Post installation stepsEdit the “/etc/oratab” file to set restart flag for ORA11G to ‘Y’.
ORA11G:/u01/app/oracle/product/11.2.0/db_1:YHave a fun

相关文章推荐
- Install Oracle 11G Release 2 (11.2) on Oracle Linux 7 (OEL7)
- Install Oracle 11G Release 2 (11.2) on Centos Linux 7
- Oracle Database 11g Release 2 (11.2) Installation On Oracle Linux 6
- Oracle Database 11g Release 2 (11.2) Installation On Oracle Linux 5
- Oracle Database 11g Release 2 (11.2) Installation On Oracle Linux 5
- Oracle Database 11g Release 2 (11.2) Installation On Oracle Linux 5
- Oracle Database 11g Release 2 (11.2) Installation On Oracle Linux 5
- Oracle® Database Vault Administrator's Guide 11g Release 2 (11.2)
- Oracle Database 11g Release 2 RAC On Linux Using NFS
- Oracle Database 11g Release 2 RAC On Oracle Linux 5.8 Using VirtualBox
- Oracle Database Documentation Roadmap——摘自Database Concepts(Oracle 11g Release 2 (11.2))
- Install and configure Oracle 11g Release 2 on Redhat 6.3 Enterprise Linux 64 step by step
- Oracle 11g release 2 (11.2.0.1.0) on Fedora 11
- [ E10857-01]Oracle® Database Quick Installation Guide 11g Release 2 (11.2) for Linux x86
- Oracle Database 11g Release 2 RAC On Oracle Linux 5.8 Using VirtualBox
- Windows下Oracle 11G - ODAC 11.2 Release 3 安装配置
- Install Oracle 11g on RHEL5–Step by Step
- Oracle Database 11g Release 2 RAC On Linux Using VMware Server 2
- [ HOWTO]Oracle Database 11g Release 2 on Ubuntu 12.04
- [ HOWTO]Oracle Database 11g Release 2 on Ubuntu 12.04