使用Spring Cloud Security OAuth2搭建授权服务
2017-03-06 19:14
183 查看
spring Cloud Security OAuth2 是 Spring 对 OAuth2 的开源实现,优点是能与Spring Cloud技术栈无缝集成,如果全部使用默认配置,开发者只需要添加注解就能完成
OAuth2 授权服务的搭建。
授权服务是基于Spring Security的,因此需要在项目中引入两个依赖:
2
3
4
5
6
7
8
9
1
2
3
4
5
6
7
8
9
前者为 Security,后者为Security的OAuth2扩展。
在启动类中添加
2
3
4
5
6
7
1
2
3
4
5
6
7
完成这些我们的授权服务最基本的骨架就已经搭建完成了。但是要想跑通整个流程,我们必须分配
Security OAuth2的配置方法是编写
2
3
4
5
6
7
8
1
2
3
4
5
6
7
8
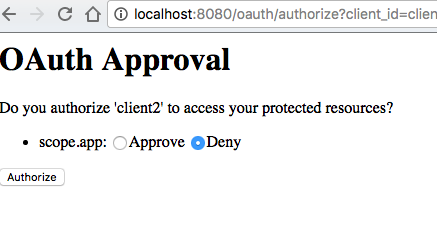
访问授权页面:
1
此时浏览器会让你输入用户名密码,这是因为 Spring Security 在默认情况下会对所有URL添加Basic Auth认证。默认的用户名为
画风虽然很简陋,但是基本功能都具备了。点击
拿到
OAuth2 授权服务的搭建。
1. 添加依赖
授权服务是基于Spring Security的,因此需要在项目中引入两个依赖:<dependency> <groupId>org.springframework.cloud</groupId> <artifactId>spring-cloud-starter-security</artifactId> </dependency> <dependency> <groupId>org.springframework.cloud</groupId> <artifactId>spring-cloud-starter-oauth2</artifactId> </dependency>1
2
3
4
5
6
7
8
9
1
2
3
4
5
6
7
8
9
前者为 Security,后者为Security的OAuth2扩展。
2. 添加注解和配置
在启动类中添加@EnableAuthorizationServer注解:
@SpringBootApplication
@EnableAuthorizationServer
public class AlanOAuthApplication {
public static void main(String[] args) {
SpringApplication.run(AlanOAuthApplication.class, args);
}
}12
3
4
5
6
7
1
2
3
4
5
6
7
完成这些我们的授权服务最基本的骨架就已经搭建完成了。但是要想跑通整个流程,我们必须分配
client_id,
client_secret才行。Spring
Security OAuth2的配置方法是编写
@Configuration类继承
AuthorizationServerConfigurerAdapter,然后重写
void
configure(ClientDetailsServiceConfigurer clients)
方法,如:
@Override
public void configure(ClientDetailsServiceConfigurer clients) throws Exception {
clients.inMemory() // 使用in-memory存储
.withClient("client") // client_id
.secret("secret") // client_secret
.authorizedGrantTypes("authorization_code") // 该client允许的授权类型
.scopes("app"); // 允许的授权范围
}12
3
4
5
6
7
8
1
2
3
4
5
6
7
8
3. 授权流程
访问授权页面:localhost:8080/oauth/authorize?client_id=client&response_type=code&redirect_uri=http://www.baidu.com1
1
此时浏览器会让你输入用户名密码,这是因为 Spring Security 在默认情况下会对所有URL添加Basic Auth认证。默认的用户名为
user, 密码是随机生成的,在控制台日志中可以看到。
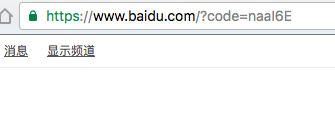
画风虽然很简陋,但是基本功能都具备了。点击
Authorize后,浏览器就会重定向到百度,并带上
code参数:
拿到
code以后,就可以调用
POST/GET http://client:secret@localhost:8080/oauth/token[/code]1 1
来换取access_token了:curl -X POST -H "Cache-Control: no-cache" -H "Content-Type: application/x-www-form-urlencoded" -d 'grant_type=authorization_code&code=Li4NZo&redirect_uri=http://www.baidu.com' "http://client:secret@localhost:8080/oauth/token"1
1
返回如下:{ "access_token": "32a1ca28-bc7a-4147-88a1-c95abcc30556", // 令牌 "token_type": "bearer", "expires_in": 2591999, "scope": "app" }1
2
3
4
5
6
1
2
3
4
5
6
到此我们最最基本的授权服务就搭建完成了。然而,这仅仅是个demo,如果要在生产环境中使用,还需要做更多的工作。在上面的例子中,所有的token信息都是保存在内存中的,这显然无法在生产环境中使用(进程结束后所有token丢失, 用户需要重新授权),因此我们需要将这些信息进行持久化操作。
4. 使用MySQL存储access_token和client信息
把授权服务器中的数据存储到数据库中并不难,因为 Spring Cloud Security OAuth 已经为我们设计好了一套Schema和对应的DAO对象。但在使用之前,我们需要先对相关的类有一定的了解。Spring Cloud Security OAuth2通过
4.1 相关接口DefaultTokenServices类来完成token生成、过期等 OAuth2 标准规定的业务逻辑,而DefaultTokenServices又是通过TokenStore接口完成对生成数据的持久化。在上面的demo中,TokenStore的默认实现为InMemoryTokenStore,即内存存储。
对于Client信息,ClientDetailsService接口负责从存储仓库中读取数据,在上面的demo中默认使用的也是InMemoryClientDetialsService实现类。说到这里就能看出,要想使用数据库存储,只需要提供这些接口的实现类即可。庆幸的是,框架已经为我们写好JDBC实现了,即JdbcTokenStore和JdbcClientDetailsService。要想使用这些JDBC实现,首先要建表。框架为我们提前设计好了schema, 在github上:https://github.com/spring-projects/spring-security-oauth/blob/master/spring-security-oauth2/src/test/resources/schema.sql
4.2 建表
在使用这套表结构之前要注意的是,对于MySQL来说,默认建表语句中主键是varchar(255)类型,在mysql中执行会报错,原因是mysql对varchar主键长度有限制。所以这里改成128即可。其次,语句中会有某些字段为LONGVARBINARY类型,它对应mysql的blob类型,也需要修改一下。数据库建好后,下一步就是配置框架使用JDBC实现。方法还是编写
4.3 配置@Configuration类继承AuthorizationServerConfigurerAdapter:@Autowired private AuthenticationManager authenticationManager; @Autowired private DataSource dataSource; @Bean // 声明TokenStore实现 public TokenStore tokenStore() { return new JdbcTokenStore(dataSource); } @Bean // 声明 ClientDetails实现 public ClientDetailsService clientDetails() { return new JdbcClientDetailsService(dataSource); } @Override // 配置框架应用上述实现 public void configure(AuthorizationServerEndpointsConfigurer endpoints) throws Exception { endpoints.authenticationManager(authenticationManager); endpoints.tokenStore(tokenStore()); // 配置TokenServices参数 DefaultTokenServices tokenServices = new DefaultTokenServices(); tokenServices.setTokenStore(endpoints.getTokenStore()); tokenServices.setSupportRefreshToken(false); tokenServices.setClientDetailsService(endpoints.getClientDetailsService()); tokenServices.setTokenEnhancer(endpoints.getTokenEnhancer()); tokenServices.setAccessTokenValiditySeconds( (int) TimeUnit.DAYS.toSeconds(30)); // 30天 endpoints.tokenServices(tokenServices); }1
2
3
4
5
6
7
8
9
10
11
12
13
14
15
16
17
18
19
20
21
22
23
24
25
26
27
1
2
3
4
5
6
7
8
9
10
11
12
13
14
15
16
17
18
19
20
21
22
23
24
25
26
27
完成这些后,框架就会将中间产生的数据写到mysql中了。oauth_client_details是client表,可以直接在该表中添加记录来添加client:这里不得不说 Spring 设计有一个奇葩地的方。注意看
4.4 需要注意的地方oauth_access_token表是存放访问令牌的,但是并没有直接在字段中存放token。Spring 使用OAuth2AccessToken来抽象与令牌有关的所有属性,在写入到数据库时,Spring将该对象通过JDK自带的序列化机制序列成字节直接保存到了该表的token字段中。也就是说,如果只看数据表你是看不出access_token的值是多少,过期时间等信息的。这就给资源服务器的实现带来了麻烦。我们的资源提供方并没有使用Spring
Security,也不想引入 Spring Security 的任何依赖,这时候就只能将DefaultOAuth2AccessToken的源码copy到资源提供方的项目中,然后读取token字段并反序列化还原对象来获取token信息。但是如果这样做还会遇到反序列化兼容性的问题,具体解决方法参考我另一篇博文: http://blog.csdn.net/neosmith/article/details/52539614至此一个能在生产环境下使用的授权服务就搭建好了。其实我们在实际使用时应该适当定制
5. 总结JdbcTokenStore或ClientDetailsService来实适应业务需要,甚至可以直接从0开始实现接口,完全不用框架提供的实现。另外,Spring
直接将DefaultOAuth2AccessToken序列化成字节保存到数据库中的设计,我认为是非常不合理的。或许设计者的初衷是保密access_token,但是通过加密的方法也可以实现,完全不应该直接扔字节。不过通过定制TokenStore接口,我们可以使用自己的表结构而不拘泥于默认实现。
github地址: https://github.com/wanghongfei/spring-security-oauth2-example
原文地址:http://blog.csdn.net/neosmith/article/details/52539927


相关文章推荐
- 使用Spring Cloud Security OAuth2搭建授权服务
- PHP网页服务实现注册和商店NPC管理(安装+搭建+使用+问题处理)
- 使用LVS(Linux Virtual Server)在Linux上搭建负载均衡的集群服务
- 从svn服务搭建、客户端安装使用 到 myeclipse8.5集成svn插件 详细图解
- 使用lucene solr搭建Oracle数据库全文搜索服务
- JBOSS中使用Java验证和授权服务jaas(转载)
- 使用Handler来增强Web服务的功能(生成日志、用户认证、用户授权、信息加密/解密)
- RHEL 5服务篇—使用Apache搭建Web服务(一)
- ffmpeg与ffserver配合使用搭建流媒体服务
- Ubuntu 搭建 NFS服务提供给 SC2440或SC6410开发板使用【要点整理】
- (原创)使用开源免费软件teamspeak搭建内网语音服务平台(无用户数限制)
- 使用Windows 7自带IIS(7.5)搭建FTP服务时遇到的一个奇怪问题
- 使用google code搭建个人的svn服务
- Jboss+EJB3下使用JAVA验证和授权服务(JAAS)
- 使用serv-u搭建FTP服务
- 使用LVS(Linux Virtual Server)在Linux上搭建负载均衡的集群服务(DR模式
- 使用Spring MVC 搭建Rest服务