iOS 多线程NSThread理解与场景示例
2017-01-21 09:48
260 查看
NSThread是相对GCD和NSOperationQuene而言,比较轻量级的一种多线程处理方式。
但同时,它的弊端就是需要自己管理线程的生命周期,以及线程同步;而另外两种不需要自己管理。
常见方法介绍:
三、NSThread的创建
执行完上面代码后会马上启动一条新线程,并且在这条线程上调用self的run方法。
会隐式地创建一条新线程,并且在这条线程上调用self的run方法。
上面两种做法都是暂停当前线程2秒
退出线程
* 上面代码的意思是在thread这条线程上调用self的run方法
* 最后的YES代表:上面的代码会阻塞,等run方法在thread线程执行完毕后,上面的代码才会通过
在主线程调用self的run方法
在当前线程调用self的run方法
场景1:
异步下载一张图片,下载完在UI显示。
代码实现:
注意:在OC中加互斥锁使用@synchronized(self) {},在swift可以使用objc_sync_enter(self)和objc_sync_exit(self)方法,注意这两个方法必须成对使用,把要加锁的代码放在中间.
场景1:
以售票为例:3个售票员同时售票,票总数为10。

可以很明显看出,每个售票员都是严格按照从10递减的方式售票,不存在票数忽多忽少的情况。
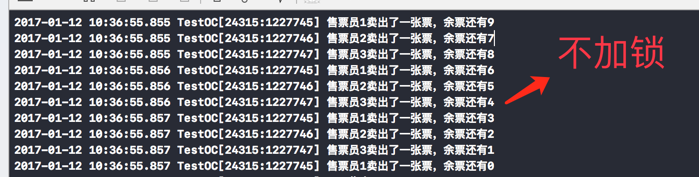
如果不加锁:
但同时,它的弊端就是需要自己管理线程的生命周期,以及线程同步;而另外两种不需要自己管理。
常见方法介绍:
一、获取当前线程
NSThread *current = [NSThread currentThread];
二、获取主线程
NSThread *main = [NSThread mainThread];
三、NSThread的创建
1 // 初始化线程
2 NSThread *thread = [[NSThread alloc] initWithTarget:self selector:@selector(run:) object:@"aaa"];
3 // 开启线程
4 [thread start];
.静态方法
+ (void)detachNewThreadSelector:(SEL)selector toTarget:(id)target withObject:(id)argument;
[NSThread detachNewThreadSelector:@selector(run:) toTarget:self withObject:@""];
执行完上面代码后会马上启动一条新线程,并且在这条线程上调用self的run方法。
.隐式创建线程
[self performSelectorInBackground:@selector(run:) withObject:@""];
会隐式地创建一条新线程,并且在这条线程上调用self的run方法。
四、暂停当前线程
[NSThread sleepForTimeInterval:2];
NSDate *date = [NSDate dateWithTimeInterval:2 sinceDate:[NSDate date]];
[NSThread sleepUntilDate:date];
上面两种做法都是暂停当前线程2秒
退出线程
[NSThread exit];
五、线程的其他操作
1.在指定线程上执行操作
1 [self performSelector:@selector(run) onThread:thread withObject:nil waitUntilDone:YES];
* 上面代码的意思是在thread这条线程上调用self的run方法
* 最后的YES代表:上面的代码会阻塞,等run方法在thread线程执行完毕后,上面的代码才会通过
2.在主线程上执行操作
[self performSelectorOnMainThread:@selector(run) withObject:nil waitUntilDone:YES];
在主线程调用self的run方法
3.在当前线程执行操作
[self performSelector:@selector(run) withObject:nil];
在当前线程调用self的run方法
场景1:
异步下载一张图片,下载完在UI显示。
代码实现:
//开启子线程下载
[NSThread detachNewThreadSelector:@selector(downloadPic) toTarget:self withObject:nil];

//下载图片
-(void)downloadPic{
NSURL *url = [NSURL URLWithString:@"https://res.wx.qq.com/mpres/htmledition/images/mp_qrcode218877.gif"];
NSData *pic = [NSData dataWithContentsOfURL:url];
UIImage *img = [UIImage imageWithData:pic];
//回到主线程显示
[self performSelectorOnMainThread:@selector(showImg:) withObject:img waitUntilDone:YES];
}

-(void)showImg:(UIImage *)image{
//imageView.image = image
NSLog(@"显示 pic");
}
六、多线程安全与加锁
说明:多线程访问同一个资源的时候可能会出现数据错乱等安全问题,解决方法是对必要的代码段进行加锁。注意:在OC中加互斥锁使用@synchronized(self) {},在swift可以使用objc_sync_enter(self)和objc_sync_exit(self)方法,注意这两个方法必须成对使用,把要加锁的代码放在中间.
场景1:
以售票为例:3个售票员同时售票,票总数为10。
- (void)sailTicket {
NSThread *thread1 = [[NSThread alloc] initWithTarget:self selector:@selector(sale) object:nil];
NSThread *thread2 = [[NSThread alloc] initWithTarget:self selector:@selector(sale) object:nil];
NSThread *thread3 = [[NSThread alloc] initWithTarget:self selector:@selector(sale) object:nil];
thread1.name = @"售票员1";
thread2.name = @"售票员2";
thread3.name = @"售票员3";
[thread1 start];
[thread2 start];
[thread3 start];

}

-(void)sale{
while (1) {
@synchronized (self) {
for (int i = 0; i<10000; i++) {
//模拟延迟
}

if (_ticketCount>0){
_ticketCount--;
NSLog(@"%@卖出了一张票,余票还有%lu",[NSThread currentThread].name,(unsigned long)_ticketCount);
}else{
NSLog(@"票已售完");
break;
}
}
}

}
可以很明显看出,每个售票员都是严格按照从10递减的方式售票,不存在票数忽多忽少的情况。
如果不加锁:

相关文章推荐
- IOS开发中委托代理(degegate)的理解和使用示例
- IOS开发(十):场景(2)-模态切换示例
- Service 与 Thread 的区别与应用场景理解
- IOS开发中委托代理(degegate)的理解和使用示例
- iOS开发——响应链(Responder Chain)的深入理解和代码示例(二)
- iOS开发——响应链(Responder Chain)的深入理解和代码示例(二)
- iOS开发——响应链(Responder Chain)的深入理解和代码示例
- IOS开发(十一):场景(3)-模态切换示例
- iOS:多线程NSThread的详细使用
- IOS开发中委托代理(degegate)的理解和使用示例
- iOS开发——响应链(Responder Chain)的深入理解和代码示例
- IOS开发中委托代理(delegate)的理解和使用示例
- iOS学习6_多线程NSThread和GCD
- iOS runtime——函数/使用方法/使用场景/示例
- iOS dispatch_sync同步应用开发场景 自己的理解
- iOS --- 理解Runtime机制及其使用场景
- IOS中委托代理(degegate)的理解和使用示例
- iOS学习6_多线程NSThread和GCD
- iOS 浅复制和深复制的深层理解,含示例
- IOS开发(十三):UIDatePicker、场景切换综合示例