Cocos2d-JS中CollectionView实现不同大小Cell同时显示的技巧(ListView中添加显示标签)
2017-01-17 18:17
573 查看
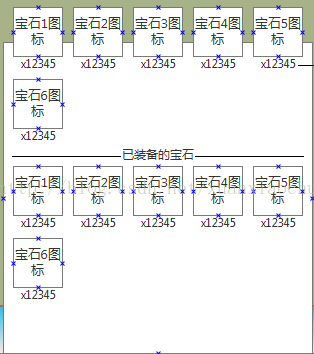
最近界面要实现一个功能:在同一个ListView中根据是否装备来展示宝石的列表,即在区分开来的两组宝石中间添加显示元素“--------------已装备的宝石-----------”,如下图。这个功能打我第一眼看到就觉得有点坑,网上并没有找到有效的答案,估计大部分是因为对问题的描述有偏差。虽然最后实现出来的时候感觉并没有多么复杂,但对于我刚入手Cocos2d-JS的一个新人来说,过程是有点艰难,因为我是一点点试验出来的。最后总结出来的无非是一些小技巧,现在分享给大家。当然,也会有更方便、快捷的方法,希望感兴趣的读者不吝赐教。
思路解析:
把整理好的没有装备的宝石和已经装备好的宝石数组放入同一数组中,使其前一部分全为没有装备的宝石,后一部分则为装备的宝石。根据分界线的索引,即没有装备宝石的数组的length属性,为整合好的数组添加没有实际意义的Cell,把它看作填空Cell,使得填空后的数组满足:当未装备的宝石数量不为每行所能含有Cell的个数的整数倍时,最后一行填充空的Cell。以让用户感觉后边没有元素了。比如:CollectView每行可容纳5个Cell,当未装备的宝石为8个时,需要在会后一行,填充两个空的Cell。此时做到可以把装备与否的宝石区分开来。在此基础上,再添加每行容纳Cell个数的空Cell,即可将要求中的提示信息“--------已装备宝石----------”留出空间来。最后处理留出空间的高度显示。
关键代码解析:
1、行数:196-212
var gems = DataManager._Gems.slice(0);
this.m_gemsNoEquip = [];
this.m_gemsEquiped = [];
for(var i = 0; i < gems.length; i++){
if(gems[i].Amount > 0)
{
this.m_gemsNoEquip.push(gems[i]);
}
if(gems[i].EqpAmount > 0)
{
this.m_gemsEquiped.push(gems[i]);
}
}
this.m_items = this.m_gemsNoEquip.concat(this.m_gemsEquiped);
this.addNullCell(this.m_gemsNoEquip.length);
将拿到的宝石结构,分成没有装备和已经装备的两个数组,m_gemsNoEquip和m_gemsEquiped;并通过concat方法将两个数组合成一个新的数组,之后执行addNullCell()方法,为整合好的数组,添加空Cell个数;
2、行数:334-347
addNullCell: function (index) {
//添加空Cell
var flag = index % 5 == 0 ? index+5 : 5 * (parseInt(index/5) + 2);
var nullCell = new GemAtt();
//从索引处开始添加空元素
for(var i=index; i<flag; i++)
{
this.m_items.splice(i, 0, nullCell);
if(i == flag-1)
{
this.m_flag = i;
}
}
}
此为addNullCell()的方法,此方法在为数组添加填充Cell的同时,在344行标记了最后一个空Cell元素的索引,这个索引将是一个关键;
3、行数:240-246
tableCellSizeForIndex: function (table, idx) {
if(this.m_type == 3 && (idx > this.m_flag-5 && idx <= this.m_flag))
{
return cc.size(110, 25);
}
return this.m_cellSize;
},
根据索引值,将整合的数组中整行为空的高度设置成需要的数值,如:正常Cell的高度是130,此处将空行设置为25;
4、行号:299-311
if(idx == this.m_flag-4)
{
cell = new CombatCell();
cell._Time.setVisible(false);
cell._Info.setString(" ------已装备宝石------")
}
else
{
cell.m_level.setVisible(false);
cell.m_image.setVisible(false);
cell.m_box.setVisible(false);
}
return cell;
在tableCellAtIndex中,如果检测到是数组中的填充数据,那么可以把此处的cell替换成其他cell,此处用了一个高度较低,宽度较长的适合显示的Cell。至于为什么idx==this.m_flag-4,这个位置根据具体情况设置。从代码中可以看出其实填充Cell就是把普通Cell的控件设置成不可见。
实现效果:

/**
* 背包
* Created by xj on 2016/12/22.
*/
InventoryCell = cc.TableViewCell.extend({

m_bagCell: null,
m_inventory: null,
m_level: null,
m_image: null,
m_box: null,

ctor: function () {
this._super();
this.init();
},
init: function () {
if(this._super()){
this.m_bagCell = ccs.csLoader.createNode(res.InventoryCell_Json);
// this.m_bagCell.setAnchorPoint(0, 0);
this.addChild(this.m_bagCell);

this.m_level = ccui.helper.seekWidgetByName(this.m_bagCell, "label_Level");
this.m_image = ccui.helper.seekWidgetByName(this.m_bagCell, "image_Equipment");
this.m_box = ccui.helper.seekWidgetByName(this.m_bagCell, "ItemBox");
}
return true;
},
draw: function (ctx) {
this._super(ctx);
}
})

InventoryUI = BaseUI.extend({

m_listView: null,
m_tableView: null,
m_items: [],
m_cellSize: null,
m_label_Text: null,
m_label_Capacity: null,
m_label_filter: null,
m_label_meltDown: null,
m_btnFilter: null,
m_btnCapacity: null,
m_btnGemChoice: null,
m_btnTabEquipment: null,
m_btnTabPieces: null,
m_btnTabOther: null,
m_btnMeltDown: null,
m_type: 1,       //1-4:装备、**、宝石、**
m_flag: null,
m_gemsNoEquip: [],
m_gemsEquiped: [],

ctor: function () {
BaseUI.prototype.ctor.call(this);
this.init();
},
init: function () {
if(!cc.Layer.prototype.init.call(this))
{
return false;
}
this.m_items = DataManager._Eqps.slice(0);

var objView = ccs.csLoader.createNode(res.Inventory_Json);
this.addChild(objView);
this.m_cellSize = ccs.csLoader.createNode(res.InventoryCell_Json).getContentSize();
this.m_label_Text = ccui.helper.seekWidgetByName(objView, "label_Text");
this.m_label_Text.setString(Exceptions.TEXT_BAGCAPACITY);
this.m_label_Capacity = ccui.helper.seekWidgetByName(objView, "label_Capacity");
this.m_label_filter = ccui.helper.seekWidgetByName(objView, "label_Filter");
this.m_label_meltDown = ccui.helper.seekWidgetByName(objView, "label_MeltDown");
this.m_btnFilter = ccui.helper.seekWidgetByName(objView, "btnFilter");
this.m_btnCapacity = ccui.helper.seekWidgetByName(objView, "btnCapacity");
this.m_btnGemChoice = ccui.helper.seekWidgetByName(objView, "btnTabItems");
this.m_btnTabEquipment = ccui.helper.seekWidgetByName(objView, "btnTabEquipment");
this.m_btnTabPieces = ccui.helper.seekWidgetByName(objView, "btnTabPieces");
this.m_btnTabOther = ccui.helper.seekWidgetByName(objView, "btnTabOther");
this.m_btnMeltDown = ccui.helper.seekWidgetByName(objView, "btnMeltDown");

this.m_btnFilter.addTouchEventListener(this.onButtonClick, this);
this.m_btnCapacity.addTouchEventListener(this.onButtonClick, this);
this.m_btnGemChoice.addTouchEventListener(this.onButtonClick, this);
this.m_btnTabEquipment.addTouchEventListener(this.onButtonClick, this);
this.m_btnTabPieces.addTouchEventListener(this.onButtonClick, this);
this.m_btnTabOther.addTouchEventListener(this.onButtonClick, this);
this.m_btnMeltDown.addTouchEventListener(this.onButtonClick, this);

var listView = ccui.helper.seekWidgetByName(objView, "Tablelist");
listView.setScrollBarEnabled(false);
this.m_tableView = new cc.CollectionView(this, cc.size(listView.getContentSize().width, listView.getContentSize().height));
this.m_tableView.setDirection(cc.SCROLLVIEW_DIRECTION_VERTICAL);
this.m_tableView.x = listView.getPositionX();
this.m_tableView.y = listView.getPositionY();
this.m_tableView.setDelegate(this);
this.addChild(this.m_tableView);

DataManager.addObserver(this, this.updateData, cc.NOTIFICATION_LAYER_FILTER, null);
return true;
},
bindData: function (data) {
this.m_label_Capacity.setString(this.m_items.length + "/" + "100");
},
onButtonClick: function (sender, type) {
switch (type){
case ccui.Widget.TOUCH_ENDED:
if(sender.getName() == "btnFilter")
{
SceneManager.addLayer(cc.LAYER_EQUIPSELECTION);
}
else if(sender.getName() == "btnTabEquipment")
{
this.changeItems(1);
}
else if(sender.getName() == "btnTabPieces")
{
this.changeItems(2);
}
else if(sender.getName() == "btnTabItems")
{
this.changeItems(3);
}
else if(sender.getName() == "btnTabOther")
{
this.changeItems(4);
}
else if(sender.getName() == "btnCapacity")
{
alert("额外格数");
}
else if(sender.getName() == "btnMeltDown")
{
alert("meltDown");
}
break;
default:
break;
}
},
updateData: function (sender) {
var filters = sender.getUserData();
this.m_items = DataManager._Eqps.slice(0);

//根据filters[0,0,0,0,0,1]对m_items进行筛选
//多选
var filterItem = new Array();
if(filters[5] != 1){    //filters[5] == 1 全选
for(var i = 0; i < this.m_items.length; i++){
for(var j = 0; j < 5; j++){
if(filters[j] == 1 && this.m_items[i].Quality == j+1){
filterItem.push(this.m_items[i]);
break;
}
}
}
this.m_items = filterItem;
}
//单选
//根据filters[0,0,0,0,0,1]对m_items进行筛选
// var filter = 0;                                         //0-5:白绿蓝紫橙红
// for(var i = 0; i < 6; i++){
//     if(filters[i] == 1){
//        filter = i;
//        break;
//     }
// }
// if(filter != 5){    //filter = 5 全选
//     for(var i = 0; i < this.m_items.length; i++){
//         if(this.m_items[i].Quality != filter+1){
//             this.m_items.splice(i, 1);
//             i --;
//         }
//     }
// }

this.m_tableView.reloadData();

},
changeItems: function (type) {
if(type == 1)
{
this.updateButtons(true);
this.m_items = DataManager._Eqps.slice(0);
this.m_flag = null;
}
else if(type == 2)
{
this.updateButtons(false);
this.m_items = DataManager._Gems.slice(0);
}
else if(type == 3)
{
this.upda
4000
teButtons(false);
var gems = DataManager._Gems.slice(0);
this.m_gemsNoEquip = [];
this.m_gemsEquiped = [];

for(var i = 0; i < gems.length; i++){
if(gems[i].Amount > 0)
{
this.m_gemsNoEquip.push(gems[i]);
}
if(gems[i].EqpAmount > 0)
{
this.m_gemsEquiped.push(gems[i]);
}
}
this.m_items = this.m_gemsNoEquip.concat(this.m_gemsEquiped);

this.addNullCell(this.m_gemsNoEquip.length);
}
else if(type == 4)
{
this.updateButtons(false);
this.m_items = DataManager._Gems.slice(0);
}
this.m_type = type;
this.m_tableView.reloadData();
},
updateButtons: function (display) {
this.m_label_filter.setVisible(display);
this.m_label_meltDown.setVisible(display);
this.m_label_Capacity.setVisible(display);
this.m_label_Text.setVisible(display);
this.m_btnFilter.setVisible(display);
this.m_btnMeltDown.setVisible(display);
this.m_btnCapacity.setVisible(display);
},
selectedItemEvent: function (sender, type) {
switch (type){
case ccui.ListView.EVENT_SELECTED_ITEM:
alert(sender.getCurSelectedIndex());
break;
default:
break;
}
},
tableCellSizeForIndex: function (table, idx) {
if(this.m_type == 3 && (idx > this.m_flag-5 && idx <= this.m_flag))
{
return cc.size(110, 25);
}
return this.m_cellSize;
},
numberOfCellsInTableView: function () {
if(!this.m_items){
return 0;
}
return this.m_items.length;
},
cellSizeForTable: function (table) {
return table.getContentSize();
// return cc.size(580, 130);
},
tableCellAtIndex: function (table, idx) {

var itemAtt = this.m_items[idx];
var cell = null;
// var cell = table.dequeueCell();
if(!cell){
cell = new InventoryCell();
}
cell.m_inventory = itemAtt;

if(itemAtt.Id != 0){
var pic = "";
if(this.m_type == 1)
{
cell.m_level.setString("Lv." + itemAtt.Level);
pic = "res/pic/Equip/" + itemAtt.IconId + ".png";
}
else if(this.m_type == 2)
{
cell.m_level.setString(itemAtt.Amount);
pic = "res/pic/Gems/" + itemAtt.IconId + ".png";
}
else if(this.m_type == 3)
{
if(idx < this.m_gemsNoEquip.length)
{
cell.m_level.setString(itemAtt.Amount);
}
else
{
cell.m_level.setString(itemAtt.EqpAmount);
}
pic = "res/pic/Gems/" + itemAtt.IconId + ".png";
}
else if(this.m_type == 4)
{
cell.m_level.setString(itemAtt.Amount);
pic = "res/pic/Gems/" + itemAtt.IconId + ".png";
}
}
else
{
if(idx == this.m_flag-4)
{
cell = new CombatCell();
cell._Time.setVisible(false);
cell._Info.setString("  ------已装备宝石------")
}
else
{
cell.m_level.setVisible(false);
cell.m_image.setVisible(false);
cell.m_box.setVisible(false);
}
return cell;
}
this.changeNodeTexture2(pic, "image_Equipment", cell);
return cell;
},
tableCellTouched: function (table, cell) {
if(cell.m_inventory.Id != 0){
if(this.m_type == 1)
{
// SceneManager.addLayer(cc.LAYER_EQUIPUI, cell.m_inventory);
var ui = SceneManager.addLayer(cc.LAYER_EQUIPUI, null, true, cc.LAYER_ANI_NONE, true);
if (ui)
{
//替换装备与装备相关操作
ui.initEquipUI(null, cell.m_inventory);
}
}
else if(this.m_type == 3)
{
SceneManager.addLayer(cc.LAYER_GEMINFO, cell.m_inventory);
}
}
},
addNullCell: function (index) {
//添加空Cell
var flag = index % 5 == 0 ? index+5 : 5 * (parseInt(index/5) + 2);
var nullCell = new GemAtt();
//从索引处开始添加空元素
for(var i=index; i<flag; i++)
{
this.m_items.splice(i, 0, nullCell);
if(i == flag-1)
{
this.m_flag = i;
}
}
}
});

InventoryUI.create = function () {
return new InventoryUI();
}
思路解析:
把整理好的没有装备的宝石和已经装备好的宝石数组放入同一数组中,使其前一部分全为没有装备的宝石,后一部分则为装备的宝石。根据分界线的索引,即没有装备宝石的数组的length属性,为整合好的数组添加没有实际意义的Cell,把它看作填空Cell,使得填空后的数组满足:当未装备的宝石数量不为每行所能含有Cell的个数的整数倍时,最后一行填充空的Cell。以让用户感觉后边没有元素了。比如:CollectView每行可容纳5个Cell,当未装备的宝石为8个时,需要在会后一行,填充两个空的Cell。此时做到可以把装备与否的宝石区分开来。在此基础上,再添加每行容纳Cell个数的空Cell,即可将要求中的提示信息“--------已装备宝石----------”留出空间来。最后处理留出空间的高度显示。
关键代码解析:
1、行数:196-212
var gems = DataManager._Gems.slice(0);
this.m_gemsNoEquip = [];
this.m_gemsEquiped = [];
for(var i = 0; i < gems.length; i++){
if(gems[i].Amount > 0)
{
this.m_gemsNoEquip.push(gems[i]);
}
if(gems[i].EqpAmount > 0)
{
this.m_gemsEquiped.push(gems[i]);
}
}
this.m_items = this.m_gemsNoEquip.concat(this.m_gemsEquiped);
this.addNullCell(this.m_gemsNoEquip.length);
将拿到的宝石结构,分成没有装备和已经装备的两个数组,m_gemsNoEquip和m_gemsEquiped;并通过concat方法将两个数组合成一个新的数组,之后执行addNullCell()方法,为整合好的数组,添加空Cell个数;
2、行数:334-347
addNullCell: function (index) {
//添加空Cell
var flag = index % 5 == 0 ? index+5 : 5 * (parseInt(index/5) + 2);
var nullCell = new GemAtt();
//从索引处开始添加空元素
for(var i=index; i<flag; i++)
{
this.m_items.splice(i, 0, nullCell);
if(i == flag-1)
{
this.m_flag = i;
}
}
}
此为addNullCell()的方法,此方法在为数组添加填充Cell的同时,在344行标记了最后一个空Cell元素的索引,这个索引将是一个关键;
3、行数:240-246
tableCellSizeForIndex: function (table, idx) {
if(this.m_type == 3 && (idx > this.m_flag-5 && idx <= this.m_flag))
{
return cc.size(110, 25);
}
return this.m_cellSize;
},
根据索引值,将整合的数组中整行为空的高度设置成需要的数值,如:正常Cell的高度是130,此处将空行设置为25;
4、行号:299-311
if(idx == this.m_flag-4)
{
cell = new CombatCell();
cell._Time.setVisible(false);
cell._Info.setString(" ------已装备宝石------")
}
else
{
cell.m_level.setVisible(false);
cell.m_image.setVisible(false);
cell.m_box.setVisible(false);
}
return cell;
在tableCellAtIndex中,如果检测到是数组中的填充数据,那么可以把此处的cell替换成其他cell,此处用了一个高度较低,宽度较长的适合显示的Cell。至于为什么idx==this.m_flag-4,这个位置根据具体情况设置。从代码中可以看出其实填充Cell就是把普通Cell的控件设置成不可见。
实现效果:

相关文章推荐
- Andorid+ ScrollView+ListView动态添加TextView ,点下一步可以内容下移背景色可以变,同时点播放按钮可以自动播放且显示背景色。
- UICollectionView 不同大小Cell 等间距的实现
- 实习小白::(转) Cocos2d-x 3.0 开发(十四)使用UIScrollView 实现大小不同物品拖动展示
- Cocos2d-x 3.0 开发(十四)使用UIScrollView 实现大小不同物品拖动展示
- Cocos2d-x 3.0 开发(十四)使用UIScrollView 实现大小不同物品拖动展示
- 如何用数据驱动实现通用化巡检APP(如何一个界面里添加多个点击拍照按钮并显示在不同的imageview里)
- ActionBar简单使用——添加搜索按钮;让不同的Activity上显示不同的ActionBar;添加Tab标签;实现DrawerLayout并用ActionBarDrawerToggle控制
- Android实战技巧:用TextView实现Rich Text---在同一个TextView中设置不同的字体风格
- Android实战技巧:用TextView实现Rich Text---在同一个TextView中设置不同的字体风格
- Cocos2d-x CCTableView设置不同Size的cell
- Android实战技巧:用TextView实现Rich Text---在同一个TextView中设置不同的字体风格
- 用JS实现表格中隔行显示不同颜色
- phpcms中实现标签文字显示不同颜色
- Android开发:setContentView切换界面,自定义带CheckBox的ListView显示SQlite条目-----实现
- Gridview使用CheckBox全选与单选采用js实现同时高亮显示选择行
- 实现UITableView中点击不同cell进入不同Controller的方法
- android 让TextView支持的Html标签实现自定义时钟显示组件DigitalClock
- Android实战技巧:用TextView实现Rich Text---在同一个TextView中设置不同的字体风格
- js实现单双行以不同颜色显示
- Android实战技巧:用TextView实现Rich Text---在同一个TextView中设置不同的字体风格