微信小程序实战(一)---实现登录界面
2017-01-17 10:10
866 查看
(本文转自杨小事er,原博客地址:http://blog.csdn.net/qq_25936689/article/details/53044178)
昨天小程序第一天公测,就下载个小程序自带IDE玩了玩,看了看API,撸出了个登录界面给大家分享下。
下面是主界面和代码。
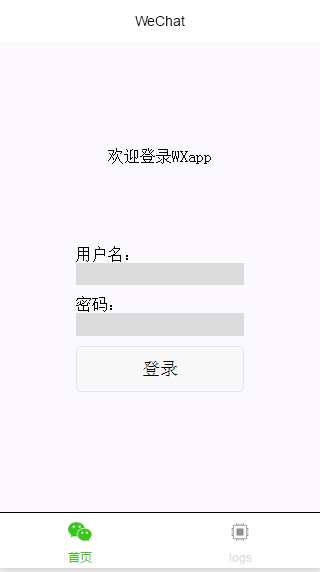
index.wxml
<view class="container">
<view class="usermotto">
<text class="user-motto">{{motto}}</text>
用户名:
<input type="text" bindinput="userNameInput"/>
密码:
<input type="text" bindinput="userPasswordInput" password="true"/>
<button bindtap="logIn">登录</button>
</view>
</view>
index.js
var app = getApp()
Page({
data: {
motto: '欢迎登录WXapp',
userName:'',
userPassword:'',
id_token:'',//方便存在本地的locakStorage
response:'' //存取返回数据
},
userNameInput:function(e){
this.setData({
userName: e.detail.value
})
},
userPasswordInput:function(e){
this.setData({
userPassword: e.detail.value
})
console.log(e.detail.value)
},
logIn:function(){
var that = this
wx.request({
url: 'http://localhost:8000/admin',
data: {
username: this.data.userName,
password: this.data.userPassword,
},
method: 'GET',
success: function (res) {
that.setData({
id_token: res.data.id_token,
response:res
})
try {
wx.setStorageSync('id_token', res.data.id_token)
} catch (e) {
}
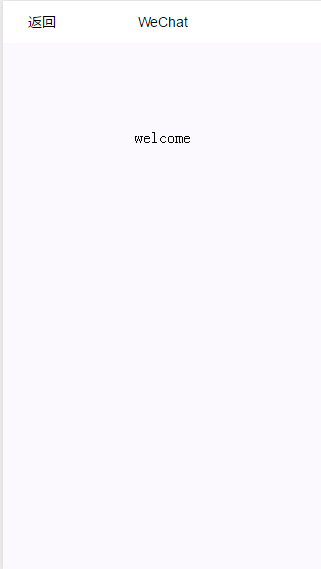
wx.navigateTo({
url: '../components/welcome/welcome'
})
console.log(res.data);
},
fail: function (res) {
console.log(res.data);
console.log('is failed')
}
})
}
})
源码都放在这里了,https://github.com/Yangzhedi/myBlog-wxapp,欢迎star,issue呦~
代码就是以上那些,个人感觉小程序和react真的很像,不亏于小程序源码中imoort react的这一句。所以有react基础的会更好上手小程序的吧~
js文件里Page里的data就类似与React中的state的机制,
之后在js文件中想要调用data里的数据就必须才才用this.data.XXX;
但是在wxml中想要绑定data里的数据,就才用双括号的方法,而且!不需要!this.data。直接就是{{XXX}}。
在回到代码里看,wxml中主要就是两个input框和一个button。通过小程序input的原生API - bindInput (文档:小程序input),就可以获取input的值,
然后在data里定义两个(userName和userPassword)来存取这两个input的输入值。
再通过button的 bindTap绑定js文件中的logIn函数。(文档:小程序button)
在logIn函数中,就通过this.data.userName和this.data.userPassword来获取曾经输入的两个值。
在通过调用微信的发送请求API,把两个值放在请求中,这就有点像ajax发送请求了。
再在success中写下成功之后想要做的事情,比如这个例子里,就跳转到welcom页面。
昨天小程序第一天公测,就下载个小程序自带IDE玩了玩,看了看API,撸出了个登录界面给大家分享下。
下面是主界面和代码。
index.wxml
<view class="container">
<view class="usermotto">
<text class="user-motto">{{motto}}</text>
用户名:
<input type="text" bindinput="userNameInput"/>
密码:
<input type="text" bindinput="userPasswordInput" password="true"/>
<button bindtap="logIn">登录</button>
</view>
</view>
index.js
var app = getApp()
Page({
data: {
motto: '欢迎登录WXapp',
userName:'',
userPassword:'',
id_token:'',//方便存在本地的locakStorage
response:'' //存取返回数据
},
userNameInput:function(e){
this.setData({
userName: e.detail.value
})
},
userPasswordInput:function(e){
this.setData({
userPassword: e.detail.value
})
console.log(e.detail.value)
},
logIn:function(){
var that = this
wx.request({
url: 'http://localhost:8000/admin',
data: {
username: this.data.userName,
password: this.data.userPassword,
},
method: 'GET',
success: function (res) {
that.setData({
id_token: res.data.id_token,
response:res
})
try {
wx.setStorageSync('id_token', res.data.id_token)
} catch (e) {
}
wx.navigateTo({
url: '../components/welcome/welcome'
})
console.log(res.data);
},
fail: function (res) {
console.log(res.data);
console.log('is failed')
}
})
}
})
源码都放在这里了,https://github.com/Yangzhedi/myBlog-wxapp,欢迎star,issue呦~
代码就是以上那些,个人感觉小程序和react真的很像,不亏于小程序源码中imoort react的这一句。所以有react基础的会更好上手小程序的吧~
js文件里Page里的data就类似与React中的state的机制,
之后在js文件中想要调用data里的数据就必须才才用this.data.XXX;
但是在wxml中想要绑定data里的数据,就才用双括号的方法,而且!不需要!this.data。直接就是{{XXX}}。
在回到代码里看,wxml中主要就是两个input框和一个button。通过小程序input的原生API - bindInput (文档:小程序input),就可以获取input的值,
然后在data里定义两个(userName和userPassword)来存取这两个input的输入值。
再通过button的 bindTap绑定js文件中的logIn函数。(文档:小程序button)
在logIn函数中,就通过this.data.userName和this.data.userPassword来获取曾经输入的两个值。
在通过调用微信的发送请求API,把两个值放在请求中,这就有点像ajax发送请求了。
再在success中写下成功之后想要做的事情,比如这个例子里,就跳转到welcom页面。

相关文章推荐
- RecyclerView+index索引实现仿微信通讯录
- 微信统计数据的获取及存储
- 微信,QQ,分享后没有调用监听回调的错误原因
- 微信小程序全局变量
- 微信开放平台网页扫码登录,href自定义CSS样式无效的原因和解决办法
- 识别微信内置浏览器
- 微信小程序实现按所选条件进行筛选功能
- 微信小程序 需要测试帐号 审核不通过的解决办法
- 微信小程序开源项目库集合
- 微信小程序详解
- 微信小程序图表插件(wx-charts)实例代码
- 微信小程序学习笔记2——一些小程序列表
- 仿微信小程序多任务栈效果
- 微信公众号判断用户是否已关注php代码解析
- 怎样在微信上发淘宝商品链接?
- “K米神器”KTV点歌类小程序开发分析|明智科技
- 欢迎关注订阅号“智慧航班”
- 微信公众号开发之网页授权获取用户基本信息
- 开发一个微信小程序项目教程
- 小程序试用体验