QT开发(六十八)——QSS应用
2017-01-12 15:53
169 查看
QT开发(六十八)——QSS应用
本博文转载自一去丶二三里的博客:http://blog.csdn.net/liang19890820一、语法高亮设置
Qt Creator中默认情况下打开qss文件(*.qss)不会高亮显示,需要手动配置,让其更符合阅读习惯,以更炫丽的方式展示代码片段。配置流程如下:
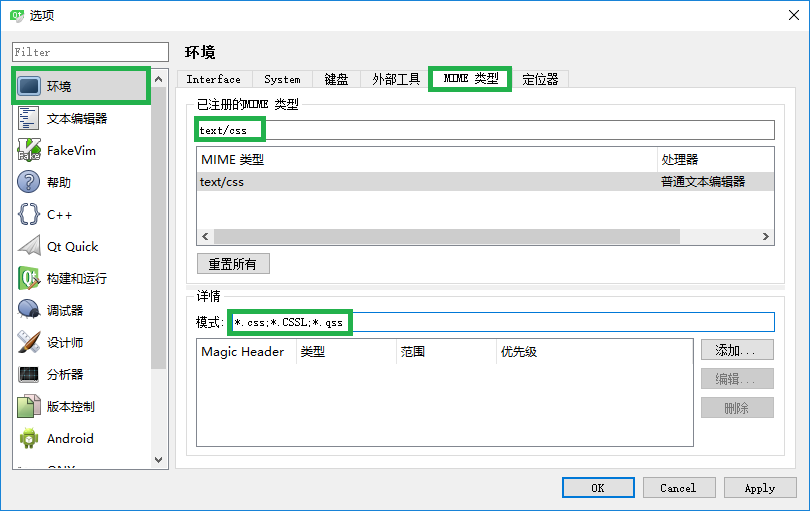
A、进入:工具 -> 选项 -> 环境 -> MIME 类型。
B、在【已注册的MIME类型】处输入“text/css”可以快速定位,然后在【详情】中的“模式”处添加 *.qss,即将原来的“模式”改为:*.css;*.CSSL;*.qss。
注意:中间用分号(;)分隔
效果如下:
二、动态属性
1、自定义属性
为了用户界面外观的动态变化,属性选择器可以与动态属性组合使用。动态属性在QT4.2中引入,允许为编译时不存在的QObject属性分配属性值。即:如果为QObject设置一个urgent属性为true,该属性将跟随该类,但不会为urgent属性包含一个Q_PROPERTY宏。创建样式选择器依赖于动态属性,例如:urgent,可以用一个非常动态的方式凸显用户界面。例如:
QLineEdit[urgent=true] {
color: red;
}
使用这种方式有局限性。最主要的是当一个属性值变化时,所引用的样式不会自动更新。相反地,必须手动触发更新才会生效。
unpolish()用于清理之前的样式,而polish()则用于添加新的样式。
lineEdit->setProperty("urgent", true);
lineEdit->style()->unpolish(lineEdit);
lineEdit->style()->polish(lineEdit);
必须在组件的样式中使用,QStyle::polish既接受QWidge也接受QApplication作为参数。
2、实例
自定义标题栏中的最大化/还原按钮为例,进行切换。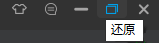
void TitleBar::updateMaximize()
{
QWidget *pWindow = this->window();
if (pWindow->isTopLevel())
{
bool bMaximize = pWindow->isMaximized();
m_pMaximizeButton->setToolTip(bMaximize ? tr("Restore") : tr("Maximize"));
m_pMaximizeButton->setProperty("maximizeProperty", bMaximize ? "restore" : "maximize");

// 手动更新样式
m_pMaximizeButton->style()->unpolish(m_pMaximizeButton);
m_pMaximizeButton->style()->polish(m_pMaximizeButton);
m_pMaximizeButton->update();
//m_pMaximizeButton->setStyle(QApplication::style());
}
}QSS:QPushButton#maximizeButton[maximizeProperty="maximize"] {
border-radius: none;
border-bottom-left-radius: 4px;
border-bottom-right-radius: 4px;
background: rgb(50, 50, 50);
image: url(:/Images/maximize);
}
QPushButton#maximizeButton[maximizeProperty="maximize"]:hover {
background: rgb(60, 60, 60);
image: url(:/Images/maximizeHover);
}
QPushButton#maximizeButton[maximizeProperty="maximize"]:pressed {
background: rgb(55, 55, 55);
image: url(:/Images/maximizePressed);
}
QPushButton#maximizeButton[maximizeProperty="restore"] {
border-radius: none;
border-bottom-left-radius: 4px;
border-bottom-right-radius: 4px;
background: rgb(50, 50, 50);
image: url(:/Images/restore);
}
QPushButton#maximizeButton[maximizeProperty="restore"]:hover {
background: rgb(60, 60, 60);
image: url(:/Images/restoreHover);
}
QPushButton#maximizeButton[maximizeProperty="restore"]:pressed {
background: rgb(55, 55, 55);
image: url(:/Images/restorePressed);三、原始属性
任何可被识别的Q_PROPERTY都可以使用qproperty-语法设置。Q_PROPERTY定义的属性通过QSS按照qproperty-<property name>语法的方式设置。
QLabel的属性如下:
class Q_WIDGETS_EXPORT QLabel : public QFrame
{
...
Q_PROPERTY(QPixmap pixmap READ pixmap WRITE setPixmap)
Q_PROPERTY(bool scaledContents READ hasScaledContents WRITE setScaledContents)
...
};
class Q_WIDGETS_EXPORT QWidget : public QObject, public QPaintDevice
{
...
Q_PROPERTY(QSize minimumSize READ minimumSize WRITE setMinimumSize)
Q_PROPERTY(QSize maximumSize READ maximumSize WRITE setMaximumSize)
...
}; QLabel的属性有minimumSize、maximumSize、pixmap、scaledContents。QSS文件:
QLabel#customLabel {
qproperty-minimumSize: 100px 100px;
qproperty-maximumSize: 100px 100px;
qproperty-pixmap: url(:/Images/logo);
qproperty-scaledContents: true;
}

QPushButton#customButton {
qproperty-text: "Click Me";
qproperty-icon: url(:/Images/logo);
qproperty-iconSize: 20px 20px;
}

QGroupBox#customGroupBox {
qproperty-title: "GroupBox";
}源码:Widget::Widget(QWidget *parent)
: QWidget(parent)
{
QLabel *pLabel = new QLabel(this);
QPushButton *pButton = new QPushButton(this);
QGroupBox *pGroupBox = new QGroupBox(this);
pLabel->setObjectName("customLabel");
pButton->setObjectName("customButton");
pGroupBox->setObjectName("customGroupBox");
QVBoxLayout *pLayout = new QVBoxLayout();
pLayout->addStretch();
pLayout->addWidget(pLabel, 0, Qt::AlignCenter);
pLayout->addWidget(pButton);
pLayout->addStretch();
pLayout->setSpacing(10);
pLayout->setContentsMargins(10, 10, 10, 10);
pGroupBox->setLayout(pLayout);
}Main.cpp文件:#include "Widget.h"
#include <QApplication>
#include <QFile>
class CommonHelper
{
public:
static void setStyle(const QString &style)
{
QFile qss(style);
qss.open(QFile::ReadOnly);
qApp->setStyleSheet(qss.readAll());
qss.close();
}
};
int main(int argc, char *argv[])
{
QApplication a(argc, argv);
CommonHelper::setStyle(":/style.qss");
Widget w;
w.show();
return a.exec();
}以上的解决方法将界面样式与业务逻辑进行了分离,效果与如下代码相同:pLabel->setPixmap(QPixmap(":/Images/logo"));
pLabel->setMinimumSize(100, 100);
pLabel->setMaximumSize(100, 100);
pLabel->setScaledContents(true);
pButton->setIcon(QIcon(":/Images/logo"));
pButton->setIconSize(QSize(20, 20));
pButton->setText("Click Me");
pGroupBox->setTitle("GroupBox");四、自定义属性
1、自定义属性
QAbstractItemModel、QAbstractItemDelegate均继承自QObject,而QSS只能用于QWidget及其子类,动态获取样式属性值方法如下:A、创建一个从QWidget继承的专用类StyledWidget。
B、为StyledWidget添加自定义属性,并使用Q_PROPERTY声明
C、自定义QSS,使用自定义属性,语法:qproperty-<property name>
其中,Q_PROPERTY声明有以下要求:
READ getFunction
用于读取属性,使用const限定,返回属性的类型或者类型的指针或引用。
WRITE setFunction
用于设置属性,参数是一个属性的类型,或者属性的const指针或引用,返回
2、应用实例
创建一个从QWidget继承的专用类StyledWidget,为其添加自定义属性,并使用Q_PROPERTY声明。StyledWidget.h文件:
#ifndef STYLEDWIDGET_H
#define STYLEDWIDGET_H

#include <QWidget>

class StyledWidget : public QWidget
{
Q_OBJECT
Q_PROPERTY(QColor normalColor READ normalColor WRITE setNormalColor DESIGNABLE true)
...
public:
explicit StyledWidget(QWidget *parent = 0);
~StyledWidget();

QColor normalColor() const;
void setNormalColor(QColor color);
...

private:
QColor m_normalColor;
...
};

#endif // STYLEDWIDGET_HStyledWidget.cpp文件:...
QColor StyledWidget::normalColor() const
{
return m_normalColor;
}
void StyledWidget::setNormalColor(QColor color)
{
m_normalColor = color;
}
...QSS文件:StyledWidget {
qproperty-normalColor: white;
qproperty-disableColor: gray;
qproperty-highlightColor: rgb(0, 160, 230);
qproperty-errorColor: red;
}使用: 在需要设置样式的类中声明StyledWidget:class TableModel : public QAbstractTableModel
{
Q_OBJECT
public:
...
QVariant data(const QModelIndex &index, int role = Qt::DisplayRole) const;
...
private:
...
StyledWidget m_styledWidget;
}; 使用自定义属性设置样式:QVariant TableModel::data(const QModelIndex &index, int role) const
{
if (!index.isValid())
return QVariant();
switch (role)
{
case Qt::TextColorRole:
{
if (index.column() == FILE_NAME_COLUMN)
return m_styledWidget.normalColor();
if (index.column() == SIZE_COLUMN)
return m_styledWidget.highlightColor();
if (index.column() == STATUS_COLUMN)
return m_styledWidget.errorColor();
}
...
}
return QVariant();
}
五、QSS文件加载
QT中对于样式表的使用,为了降低耦合性(与逻辑代码分离),通常会定义一个QSS文件,然后编写各种组件(QLabel、 QLineEdit、QPushButton)的样式,最后使用QApplication进行样式加载,让整个应用程序就共享同一个样式。1、创建QSS文件
创建一个后缀名为qss的文件,例如:style.qss,将其加入资源文件(qrc)中。2、编写QSS文件
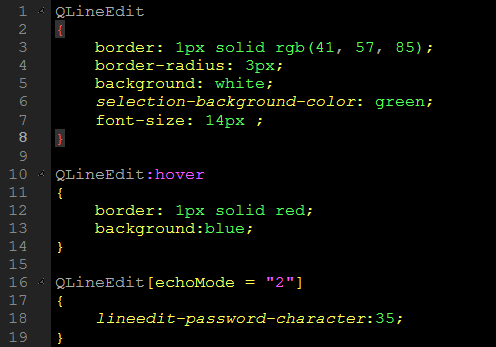
QLineEdit
{
border: 1px solid rgb(41, 57, 85);
border-radius: 3px;
background: white;
selection-background-color: green;
font-size: 14px ;
}3、QSS文件加载
为了便于调用,可以写一个静态加载样式的函数#include <QFile>
#include <QApplication>
class CommonHelper
{
public:
static void setStyle(const QString &style)
{
QFile qss(style);
qss.open(QFile::ReadOnly);
qApp->setStyleSheet(qss.readAll());
qss.close();
}
}; 主函数中加载:int main(int argc, char *argv[])
{
QApplication a(argc, argv);
// 加载QSS样式
CommonHelper::setStyle("style.qss");
MainWindow window;
window.show();
return a.exec();
}4、QSS加载实现原理
qApp是QCoreApplication的一个单例,然后,将其转换为QApplication。#if defined(qApp) #undef qApp #endif #define qApp (static_cast<QApplication *>(QCoreApplication::instance()))QApplication调用setStyleSheet()后所有的组件样式都改变的主要原因是调用了setStyle()。
void QApplication::setStyle(QStyle *style)
{
if (!style || style == QApplicationPrivate::app_style)
return;

QWidgetList all = allWidgets();

// clean up the old style
if (QApplicationPrivate::app_style)
{
if (QApplicationPrivate::is_app_running && !QApplicationPrivate::is_app_closing)
{
for (QWidgetList::ConstIterator it = all.constBegin(), cend = all.constEnd(); it != cend; ++it)
{
QWidget *w = *it;
if (!(w->windowType() == Qt::Desktop) &&        // except desktop
w->testAttribute(Qt::WA_WState_Polished))
{ // has been polished
QApplicationPrivate::app_style->unpolish(w);
}
}
}
QApplicationPrivate::app_style->unpolish(qApp);
}
QStyle *old = QApplicationPrivate::app_style; // save

QApplicationPrivate::overrides_native_style =
nativeStyleClassName() == QByteArray(style->metaObject()->className());

#ifndef QT_NO_STYLE_STYLESHEET
if (!QApplicationPrivate::styleSheet.isEmpty() && !qobject_cast<QStyleSheetStyle *>(style))
{
// we have a stylesheet already and a new style is being set
QStyleSheetStyle *newProxy = new QStyleSheetStyle(style);
style->setParent(newProxy);
QApplicationPrivate::app_style = newProxy;
}
else
#endif // QT_NO_STYLE_STYLESHEET
QApplicationPrivate::app_style = style;
QApplicationPrivate::app_style->setParent(qApp); // take ownership

// take care of possible palette requirements of certain gui
// styles. Do it before polishing the application since the style
// might call QApplication::setPalette() itself
if (QApplicationPrivate::set_pal)
{
QApplication::setPalette(*QApplicationPrivate::set_pal);
}
else if (QApplicationPrivate::sys_pal)
{
clearSystemPalette();
initSystemPalette();
QApplicationPrivate::initializeWidgetPaletteHash();
QApplicationPrivate::initializeWidgetFontHash();
QApplicationPrivate::setPalette_helper(*QApplicationPrivate::sys_pal, /*className=*/0, /*clearWidgetPaletteHash=*/false);
}
else if (!QApplicationPrivate::sys_pal)
{
// Initialize the sys_pal if it hasn't happened yet...
QApplicationPrivate::setSystemPalette(QApplicationPrivate::app_style->standardPalette());
}

// initialize the application with the new style
QApplicationPrivate::app_style->polish(qApp);

// re-polish existing widgets if necessary
if (QApplicationPrivate::is_app_running && !QApplicationPrivate::is_app_closing)
{
for (QWidgetList::ConstIterator it = all.constBegin(), cend = all.constEnd(); it != cend; ++it)
{
QWidget *w = *it;
if (w->windowType() != Qt::Desktop && w->testAttribute(Qt::WA_WState_Polished))
{
if (w->style() == QApplicationPrivate::app_style)
QApplicationPrivate::app_style->polish(w);                // repolish
#ifndef QT_NO_STYLE_STYLESHEET
else
w->setStyleSheet(w->styleSheet()); // touch
#endif
}
}

for (QWidgetList::ConstIterator it = all.constBegin(), cend = all.constEnd(); it != cend; ++it)
{
QWidget *w = *it;
if (w->windowType() != Qt::Desktop && !w->testAttribute(Qt::WA_SetStyle))
{
QEvent e(QEvent::StyleChange);
QApplication::sendEvent(w, &e);
w->update();
}
}
}

#ifndef QT_NO_STYLE_STYLESHEET
if (QStyleSheetStyle *oldProxy = qobject_cast<QStyleSheetStyle *>(old))
{
oldProxy->deref();
}
else
#endif
if (old && old->parent() == qApp)
{
delete old;
}

if (QApplicationPrivate::focus_widget)
{
QFocusEvent in(QEvent::FocusIn, Qt::OtherFocusReason);
QApplication::sendEvent(QApplicationPrivate::focus_widget->style(), &in);
QApplicationPrivate::focus_widget->update();
}
} 主要分为4步:A、清理旧样式 - unpolish()
B、初始化新样式 - polish()
C、加载新样式 - polish() + sendEvent()、update()
D、删除旧样式 - delete
通过调用QWidgetList all = allWidgets()获取了所有控件的集合,然后利用迭代器QWidgetList::ConstIterator对每一个控件进行处理,通 过QApplication::sendEvent()来发送QEvent::StyleChange事件,达到全局样式更改。

相关文章推荐
- QT开发(六十八)——QSS应用
- 利用QT进行web与本地混合应用开发
- 分享一个关于Symbian上开发QT应用的文档吧
- Qt移动应用开发(三):使用精灵图片实现帧动画
- QT 跨平台的C++应用和UI开发库
- 用Qt开发Web和本地混合的应用
- 【Qt】Web与本地应用的混合开发
- Qt移动应用开发(一):适配不同的屏幕
- BlackBerry PlayBook NDK 2.0开发使用真机测试Qt应用
- Linux下QT图形界面开发在终端窗口中Qt编程信号的应用实例(4)
- 用Qt开发Web和本地混合的应用
- 用Qt开发Web和本地混合的应用
- 利用QT进行web与本地混合应用开发-转载
- Qt WebKit可以做什么(三)——开发包含丰富web内容的本地应用
- 嵌入式linux应用开发之:初识Qt
- Qt for Symbian应用的开发-转载
- 嵌入式linux应用开发之:初识Qt
- 基于QT的webkit开发CB/S结构的应用系统
- 用 Qt Creator环境 为 BlackBerry 10 开发 Qt应用
- 基于QT的webkit与ExtJs开发CB/S结构的企业应用管理系统