SpringBoot默认的H2数据库如何查看?
2017-01-11 16:31
489 查看
如果大家用SpringBoot的话,如果在pom.xml文件里面加入了H2 数据库的引用的话,其将会把数据持久化到H2 内存数据库中。
那么,我们如何查看其被持久化到H2数据库中的数据,且不需要安装第三发的软件?
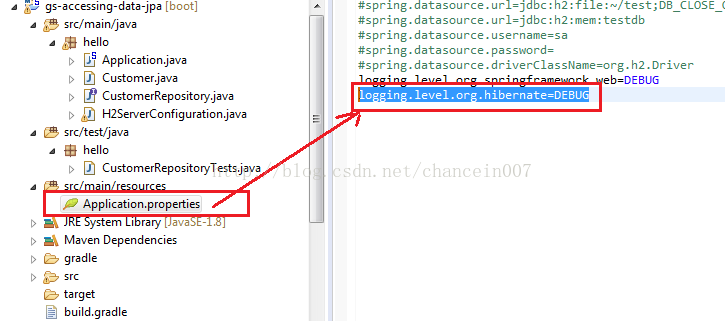
首先,我们需要知道H2数据的连接的URL,默认情况下,SpringBoot的Hibernate打印的是Info级别的信息,其是查看不到H2数据连接相关的信息。所以首先需要把SpringBoot的Hibernate的debug信息打开。方式很简单,创建一个application.properties文件,然后在其文件里面添加下面一行。
添加之后,就可以启动SpringBoot,(注,笔者的开发环境是STS),这样就能看到打印出的log信息了。
从上面的debug的日志信息,我可以知道,其H2的连接的URL为jdbc:h2:mem:testdb,默认的用户名为sa,密码为空。
然后,打开浏览器,输入http://localhost:8080/h2-console/
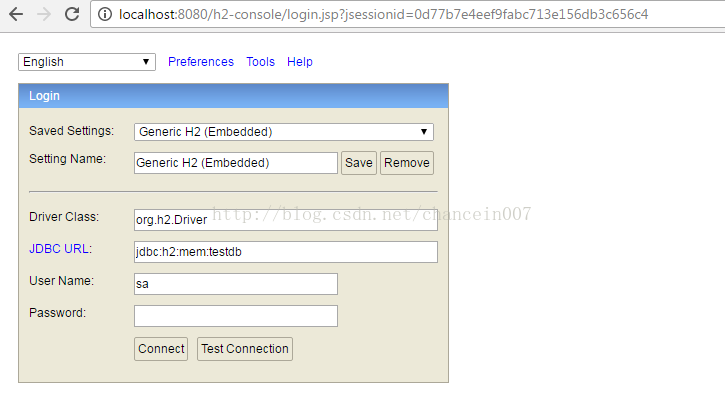
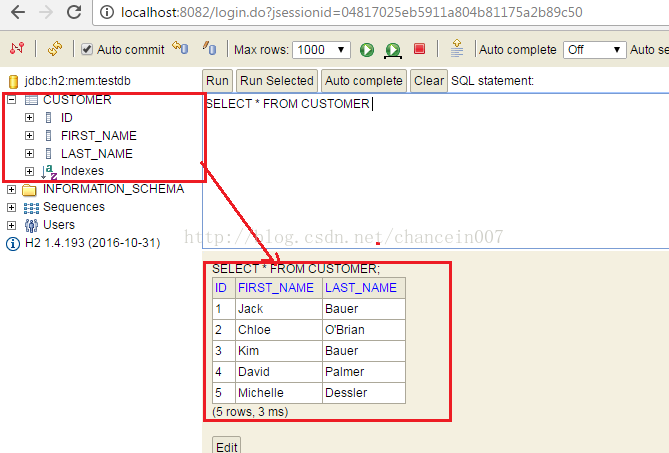
输入相应的信息,如上。然进入,就能看到刚刚的SpringBoot创建的信息的了。
如果想自己制定H2的web Console,可以用下面的配置文件。
import java.sql.SQLException;
import org.h2.tools.Server;
import org.springframework.beans.factory.annotation.Value;
import org.springframework.boot.autoconfigure.condition.ConditionalOnExpression;
import org.springframework.context.annotation.Bean;
import org.springframework.context.annotation.Configuration;
import org.springframework.context.annotation.Profile;
@Configuration
//@Profile("dev") // Only activate this in the "dev" profile
public class H2ServerConfiguration {
// TCP port for remote connections, default 9092
@Value("${h2.tcp.port:9092}")
private String h2TcpPort;
// Web port, default 8082
@Value("${h2.web.port:8082}")
private String h2WebPort;
@Bean
@ConditionalOnExpression("${h2.tcp.enabled:false}")
public Server h2TcpServer() throws SQLException {
return Server.createTcpServer("-tcp", "-tcpAllowOthers", "-tcpPort", h2TcpPort).start();
}
@Bean
@ConditionalOnExpression("${h2.web.enabled:true}")
public Server h2WebServer() throws SQLException {
return Server.createWebServer("-web", "-webAllowOthers", "-webPort", h2WebPort).start();
}
}
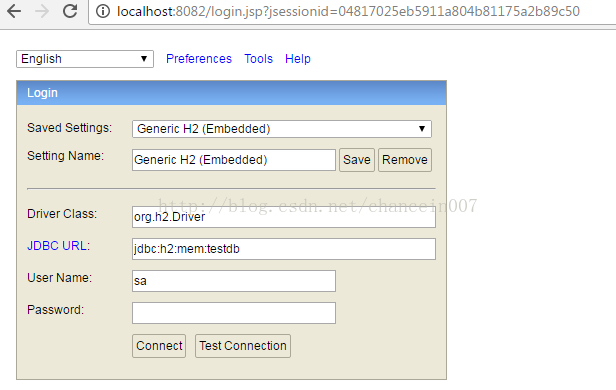
然后输入http://localhost:8082/ 就能登录到H2的数据库管理平台了。
具体的项目的代码地址,请到Github上下载:https://github.com/spring-guides/gs-accessing-data-jpa
<dependency>
<groupId>com.h2database</groupId>
<artifactId>h2</artifactId>
</dependency>
那么,我们如何查看其被持久化到H2数据库中的数据,且不需要安装第三发的软件?
首先,我们需要知道H2数据的连接的URL,默认情况下,SpringBoot的Hibernate打印的是Info级别的信息,其是查看不到H2数据连接相关的信息。所以首先需要把SpringBoot的Hibernate的debug信息打开。方式很简单,创建一个application.properties文件,然后在其文件里面添加下面一行。
logging.level.org.hibernate=DEBUG
添加之后,就可以启动SpringBoot,(注,笔者的开发环境是STS),这样就能看到打印出的log信息了。
2017-01-11 16:15:19.868 DEBUG 8340 --- [           main] o.hibernate.jpa.internal.util.LogHelper  : PersistenceUnitInfo [
name: default
persistence provider classname: null
classloader: sun.misc.Launcher$AppClassLoader@764c12b6
excludeUnlistedClasses: true
JTA datasource: null
Non JTA datasource: org.apache.tomcat.jdbc.pool.DataSource@2e554a3b{ConnectionPool[defaultAutoCommit=null; defaultReadOnly=null; defaultTransactionIsolation=-1; defaultCatalog=null; driverClassName=org.h2.Driver; maxActive=100; maxIdle=100; minIdle=10; initialSize=10; maxWait=30000; testOnBorrow=true; testOnReturn=false; timeBetweenEvictionRunsMillis=5000; numTestsPerEvictionRun=0; minEvictableIdleTimeMillis=60000; testWhileIdle=false; testOnConnect=false; password=********; url=jdbc:h2:mem:testdb;DB_CLOSE_DELAY=-1;DB_CLOSE_ON_EXIT=FALSE; username=sa; validationQuery=SELECT 1; validationQueryTimeout=-1; validatorClassName=null; validationInterval=3000; accessToUnderlyingConnectionAllowed=true; removeAbandoned=false; removeAbandonedTimeout=60; logAbandoned=false; connectionProperties=null; initSQL=null; jdbcInterceptors=null; jmxEnabled=true; fairQueue=true; useEquals=true; abandonWhenPercentageFull=0; maxAge=0; useLock=false; dataSource=null; dataSourceJNDI=null; suspectTimeout=0; alternateUsernameAllowed=false; commitOnReturn=false; rollbackOnReturn=false; useDisposableConnectionFacade=true; logValidationErrors=false; propagateInterruptState=false; ignoreExceptionOnPreLoad=false; }
Transaction type: RESOURCE_LOCAL
PU root URL: file:/D:/4.Trainning/Springboot/gs-accessing-data-jpa-master/gs-accessing-data-jpa-master/complete/target/classes/
Shared Cache Mode: UNSPECIFIED
Validation Mode: AUTO
Jar files URLs []
Managed classes names [
hello.Customer]
Mapping files names []
Properties []
从上面的debug的日志信息,我可以知道,其H2的连接的URL为jdbc:h2:mem:testdb,默认的用户名为sa,密码为空。
然后,打开浏览器,输入http://localhost:8080/h2-console/
输入相应的信息,如上。然进入,就能看到刚刚的SpringBoot创建的信息的了。
如果想自己制定H2的web Console,可以用下面的配置文件。
import java.sql.SQLException;
import org.h2.tools.Server;
import org.springframework.beans.factory.annotation.Value;
import org.springframework.boot.autoconfigure.condition.ConditionalOnExpression;
import org.springframework.context.annotation.Bean;
import org.springframework.context.annotation.Configuration;
import org.springframework.context.annotation.Profile;
@Configuration
//@Profile("dev") // Only activate this in the "dev" profile
public class H2ServerConfiguration {
// TCP port for remote connections, default 9092
@Value("${h2.tcp.port:9092}")
private String h2TcpPort;
// Web port, default 8082
@Value("${h2.web.port:8082}")
private String h2WebPort;
@Bean
@ConditionalOnExpression("${h2.tcp.enabled:false}")
public Server h2TcpServer() throws SQLException {
return Server.createTcpServer("-tcp", "-tcpAllowOthers", "-tcpPort", h2TcpPort).start();
}
@Bean
@ConditionalOnExpression("${h2.web.enabled:true}")
public Server h2WebServer() throws SQLException {
return Server.createWebServer("-web", "-webAllowOthers", "-webPort", h2WebPort).start();
}
}
然后输入http://localhost:8082/ 就能登录到H2的数据库管理平台了。
具体的项目的代码地址,请到Github上下载:https://github.com/spring-guides/gs-accessing-data-jpa

相关文章推荐
- spring boot 使用h2数据库配置(内存模式)
- 启动springBoot,使用h2内嵌数据库,修改hibernate方言
- 如何修改覆盖spring boot默认日志策略logback详解
- 如何查看OSB默认数据库(Derby)的表数据?
- 如何查看OSB默认数据库(Derby)的表数据
- SpringBoot笔记5---如何读写数据库之通过Query对象读写数据库
- springboot h2数据库的配置
- 在play中如何查看h2 数据库中的数据
- Spring-Boot整合mybatis(一),使用默认的数据库连接池
- springboot 2.0.0.M7 之 h2 嵌入式数据库的使用
- SpringBoot笔记4---如何读写数据库之使用@Query注解来读写数据库
- SpringBoot笔记3---如何读写数据库之使用CrudRepository中提供的方法来读写数据库
- springboot--h2 嵌入式数据库的使用
- springboot整合H2内存数据库,实现单元测试与数据库无关性
- spring boot 实现h2数据库本地化
- 【Spring】如何在单个Boot应用中配置多数据库?
- java~springboot~h2数据库在单元测试中的使用
- 如何查看INFORMIX数据库的字符集呀
- 如何更改在Ubuntu下的MySQL的默认数据库存储位置
- 如何查看数据库端口信息?