Unity网络教程翻译(一)从零开始编写一个网络游戏
2017-01-03 10:28
555 查看
原文:
Unity网络教程翻译(一)从零开始编写一个网络游戏
未解决疑问:
1、战斗延迟
2、NetworkIdentity勾选任意一个时报错:“cannot be set for local player/server authority objects”
Setting up a Multiplayer Project fromScratch
由零开始编写一个多人网络游戏
This document describes steps to setup anew multiplayer project from nothing using the new networking system. Thisstep-by-step process is generic, but can be customized for many types ofmultiplayer
games once it is started.
To get started, create a new empty Unityproject.
这个文档介绍了如何从一个空项目创建多人联网项目的各个步骤。这个步骤教学是一个通用的教学,可以作为很多类型的多人联网游戏的初步定制。
NetworkManager Setup
设置NetworkManager
The first step is to create aNetworkManager object in the project:
第一步,在项目中创建一个NetworkManager对象
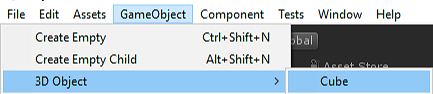
.Add a new empty game object, from the menu Game Object-> Create Empty.
.Find the newly created object in the Hierarchy View andselect it
.Rename the object to “NetworkManager” from theright-click context menu or by clicking on the object’s name and typing.
.In the inspector window for the object, click the AddComponent button
.Find the component Network -> NetworkManager and addit to the object. This component manages the network state of the game.
.Find the component Network -> NetworkManagerHUD andadd it to the object. This component supplies a simple user interface in yourgame for controlling the network state.
For more details, see Usingthe
NetworkManager.
.选择GameObject菜单的Create
Empty选项,在项目中创建一个空的游戏对象
.在Hierarchy(结构列表)视图中选中这个新创建的对象
.点击鼠标右键,在弹出菜单中选择重命名,将这个物体重命名为“NetworkManager”
.在对象的inspector(审查面板)中点击Add
Component(添加组件)按钮
.在选择的列表中选择Network(网络工作)里的NetworkManager(网络工作管理器),将这个组件添加到对象上。这个组件是用来管理游戏的网络工作状态的。
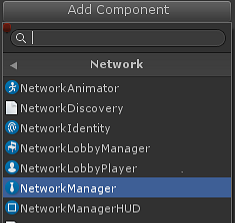
.用同样的方法,在对象上添加Network ->NetworkManagerHUD组件。这个组件提供了一个简单的用户交互界面,来控制网络连接状态

想要查看更多详情,点击连接如何使用NetworkManager(网络工作管理器).
Setup the Player Prefab
设置玩家预制
The next step is to setup the UnityPrefab that represents the player in the game. By default, the NetworkManagerinstantiates an object for each player by cloning the player
prefab. In thisexample, the player object will be a simple cube.
下一步是为游戏中的玩家设置一个Unity的预制。默认情况下,NetworkManager(网络工作管理器)会为游戏中的每个玩家实例化一个玩家预制的克隆体。在本示例中,玩家预制会是一个简单的cube(立方体)
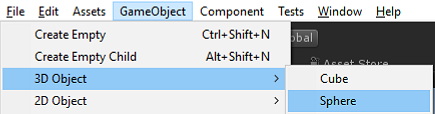
.Create a new Cube from the menu Game Object -> 3DObject -> Cube
.Find the cube in the Hierarchy view and select it
.Rename the object to “PlayerCube”
.In the inspector window for the object click the AddComponent button
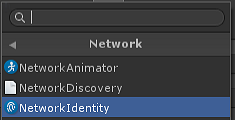
.Add the component Network -> NetworkIdentity to theobject. This component is used to identify the object between the server andclients.
.Set the “Local Player Authority” checkbox on theNetworkIdentity to true. This will allow the client to control the movement ofthe player object
.Make a prefab from the player cube object by dragging itinto the Assets window. This will create a prefab called “PlayerCube”
.Delete the PlayerCube object from the scene - we don’tneed it now that we have a prefab
.See PlayerObjects.
.点击菜单选项中的Game Object-> 3D Object -> Cube创建一个新的立方体
.在Hierarchy(结构列表)视图中找到这个立方体并且选中它
.将这个立方体对象重命名为“PlayerCube”
.在立方体的inspector(审查面板)中点击Add
Component(添加组件)按钮
.将Network(网络工作)中的NetworkIdentity(网络工作身份证)组件添加到对象上。这个组件用来标识这个对象在服务器和客户端上的身份。
.勾选“Local PlayerAuthority”(本地玩家权限)单选框上的对勾。这个操作是用来允许客户端可以操作这个对象的移动。

.把Hierarchy(结构列表)中的这个对象用鼠标左键选中并按住,将之拖到Assets(资源)窗口中,会生成一个名叫PlayerCube的预制文件。
.删除Hierarchy(结构列表)中的PlayerCube
– 现在我们不需要场景中的这个对象了,因为我们有了一个预制文件
查看玩家对象
Register the Player Prefab
注册这个玩家预制
Once the player prefab is created, itmust be registered with the network system.
当一个玩家预制成功创建,我们必须把他注册到网络工作系统中
.Find the NetworkManager object in the Heirarchy View andselect it
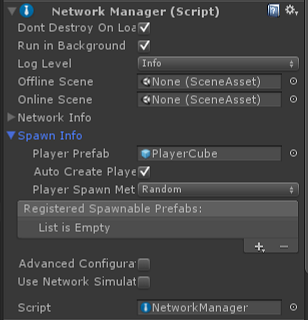
.Open the “Spawn Info” foldout of the inspector for theNetworkManager
.Find the “Player Prefab” slot
.Drag the PlayerCube prefab into the “Player Prefab” slot
.在Heirarchy(结构列表)视图中找到场景中的NetworkManager对象并选中它
.在inspector(审查面板)窗口中,打开“Spawn
Info”的三角展开更多属性
.找到一个名叫“Player Prefab”的槽
.将刚才创建好的“Player Prefab”预制文件拖到这个槽中
Now is a good time to save the projectfor the first time. From the menu File -> Save Project, save the project.You should also save the scene. Lets call this scene the
“offline” scene.
现在是第一次保存项目的好时机。从菜单里选择File -> SaveProject保存项目。你也可以保存场景,把场景保存为“offline”(离线)名称吧
Player Movement (Single Player Version)
玩家的移动(单人版本)
The first piece of game functionality isto move the player object. This will first be done without any networking, soit will only work in a single-player mode.
实现游戏功能的第一部分是移动一个玩家对象。这个部分一开始可以不使用网络工作,所以将会仅运行在一个单机模式下。
.Find the PlayerCube prefab in the Asset view.
.Click the Add Component button and choose “New Script”
.Enter the name “PlayerMove” for the new script name. Anew script will be created.
.Open this new script in an editor (such as Visual Studio)by double clicking it
.Add this simple movement code to the script:
.在Asset(资源)窗口中找到之前创建的PlayerCube(玩家立方体)预制并选中
.点击inspector(审查面板)上的Add
Component(添加组件)按钮,并且选择“New Script”(新建脚本)命令
.给新建的脚本输入一个名字“PlayerMove”(玩家移动)。一个新的脚本文件将会自动被创建出来
.双击新添加的脚本组件,可以用编辑器打开(类似Visual Studio之类的工具),输入以下代码

This hooks up the cube to be controlledby the arrow keys or a controller pad. The cube only moves on the client rightnow - it is not networked.
Save the project again.
这个脚本会将立方体的移动与键盘上的方向键或者控制方向的其他热键挂钩(类似于WASD)这个立方体现在仅能运行在客户端 – 这个并不是联网的
再次保存项目
Test a Hosted Game
测试主机游戏
Enter play mode in the editor byclicking the play button. You should see the NetworkManagerHUD default userinterface:
点击Unity上的运行按钮

运行游戏。可以看到NetworkManagerHUD组件提供的一个默认UI
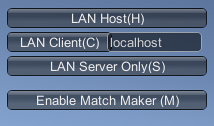
Press “Host” to start the game as thehost of the game. This will cause a player object to be created, and the HUDwill change to show the server is active. This game is
running as a “host” -which is a server and a client in the same process.
点击“LAN Host(H)”运行一个主机游戏。一个玩家对象将会被创建出来,然后HUD将会变成显示一个服务器被激活了。这个游戏已一个”主机“的方式运行起来了 – 主机方式就是服务器和客户端运行在同一个进程里。
See Network
Concepts.
点击查看网络概念
Pressing the arrow keys should make theplayer cube object move around.
Exit play mode by pressing the stopbutton in the editor.
点击方向键可以移动玩家立方体来回移动。
可以点击停止运行

按钮来退出游戏
Test Player Movement for a Client
测试客户端上的玩家移动
.Use the menu File -> Build Settings to open the BuildSettings dialog.
.Add the current scene to the build by pressing the “AddOpen Scenes” button
.点击菜单File -> BuildSettings打开打包设置窗口
.点击”Add OpenScenes“(添加当前场景)按钮将当前打开的场景添加到打包配置中
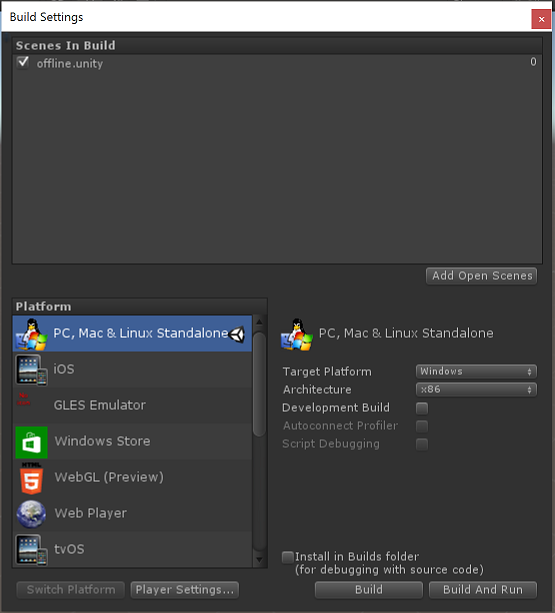
.Create a build by pressing the “Build and Run” button.This will prompt for a name for the executable, enter a name such as“networkTest”
.A stand-alone player will launch, and show a resolutionchoice dialogue.
.Choose the “windowed” checkbox and a lower resolutionsuch as 640x480
.The stand-alone player will start and show theNetworkManager HUD.
.Choose “Host” from the menu to start as a host. A playercube should be created
.Press the arrow keys to move the player cube around alittle
.Switch back to the editor and close the Build Settingsdialog.
.Enter play mode with the play button
.From the NetworkManagerHUD user interace, choose “LANClient” to connect to the host as a client
.There should be two cubes, one for the local player onthe host and one for the remote player for this client
.Press the arrow keys to move the cube around
.Both cube currently move! This because the movementscript is not network-aware.
.点击”Build and Run“(打包并运行)打一个包。将会在指定的目录下生成一个可执行文件,我们可以给这个文件起一个名字”networkTest“(联网测试)
.一个unity应用程序会自动执行,将会先弹出一个分辨率设置对话框
.勾选”windowed“窗口化运行单选框,选一个较低的运行分辨率类似640x480
.点击运行按钮将会运行游戏,一个NetworkManagerHUD界面将会被显示出来
.选择”Host“方式运行一个主机游戏,一个玩家立方体将会被创建
.点击方向键可以移动玩家立方体
.切换回Unity编辑器关掉Build
Setting窗口
.点击运行按钮运行游戏
.在NetworkManagerHUD的入口UI上,选择”LAN
Client“按钮运行一个连接到主机的客户端
.然后可以看到有两个立方体,一个是主机的玩家立方体,一个是客户端的立方体
.点击方向键来移动这个立方体
.两个立方体都移动了!这是因为移动的脚本不是以联网的方式运行的
Make Player Movement Networked
制作玩家联网移动
.Close the stand-alone player
.Exit play mode in the editor
.Open the PlayerMove script.
.Update the script to only move the local player
.Add “using UnityEngine.Networking”
.Change “MonoBehaviour” to “NetworkBehaviour”
.Add a check for “isLocalPlayer” in the Update function,so that only the local player processes input
.关闭打包运行的Unity程序
.退出Unity编辑器的运行模式
.打开PlayerMove脚本文件
.更新以下脚本内容来控制本地玩家的移动
.添加“usingUnityEngine.Networking”
.修改“MonoBehaviour”为“NetworkBehaviour”
.在Update方法里添加一个isLocalPlayer的判断条件,只有当是本地玩家进行输入才移动
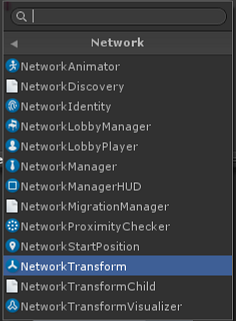
.Find the PlayerCube prefab in the Asset View and select
.Click the “Add Component” button and add the Networking-> NetworkTransform component. This component makes the object sychronizeit’s position across the network.
.在”Asset“(资源)面板中找到PlayerCube预制并且选中它
.点击inspector(审查面板)上的“Add
Component“按钮添加Networking ->NetworkTransform(联网变形)组件。这个组件让对象可以在联网中同步位置
.Save the Project again
.再次保存项目
Test Multiplayer Movement
测试多玩家移动
.Build and run the stand-alone player again and start ashost
.Enter play mode in the editor and connect as a client
.The player objects should now move independently of eachother, and are controlled by the local player on their client.
.再次打包运行Unity程序,建立一个主机游戏
.Unity编辑器运行一个客户端连接到主机
.现在玩家对象可以各自独立运动了,并且被两个客户端分别控制
Identify Your Player
标识你的玩家
The cubes in the game are currently allwhite, so the user cannot tell which one is their cube. To identify the player,we will make the cube of the local player red.
现在游戏中的立方体都是白色的,所以我们无法分辨出哪个是某个客户端上的立方体。想要标识这些独立的玩家立方体,我们让不同客户端看自己的立方体是红色的。
.Open the PlayerMove script
.Add an implementation of the OnStartLocalPlayer functionto change the player object’s color.
.打开PlayerMove脚本
.添加一个OnStartLocalPlayer方法的实现来改变玩家立方体的颜色
This function is only called on thelocal player on their client. This will make the user see their cube as red.The OnStartLocalPlayer function is a good place to do initialization
that isonly for the local player, such as configuring cameras and input.
There are also other useful virtualfunctions on the NetworkBehaviour base class. See Spawning.
这个方法只会运行在玩家自己的客户端上。这可以让玩家看到他们自己的立方体是红色的。OnStartLocalPlayer方法是一个用来初始化仅用于本地玩家数据的好地方。
.Build and run the game
.The cube controlled by the local player should now bered, while the others are still white.
.打包并运行游戏
.客户端本地的立方体现在应该变成了红色,其他的立方体还是白色
Shooting Bullets (Not Networked)
射击子弹(非联网)
A common feature in multiplayer games isto have player fire bullets. This section adds non-networked bullets to theexample. Networking for bullets is added in the next
section.
联网游戏的一个常见特征是各个玩家可以进行开火射击子弹。本节将会添加一个非联网下的射击子弹演示。联网射子弹将会在下一节进行讲解。
.Create a sphere game object
.Rename the sphere object to “Bullet”
.Change scale of the bullet from 1.o to 0.2
.Drag the bullet to the assets folder to make a prefab ofthe bullet
.Delete the bullet object from the scene
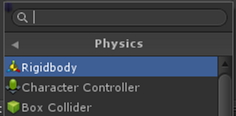
.Add a Rigidbody component to the bullet
.创建一个球形游戏对象
.将之重命名为”Bullet“(子弹)
.将子弹各轴的缩放从1改为0.2
.将Bullet拖拽到Assets(资源)面板中创建一个子弹的预制文件
.删除场景中的子弹对象
.在子弹预制上添加一个Rigidbody(刚体)组件
.Set the “Use Gravity” checkbox on the rigidbody to false
.Update the PlayerMove script to fire bullets:
.Add a public slot for the bullet prefab
.Add input handling in Update() function
.Add a function to fire a bullet
.勾选掉刚体组件上的”Use Gravity“(使用重力)
.更新PlayerMove脚本如下,添加发射子弹的代码
.添加一个用于放置子弹预制的公用槽
.在Update方法中添加按键发射的逻辑
.添加一个发射子弹的方法
.Save the script and return to the editor
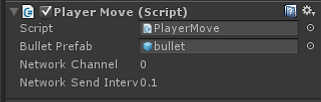
.Select the PlayerCube prefab and find the PlayerMovecomponent
.Find the bulletPrefab slot on the component
.Drag the bull prefab into the bulletPrefab slot
.保存脚本返回编辑器
.选择PlayerCube预制,找到PlayerMove组件
.在PlayerMove组件上找到BulletPrefab槽
.将子弹预制文件BulletPrefab拖入这个槽中
.Make a build then start the stand-alone player as thehost
.Enter play mode in the editor and connect as a client
.Pressing the space bar should cause a bullet to becreated and fired from the player object
.The bullet is not fired on other clients, only the onewhere the space bar was pressed.
.打包运行一个主机游戏
.运行Unity创建一个连接到主机的客户端
.点击空格键可以从玩家立方体中发射一个圆形的小子弹
.但是其他的客户端看不到这个发射,只有自己的客户端可以看到子弹的发射
Shooting Bullets with Networking
联网发射子弹
This section adds networking to thebullets in the example.
本节示例将会讲述如何让一个子弹在联网过程中发射
.Find the bullet prefab and select it
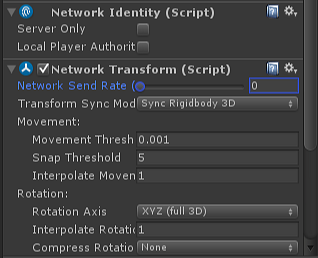
.Add NetworkIdentity to the bullet prefab
.Add NetworkTransform component to the bullet prefab
.Set the send rate to zero on the NetworkTransformcomponent on the bullet prefab. The bullet doesnt change direction or velocityafter it is shot, so it does not need to
send movement updates.
· 找到子弹预制文件并且选中它
· 添加一个NetworkIdentity组件
· 添加一个NetworkTransform组件
· 设置NetworkTransform组件上的Network
Send Rate(网络发送频率)为0。因为子弹发射后不会改变方向和速度,所以我们不需要实时更新它的位置
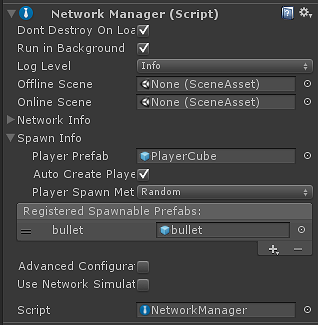
.Select the NetworkManager and open the “Spawn Info”foldout
.Add a new spawn prefab with the plus button
.Drag the Bullet prefab into the new spawn prefab slot
.选择场景中的NetworkManager(联网管理器)对象,打开Spawn
Info(生产信息)的展开信息
.点击右下角的”+“加号按钮添加一个新的生产器
.将子弹预制文件Bullet拖入刚才新加的生产器预制槽中
.Open the PlayerMove script
.Update the PlayerMove script to network the bullet:
.Change the Fire function to be a networked command, byadding the [Command] custom attribute and the “Cmd” prefix
.Use Network.Spawn() on bullet object
.打开PlayerMove脚本文件
.更新脚本文件如下,加入联网子弹的相关代码
.将Fire(开火)方法变成一个联网的命令,添加[Command]字段到方法头,并且必须把方法改名为“Cmd”开头的方法CmdFire
.在子弹对象上调用Network.Spawn()方法
This code uses a [Command] to fire thebullet on the server. For more information see NetworkedActions.
这段代码使用了[Command]来让子弹在服务器上发射。想要获取更多详细信息请查看网络动作
.Make a build then start the stand-alone player as thehost
.Enter play mode in the editor and connect as a client
.Pressing the space bar should make bullet fire for thecorrect player (only) on all clients
.打包运行一个主机游戏
.编辑器进入运行模式,打开一个连接到主机的客户端
.按下空格键,每个客户端都可以正确的发出子弹让其他客户端看到了
Bullet Collisions
子弹的碰撞
This adds a collision handler so thatbullets will disappear when they hit a player cube object.
这一节将会讲述让子弹在碰到一个玩家对象就消失的逻辑
.Find the bullet prefab and select it
.Choose the Add Component button and add a new script
.Call the new script “Bullet”
.Open the new script and add the collision handler thatdestroys the bullet when it hits a player object
.找到子弹预制文件并且选中它
.选择Add Component(添加组件)添加一个新的脚本
.将脚本命名为Bullet(子弹)
.双击添加的脚本打开文件,加入碰撞逻辑来控制子弹在碰到一个玩家对象就消失的情况
Now when a bullet hits a player objectit will be destroyed. When the bullet on the server is destroyed, since it is aspawned object managed by the network, it will be destroyed
on clients too.
现在当一个子弹达到玩家立方体,子弹就会被销毁。当服务器上的子弹被销毁了,因为它是由网络生产管理器产生的对象,所以在其他客户端上这个子弹也会被销毁。
Player State (Non-Networked Health)
玩家状态(非联网血条)
A common feature related to bullets isthat the player object has a “health” property that starts at a full value andthen is reduced when the player takes damage from a
bullet hitting them. Thissection adds non-networked health to the player object.
与子弹有关的一个共同特点是,玩家会有一个血量的属性,初始将会是一个满的值,当子弹击中玩家的时候,这个值会变少。本节将会讲述非联网情况下给玩家加入血条的方法。
.Select the PlayerCube prefab
.Choose the Add Component button and add a new script
.Call the script “Combat”
.Open the Combat script, add the health variables andTakeDamage function
.选中PlayerCube预制文件
.选择添加组件添加一个新脚本
.给新的脚本起个名字叫”Combat“(战斗)
.打开Combat脚本文件,添加health(血量)变量和TakeDamage(伤血)方法
The bullet script needs to be updated tocall the TakeDamage function on a hit. * Open the bullet script * Add a call toTakeDamage() from the Combat script in the collision
handler function
子弹脚本也需要更新,当子弹打到玩家立方体需要调用TakeDamage(伤血)方法,打开Bullet子弹脚本,在碰撞检测方法中添加调用TakeDamage方法的逻辑
This will make health on the playerobject go down when hit by a bullet. But you cannot see this happening in thegame. We need to add a simple health bar. * Select the PlayerCube
prefab *Choose the Add Component button and add a new script called HealthBar * Open theHealthBar script
这样当子弹打到玩家立方体的时候,玩家的血量就会下降,但是现在还看不到任何的显示。我们需要给立方体添加一个简单的血条。选择PlayerCube预制文件,选择添加组件添加一个明教”HealthBar“的新脚本文件
This is a lot of code that uses the oldGUI system. This is not very relevant for networking so we’ll just use itwithout explaination for now.
这是一段使用了老GUI系统的代码,因为和网络并没有太大的关系,所以我们就先不对此段代码进行解释。
.Save the project
.Build and Run the game and see health bar on the playerobject
.If a player shoots another player now, the health goesdown on that particular client, but not on other clients.
.保存项目
.打包运行一个主机程序,这个时候可以看到每个立方体上都会带有一个血条
.当一个玩家射击了另一个玩家,只有射击的玩家的客户端会显示血条变短,其他客户端都看不到这个情况
Player State (Networked Health)
玩家状态(联网的血量)
Changes to health are being appliedeverywhere now - independently on the client and host. This allows health tolook different for different players. Health should only
be applied on theserver and the changes replicated to clients. We call this “server authority”for health.
血量的变化现在可以显示在任意的客户端上 – 但是客户端和主机是相互独立的显示。这让每个不同的玩家看到不同的血条。血条的变动应该仅发生在服务器上,并且将变化复制给每个客户端。我们管这个情况叫血量的”服务器权限“
.Open the Combat script
.Change script to be a NetworkBehaviour
.Make health a [SyncVar]
.Add isServer check to TakeDamage, so it will only beapplied on the server
.打开Combat脚本
.修改脚本为NetworkBehaviour
.给health属性添加一个[SyncVar]标签
.在TakeDamage(伤血)方法中添加isServer(是否为服务器)的判断条件,所以伤血这个方法仅能在服务器上运行
For more information on SyncVars,see State
Synchronization.
想要获取更多SyncVars(同步值)信息请查阅状态同步机制
Death and Respawning
死亡与重新生成
Currently, nothing currently happenswhen the health of a player reaches zero except a log message. To make it moreof a game, when health reaches zero, the player should
be teleported back tothe starting location with full health.
目前,当玩家血量到0的时候除了控制台会打印一条消息之外没有其他的事情发生。想要让这个游戏更完善,我们想让玩家在血量到0的时候,被传送回一开始的位置并且血量恢复到满。
.Open the Combat script
.Add a [ClientRpc] function to respawn the player object.For more information see NetworkedActions.
.Call the repawn function on the server when healthreaches zero
.打开Combat脚本
.添加一个[ClientRpc]方法让玩家复活,更多信息请查询联网动作
.在服务器上当血量降为0的时候,调用复活方法
In this game, the client controls theposition of the player object - the player object has “local authority” on theclient. If the server just set the player’s position
to the start position, it wouldbe overridden by the client, since the client has authority. To avoid this, theserver tells the owning client to move the player object to the start position.
在游戏中,客户端控制立方体的位置 – 因为玩家对象使用的”本地权限“。当服务器设置玩家的坐标到原点位置,这个坐标会被客户端覆盖,因为此时客户端拥有权限。为了避免这种情况,服务器来通知所属客户端移动玩家对象到起始原点
.Build and run the game
.Move the player objects away from the start position
.Shoot bullets at one player until their health reacheszero
.The player object should teleport to the startingposition.
.打包运行游戏
.移动玩家对象离开起始原点
.射击离开原点的玩家,让他的血量变成0
.玩家对象将会被传送回起始原点
Non-Player Objects
非玩家对象
While player objects are spawned whenclient connect to the host, most games have non-player objects that exist inthe game world, such as enemies. In this section a spawner
is added thatcreates non-player objects that can be shot and killed.
现在玩家对象可以在客户端连接主机的时候被生成,大部分游戏会有一些非玩家对象存在于游戏中,比如说”敌人“。本节将会讲述如何使用生成器生成一些可以被射击被消灭的非玩家对象
.From the GameObject menu create a new empty game object
.Rename this object to “EnemySpawner”
.Select the EnemySpawner object
.Choose the Add Component button and add a NetworkIdentityto the object
.In the NetworkIdentity click the “Server Only” checkbox.This makes the spawner not be sent to clients.
.Choose the Add Component button and create a new scriptcalled “EnemySpawner”
.Edit the new script
.Make it a NetworkBehaviour
.Implement the virtual function OnStartServer to createthe enemies
.点击GameObject菜单,创建一个空的游戏对象
.重命名这个对象为”EnemySpawner“敌人生成器
.选中EnemySpawner对象
.添加一个NetworkIdentity(联网身份证)组件到对象上
.在NetworkIdentity组件中勾选上”Server
Only“(仅用于服务器)。这是为了这个生成器不会在客户端生效
.选择添加组件,添加一个新的脚本,并且命名为”EnemySpawner“(敌人生成器)
.打开并编辑脚本
.将脚本变成一个NetworkBehaviour脚本
.对虚函数OnStartServer(创建服务器)进行实现,在创建服务器的时候创建敌人
Now create an Enemy prefab:
现在,我们创建一个敌人的预制
.From the GameObject menu create a new Capsule.
.Rename the object to “Enemy”
.Choose the Add Component button add a NetworkIdentitycomponent to the Enemy
.Choose the Add Component button add a NetworkTransformcomponent to the Enemy
.Drag the Enemy object into the Asset view to create aprefab
.there should be a prefab asset now called “Enemy”
.Delete the Enemy object from the scene
.Select the Enemy prefab
.Choose the Add Component button and add the Combat scriptto the Enemy
.Choose the Add Component button and add the HealthBarscript to the Enemy
.Select the NetworkManager and in Spawn Info add a newspawnable prefab
.Set the new spawn prefab to the Enemy Prefab
The bullet script was setup to only workfor players. Now update the bullet script to work with any object that has theCombat script on it:
.Open the Bullet script
.Change the collision check to use Combat instead ofPlayerMove:
.在GameObject菜单中创建一个新的胶囊对象Capsule
.重命名为“Enemy“
.给Enemy对象添加NetworkIdentity组件
.给Enemy对象添加NetworkTransform组件
.将Enemy对象拖入Asset(资源)窗口生成一个新的预制文件
.现在有了一个新的预制资源”Enemy“
.删除场景中的Enemy对象
.选中Enemy预制文件
.选择Add Component(添加组件),为Enemy添加一个Combat(战斗)脚本
.选择Add Component(添加组件),为Enemy添加一个HealthBar(血条)脚本
.选中场景中的NetworkManager(联网管理器)对象,在Spawn
Info(生成器信息)中添加一个新的生成预制
.将Enemy预制拖入新加的预制槽中
子弹脚本仅对玩家有效。现在我们需要更新子弹脚本对任意拥有Combat脚本的游戏对象都有效。
.打开Bullet脚本
.修改碰撞逻辑,使用Combat来代替PlayerMove
Hookup the EnemySpawner with the Enemyobject:
将敌人生成器与敌人对象进行连接:
.Select the EnemySpawner object
.Find the “Enemy” slot on the EnemySpawner component
.Drag the Enemy prefab into the slot
.Set the numEnemies value to 4
.选中场景中的EnemySpawner(敌人生成器)对象
.在对象的EnemySpawner组件上找到Enemy的槽
.将Enemy预制文件拖入这个槽
.将组件上NumEnemies(敌人数量)设置为4
Test Enemies:
测试敌人:
.Build and run the game
.When starting as Host, four enemies should be created atrandom locations
.The player should be able to shoot enemies, and theirhealth should go down
.When the client joins they should see the enemies in thesame positions, and same health values as on the server
.打包运行游戏
.当建立一个主机时,4个敌人会被创建在随机的位置上
.玩家可以对敌人进行设计,敌人被击中后血量会降低
.当有其他的客户端加入游戏,他们可以看到敌人在同样的位置,拥有同样的血量
Destroying Enemies
销毁敌人
While the enemies can be shot by bulletsand their health goes down, then respawn like players. Enemies should bedestroyed when their health reaches zero instead of respawning.
现在敌人被子弹击中时血量会下降,然后会像玩家一样复活。我们希望敌人在血量到达0的时候被销毁而不是复活。
.Open the Combat script
.Add a “destroyOnDeath” variable
.Check destroyOnDeath when health reaches zero
.打开Combat脚本
.添加destroyOnDeath(死亡时销毁)变量
.在血量降到0时,判断destroyOnDeath的条件
.Select the Enemy prefab
.Set the destroyOnDeath checkbox to true for the Enemy
.选中Enemy(敌人)预制文件
.在敌人预制上勾选上DestroyOnDeath(死亡时销毁)
Now the enemy will be destroyed whenhealth reaches zero, but players will respawn.
现在敌人的血量降为0时会被销毁,但是玩家血量为0时还是复活
Spawn Positions for players
生成玩家的坐标
Players currently all appear at the zeropoint when they are created. This means that they are potentially on top ofeach other. Player should spawn at different locations.
TheNetworkStartPosition component can be used to do this.
玩家目前会被创建在坐标原点。这意味着他们有可能在彼此很近的地方。我们需要玩家生成在不同的位置上。NetworkStartPosition(联网初始坐标)组件可以用于处理这种情况
.Create a new empty GameObject
.Rename the object to “Pos1”
.Choose the Add Component button and add theNetworkStartPosition component
.Move the Pos1 object to the position (–3,0,0)
.Create a second empty GameObject
.Rename the object to “Pos2”
.Choose the Add Component button and add theNetworkStartPosition component
.Move the Pos2 object to the position (3,0,0)
.Find the NetworkManager and select it.
.Open the “Spawn Info” foldout
.Change the “Player Spawn Method” to “Round Robin”
.Build and run the game
.Player objects should now be created at the locations ofthe Pos1 and Pos2 objects instead of at zero.
.创建一个新的空游戏对象
.将其重命名为”Pos1“
.选择它并且给这个对象添加一个NetworkStartPosition(联网初始位置)组件
.将这个对象的坐标设为(-3,0,0)
.创建第二个空游戏对象
.重命名为”Pos2”
.选择并给这个对象添加NetworkStartPosition(联网初始位置)组件
.将Pos对象的坐标设为(3,0,0)
.在场景中找到NetworkManager对象并选中它
.打开“SpawnInfo”展开信息
.修改“Player SpawnMethod”(玩家生成方法)为“Round
Robin”(轮转)
.打包运行游戏
.玩家对象现在会Pos1和Pos2之间被创建而不是坐标原点了
Unity网络教程翻译(一)从零开始编写一个网络游戏
未解决疑问:
1、战斗延迟
2、NetworkIdentity勾选任意一个时报错:“cannot be set for local player/server authority objects”
Setting up a Multiplayer Project fromScratch
由零开始编写一个多人网络游戏
This document describes steps to setup anew multiplayer project from nothing using the new networking system. Thisstep-by-step process is generic, but can be customized for many types ofmultiplayer
games once it is started.
To get started, create a new empty Unityproject.
这个文档介绍了如何从一个空项目创建多人联网项目的各个步骤。这个步骤教学是一个通用的教学,可以作为很多类型的多人联网游戏的初步定制。
NetworkManager Setup
设置NetworkManager
The first step is to create aNetworkManager object in the project:
第一步,在项目中创建一个NetworkManager对象
.Add a new empty game object, from the menu Game Object-> Create Empty.
.Find the newly created object in the Hierarchy View andselect it
.Rename the object to “NetworkManager” from theright-click context menu or by clicking on the object’s name and typing.
.In the inspector window for the object, click the AddComponent button
.Find the component Network -> NetworkManager and addit to the object. This component manages the network state of the game.
.Find the component Network -> NetworkManagerHUD andadd it to the object. This component supplies a simple user interface in yourgame for controlling the network state.
For more details, see Usingthe
NetworkManager.
.选择GameObject菜单的Create
Empty选项,在项目中创建一个空的游戏对象
.在Hierarchy(结构列表)视图中选中这个新创建的对象
.点击鼠标右键,在弹出菜单中选择重命名,将这个物体重命名为“NetworkManager”
.在对象的inspector(审查面板)中点击Add
Component(添加组件)按钮
.在选择的列表中选择Network(网络工作)里的NetworkManager(网络工作管理器),将这个组件添加到对象上。这个组件是用来管理游戏的网络工作状态的。
.用同样的方法,在对象上添加Network ->NetworkManagerHUD组件。这个组件提供了一个简单的用户交互界面,来控制网络连接状态
想要查看更多详情,点击连接如何使用NetworkManager(网络工作管理器).
Setup the Player Prefab
设置玩家预制
The next step is to setup the UnityPrefab that represents the player in the game. By default, the NetworkManagerinstantiates an object for each player by cloning the player
prefab. In thisexample, the player object will be a simple cube.
下一步是为游戏中的玩家设置一个Unity的预制。默认情况下,NetworkManager(网络工作管理器)会为游戏中的每个玩家实例化一个玩家预制的克隆体。在本示例中,玩家预制会是一个简单的cube(立方体)
.Create a new Cube from the menu Game Object -> 3DObject -> Cube
.Find the cube in the Hierarchy view and select it
.Rename the object to “PlayerCube”
.In the inspector window for the object click the AddComponent button
.Add the component Network -> NetworkIdentity to theobject. This component is used to identify the object between the server andclients.
.Set the “Local Player Authority” checkbox on theNetworkIdentity to true. This will allow the client to control the movement ofthe player object
.Make a prefab from the player cube object by dragging itinto the Assets window. This will create a prefab called “PlayerCube”
.Delete the PlayerCube object from the scene - we don’tneed it now that we have a prefab
.See PlayerObjects.
.点击菜单选项中的Game Object-> 3D Object -> Cube创建一个新的立方体
.在Hierarchy(结构列表)视图中找到这个立方体并且选中它
.将这个立方体对象重命名为“PlayerCube”
.在立方体的inspector(审查面板)中点击Add
Component(添加组件)按钮
.将Network(网络工作)中的NetworkIdentity(网络工作身份证)组件添加到对象上。这个组件用来标识这个对象在服务器和客户端上的身份。
.勾选“Local PlayerAuthority”(本地玩家权限)单选框上的对勾。这个操作是用来允许客户端可以操作这个对象的移动。
.把Hierarchy(结构列表)中的这个对象用鼠标左键选中并按住,将之拖到Assets(资源)窗口中,会生成一个名叫PlayerCube的预制文件。
.删除Hierarchy(结构列表)中的PlayerCube
– 现在我们不需要场景中的这个对象了,因为我们有了一个预制文件
查看玩家对象
Register the Player Prefab
注册这个玩家预制
Once the player prefab is created, itmust be registered with the network system.
当一个玩家预制成功创建,我们必须把他注册到网络工作系统中
.Find the NetworkManager object in the Heirarchy View andselect it
.Open the “Spawn Info” foldout of the inspector for theNetworkManager
.Find the “Player Prefab” slot
.Drag the PlayerCube prefab into the “Player Prefab” slot
.在Heirarchy(结构列表)视图中找到场景中的NetworkManager对象并选中它
.在inspector(审查面板)窗口中,打开“Spawn
Info”的三角展开更多属性
.找到一个名叫“Player Prefab”的槽
.将刚才创建好的“Player Prefab”预制文件拖到这个槽中
Now is a good time to save the projectfor the first time. From the menu File -> Save Project, save the project.You should also save the scene. Lets call this scene the
“offline” scene.
现在是第一次保存项目的好时机。从菜单里选择File -> SaveProject保存项目。你也可以保存场景,把场景保存为“offline”(离线)名称吧
Player Movement (Single Player Version)
玩家的移动(单人版本)
The first piece of game functionality isto move the player object. This will first be done without any networking, soit will only work in a single-player mode.
实现游戏功能的第一部分是移动一个玩家对象。这个部分一开始可以不使用网络工作,所以将会仅运行在一个单机模式下。
.Find the PlayerCube prefab in the Asset view.
.Click the Add Component button and choose “New Script”
.Enter the name “PlayerMove” for the new script name. Anew script will be created.
.Open this new script in an editor (such as Visual Studio)by double clicking it
.Add this simple movement code to the script:
.在Asset(资源)窗口中找到之前创建的PlayerCube(玩家立方体)预制并选中
.点击inspector(审查面板)上的Add
Component(添加组件)按钮,并且选择“New Script”(新建脚本)命令
.给新建的脚本输入一个名字“PlayerMove”(玩家移动)。一个新的脚本文件将会自动被创建出来
.双击新添加的脚本组件,可以用编辑器打开(类似Visual Studio之类的工具),输入以下代码
using UnityEngine;

public class PlayerMove : MonoBehaviour
{
void Update()
{
var x =Input.GetAxis("Horizontal")*0.1f;
var z =Input.GetAxis("Vertical")*0.1f;

transform.Translate(x, 0, z);
}
}
This hooks up the cube to be controlledby the arrow keys or a controller pad. The cube only moves on the client rightnow - it is not networked.
Save the project again.
这个脚本会将立方体的移动与键盘上的方向键或者控制方向的其他热键挂钩(类似于WASD)这个立方体现在仅能运行在客户端 – 这个并不是联网的
再次保存项目
Test a Hosted Game
测试主机游戏
Enter play mode in the editor byclicking the play button. You should see the NetworkManagerHUD default userinterface:
点击Unity上的运行按钮
运行游戏。可以看到NetworkManagerHUD组件提供的一个默认UI
Press “Host” to start the game as thehost of the game. This will cause a player object to be created, and the HUDwill change to show the server is active. This game is
running as a “host” -which is a server and a client in the same process.
点击“LAN Host(H)”运行一个主机游戏。一个玩家对象将会被创建出来,然后HUD将会变成显示一个服务器被激活了。这个游戏已一个”主机“的方式运行起来了 – 主机方式就是服务器和客户端运行在同一个进程里。
See Network
Concepts.
点击查看网络概念
Pressing the arrow keys should make theplayer cube object move around.
Exit play mode by pressing the stopbutton in the editor.
点击方向键可以移动玩家立方体来回移动。
可以点击停止运行
按钮来退出游戏
Test Player Movement for a Client
测试客户端上的玩家移动
.Use the menu File -> Build Settings to open the BuildSettings dialog.
.Add the current scene to the build by pressing the “AddOpen Scenes” button
.点击菜单File -> BuildSettings打开打包设置窗口
.点击”Add OpenScenes“(添加当前场景)按钮将当前打开的场景添加到打包配置中
.Create a build by pressing the “Build and Run” button.This will prompt for a name for the executable, enter a name such as“networkTest”
.A stand-alone player will launch, and show a resolutionchoice dialogue.
.Choose the “windowed” checkbox and a lower resolutionsuch as 640x480
.The stand-alone player will start and show theNetworkManager HUD.
.Choose “Host” from the menu to start as a host. A playercube should be created
.Press the arrow keys to move the player cube around alittle
.Switch back to the editor and close the Build Settingsdialog.
.Enter play mode with the play button
.From the NetworkManagerHUD user interace, choose “LANClient” to connect to the host as a client
.There should be two cubes, one for the local player onthe host and one for the remote player for this client
.Press the arrow keys to move the cube around
.Both cube currently move! This because the movementscript is not network-aware.
.点击”Build and Run“(打包并运行)打一个包。将会在指定的目录下生成一个可执行文件,我们可以给这个文件起一个名字”networkTest“(联网测试)
.一个unity应用程序会自动执行,将会先弹出一个分辨率设置对话框
.勾选”windowed“窗口化运行单选框,选一个较低的运行分辨率类似640x480
.点击运行按钮将会运行游戏,一个NetworkManagerHUD界面将会被显示出来
.选择”Host“方式运行一个主机游戏,一个玩家立方体将会被创建
.点击方向键可以移动玩家立方体
.切换回Unity编辑器关掉Build
Setting窗口
.点击运行按钮运行游戏
.在NetworkManagerHUD的入口UI上,选择”LAN
Client“按钮运行一个连接到主机的客户端
.然后可以看到有两个立方体,一个是主机的玩家立方体,一个是客户端的立方体
.点击方向键来移动这个立方体
.两个立方体都移动了!这是因为移动的脚本不是以联网的方式运行的
Make Player Movement Networked
制作玩家联网移动
.Close the stand-alone player
.Exit play mode in the editor
.Open the PlayerMove script.
.Update the script to only move the local player
.Add “using UnityEngine.Networking”
.Change “MonoBehaviour” to “NetworkBehaviour”
.Add a check for “isLocalPlayer” in the Update function,so that only the local player processes input
.关闭打包运行的Unity程序
.退出Unity编辑器的运行模式
.打开PlayerMove脚本文件
.更新以下脚本内容来控制本地玩家的移动
.添加“usingUnityEngine.Networking”
.修改“MonoBehaviour”为“NetworkBehaviour”
.在Update方法里添加一个isLocalPlayer的判断条件,只有当是本地玩家进行输入才移动
using UnityEngine;
using UnityEngine.Networking;

public class PlayerMove : NetworkBehaviour
{
void Update()
{
if(!isLocalPlayer)
return;

var x = Input.GetAxis("Horizontal")*0.1f;
var z =Input.GetAxis("Vertical")*0.1f;

transform.Translate(x, 0, z);
}
}
.Find the PlayerCube prefab in the Asset View and select
.Click the “Add Component” button and add the Networking-> NetworkTransform component. This component makes the object sychronizeit’s position across the network.
.在”Asset“(资源)面板中找到PlayerCube预制并且选中它
.点击inspector(审查面板)上的“Add
Component“按钮添加Networking ->NetworkTransform(联网变形)组件。这个组件让对象可以在联网中同步位置
.Save the Project again
.再次保存项目
Test Multiplayer Movement
测试多玩家移动
.Build and run the stand-alone player again and start ashost
.Enter play mode in the editor and connect as a client
.The player objects should now move independently of eachother, and are controlled by the local player on their client.
.再次打包运行Unity程序,建立一个主机游戏
.Unity编辑器运行一个客户端连接到主机
.现在玩家对象可以各自独立运动了,并且被两个客户端分别控制
Identify Your Player
标识你的玩家
The cubes in the game are currently allwhite, so the user cannot tell which one is their cube. To identify the player,we will make the cube of the local player red.
现在游戏中的立方体都是白色的,所以我们无法分辨出哪个是某个客户端上的立方体。想要标识这些独立的玩家立方体,我们让不同客户端看自己的立方体是红色的。
.Open the PlayerMove script
.Add an implementation of the OnStartLocalPlayer functionto change the player object’s color.
.打开PlayerMove脚本
.添加一个OnStartLocalPlayer方法的实现来改变玩家立方体的颜色
public overridevoid OnStartLocalPlayer()
{
GetComponent<MeshRenderer>().material.color = Color.red;
}
This function is only called on thelocal player on their client. This will make the user see their cube as red.The OnStartLocalPlayer function is a good place to do initialization
that isonly for the local player, such as configuring cameras and input.
There are also other useful virtualfunctions on the NetworkBehaviour base class. See Spawning.
这个方法只会运行在玩家自己的客户端上。这可以让玩家看到他们自己的立方体是红色的。OnStartLocalPlayer方法是一个用来初始化仅用于本地玩家数据的好地方。
.Build and run the game
.The cube controlled by the local player should now bered, while the others are still white.
.打包并运行游戏
.客户端本地的立方体现在应该变成了红色,其他的立方体还是白色
Shooting Bullets (Not Networked)
射击子弹(非联网)
A common feature in multiplayer games isto have player fire bullets. This section adds non-networked bullets to theexample. Networking for bullets is added in the next
section.
联网游戏的一个常见特征是各个玩家可以进行开火射击子弹。本节将会添加一个非联网下的射击子弹演示。联网射子弹将会在下一节进行讲解。
.Create a sphere game object
.Rename the sphere object to “Bullet”
.Change scale of the bullet from 1.o to 0.2
.Drag the bullet to the assets folder to make a prefab ofthe bullet
.Delete the bullet object from the scene
.Add a Rigidbody component to the bullet
.创建一个球形游戏对象
.将之重命名为”Bullet“(子弹)
.将子弹各轴的缩放从1改为0.2
.将Bullet拖拽到Assets(资源)面板中创建一个子弹的预制文件
.删除场景中的子弹对象
.在子弹预制上添加一个Rigidbody(刚体)组件
.Set the “Use Gravity” checkbox on the rigidbody to false
.Update the PlayerMove script to fire bullets:
.Add a public slot for the bullet prefab
.Add input handling in Update() function
.Add a function to fire a bullet
.勾选掉刚体组件上的”Use Gravity“(使用重力)
.更新PlayerMove脚本如下,添加发射子弹的代码
.添加一个用于放置子弹预制的公用槽
.在Update方法中添加按键发射的逻辑
.添加一个发射子弹的方法
using UnityEngine;
using UnityEngine.Networking;

public class PlayerMove : NetworkBehaviour
{
publicGameObject bulletPrefab;

public overridevoid OnStartLocalPlayer()
{
GetComponent<MeshRenderer>().material.color = Color.red;
}

void Update()
{
if(!isLocalPlayer)
return;

var x =Input.GetAxis("Horizontal")*0.1f;
var z =Input.GetAxis("Vertical")*0.1f;

transform.Translate(x, 0, z);

if(Input.GetKeyDown(KeyCode.Space))
{
Fire();
}
}

void Fire()
{
// createthe bullet object from the bullet prefab
// 使用子弹预制创建子弹对象
var bullet= (GameObject)Instantiate(
bulletPrefab,
transform.position - transform.forward,
Quaternion.identity);

// make thebullet move away in front of the player
// 让子弹从玩家的正前方射出
bullet.GetComponent<Rigidbody>().velocity = -transform.forward*4;

// makebullet disappear after 2 seconds
// 让子弹在2秒后自动消失
Destroy(bullet, 2.0f);
}
}
.Save the script and return to the editor
.Select the PlayerCube prefab and find the PlayerMovecomponent
.Find the bulletPrefab slot on the component
.Drag the bull prefab into the bulletPrefab slot
.保存脚本返回编辑器
.选择PlayerCube预制,找到PlayerMove组件
.在PlayerMove组件上找到BulletPrefab槽
.将子弹预制文件BulletPrefab拖入这个槽中
.Make a build then start the stand-alone player as thehost
.Enter play mode in the editor and connect as a client
.Pressing the space bar should cause a bullet to becreated and fired from the player object
.The bullet is not fired on other clients, only the onewhere the space bar was pressed.
.打包运行一个主机游戏
.运行Unity创建一个连接到主机的客户端
.点击空格键可以从玩家立方体中发射一个圆形的小子弹
.但是其他的客户端看不到这个发射,只有自己的客户端可以看到子弹的发射
Shooting Bullets with Networking
联网发射子弹
This section adds networking to thebullets in the example.
本节示例将会讲述如何让一个子弹在联网过程中发射
.Find the bullet prefab and select it
.Add NetworkIdentity to the bullet prefab
.Add NetworkTransform component to the bullet prefab
.Set the send rate to zero on the NetworkTransformcomponent on the bullet prefab. The bullet doesnt change direction or velocityafter it is shot, so it does not need to
send movement updates.
· 找到子弹预制文件并且选中它
· 添加一个NetworkIdentity组件
· 添加一个NetworkTransform组件
· 设置NetworkTransform组件上的Network
Send Rate(网络发送频率)为0。因为子弹发射后不会改变方向和速度,所以我们不需要实时更新它的位置
.Select the NetworkManager and open the “Spawn Info”foldout
.Add a new spawn prefab with the plus button
.Drag the Bullet prefab into the new spawn prefab slot
.选择场景中的NetworkManager(联网管理器)对象,打开Spawn
Info(生产信息)的展开信息
.点击右下角的”+“加号按钮添加一个新的生产器
.将子弹预制文件Bullet拖入刚才新加的生产器预制槽中
.Open the PlayerMove script
.Update the PlayerMove script to network the bullet:
.Change the Fire function to be a networked command, byadding the [Command] custom attribute and the “Cmd” prefix
.Use Network.Spawn() on bullet object
.打开PlayerMove脚本文件
.更新脚本文件如下,加入联网子弹的相关代码
.将Fire(开火)方法变成一个联网的命令,添加[Command]字段到方法头,并且必须把方法改名为“Cmd”开头的方法CmdFire
.在子弹对象上调用Network.Spawn()方法
using UnityEngine;
using UnityEngine.Networking;

public class PlayerMove : NetworkBehaviour
{
publicGameObject bulletPrefab;

public overridevoid OnStartLocalPlayer()
{
GetComponent<MeshRenderer>().material.color = Color.red;
}

[Command]
void CmdFire()
{
// This[Command] code is run on the server!
// 标识了[Command]的代码仅会运行在服务器上!

// createthe bullet object locally
// 为本地创建子弹对象
var bullet =(GameObject)Instantiate(
bulletPrefab,
transform.position - transform.forward,
Quaternion.identity);

bullet.GetComponent<Rigidbody>().velocity = -transform.forward*4;

// spawn thebullet on the clients
// 在客户端生成子弹
NetworkServer.Spawn(bullet);

// when thebullet is destroyed on the server it will automaticaly be destroyed on clients
// 当子弹在服务器销毁的时候,客户端也会自动销毁
Destroy(bullet, 2.0f);
}

void Update()
{
if(!isLocalPlayer)
return;

var x =Input.GetAxis("Horizontal")*0.1f;
var z =Input.GetAxis("Vertical")*0.1f;

transform.Translate(x, 0, z);

if(Input.GetKeyDown(KeyCode.Space))
{
//Command function is called from the client, but invoked on the server
// 命令在客户端被执行,但是在服务器上调用
CmdFire();
}
}
}
This code uses a [Command] to fire thebullet on the server. For more information see NetworkedActions.
这段代码使用了[Command]来让子弹在服务器上发射。想要获取更多详细信息请查看网络动作
.Make a build then start the stand-alone player as thehost
.Enter play mode in the editor and connect as a client
.Pressing the space bar should make bullet fire for thecorrect player (only) on all clients
.打包运行一个主机游戏
.编辑器进入运行模式,打开一个连接到主机的客户端
.按下空格键,每个客户端都可以正确的发出子弹让其他客户端看到了
Bullet Collisions
子弹的碰撞
This adds a collision handler so thatbullets will disappear when they hit a player cube object.
这一节将会讲述让子弹在碰到一个玩家对象就消失的逻辑
.Find the bullet prefab and select it
.Choose the Add Component button and add a new script
.Call the new script “Bullet”
.Open the new script and add the collision handler thatdestroys the bullet when it hits a player object
.找到子弹预制文件并且选中它
.选择Add Component(添加组件)添加一个新的脚本
.将脚本命名为Bullet(子弹)
.双击添加的脚本打开文件,加入碰撞逻辑来控制子弹在碰到一个玩家对象就消失的情况
using UnityEngine;

public class Bullet : MonoBehaviour
{
void OnCollisionEnter(Collisioncollision)
{
var hit =collision.gameObject;
varhitPlayer = hit.GetComponent<PlayerMove>();
if(hitPlayer != null)
{
Destroy(gameObject);
}
}
}
Now when a bullet hits a player objectit will be destroyed. When the bullet on the server is destroyed, since it is aspawned object managed by the network, it will be destroyed
on clients too.
现在当一个子弹达到玩家立方体,子弹就会被销毁。当服务器上的子弹被销毁了,因为它是由网络生产管理器产生的对象,所以在其他客户端上这个子弹也会被销毁。
Player State (Non-Networked Health)
玩家状态(非联网血条)
A common feature related to bullets isthat the player object has a “health” property that starts at a full value andthen is reduced when the player takes damage from a
bullet hitting them. Thissection adds non-networked health to the player object.
与子弹有关的一个共同特点是,玩家会有一个血量的属性,初始将会是一个满的值,当子弹击中玩家的时候,这个值会变少。本节将会讲述非联网情况下给玩家加入血条的方法。
.Select the PlayerCube prefab
.Choose the Add Component button and add a new script
.Call the script “Combat”
.Open the Combat script, add the health variables andTakeDamage function
.选中PlayerCube预制文件
.选择添加组件添加一个新脚本
.给新的脚本起个名字叫”Combat“(战斗)
.打开Combat脚本文件,添加health(血量)变量和TakeDamage(伤血)方法
using UnityEngine;

public class Combat : MonoBehaviour
{
public constint maxHealth = 100;
public inthealth = maxHealth;

public void TakeDamage(int amount)
{
health -=amount;
if (health<= 0)
{
health= 0;
Debug.Log("Dead!");
}
}
}
The bullet script needs to be updated tocall the TakeDamage function on a hit. * Open the bullet script * Add a call toTakeDamage() from the Combat script in the collision
handler function
子弹脚本也需要更新,当子弹打到玩家立方体需要调用TakeDamage(伤血)方法,打开Bullet子弹脚本,在碰撞检测方法中添加调用TakeDamage方法的逻辑
using UnityEngine;

public class Bullet : MonoBehaviour
{
voidOnCollisionEnter(Collision collision)
{
var hit =collision.gameObject;
varhitPlayer = hit.GetComponent<PlayerMove>();
if(hitPlayer != null)
{
varcombat = hit.GetComponent<Combat>();//同一类物体用此方法寻找共同点,取代使用string等名字!
combat.TakeDamage(10);

Destroy(gameObject);
}
}
}
This will make health on the playerobject go down when hit by a bullet. But you cannot see this happening in thegame. We need to add a simple health bar. * Select the PlayerCube
prefab *Choose the Add Component button and add a new script called HealthBar * Open theHealthBar script
这样当子弹打到玩家立方体的时候,玩家的血量就会下降,但是现在还看不到任何的显示。我们需要给立方体添加一个简单的血条。选择PlayerCube预制文件,选择添加组件添加一个明教”HealthBar“的新脚本文件
This is a lot of code that uses the oldGUI system. This is not very relevant for networking so we’ll just use itwithout explaination for now.
这是一段使用了老GUI系统的代码,因为和网络并没有太大的关系,所以我们就先不对此段代码进行解释。
using UnityEngine;
using System.Collections;

public class HealthBar : MonoBehaviour
{
GUIStylehealthStyle;
GUIStylebackStyle;
Combat combat;

void Awake()
{
combat =GetComponent<Combat>();
}

void OnGUI()
{
InitStyles();

// Draw aHealth Bar
// 绘制一个血条

/*把物体的世界坐标对应到屏幕,用来对应GUI和物体的位置*/
Vector3 pos= Camera.main.WorldToScreenPoint(transform.position);

/*下面的GUI.color和GUI.bgc并没有什么用处*/
// drawhealth bar background
// 绘制血条背景
GUI.color =Color.grey;
GUI.backgroundColor = Color.grey;
GUI.Box(newRect(pos.x-26, Screen.height - pos.y + 20, Combat.maxHealth/2, 7),".", backStyle);

// drawhealth bar amount
// 绘制当前血量
GUI.color =Color.green;
GUI.backgroundColor = Color.green;
GUI.Box(newRect(pos.x-25, Screen.height - pos.y + 21, combat.health/2, 5), ".",healthStyle);
}

voidInitStyles()
{
if(healthStyle == null )
{
healthStyle = new GUIStyle( GUI.skin.box );
healthStyle.normal.background = MakeTex( 2, 2, new Color( 0f, 1f, 0f,1.0f ) );
}

if(backStyle == null )
{
backStyle = new GUIStyle( GUI.skin.box );
backStyle.normal.background = MakeTex( 2, 2, new Color( 0f, 0f, 0f, 1.0f) );
}
}

/*用像素和颜色绘制一张图片作为GUIStyle的背景图*/
Texture2DMakeTex( int width, int height, Color col )
{
Color[] pix= new Color[width * height];
for( int i= 0; i < pix.Length; ++i )
{
pix[ i] = col;
}
Texture2Dresult = new Texture2D( width, height );
result.SetPixels( pix );
result.Apply();
returnresult;
}
}
.Save the project
.Build and Run the game and see health bar on the playerobject
.If a player shoots another player now, the health goesdown on that particular client, but not on other clients.
.保存项目
.打包运行一个主机程序,这个时候可以看到每个立方体上都会带有一个血条
.当一个玩家射击了另一个玩家,只有射击的玩家的客户端会显示血条变短,其他客户端都看不到这个情况
Player State (Networked Health)
玩家状态(联网的血量)
Changes to health are being appliedeverywhere now - independently on the client and host. This allows health tolook different for different players. Health should only
be applied on theserver and the changes replicated to clients. We call this “server authority”for health.
血量的变化现在可以显示在任意的客户端上 – 但是客户端和主机是相互独立的显示。这让每个不同的玩家看到不同的血条。血条的变动应该仅发生在服务器上,并且将变化复制给每个客户端。我们管这个情况叫血量的”服务器权限“
.Open the Combat script
.Change script to be a NetworkBehaviour
.Make health a [SyncVar]
.Add isServer check to TakeDamage, so it will only beapplied on the server
.打开Combat脚本
.修改脚本为NetworkBehaviour
.给health属性添加一个[SyncVar]标签
.在TakeDamage(伤血)方法中添加isServer(是否为服务器)的判断条件,所以伤血这个方法仅能在服务器上运行
For more information on SyncVars,see State
Synchronization.
想要获取更多SyncVars(同步值)信息请查阅状态同步机制
using UnityEngine;
using UnityEngine.Networking;

public class Combat : NetworkBehaviour
{
public constint maxHealth = 100;

[SyncVar]
public inthealth = maxHealth;

public voidTakeDamage(int amount)
{
if(!isServer)
return;

health -=amount;
if (health<= 0)
{
health= 0;
Debug.Log("Dead!");
}
}
}
Death and Respawning
死亡与重新生成
Currently, nothing currently happenswhen the health of a player reaches zero except a log message. To make it moreof a game, when health reaches zero, the player should
be teleported back tothe starting location with full health.
目前,当玩家血量到0的时候除了控制台会打印一条消息之外没有其他的事情发生。想要让这个游戏更完善,我们想让玩家在血量到0的时候,被传送回一开始的位置并且血量恢复到满。
.Open the Combat script
.Add a [ClientRpc] function to respawn the player object.For more information see NetworkedActions.
.Call the repawn function on the server when healthreaches zero
.打开Combat脚本
.添加一个[ClientRpc]方法让玩家复活,更多信息请查询联网动作
.在服务器上当血量降为0的时候,调用复活方法
using UnityEngine;
using UnityEngine.Networking;

public class Combat : NetworkBehaviour
{
public constint maxHealth = 100;

[SyncVar]
public inthealth = maxHealth;

public voidTakeDamage(int amount)
{
if(!isServer)
return;

health -=amount;
if (health<= 0)
{
health= maxHealth;

//called on the server, will be invoked on the clients
// 在服务器上执行,在客户端上被调用
RpcRespawn();
}
}

[ClientRpc]
voidRpcRespawn()
{
if(isLocalPlayer)
{
// moveback to zero location
// 移动回零点原点位置
transform.position = Vector3.zero;
}
}
}
In this game, the client controls theposition of the player object - the player object has “local authority” on theclient. If the server just set the player’s position
to the start position, it wouldbe overridden by the client, since the client has authority. To avoid this, theserver tells the owning client to move the player object to the start position.
在游戏中,客户端控制立方体的位置 – 因为玩家对象使用的”本地权限“。当服务器设置玩家的坐标到原点位置,这个坐标会被客户端覆盖,因为此时客户端拥有权限。为了避免这种情况,服务器来通知所属客户端移动玩家对象到起始原点
.Build and run the game
.Move the player objects away from the start position
.Shoot bullets at one player until their health reacheszero
.The player object should teleport to the startingposition.
.打包运行游戏
.移动玩家对象离开起始原点
.射击离开原点的玩家,让他的血量变成0
.玩家对象将会被传送回起始原点
Non-Player Objects
非玩家对象
While player objects are spawned whenclient connect to the host, most games have non-player objects that exist inthe game world, such as enemies. In this section a spawner
is added thatcreates non-player objects that can be shot and killed.
现在玩家对象可以在客户端连接主机的时候被生成,大部分游戏会有一些非玩家对象存在于游戏中,比如说”敌人“。本节将会讲述如何使用生成器生成一些可以被射击被消灭的非玩家对象
.From the GameObject menu create a new empty game object
.Rename this object to “EnemySpawner”
.Select the EnemySpawner object
.Choose the Add Component button and add a NetworkIdentityto the object
.In the NetworkIdentity click the “Server Only” checkbox.This makes the spawner not be sent to clients.
.Choose the Add Component button and create a new scriptcalled “EnemySpawner”
.Edit the new script
.Make it a NetworkBehaviour
.Implement the virtual function OnStartServer to createthe enemies
.点击GameObject菜单,创建一个空的游戏对象
.重命名这个对象为”EnemySpawner“敌人生成器
.选中EnemySpawner对象
.添加一个NetworkIdentity(联网身份证)组件到对象上
.在NetworkIdentity组件中勾选上”Server
Only“(仅用于服务器)。这是为了这个生成器不会在客户端生效
.选择添加组件,添加一个新的脚本,并且命名为”EnemySpawner“(敌人生成器)
.打开并编辑脚本
.将脚本变成一个NetworkBehaviour脚本
.对虚函数OnStartServer(创建服务器)进行实现,在创建服务器的时候创建敌人
using UnityEngine;
using UnityEngine.Networking;

public class EnemySpawner : NetworkBehaviour {

publicGameObject enemyPrefab;
public intnumEnemies;

public override void OnStartServer()
{
for (inti=0; i < numEnemies; i++)
{
var pos= new Vector3(
Random.Range(-8.0f, 8.0f),
0.2f,
Random.Range(-8.0f, 8.0f)
);

varrotation = Quaternion.Euler( Random.Range(0,180), Random.Range(0,180),Random.Range(0,180));

varenemy = (GameObject)Instantiate(enemyPrefab, pos, rotation);
NetworkServer.Spawn(enemy);
}
}
}
Now create an Enemy prefab:
现在,我们创建一个敌人的预制
.From the GameObject menu create a new Capsule.
.Rename the object to “Enemy”
.Choose the Add Component button add a NetworkIdentitycomponent to the Enemy
.Choose the Add Component button add a NetworkTransformcomponent to the Enemy
.Drag the Enemy object into the Asset view to create aprefab
.there should be a prefab asset now called “Enemy”
.Delete the Enemy object from the scene
.Select the Enemy prefab
.Choose the Add Component button and add the Combat scriptto the Enemy
.Choose the Add Component button and add the HealthBarscript to the Enemy
.Select the NetworkManager and in Spawn Info add a newspawnable prefab
.Set the new spawn prefab to the Enemy Prefab
The bullet script was setup to only workfor players. Now update the bullet script to work with any object that has theCombat script on it:
.Open the Bullet script
.Change the collision check to use Combat instead ofPlayerMove:
.在GameObject菜单中创建一个新的胶囊对象Capsule
.重命名为“Enemy“
.给Enemy对象添加NetworkIdentity组件
.给Enemy对象添加NetworkTransform组件
.将Enemy对象拖入Asset(资源)窗口生成一个新的预制文件
.现在有了一个新的预制资源”Enemy“
.删除场景中的Enemy对象
.选中Enemy预制文件
.选择Add Component(添加组件),为Enemy添加一个Combat(战斗)脚本
.选择Add Component(添加组件),为Enemy添加一个HealthBar(血条)脚本
.选中场景中的NetworkManager(联网管理器)对象,在Spawn
Info(生成器信息)中添加一个新的生成预制
.将Enemy预制拖入新加的预制槽中
子弹脚本仅对玩家有效。现在我们需要更新子弹脚本对任意拥有Combat脚本的游戏对象都有效。
.打开Bullet脚本
.修改碰撞逻辑,使用Combat来代替PlayerMove
using UnityEngine;

public class Bullet : MonoBehaviour
{
voidOnCollisionEnter(Collision collision)
{
var hit =collision.gameObject;
varhitCombat = hit.GetComponent<Combat>();//根据需求随时修改,方便!
if(hitCombat != null)
{
hitCombat.TakeDamage(10);
Destroy(gameObject);
}
}
}
Hookup the EnemySpawner with the Enemyobject:
将敌人生成器与敌人对象进行连接:
.Select the EnemySpawner object
.Find the “Enemy” slot on the EnemySpawner component
.Drag the Enemy prefab into the slot
.Set the numEnemies value to 4
.选中场景中的EnemySpawner(敌人生成器)对象
.在对象的EnemySpawner组件上找到Enemy的槽
.将Enemy预制文件拖入这个槽
.将组件上NumEnemies(敌人数量)设置为4
Test Enemies:
测试敌人:
.Build and run the game
.When starting as Host, four enemies should be created atrandom locations
.The player should be able to shoot enemies, and theirhealth should go down
.When the client joins they should see the enemies in thesame positions, and same health values as on the server
.打包运行游戏
.当建立一个主机时,4个敌人会被创建在随机的位置上
.玩家可以对敌人进行设计,敌人被击中后血量会降低
.当有其他的客户端加入游戏,他们可以看到敌人在同样的位置,拥有同样的血量
Destroying Enemies
销毁敌人
While the enemies can be shot by bulletsand their health goes down, then respawn like players. Enemies should bedestroyed when their health reaches zero instead of respawning.
现在敌人被子弹击中时血量会下降,然后会像玩家一样复活。我们希望敌人在血量到达0的时候被销毁而不是复活。
.Open the Combat script
.Add a “destroyOnDeath” variable
.Check destroyOnDeath when health reaches zero
.打开Combat脚本
.添加destroyOnDeath(死亡时销毁)变量
.在血量降到0时,判断destroyOnDeath的条件
using UnityEngine;
using UnityEngine.Networking;

public class Combat : NetworkBehaviour
{
public constint maxHealth = 100;
public booldestroyOnDeath;

[SyncVar]
public inthealth = maxHealth;

public voidTakeDamage(int amount)
{
if (!isServer)
return;

health -=amount;
if (health<= 0)
{
if(destroyOnDeath)
{
Destroy(gameObject);
}
else
{
health = maxHealth;

//called on the server, will be invoked on the clients
// 在服务器上执行,在客户端上被调用
RpcRespawn();
}
}
}

[ClientRpc]
voidRpcRespawn()
{
if(isLocalPlayer)
{
// move back to zero location
// 移动回零点原点位置
transform.position = Vector3.zero;
}
}
}
.Select the Enemy prefab
.Set the destroyOnDeath checkbox to true for the Enemy
.选中Enemy(敌人)预制文件
.在敌人预制上勾选上DestroyOnDeath(死亡时销毁)
Now the enemy will be destroyed whenhealth reaches zero, but players will respawn.
现在敌人的血量降为0时会被销毁,但是玩家血量为0时还是复活
Spawn Positions for players
生成玩家的坐标
Players currently all appear at the zeropoint when they are created. This means that they are potentially on top ofeach other. Player should spawn at different locations.
TheNetworkStartPosition component can be used to do this.
玩家目前会被创建在坐标原点。这意味着他们有可能在彼此很近的地方。我们需要玩家生成在不同的位置上。NetworkStartPosition(联网初始坐标)组件可以用于处理这种情况
.Create a new empty GameObject
.Rename the object to “Pos1”
.Choose the Add Component button and add theNetworkStartPosition component
.Move the Pos1 object to the position (–3,0,0)
.Create a second empty GameObject
.Rename the object to “Pos2”
.Choose the Add Component button and add theNetworkStartPosition component
.Move the Pos2 object to the position (3,0,0)
.Find the NetworkManager and select it.
.Open the “Spawn Info” foldout
.Change the “Player Spawn Method” to “Round Robin”
.Build and run the game
.Player objects should now be created at the locations ofthe Pos1 and Pos2 objects instead of at zero.
.创建一个新的空游戏对象
.将其重命名为”Pos1“
.选择它并且给这个对象添加一个NetworkStartPosition(联网初始位置)组件
.将这个对象的坐标设为(-3,0,0)
.创建第二个空游戏对象
.重命名为”Pos2”
.选择并给这个对象添加NetworkStartPosition(联网初始位置)组件
.将Pos对象的坐标设为(3,0,0)
.在场景中找到NetworkManager对象并选中它
.打开“SpawnInfo”展开信息
.修改“Player SpawnMethod”(玩家生成方法)为“Round
Robin”(轮转)
.打包运行游戏
.玩家对象现在会Pos1和Pos2之间被创建而不是坐标原点了

相关文章推荐
- Unity网络教程翻译(一)从零开始编写一个网络游戏
- Unity网络教程翻译(三)多人游戏大厅
- Unity网络教程翻译(三)多人游戏大厅
- [Unity通信]一个基于socket的3DARPG网络游戏(二):消息分类处理和json的使用
- 网络游戏外挂编写初级教程
- Unity网络多玩家游戏开发教程第1章Unity自带网络功能
- 从零开始编写网络游戏 --- 基础篇
- [入门教程]使用Cocos2d-html5游戏引擎编写一个简单的游戏 第一回合: 搭建开发环境
- 从零开始编写网络游戏--基础篇(1)
- 用Python编写一个简单的俄罗斯方块游戏的教程
- 从零开始编写网络游戏--基础篇(1)
- 网络游戏外挂编写初级教程
- 网络游戏外挂编写初级教程
- [Unity通信]一个基于socket的3DARPG网络游戏(一):建立连接和事件分发
- Unity网络多玩家游戏开发教程第1章Unity自带网络功能
- 网络游戏外挂编写初级教程
- 网络游戏外挂编写初级教程
- 从零开始编写网络游戏
- 网络游戏外挂编写初级教程
- 分享使用Unity 3D免费版本编写游戏的教程