003商城项目:数据库的创建以及ssm框架的整合
2016-12-27 21:41
701 查看
我们创建一个数据库。如下:

然后开始整合框架:
先给出整合框架的思路:
我们的Dao层用的是Mybatis,其实Mybatis与Spring整合要做的就是把他的数据库连接这部分全部交给Spring来管理。其他Mybatis不用做什么。
我们分三层整合
第一步:
Dao层:也就是Mybatis与SPring在数据库连接的整合。
包含三个方面:
1、配置数据源
2、需要让spring容器管理SqlsessionFactory,单例存在。
3、把mapper的代理对象放到spring容器中。使用扫描包的方式加载mapper的代理对象。
使用的是Mybatis,创建SqlMapConfig.xml。这个文件只要创建一下就好,里面可以什么都不写。
如下:
SqlMapConfig.xml:
applicationContext-dao.xml文件。这个文件就是整合Mybatis与数据库的连接全部交给Spring来管理。
如下:
这里的db.properties:
解释一下为什么要上面这样配:
我们自顶向下解释:我们配了一个扫描包,MapperScannerConfigurer.这个类里面需要两个属性:

basePackage使我们要扫描的包路径。
sqlSessionFactory是里面的一个属性,spring容器生成MapperScannerConfigurer对象时要从IOC容器里面去拿这个sqlSessionFactory对象,所以我们之前要配置
<bean id="sqlSessionFactory"。但是要配置sqlSessionFactory时有需要两个属性:

所以我们这么配,就是说就算我们的SqlMapConfig.xml里面什么都没有,就是空的,我们也要把这个配置文件写上。不然就要报错。
第二步:Service:
这一层包含两个方面:
1、事务管理
2、需要把service实现类对象放到spring容器中管理。
我们先配置把service实现类对象放到spring容器中管理。
applicationContext-service.xml
我们再配置事务管理:要么不执行要么一起执行。
这里是spring的传统AOP编程参考这篇文章10Spring_AOP编程(传统编程)。
第三步:
接下来我们来配置表现层:
springmvc.xml:
第四步:最后配置web.xml来启动spring容器和拦截链接,配置springmvc,解决post乱码.
web.xml:
注意我们上面这么配置的话,所有的请求都会被拦截的。包括我们请求的静态资源,而且我们创建静态资源如下:
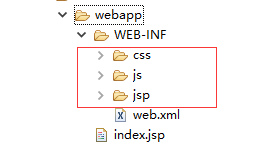
我们知道WEB-INFO下面的资源除了服务器转发,浏览器是不能访问的,那么我们怎么解决这么问题呢。我们可以在spirngMvc.xml中这么写:

上面的红色框框就做了资源的映射,凡是请求形式是/css/**的都会被转成/WEB-INF/CSS/这种形式,这样静态资源就不会被拦截了可以正常发访问了。
整合测试:碰到的问题比较多,就放在下一篇博客里面讲了。
然后开始整合框架:
先给出整合框架的思路:
我们的Dao层用的是Mybatis,其实Mybatis与Spring整合要做的就是把他的数据库连接这部分全部交给Spring来管理。其他Mybatis不用做什么。
我们分三层整合
第一步:
Dao层:也就是Mybatis与SPring在数据库连接的整合。
包含三个方面:
1、配置数据源
2、需要让spring容器管理SqlsessionFactory,单例存在。
3、把mapper的代理对象放到spring容器中。使用扫描包的方式加载mapper的代理对象。
使用的是Mybatis,创建SqlMapConfig.xml。这个文件只要创建一下就好,里面可以什么都不写。
如下:
SqlMapConfig.xml:
<?xml version="1.0" encoding="UTF-8" ?>
<!DOCTYPE configuration
PUBLIC "-//mybatis.org//DTD Config 3.0//EN"
"http://mybatis.org/dtd/mybatis-3-config.dtd">
<configuration>

</configuration>
applicationContext-dao.xml文件。这个文件就是整合Mybatis与数据库的连接全部交给Spring来管理。
如下:
<?xml version="1.0" encoding="UTF-8"?>
<beans xmlns="http://www.springframework.org/schema/beans"
xmlns:context="http://www.springframework.org/schema/context" xmlns:p="http://www.springframework.org/schema/p"
xmlns:aop="http://www.springframework.org/schema/aop" xmlns:tx="http://www.springframework.org/schema/tx"
xmlns:xsi="http://www.w3.org/2001/XMLSchema-instance"
xsi:schemaLocation="http://www.springframework.org/schema/beans http://www.springframework.org/schema/beans/spring-beans-4.0.xsd http://www.springframework.org/schema/context http://www.springframework.org/schema/context/spring-context-4.0.xsd http://www.springframework.org/schema/aop http://www.springframework.org/schema/aop/spring-aop-4.0.xsd http://www.springframework.org/schema/tx http://www.springframework.org/schema/tx/spring-tx-4.0.xsd http://www.springframework.org/schema/util http://www.springframework.org/schema/util/spring-util-4.0.xsd">
<!-- 数据库连接池 -->
<!-- 加载配置文件 -->
<context:property-placeholder location="classpath:resource/db.properties" />
<!-- 数据库连接池 -->
<bean id="dataSource" class="com.alibaba.druid.pool.DruidDataSource"
destroy-method="close">
<property name="url" value="${jdbc.url}" />
<property name="username" value="${jdbc.username}" />
<property name="password" value="${jdbc.password}" />
<property name="driverClassName" value="${jdbc.driver}" />
<property name="maxActive" value="10" />
<property name="minIdle" value="5" />
</bean>
<!-- 配置sqlsessionFactory -->
<bean id="sqlSessionFactory" class="org.mybatis.spring.SqlSessionFactoryBean">
<property name="configLocation" value="classpath:mybatis/SqlMapConfig.xml"></property>
<property name="dataSource" ref="dataSource"></property>
</bean>
<!-- 配置扫描包,加载mapper代理对象

-->
<bean class="org.mybatis.spring.mapper.MapperScannerConfigurer">
<property name="basePackage" value="com.taotao.mapper"></property>
</bean>
</beans>
这里的db.properties:
jdbc.driver=com.mysql.jdbc.Driver
jdbc.url=jdbc:mysql://127.0.0.1:3306/taotao?characterEncoding=utf-8
jdbc.username=root
jdbc.password=1234
解释一下为什么要上面这样配:
我们自顶向下解释:我们配了一个扫描包,MapperScannerConfigurer.这个类里面需要两个属性:
basePackage使我们要扫描的包路径。
sqlSessionFactory是里面的一个属性,spring容器生成MapperScannerConfigurer对象时要从IOC容器里面去拿这个sqlSessionFactory对象,所以我们之前要配置
<bean id="sqlSessionFactory"。但是要配置sqlSessionFactory时有需要两个属性:
所以我们这么配,就是说就算我们的SqlMapConfig.xml里面什么都没有,就是空的,我们也要把这个配置文件写上。不然就要报错。
第二步:Service:
这一层包含两个方面:
1、事务管理
2、需要把service实现类对象放到spring容器中管理。
我们先配置把service实现类对象放到spring容器中管理。
applicationContext-service.xml
<?xml version="1.0" encoding="UTF-8"?>
<beans xmlns="http://www.springframework.org/schema/beans"
xmlns:context="http://www.springframework.org/schema/context" xmlns:p="http://www.springframework.org/schema/p"
xmlns:aop="http://www.springframework.org/schema/aop" xmlns:tx="http://www.springframework.org/schema/tx"
xmlns:xsi="http://www.w3.org/2001/XMLSchema-instance"
xsi:schemaLocation="http://www.springframework.org/schema/beans http://www.springframework.org/schema/beans/spring-beans-4.0.xsd http://www.springframework.org/schema/context http://www.springframework.org/schema/context/spring-context-4.0.xsd http://www.springframework.org/schema/aop http://www.springframework.org/schema/aop/spring-aop-4.0.xsd http://www.springframework.org/schema/tx http://www.springframework.org/schema/tx/spring-tx-4.0.xsd http://www.springframework.org/schema/util http://www.springframework.org/schema/util/spring-util-4.0.xsd">
<!-- 扫描包加载Service实现类 -->
<context:component-scan base-package="com.taotao.service"></context:component-scan>
</beans>
我们再配置事务管理:要么不执行要么一起执行。
<?xml version="1.0" encoding="UTF-8"?>
<beans xmlns="http://www.springframework.org/schema/beans"
xmlns:context="http://www.springframework.org/schema/context" xmlns:p="http://www.springframework.org/schema/p"
xmlns:aop="http://www.springframework.org/schema/aop" xmlns:tx="http://www.springframework.org/schema/tx"
xmlns:xsi="http://www.w3.org/2001/XMLSchema-instance"
xsi:schemaLocation="http://www.springframework.org/schema/beans http://www.springframework.org/schema/beans/spring-beans-4.0.xsd http://www.springframework.org/schema/context http://www.springframework.org/schema/context/spring-context-4.0.xsd http://www.springframework.org/schema/aop http://www.springframework.org/schema/aop/spring-aop-4.0.xsd http://www.springframework.org/schema/tx http://www.springframework.org/schema/tx/spring-tx-4.0.xsd http://www.springframework.org/schema/util http://www.springframework.org/schema/util/spring-util-4.0.xsd">
<!-- 事务管理器 -->
<bean id="transactionManager"
class="org.springframework.jdbc.datasource.DataSourceTransactionManager">
<!-- 数据源 -->
<property name="dataSource" ref="dataSource" />
</bean>
<!-- 通知 -->
<tx:advice id="txAdvice" transaction-manager="transactionManager">
<tx:attributes>
<!-- 传播行为 -->
<tx:method name="save*" propagation="REQUIRED" />
<tx:method name="insert*" propagation="REQUIRED" />
<tx:method name="add*" propagation="REQUIRED" />
<tx:method name="create*" propagation="REQUIRED" />
<tx:method name="delete*" propagation="REQUIRED" />
<tx:method name="update*" propagation="REQUIRED" />
<tx:method name="find*" propagation="SUPPORTS" read-only="true" />
<tx:method name="select*" propagation="SUPPORTS" read-only="true" />
<tx:method name="get*" propagation="SUPPORTS" read-only="true" />
</tx:attributes>
</tx:advice>
<!-- 切面 -->
<aop:config>
<aop:advisor advice-ref="txAdvice"
pointcut="execution(* com.taotao.service.*.*(..))" />
</aop:config>
</beans>
这里是spring的传统AOP编程参考这篇文章10Spring_AOP编程(传统编程)。
第三步:
接下来我们来配置表现层:
springmvc.xml:
<?xml version="1.0" encoding="UTF-8"?>
<beans xmlns="http://www.springframework.org/schema/beans"
xmlns:xsi="http://www.w3.org/2001/XMLSchema-instance" xmlns:p="http://www.springframework.org/schema/p"
xmlns:context="http://www.springframework.org/schema/context"
xmlns:mvc="http://www.springframework.org/schema/mvc"
xsi:schemaLocation="http://www.springframework.org/schema/beans http://www.springframework.org/schema/beans/spring-beans.xsd http://www.springframework.org/schema/mvc http://www.springframework.org/schema/mvc/spring-mvc-4.0.xsd http://www.springframework.org/schema/context http://www.springframework.org/schema/context/spring-context.xsd">
<context:component-scan base-package="com.taotao.controller" />
<mvc:annotation-driven />
<bean
class="org.springframework.web.servlet.view.InternalResourceViewResolver">
<property name="prefix" value="/WEB-INF/jsp/" />
<property name="suffix" value=".jsp" />
</bean>
</beans>
第四步:最后配置web.xml来启动spring容器和拦截链接,配置springmvc,解决post乱码.
web.xml:
<?xml version="1.0" encoding="UTF-8"?>
<web-app xmlns:xsi="http://www.w3.org/2001/XMLSchema-instance"
xmlns="http://java.sun.com/xml/ns/javaee" xmlns:web="http://java.sun.com/xml/ns/javaee/web-app_2_5.xsd"
xsi:schemaLocation="http://java.sun.com/xml/ns/javaee http://java.sun.com/xml/ns/javaee/web-app_2_5.xsd" id="taotao" version="2.5">
<display-name>taotao-manager</display-name>
<welcome-file-list>
<welcome-file>index.html</welcome-file>
<welcome-file>index.htm</welcome-file>
<welcome-file>index.jsp</welcome-file>
<welcome-file>default.html</welcome-file>
<welcome-file>default.htm</welcome-file>
<welcome-file>default.jsp</welcome-file>
</welcome-file-list>
<!-- 加载spring容器 -->
<context-param>
<param-name>contextConfigLocation</param-name>
<param-value>classpath:spring/applicationContext-*.xml</param-value>
</context-param>
<listener>
<listener-class>org.springframework.web.context.ContextLoaderListener</listener-class>
</listener>
<!-- 解决post乱码 -->
<filter>
<filter-name>CharacterEncodingFilter</filter-name>
<filter-class>org.springframework.web.filter.CharacterEncodingFilter</filter-class>
<init-param>
<param-name>encoding</param-name>
<param-value>utf-8</param-value>
</init-param>
</filter>
<filter-mapping>
<filter-name>CharacterEncodingFilter</filter-name>
<url-pattern>/*</url-pattern>
</filter-mapping>
<!-- springmvc的前端控制器 -->
<servlet>
<servlet-name>taotao-manager</servlet-name>
<servlet-class>org.springframework.web.servlet.DispatcherServlet</servlet-class>
<!-- contextConfigLocation不是必须的, 如果不配置contextConfigLocation, springmvc的配置文件默认在:WEB-INF/servlet的name+"-servlet.xml" -->
<init-param>
<param-name>contextConfigLocation</param-name>
<param-value>classpath:spring/springmvc.xml</param-value>
</init-param>
<load-on-startup>1</load-on-startup>
</servlet>
<servlet-mapping>
<servlet-name>taotao-manager</servlet-name>
<url-pattern>/</url-pattern>
</servlet-mapping>
</web-app>
注意我们上面这么配置的话,所有的请求都会被拦截的。包括我们请求的静态资源,而且我们创建静态资源如下:
我们知道WEB-INFO下面的资源除了服务器转发,浏览器是不能访问的,那么我们怎么解决这么问题呢。我们可以在spirngMvc.xml中这么写:
上面的红色框框就做了资源的映射,凡是请求形式是/css/**的都会被转成/WEB-INF/CSS/这种形式,这样静态资源就不会被拦截了可以正常发访问了。
整合测试:碰到的问题比较多,就放在下一篇博客里面讲了。

相关文章推荐
- 【SSM】Eclipse使用Maven创建Web项目+整合SSM框架(这个666)
- 【SSM】Eclipse使用Maven创建Web项目+整合SSM框架
- 【SSM】Eclipse使用Maven创建Web项目+整合SSM框架
- Eclipse使用Maven创建Web项目+整合SSM框架
- 004商城项目:ssm框架的整合之后的调试
- 【SSM】Eclipse使用Maven创建Web项目+整合SSM框架
- Eclipse使用Maven创建Web项目+整合SSM框架
- IntelliJ IDEA下SSM框架整合、创建Maven项目流程(Spring + SpringMVC + MyBatis)
- 商城项目实战06:SSM框架整合之Dao层整合
- 商城项目实战09:SSM框架整合之逆向工程
- IDEA创建maven项目 整合SSM框架
- 【SSM】Eclipse使用Maven创建Web项目+整合SSM框架
- 【SSM】Eclipse使用Maven创建Web项目+整合SSM框架
- Eclipse下创建Maven项目 SSM框架整合(第一篇技术博客)
- 【SSM】Eclipse使用Maven创建Web项目+整合SSM框架
- 005商城项目:ssm框架的整合成功之后的问题:使用maven的tomcat插件时的debug
- 使用maven创建web项目,并且整合SSM框架
- IDEA创建maven项目 整合SSM框架
- 商城项目实战08:SSM框架整合之表现层整合
- 【SSM】Eclipse使用Maven创建Web项目+整合SSM框架