Java设计模式之六--适配器模式
2016-12-26 09:16
363 查看
前言:坚持就是胜利!
一、适配模式的具体应用
具体怎么用来自鸿洋大神的
今天带来适配器模式
老样子,定义:将一个类的接口转换成客户期望的另一个接口,适配器让原本接口不兼容的类可以相互合作。这个定义还好,说适配器的功能就是把一个接口转成另一个接口。
发现两张图片可以很好的解释适配器模式:
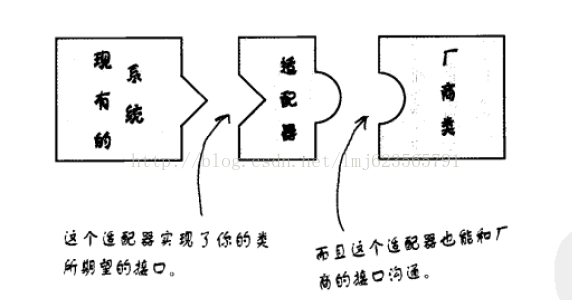
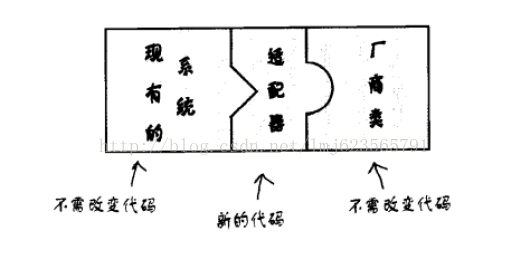
这两张图很好的说明了适配器的作用哈,话说我当年买了个欧版的HTC G17 ,还配了个插头转化器,这个插头转化器就是起得适配器的作用。下来来点代码解释哈,如题目,手机充电器一般都是5V左右吧,咱天朝的家用交流电压220V,所以手机充电需要一个适配器(降压器),有什么物理名词使用错误的,见谅。
首先一部手机:Mobile.Java
[java] view
plain copy


package com.zhy.pattern.adapter;
public class Mobile
{
/**
* 充电
* @param power
*/
public void inputPower(V5Power power)
{
int provideV5Power = power.provideV5Power();
System.out.println("手机(客户端):我需要5V电压充电,现在是-->" + provideV5Power + "V");
}
}
可以看出,手机依赖一个提供5V电压的接口:
[java] view
plain copy
package com.zhy.pattern.adapter;
/**
* 提供5V电压的一个接口
* @author zhy
*
*/
public interface V5Power
{
public int provideV5Power();
}
然后我们拥有的是220V家用交流电:
[java] view
plain copy
20000
package com.zhy.pattern.adapter;
/**
* 家用220V交流电
* @author zhy
*
*/
public class V220Power
{
/**
* 提供220V电压
* @return
*/
public int provideV220Power()
{
System.out.println("我提供220V交流电压。");
return 220 ;
}
}
下面我们需要一个适配器,完成220V转5V的作用:
[java] view
plain copy
package com.zhy.pattern.adapter;
/**
* 适配器,把220V电压变成5V
* @author zhy
*
*/
public class V5PowerAdapter implements V5Power
{
/**
* 组合的方式
*/
private V220Power v220Power ;
public V5PowerAdapter(V220Power v220Power)
{
this.v220Power = v220Power ;
}
@Override
public int provideV5Power()
{
int power = v220Power.provideV220Power() ;
//power经过各种操作-->5
System.out.println("适配器:我悄悄的适配了电压。");
return 5 ;
}
}
最后测试,我们给手机冲个电:
[java] view
plain copy
package com.zhy.pattern.adapter;
public class Test
{
public static void main(String[] args)
{
Mobile mobile = new Mobile();
V5Power v5Power = new V5PowerAdapter(new V220Power()) ;
mobile.inputPower(v5Power);
}
}
输出:
[java] view
plain copy
现有类:我提供220V交流电压。
适配器:我悄悄的适配了电压。
手机(客户端):我需要5V电压充电,现在是-->5V
可以看出,我们使用一个适配器完成了把220V转化了5V然后提供给手机使用,且我们使用了组合(OO设计原则),原有的手机,以及200V电压类都不需要变化,且手机(客户端)和220V(被适配者)完全解耦。
最后画个uml类图,便于大家理解:

上面是适配器的类图,下面是我们的例子的类图,咋样,还不错吧。没事画个图也不错,不然软件都白装了。。。。
二、比配器模式的优势
二、适配模式的应用场景(常见的listview)
在Android源码中,ListView中用到的就是适配器模式。ListView用于显示列表数据,但列表数据形式多种多样(),为了处理和显示不同的数据,我们需要对应的适配器作为桥梁。
在ListView中有一个变量ListAdapter mAdapter;是显示在view试图上的数据:
在ListAdapter中定义了所需要的接口函数:
它是继承自Adapter:

View
Code
其中Adapter定义了getCount()、getItemViewType(int position)等接口函数。
此时的ListAdapter就是一个Target目标角色,而我们的ListView就是一个Client。因此为了适配和显示一些数据,如Cursor等,所以就需要相应的适配器CursorAdapter,代码如下:
其中源角色Cursor接口如下所示:
这就将Cursor类型接口通过CursorAdapter适配器转换成目标角色ListAdapter目标接口,继而让ListView使用,并展示。
设计模式相关源码地址:https://github.com/371894545/Pattern#pattern
一、适配模式的具体应用
具体怎么用来自鸿洋大神的
今天带来适配器模式
老样子,定义:将一个类的接口转换成客户期望的另一个接口,适配器让原本接口不兼容的类可以相互合作。这个定义还好,说适配器的功能就是把一个接口转成另一个接口。
发现两张图片可以很好的解释适配器模式:
这两张图很好的说明了适配器的作用哈,话说我当年买了个欧版的HTC G17 ,还配了个插头转化器,这个插头转化器就是起得适配器的作用。下来来点代码解释哈,如题目,手机充电器一般都是5V左右吧,咱天朝的家用交流电压220V,所以手机充电需要一个适配器(降压器),有什么物理名词使用错误的,见谅。
首先一部手机:Mobile.Java
[java] view
plain copy
package com.zhy.pattern.adapter;
public class Mobile
{
/**
* 充电
* @param power
*/
public void inputPower(V5Power power)
{
int provideV5Power = power.provideV5Power();
System.out.println("手机(客户端):我需要5V电压充电,现在是-->" + provideV5Power + "V");
}
}
可以看出,手机依赖一个提供5V电压的接口:
[java] view
plain copy
package com.zhy.pattern.adapter;
/**
* 提供5V电压的一个接口
* @author zhy
*
*/
public interface V5Power
{
public int provideV5Power();
}
然后我们拥有的是220V家用交流电:
[java] view
plain copy
20000
package com.zhy.pattern.adapter;
/**
* 家用220V交流电
* @author zhy
*
*/
public class V220Power
{
/**
* 提供220V电压
* @return
*/
public int provideV220Power()
{
System.out.println("我提供220V交流电压。");
return 220 ;
}
}
下面我们需要一个适配器,完成220V转5V的作用:
[java] view
plain copy
package com.zhy.pattern.adapter;
/**
* 适配器,把220V电压变成5V
* @author zhy
*
*/
public class V5PowerAdapter implements V5Power
{
/**
* 组合的方式
*/
private V220Power v220Power ;
public V5PowerAdapter(V220Power v220Power)
{
this.v220Power = v220Power ;
}
@Override
public int provideV5Power()
{
int power = v220Power.provideV220Power() ;
//power经过各种操作-->5
System.out.println("适配器:我悄悄的适配了电压。");
return 5 ;
}
}
最后测试,我们给手机冲个电:
[java] view
plain copy
package com.zhy.pattern.adapter;
public class Test
{
public static void main(String[] args)
{
Mobile mobile = new Mobile();
V5Power v5Power = new V5PowerAdapter(new V220Power()) ;
mobile.inputPower(v5Power);
}
}
输出:
[java] view
plain copy
现有类:我提供220V交流电压。
适配器:我悄悄的适配了电压。
手机(客户端):我需要5V电压充电,现在是-->5V
可以看出,我们使用一个适配器完成了把220V转化了5V然后提供给手机使用,且我们使用了组合(OO设计原则),原有的手机,以及200V电压类都不需要变化,且手机(客户端)和220V(被适配者)完全解耦。
最后画个uml类图,便于大家理解:
上面是适配器的类图,下面是我们的例子的类图,咋样,还不错吧。没事画个图也不错,不然软件都白装了。。。。
二、比配器模式的优势
| 适配器模式可以让两个没有任何关系的类在一起运行,只要适配器这个角色能够搞定它们。 |
| 增加了类的通透性,我们访问的Target目标角色,但是具体的实现都委托给了源角色,而这些对高层次模块是透明的,也是它不需要关心得。 |
| 调高了类的复用性和灵活性非常好。如果觉得适配器不够好,只要修改适配器就行,其它的代码都不用修改,适配器就是一个灵活的构件,想用就用。 |
在Android源码中,ListView中用到的就是适配器模式。ListView用于显示列表数据,但列表数据形式多种多样(),为了处理和显示不同的数据,我们需要对应的适配器作为桥梁。
在ListView中有一个变量ListAdapter mAdapter;是显示在view试图上的数据:
/**
* The adapter containing the data to be displayed by this view
*/
ListAdapter mAdapter;
在ListAdapter中定义了所需要的接口函数:
package android.widget;

/**
* Extended {@link Adapter} that is the bridge between a {@link ListView}
* and the data that backs the list. Frequently that data comes from a Cursor,
* but that is not
* required. The ListView can display any data provided that it is wrapped in a
* ListAdapter.
*/
public interface ListAdapter extends Adapter {

/**
* Indicates whether all the items in this adapter are enabled. If the
* value returned by this method changes over time, there is no guarantee
* it will take effect.  If true, it means all items are selectable and
* clickable (there is no separator.)
*
* @return True if all items are enabled, false otherwise.
*
* @see #isEnabled(int)
*/
public boolean areAllItemsEnabled();

/**
* Returns true if the item at the specified position is not a separator.
* (A separator is a non-selectable, non-clickable item).
*
* The result is unspecified if position is invalid. An {@link ArrayIndexOutOfBoundsException}
* should be thrown in that case for fast failure.
*
* @param position Index of the item
*
* @return True if the item is not a separator
*
* @see #areAllItemsEnabled()
*/
boolean isEnabled(int position);
}
它是继承自Adapter:
View
Code
其中Adapter定义了getCount()、getItemViewType(int position)等接口函数。
此时的ListAdapter就是一个Target目标角色,而我们的ListView就是一个Client。因此为了适配和显示一些数据,如Cursor等,所以就需要相应的适配器CursorAdapter,代码如下:
public abstract class CursorAdapter extends BaseAdapter implements Filterable,
CursorFilter.CursorFilterClient {
。。。
protected Cursor mCursor;
protected ChangeObserver mChangeObserver;
protected DataSetObserver mDataSetObserver;
protected CursorFilter mCursorFilter;

。。。
/**
* Returns the cursor.
* @return the cursor.
*/
public Cursor getCursor() {
return mCursor;
}

// 实现ListAdapter目标接口的getCount函数,通过返回源角色mCursor的方法getCount函数
/**
* @see android.widget.ListAdapter#getCount()
*/
public int getCount() {
if (mDataValid && mCursor != null) {
return mCursor.getCount();
} else {
return 0;
}
}

// 实现ListAdapter目标接口的getItem函数,通过返回源角色mCursor的方法moveToPosition函数
/**
* @see android.widget.ListAdapter#getItem(int)
*/
public Object getItem(int position) {
if (mDataValid && mCursor != null) {
mCursor.moveToPosition(position);
return mCursor;
} else {
return null;
}
}

// 实现ListAdapter目标接口的getItemId函数,通过返回源角色mCursor的方法getLong函数
/**
* @see android.widget.ListAdapter#getItemId(int)
*/
public long getItemId(int position) {
if (mDataValid && mCursor != null) {
if (mCursor.moveToPosition(position)) {
return mCursor.getLong(mRowIDColumn);
} else {
return 0;
}
} else {
return 0;
}
}

@Override
public boolean hasStableIds() {
return true;
}
其中源角色Cursor接口如下所示:
public interface Cursor {
。。。
/**
* Returns the numbers of rows in the cursor.
*
* @return the number of rows in the cursor.
*/
int getCount();

/**
* Returns the current position of the cursor in the row set.
* The value is zero-based. When the row set is first returned the cursor
* will be at positon -1, which is before the first row. After the
* last row is returned another call to next() will leave the cursor past
* the last entry, at a position of count().
*
* @return the current cursor position.
*/
int getPosition();

。。。

/**
* Move the cursor to an absolute position. The valid
* range of values is -1 <= position <= count.
*
* <p>This method will return true if the request destination was reachable,
* otherwise, it returns false.
*
* @param position the zero-based position to move to.
* @return whether the requested move fully succeeded.
*/
boolean moveToPosition(int position);

。。。

/**
* Returns the value of the requested column as a long.
*
* <p>The result and whether this method throws an exception when the
* column value is null, the column type is not an integral type, or the
* integer value is outside the range [<code>Long.MIN_VALUE</code>,
* <code>Long.MAX_VALUE</code>] is implementation-defined.
*
* @param columnIndex the zero-based index of the target column.
* @return the value of that column as a long.
*/
long getLong(int columnIndex);

。。。
}
这就将Cursor类型接口通过CursorAdapter适配器转换成目标角色ListAdapter目标接口,继而让ListView使用,并展示。
设计模式相关源码地址:https://github.com/371894545/Pattern#pattern

相关文章推荐
- 我理解的--java 单例模式
- 我理解的--java工厂模式
- 我理解的--java建造者模式
- 我理解的--java组合模式
- 我理解的--java门面模式
- 我理解的--java策略模式
- 我理解的--java模板方法模式
- 我理解的--java观察者模式
- 我理解的--java备忘录模式
- 我理解的--java中介者模式
- Java设计模式(一) 简单工厂模式不简单
- Java设计模式(十一) 享元模式
- Java设计模式(二) 工厂方法模式
- 从赵本山的小品联想到的Java设计模式
- JAVA设计模式学习第三天 设计模式之Chain of Responsibility——项目篇
- 学习:java设计模式—工厂模式
- 设计模式----简单工厂模式
- java设计模式-builder模式
- Java设计模式 创建模式-工厂模式(Factory)