jconsole监控远程linux tomcat运行情况的配置 (转)
2016-12-24 22:00
591 查看
来自:http://zhumeng8337797.blog.163.com/blog/static/100768914201242494649455/
步骤如下:
1.编辑tomcat/bin/catalina.sh
Bash代码
vi catalina.sh
在其中“
# ----- Execute The Requested Command -----------------------------------------”
之前插入新的一行(中间没有换行),内容如下:
Vi catalina.sh代码
CATALINA_OPTS="$CATALINA_OPTS -Djava.rmi.server.hostname=jdzz10.ucjoy.com -Dcom.sun.management.jmxremote -Dcom.sun.management.jmxrem
ote.port=12345 -Dcom.sun.management.jmxremote.ssl=false -Dcom.sun.management.jmxremote.authenticate=true"
插入后,应该如图:

(其中的选中部分为新增内容)
2.编辑jmxremote.access和jmxremote.password
Bash代码
cd /usr/java/jdk1.6.0_18/jre/lib/management
mv jmxremote.password.template jmxremote.password
chmod 600 jmxremote.access jmxremote.password
vi jmxremote.password
jmxremote.access 一般保持原始内容不变即可。
对于jmxremote.password,将 其中的:
# monitorRole mzxwswj
# controlRole mzxwswj
井号注释取消掉。其中monitorRole为只拥有只读权限的角色,controlRole有更高权限:读写等等。
3.
a.最后将端口加入防火墙信任列表
Bash代码
vi /etc/sysconfig/iptables
编辑iptables,加入新一行内容:-A RH-Firewall-1-INPUT -p tcp -m state --state NEW -m tcp --dport 12345 -j ACCEPT
如图(选中内容为新增的):
要是想图省事,可直接:【 service iptables stop 】表示直接关闭防火墙不用重启启动直接生效

b.启动tomcat
Bash代码
/usr/local/tomcat/bin/startup.sh
而我们在上面配置的jmx代理就会随tomcat一起启动。
可以使用netstat -an | grep 12345命令查看端口是否正常启动。
至此,服务器端配置完毕。
4.使用windows客户机上的jconsole连接服务器端 进行监控。
打开C:\Program Files\Java\jdk1.6.0_10\bin\jconsole.exe,输入服务器端相关信息:
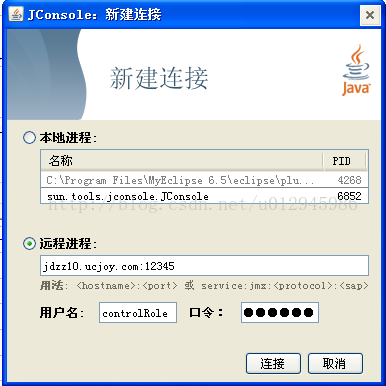
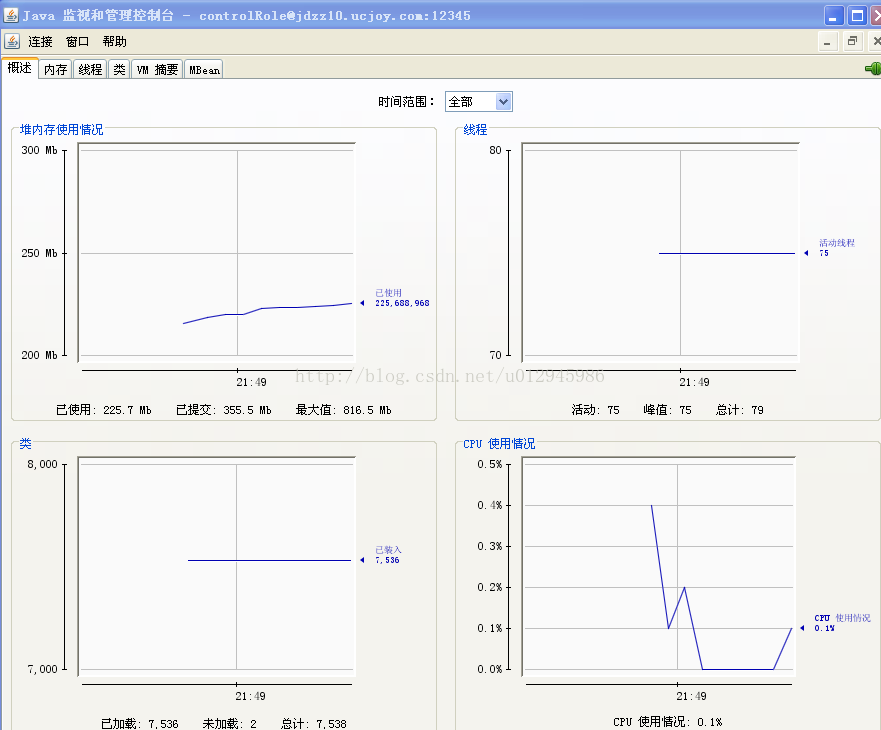
点击“连接”,进入监控页面:
1. 添加tomcat管理员帐户
添加管理员账户tomcat-users.xml
< ?xml version='1.0' encoding='utf-8'?>
2. TOMCAT内存
基 本原理:JAVA程序启动时都会JVM 都会分配一个初始内存和最大内存给这个应用程序。这个初始内存和最大内存在一定程度都会影响程序的性能。比如说在应用程序用到最大内存的时候,JVM是要 先去做垃圾回收的动作,释放被占用的一些内存。 所以想调整Tomcat的启动时初始内存和最大内存就需要向JVM声明,一般的JAVA程序在运行都可以通过中-Xms -Xmx来调整应用程序的初始内存和最大内存: 如:java -Xms64m -Xmx128m application.jar.
方法1:如果是使用的tomcat_home/bin/catalina.sh(linux)或catalina.bat(win)启动的:
修改相应文件,加上下面这句:
JAVA_OPTS='$JAVA_OPTS -server -Xmx800m -Xms512m -XX:MaxNewSize=256m -XX:MaxPermSize=256m -Djava.awt.headless=true'--ms是最小内存,mx是最大内存。这里设置最小内存为512M,最大内存为 800M。$JAVA_OPTS是保留先前设置。 CATALINA_OPTS似乎可以与JAVA_OPTS不加区别的使用。[对于catalina.bat则是如此设置: set JAVA_OPTS=-Xms1024m
-Xmx1024m]
方法2:如果使用的winnt服务启动:
在 命令行键入regedit,找到 HKEY_LOCAL_MACHINE-->SOFTWARE-->Apache Software Foundation-->Procrun 2.0-->Tomcat5-->Parameters的Java,
修改Options的值,新添加属性:
-Xms64m
-Xmx128m 或者直接修改JvmMx(最大内存)和JvmMs(最小内存)。
有人建议Xms和Xmx的值取成一样比较好,说是可以加快内存回收速度。
修改完之后,可以访问http://127.0.0.1:8080/manager/status查看内存大小。
也可以编写下面测试tomcat内存大小的jsp页面:
< %
Runtime lRuntime = Runtime.getRuntime();
out.println("*** BEGIN MEMORY STATISTICS ***
");
out.println("Free Memory: "+lRuntime.freeMemory()+"
");
out.println("Max Memory: "+lRuntime.maxMemory()+"
");
out.println("Total Memory: "+lRuntime.totalMemory()+"
");
out.println("Available Processors : "+lRuntime.availableProcessors()+"
");
out.println("*** END MEMORY STATISTICS ***");
%>
3. 增加tomcat连接数
在tomcat配置文件server.xml中的配置中,和连接数相关的参数有:
minProcessors:最小空闲连接线程数,用于提高系统处理性能,默认值为10
maxProcessors:最大连接线程数,即:并发处理的最大请求数,默认值为75
acceptCount:允许的最大连接数,应大于等于maxProcessors,默认值为100
enableLookups:是否反查域名,取值为:true或false。为了提高处理能力,应设置为false
connectionTimeout: 网络连接超时,单位:毫秒。设置为0表示永不超时,这样设置有隐患的。通常可设置为30000毫秒。 其中和最大连接数相关的参数为maxProcessors和acceptCount。如果要加大并发连接数,应同时加大这两个参数。 web server允许的最大连接数还受制于操作系统的内核参数设置,通常Windows是2000个左右,Linux是1000个左右。
如:
maxThreads="150"
minSpareThreads="25"
maxSpareThreads="75"
acceptCount="100"
/>
maxThreads="150" 表示最多同时处理150个连接
minSpareThreads="25" 表示即使没有人使用也开这么多空线程等待
maxSpareThreads="75" 表示如果最多可以空75个线程,例如某时刻有80人访问,之后没有人访问了,则tomcat不会保留80个空线程,而是关闭5个空的。
acceptCount="100" 当同时连接的人数达到maxThreads时,还可以接收排队的连接,超过这个连接的则直接返回拒绝连接。
4.使用Jconsole监控
在需要监控的tomcat_home/bin/catalina.sh(linux)文件中添加下面语句:JAVA_OPTS="$JAVA_OPTS -Dcom.sun.management.jmxremote.port=8089
-Dcom.sun.management.jmxremote.ssl=false
-Dcom.sun.management.jmxremote.authenticate=false"
设置一个新的端口号。然后在本机dos下输入Jconsole命令,弹出“JAVA 监视和管理控制台”,如果是远程监视,就输入:, 这个port就上上面配置的8089,然后再输入远程主机的用户名跟口令,就可以监控啦。 传说这里面还可以加一句话"-Djava.rmi.server.hostname=192.168.1.80" 没有试过 ⊙﹏⊙b汗 先拷贝上一句话,留作记忆: 再找找远程tomcat的jmx配置,多了个参数-Djava.rmi.server.hostname=ip_or_hostname。然后我就加上了
服务器的IP。然后再连接就可以了。对这样的情况有点不解,再官方又没有找任何这个参数的说明。回来后,再试用一下。在虚拟机的开一个linux,然后配 上jmx参数(没有java.rmi.server.hostname的)。结果可以连接。... 公司的为什么不能连接呢?为什么加了IP就行?怀疑多网卡。然后在虚拟机上再加一个网上,然后启动 tomcat ,恩,不能连接(没有server.hostname),然后再加上java.rmi.server.hostname启动 tomcat ,结果或以连接。原来java.rmi.server.hostname是这个作用。
1.测试环境
服 务器:RedHat Linux 3.4.3-9.EL4(内核版本 2.6.9-5.EL),Tomcat5.5.20,Sun JDK 1.5.0_09,JProfiler 4.3.2 for linux(安装包:jprofiler_linux_4_3_2.sh)
客户端:Windows XP,JProfiler 4.3.2 for windows(安装包:jprofiler_windows_4_3_2.exe)
2.JProfiler软件下载地址 http://www.ej-technologies.com/
3.客户端 JProfiler 安装 略
4.服务器端 JProfiler 安装:
把 jprofiler_linux_4.3.2.sh 上传到到服务器,假设路径为 /opt/jprofiler
# cd /opt/jprofiler
# chmod +x *.sh
# ./jprofiler_linux_4.3.2.sh -c
按照提示来安装,提示都很简单,不在多说。安装路径选择 /opt/jprofiler4
注意,这里的 -c 意思是用字符方式来安装,如果机器上没有 X 则加上该参数.
5.客户端连接配置
1). 运行 JProfiler 。第一次打开会有向导,忽略它。
2). 选择 Session->Integration Wizard->New Remote Integratation
3). 选择 On a remote computer;Platform of remote computer 选择 Linux x86/AMD 64;Next
4). 输入服务器 IP ;Next
5). 输入服务器上的 jprofiler 的安装路径,如 /opt/jprofiler4 ;next
6). 选择服务器的 JDK 环境,这里是:Sun,1.5.0,hotspot;next
7). 输入端口:这里是默认值 8849;next
8). 选择启动模式:这里选第一种 wait for a connection from the jprofiler GUI;next
9). 这里会列出需要在服务器端做的配置:
Integration type: [Generic application]
Selected JVM: Sun 1.5.0 (hotspot)
Startup mode: Wait for JProfiler GUI
(1) Please insert
-agentlib:jprofilerti=port=8849 -Xbootclasspath/a:/opt/jprofiler4/bin/agent.jar
into the start command of your remote application right after the java command.
(2) Please add
/opt/jprofiler4/bin/linux-x86
to the environment variable LD_LIBRARY_PATH.
A remote session named Remote application on 192.168.40.15 will be created that connects to a running instance of the remote application that is started with the modified start command.
6.服务器端的配置
(1)修改系统环境配置文件 /etc/profile ,增加
JPROFILER_HOME=/opt/jprofiler4/bin/linux-x86
export LD_LIBRARY_PATH=$LD_LIBRARY_PATH:$JPROFILER_HOME
(2)修改TOMCAT启动文件catalina.sh,添加-agentlib:jprofilerti=port=8849 -Xbootclasspath/a:/opt/jprofiler4/bin/agent.jar 内容到CATALINA_OPTS中;
“-agentlib:jprofilerti=port=8849 -Xbootclasspath/a:/opt/jprofiler4/bin/agent.jar ” 此内容由客户端软件生成
CATALINA_OPTS="$CATALINA_OPTS -Xms128m -Xmx128m $JPDA_OPTS -agentlib:jprofilerti=port=8849 -Xbootclasspath/a:/opt/jprofiler4/bin/agent.jar"
7.Reboot Linux and startup Tomcat using startup.sh;
The log of tomcat which is $CATALINA_HOME/logs/catalina.out will show:
JProfiler> Protocol version 23
JProfiler> Using JVMTI
JProfiler> 32-bit library
JProfiler> Listening on port: 8849.
JProfiler> Native library initialized
JProfiler> Waiting for a connection from the JProfiler GUI
8.启动客户端软件
点击jprofiler菜单 session>start center>Open Session
Available session configurations中列出了刚才配置的连接,选中使用就OK了!!
9.The log of tomcat which is $CATALINA_HOME/logs/catalina.out will show:
JProfiler> Using dynamic instrumentation
JProfiler> Time measurement: elapsed time
JProfiler> CPU profiling enabled
JProfiler> Hotspot compiler enabled
JProfiler> Starting org/apache/catalina/startup/Bootstrap
10.当中断JProfiler连接时
The log of tomcat which is $CATALINA_HOME/logs/catalina.out will show:
JProfiler> Disconnected. Waiting for reconnection.
JProfiler> Listening on port: 8849.
经过我的测试发现了有以上一些问题
1、)并不是将-agentlib:jprofilerti=port=8849 -Xbootclasspath/a:/opt/jprofiler4/bin/agent.jar 加入到CATALINA_OPTS 中而是加入到
JAVA_OPTS中,加入格式如下所示:
其余步同上

JAVA_OPTS="$JAVA_OPTS "-agentlib:jprofilerti=port=8849
JAVA_OPTS="$JAVA_OPTS "-Xbootclasspath/a:/opt/jprofiler5/bin/agent.jar
下面是我采用过的一个完整的配置
if [ -r "$CATALINA_HOME"/bin/tomcat-juli.jar ]; then
JAVA_OPTS="$JAVA_OPTS "-Xms128m
JAVA_OPTS="$JAVA_OPTS "-Xmx256m
JAVA_OPTS="$JAVA_OPTS "-XX:PermSize=32m
JAVA_OPTS="$JAVA_OPTS "-XX:MaxNewSize=128m
JAVA_OPTS="$JAVA_OPTS "-XX:MaxPermSize=64m
JAVA_OPTS="$JAVA_OPTS "-Dcom.sun.management.jmxremote
JAVA_OPTS="$JAVA_OPTS "-Dcom.sun.management.jmxremote.port=9009
JAVA_OPTS="$JAVA_OPTS "-Dcom.sun.management.jmxremote.authenticate=false
JAVA_OPTS="$JAVA_OPTS "-Dcom.sun.management.jmxremote.ssl=false
JAVA_OPTS="$JAVA_OPTS "-agentlib:jprofilerti=port=8849
JAVA_OPTS="$JAVA_OPTS "-Xbootclasspath/a:/opt/jprofiler5/bin/agent.jar
JAVA_OPTS="$JAVA_OPTS "-Djava.util.logging.manager=org.apache.juli.ClassLoaderLogManager" "-Djava.util.logging.config.file="$CATALINA_BASE/conf/logging.properties"
fi
当时遇到的问题是jconsole无法连接上远程Linux上的JVM,Google看到Sun官方bugdatabase有人讲是bug,就没再理。今天再次Google,在java.sun.com/j2se/1.5.0/docs/guide/management/faq.html#linux2看到
Run "hostname -i" command. If it reports 127.0.0.1, JConsole would not be able to connect to the JVM running on that Linux machine. To fix this issue, edit /etc/hosts so that the hostname resolves to the host address.
马上修改/etc/hosts,连接成功了。对于上面提到“在一个jsp中进行while (true);死循环”的测试,一个个线程查看,发现有一个Thread在_jspService方法上始终处于Runnable状态。看来Programmer还是得用Google
【Linux查看tomcat版本】
【Linux查看tomcat版本】
一、不同的tomcat查看版本可能不同,例如有的直接执行./version.sh就可以,其他就没有;一般来说,在tomcat启动时就会有版本信息,如:
信息: Initializing Coyote HTTP/1.1 on http-8023
2009-5-6 16:38:09 org.apache.catalina.startup.Catalina load
信息: Initialization processed in 1673 ms
2009-5-6 16:38:10 org.apache.catalina.core.StandardService start
信息: Starting service Catalina
2009-5-6 16:38:10 org.apache.catalina.core.StandardEngine start
信息: Starting Servlet Engine: Apache Tomcat/6.0.16
另外还可以在以下文件中找到,但据tomcat版本不一样,文件位置稍有差异:
Tomcat5:tomcat_home\server\lib\catalina.jar org\apache\catalina\util\ServerInfo.properties
Tomcat6:tomcat_home \lib\catalina.jar org\apache\catalina\util\ServerInfo.properties (这里的两个jar包可以下载下来用rar打开然后再查看。)
# Licensed to the Apache Software Foundation (ASF) under one or more
# contributor license agreements. See the NOTICE file distributed with
# this work for additional information regarding copyright ownership.
# The ASF licenses this file to You under the Apache License, Version 2.0
# (the "License"); you may not use this file except in compliance with
# the License. You may obtain a copy of the License at
#
# http://www.apache.org/licenses/LICENSE-2.0
#
# Unless required by applicable law or agreed to in writing, software
# distributed under the License is distributed on an "AS IS" BASIS,
# WITHOUT WARRANTIES OR CONDITIONS OF ANY KIND, either express or implied.
# See the License for the specific language governing permissions and
# limitations under the License.
server.info=Apache Tomcat/6.0.16
server.number=6.0.16.0
server.built=Jan 28 2008 11:35:29
原文出自:http://dengjianqiang200.blog.163.com/blog/static/65811920094644354148/
步骤如下:
1.编辑tomcat/bin/catalina.sh
Bash代码
vi catalina.sh
在其中“
# ----- Execute The Requested Command -----------------------------------------”
之前插入新的一行(中间没有换行),内容如下:
Vi catalina.sh代码
CATALINA_OPTS="$CATALINA_OPTS -Djava.rmi.server.hostname=jdzz10.ucjoy.com -Dcom.sun.management.jmxremote -Dcom.sun.management.jmxrem
ote.port=12345 -Dcom.sun.management.jmxremote.ssl=false -Dcom.sun.management.jmxremote.authenticate=true"
插入后,应该如图:
(其中的选中部分为新增内容)
2.编辑jmxremote.access和jmxremote.password
Bash代码
cd /usr/java/jdk1.6.0_18/jre/lib/management
mv jmxremote.password.template jmxremote.password
chmod 600 jmxremote.access jmxremote.password
vi jmxremote.password
jmxremote.access 一般保持原始内容不变即可。
对于jmxremote.password,将 其中的:
# monitorRole mzxwswj
# controlRole mzxwswj
井号注释取消掉。其中monitorRole为只拥有只读权限的角色,controlRole有更高权限:读写等等。
3.
a.最后将端口加入防火墙信任列表
Bash代码
vi /etc/sysconfig/iptables
编辑iptables,加入新一行内容:-A RH-Firewall-1-INPUT -p tcp -m state --state NEW -m tcp --dport 12345 -j ACCEPT
如图(选中内容为新增的):
要是想图省事,可直接:【 service iptables stop 】表示直接关闭防火墙不用重启启动直接生效
b.启动tomcat
Bash代码
/usr/local/tomcat/bin/startup.sh
而我们在上面配置的jmx代理就会随tomcat一起启动。
可以使用netstat -an | grep 12345命令查看端口是否正常启动。
至此,服务器端配置完毕。
4.使用windows客户机上的jconsole连接服务器端 进行监控。
打开C:\Program Files\Java\jdk1.6.0_10\bin\jconsole.exe,输入服务器端相关信息:
点击“连接”,进入监控页面:
linux下tomcat优化,设置最大连接数,内存,Jconsole监控
1. 添加tomcat管理员帐户
添加管理员账户tomcat-users.xml
< ?xml version='1.0' encoding='utf-8'?>
2. TOMCAT内存
基 本原理:JAVA程序启动时都会JVM 都会分配一个初始内存和最大内存给这个应用程序。这个初始内存和最大内存在一定程度都会影响程序的性能。比如说在应用程序用到最大内存的时候,JVM是要 先去做垃圾回收的动作,释放被占用的一些内存。 所以想调整Tomcat的启动时初始内存和最大内存就需要向JVM声明,一般的JAVA程序在运行都可以通过中-Xms -Xmx来调整应用程序的初始内存和最大内存: 如:java -Xms64m -Xmx128m application.jar.
方法1:如果是使用的tomcat_home/bin/catalina.sh(linux)或catalina.bat(win)启动的:
修改相应文件,加上下面这句:
JAVA_OPTS='$JAVA_OPTS -server -Xmx800m -Xms512m -XX:MaxNewSize=256m -XX:MaxPermSize=256m -Djava.awt.headless=true'--ms是最小内存,mx是最大内存。这里设置最小内存为512M,最大内存为 800M。$JAVA_OPTS是保留先前设置。 CATALINA_OPTS似乎可以与JAVA_OPTS不加区别的使用。[对于catalina.bat则是如此设置: set JAVA_OPTS=-Xms1024m
-Xmx1024m]
方法2:如果使用的winnt服务启动:
在 命令行键入regedit,找到 HKEY_LOCAL_MACHINE-->SOFTWARE-->Apache Software Foundation-->Procrun 2.0-->Tomcat5-->Parameters的Java,
修改Options的值,新添加属性:
-Xms64m
-Xmx128m 或者直接修改JvmMx(最大内存)和JvmMs(最小内存)。
有人建议Xms和Xmx的值取成一样比较好,说是可以加快内存回收速度。
修改完之后,可以访问http://127.0.0.1:8080/manager/status查看内存大小。
也可以编写下面测试tomcat内存大小的jsp页面:
< %
Runtime lRuntime = Runtime.getRuntime();
out.println("*** BEGIN MEMORY STATISTICS ***
");
out.println("Free Memory: "+lRuntime.freeMemory()+"
");
out.println("Max Memory: "+lRuntime.maxMemory()+"
");
out.println("Total Memory: "+lRuntime.totalMemory()+"
");
out.println("Available Processors : "+lRuntime.availableProcessors()+"
");
out.println("*** END MEMORY STATISTICS ***");
%>
3. 增加tomcat连接数
在tomcat配置文件server.xml中的配置中,和连接数相关的参数有:
minProcessors:最小空闲连接线程数,用于提高系统处理性能,默认值为10
maxProcessors:最大连接线程数,即:并发处理的最大请求数,默认值为75
acceptCount:允许的最大连接数,应大于等于maxProcessors,默认值为100
enableLookups:是否反查域名,取值为:true或false。为了提高处理能力,应设置为false
connectionTimeout: 网络连接超时,单位:毫秒。设置为0表示永不超时,这样设置有隐患的。通常可设置为30000毫秒。 其中和最大连接数相关的参数为maxProcessors和acceptCount。如果要加大并发连接数,应同时加大这两个参数。 web server允许的最大连接数还受制于操作系统的内核参数设置,通常Windows是2000个左右,Linux是1000个左右。
如:
maxThreads="150"
minSpareThreads="25"
maxSpareThreads="75"
acceptCount="100"
/>
maxThreads="150" 表示最多同时处理150个连接
minSpareThreads="25" 表示即使没有人使用也开这么多空线程等待
maxSpareThreads="75" 表示如果最多可以空75个线程,例如某时刻有80人访问,之后没有人访问了,则tomcat不会保留80个空线程,而是关闭5个空的。
acceptCount="100" 当同时连接的人数达到maxThreads时,还可以接收排队的连接,超过这个连接的则直接返回拒绝连接。
4.使用Jconsole监控
在需要监控的tomcat_home/bin/catalina.sh(linux)文件中添加下面语句:JAVA_OPTS="$JAVA_OPTS -Dcom.sun.management.jmxremote.port=8089
-Dcom.sun.management.jmxremote.ssl=false
-Dcom.sun.management.jmxremote.authenticate=false"
设置一个新的端口号。然后在本机dos下输入Jconsole命令,弹出“JAVA 监视和管理控制台”,如果是远程监视,就输入:, 这个port就上上面配置的8089,然后再输入远程主机的用户名跟口令,就可以监控啦。 传说这里面还可以加一句话"-Djava.rmi.server.hostname=192.168.1.80" 没有试过 ⊙﹏⊙b汗 先拷贝上一句话,留作记忆: 再找找远程tomcat的jmx配置,多了个参数-Djava.rmi.server.hostname=ip_or_hostname。然后我就加上了
服务器的IP。然后再连接就可以了。对这样的情况有点不解,再官方又没有找任何这个参数的说明。回来后,再试用一下。在虚拟机的开一个linux,然后配 上jmx参数(没有java.rmi.server.hostname的)。结果可以连接。... 公司的为什么不能连接呢?为什么加了IP就行?怀疑多网卡。然后在虚拟机上再加一个网上,然后启动 tomcat ,恩,不能连接(没有server.hostname),然后再加上java.rmi.server.hostname启动 tomcat ,结果或以连接。原来java.rmi.server.hostname是这个作用。
1.测试环境
服 务器:RedHat Linux 3.4.3-9.EL4(内核版本 2.6.9-5.EL),Tomcat5.5.20,Sun JDK 1.5.0_09,JProfiler 4.3.2 for linux(安装包:jprofiler_linux_4_3_2.sh)
客户端:Windows XP,JProfiler 4.3.2 for windows(安装包:jprofiler_windows_4_3_2.exe)
2.JProfiler软件下载地址 http://www.ej-technologies.com/
3.客户端 JProfiler 安装 略
4.服务器端 JProfiler 安装:
把 jprofiler_linux_4.3.2.sh 上传到到服务器,假设路径为 /opt/jprofiler
# cd /opt/jprofiler
# chmod +x *.sh
# ./jprofiler_linux_4.3.2.sh -c
按照提示来安装,提示都很简单,不在多说。安装路径选择 /opt/jprofiler4
注意,这里的 -c 意思是用字符方式来安装,如果机器上没有 X 则加上该参数.
5.客户端连接配置
1). 运行 JProfiler 。第一次打开会有向导,忽略它。
2). 选择 Session->Integration Wizard->New Remote Integratation
3). 选择 On a remote computer;Platform of remote computer 选择 Linux x86/AMD 64;Next
4). 输入服务器 IP ;Next
5). 输入服务器上的 jprofiler 的安装路径,如 /opt/jprofiler4 ;next
6). 选择服务器的 JDK 环境,这里是:Sun,1.5.0,hotspot;next
7). 输入端口:这里是默认值 8849;next
8). 选择启动模式:这里选第一种 wait for a connection from the jprofiler GUI;next
9). 这里会列出需要在服务器端做的配置:
Integration type: [Generic application]
Selected JVM: Sun 1.5.0 (hotspot)
Startup mode: Wait for JProfiler GUI
(1) Please insert
-agentlib:jprofilerti=port=8849 -Xbootclasspath/a:/opt/jprofiler4/bin/agent.jar
into the start command of your remote application right after the java command.
(2) Please add
/opt/jprofiler4/bin/linux-x86
to the environment variable LD_LIBRARY_PATH.
A remote session named Remote application on 192.168.40.15 will be created that connects to a running instance of the remote application that is started with the modified start command.
6.服务器端的配置
(1)修改系统环境配置文件 /etc/profile ,增加
JPROFILER_HOME=/opt/jprofiler4/bin/linux-x86
export LD_LIBRARY_PATH=$LD_LIBRARY_PATH:$JPROFILER_HOME
(2)修改TOMCAT启动文件catalina.sh,添加-agentlib:jprofilerti=port=8849 -Xbootclasspath/a:/opt/jprofiler4/bin/agent.jar 内容到CATALINA_OPTS中;
“-agentlib:jprofilerti=port=8849 -Xbootclasspath/a:/opt/jprofiler4/bin/agent.jar ” 此内容由客户端软件生成
CATALINA_OPTS="$CATALINA_OPTS -Xms128m -Xmx128m $JPDA_OPTS -agentlib:jprofilerti=port=8849 -Xbootclasspath/a:/opt/jprofiler4/bin/agent.jar"
7.Reboot Linux and startup Tomcat using startup.sh;
The log of tomcat which is $CATALINA_HOME/logs/catalina.out will show:
JProfiler> Protocol version 23
JProfiler> Using JVMTI
JProfiler> 32-bit library
JProfiler> Listening on port: 8849.
JProfiler> Native library initialized
JProfiler> Waiting for a connection from the JProfiler GUI
8.启动客户端软件
点击jprofiler菜单 session>start center>Open Session
Available session configurations中列出了刚才配置的连接,选中使用就OK了!!
9.The log of tomcat which is $CATALINA_HOME/logs/catalina.out will show:
JProfiler> Using dynamic instrumentation
JProfiler> Time measurement: elapsed time
JProfiler> CPU profiling enabled
JProfiler> Hotspot compiler enabled
JProfiler> Starting org/apache/catalina/startup/Bootstrap
10.当中断JProfiler连接时
The log of tomcat which is $CATALINA_HOME/logs/catalina.out will show:
JProfiler> Disconnected. Waiting for reconnection.
JProfiler> Listening on port: 8849.
经过我的测试发现了有以上一些问题
1、)并不是将-agentlib:jprofilerti=port=8849 -Xbootclasspath/a:/opt/jprofiler4/bin/agent.jar 加入到CATALINA_OPTS 中而是加入到
JAVA_OPTS中,加入格式如下所示:
其余步同上
JAVA_OPTS="$JAVA_OPTS "-agentlib:jprofilerti=port=8849
JAVA_OPTS="$JAVA_OPTS "-Xbootclasspath/a:/opt/jprofiler5/bin/agent.jar
下面是我采用过的一个完整的配置
if [ -r "$CATALINA_HOME"/bin/tomcat-juli.jar ]; then
JAVA_OPTS="$JAVA_OPTS "-Xms128m
JAVA_OPTS="$JAVA_OPTS "-Xmx256m
JAVA_OPTS="$JAVA_OPTS "-XX:PermSize=32m
JAVA_OPTS="$JAVA_OPTS "-XX:MaxNewSize=128m
JAVA_OPTS="$JAVA_OPTS "-XX:MaxPermSize=64m
JAVA_OPTS="$JAVA_OPTS "-Dcom.sun.management.jmxremote
JAVA_OPTS="$JAVA_OPTS "-Dcom.sun.management.jmxremote.port=9009
JAVA_OPTS="$JAVA_OPTS "-Dcom.sun.management.jmxremote.authenticate=false
JAVA_OPTS="$JAVA_OPTS "-Dcom.sun.management.jmxremote.ssl=false
JAVA_OPTS="$JAVA_OPTS "-agentlib:jprofilerti=port=8849
JAVA_OPTS="$JAVA_OPTS "-Xbootclasspath/a:/opt/jprofiler5/bin/agent.jar
JAVA_OPTS="$JAVA_OPTS "-Djava.util.logging.manager=org.apache.juli.ClassLoaderLogManager" "-Djava.util.logging.config.file="$CATALINA_BASE/conf/logging.properties"
fi
当时遇到的问题是jconsole无法连接上远程Linux上的JVM,Google看到Sun官方bugdatabase有人讲是bug,就没再理。今天再次Google,在java.sun.com/j2se/1.5.0/docs/guide/management/faq.html#linux2看到
Run "hostname -i" command. If it reports 127.0.0.1, JConsole would not be able to connect to the JVM running on that Linux machine. To fix this issue, edit /etc/hosts so that the hostname resolves to the host address.
马上修改/etc/hosts,连接成功了。对于上面提到“在一个jsp中进行while (true);死循环”的测试,一个个线程查看,发现有一个Thread在_jspService方法上始终处于Runnable状态。看来Programmer还是得用Google
【Linux查看tomcat版本】
【Linux查看tomcat版本】
一、不同的tomcat查看版本可能不同,例如有的直接执行./version.sh就可以,其他就没有;一般来说,在tomcat启动时就会有版本信息,如:
信息: Initializing Coyote HTTP/1.1 on http-8023
2009-5-6 16:38:09 org.apache.catalina.startup.Catalina load
信息: Initialization processed in 1673 ms
2009-5-6 16:38:10 org.apache.catalina.core.StandardService start
信息: Starting service Catalina
2009-5-6 16:38:10 org.apache.catalina.core.StandardEngine start
信息: Starting Servlet Engine: Apache Tomcat/6.0.16
另外还可以在以下文件中找到,但据tomcat版本不一样,文件位置稍有差异:
Tomcat5:tomcat_home\server\lib\catalina.jar org\apache\catalina\util\ServerInfo.properties
Tomcat6:tomcat_home \lib\catalina.jar org\apache\catalina\util\ServerInfo.properties (这里的两个jar包可以下载下来用rar打开然后再查看。)
# Licensed to the Apache Software Foundation (ASF) under one or more
# contributor license agreements. See the NOTICE file distributed with
# this work for additional information regarding copyright ownership.
# The ASF licenses this file to You under the Apache License, Version 2.0
# (the "License"); you may not use this file except in compliance with
# the License. You may obtain a copy of the License at
#
# http://www.apache.org/licenses/LICENSE-2.0
#
# Unless required by applicable law or agreed to in writing, software
# distributed under the License is distributed on an "AS IS" BASIS,
# WITHOUT WARRANTIES OR CONDITIONS OF ANY KIND, either express or implied.
# See the License for the specific language governing permissions and
# limitations under the License.
server.info=Apache Tomcat/6.0.16
server.number=6.0.16.0
server.built=Jan 28 2008 11:35:29
原文出自:http://dengjianqiang200.blog.163.com/blog/static/65811920094644354148/

相关文章推荐
- jconsole监控远程linux tomcat运行情况的配置
- jconsole监控远程linux tomcat运行情况的配置 (转)
- jconsole监控远程linux下tomcat运行情况的配置
- jconsole监控远程linux tomcat运行情况的配置
- jconsole监控远程linux tomcat运行情况的配置 (转)
- jconsole监控远程linux tomcat运行情况的配置
- jconsole监控远程linux tomcat运行情况的配置
- jconsole监控远程linux tomcat运行情况的配置
- Tomcat内存监控 JConsole / JProfiler 监控远程linux tomcat运行情况的配置
- win10下通过jconsole监控远程centos tomcat运行情况
- linux 配置tomcat运行远程监控(JMX)
- 通过jconsole查看tomcat运行情况的配置方法——基于JDK1.5、Linux(Redhat5.5)、Tomcat6
- 通过jconsole查看tomcat运行情况的配置方法——基于JDK1.5、Linux(Redhat5.5)、Tomcat6
- jconsole 监控 tomcat使用情况如何配置
- Linux crontab的使用方式,sh脚本的编写,sh脚本自动启动tomcat服务器,sh监控系统运行情况
- 远程监控Tomcat的JVM运行情况详解
- Jconsole监控tomcat 的JVM内存(远程、linux、windows)
- [置顶] Tomcat开启远程监控Jconsole配置
- 远程监控tomcat的JVM运行情况详解
- 使用JCONSOLE监控远程LINUX运行的JAVA进程,总是在报连接失败的错误。