Linux环境搭建nginx+2个tomcat+2个redis(主从复制)
2016-12-20 18:15
661 查看
转自:http://blog.csdn.net/u013410747/article/details/50651995
实现流程图,自己画的图,容易理解。
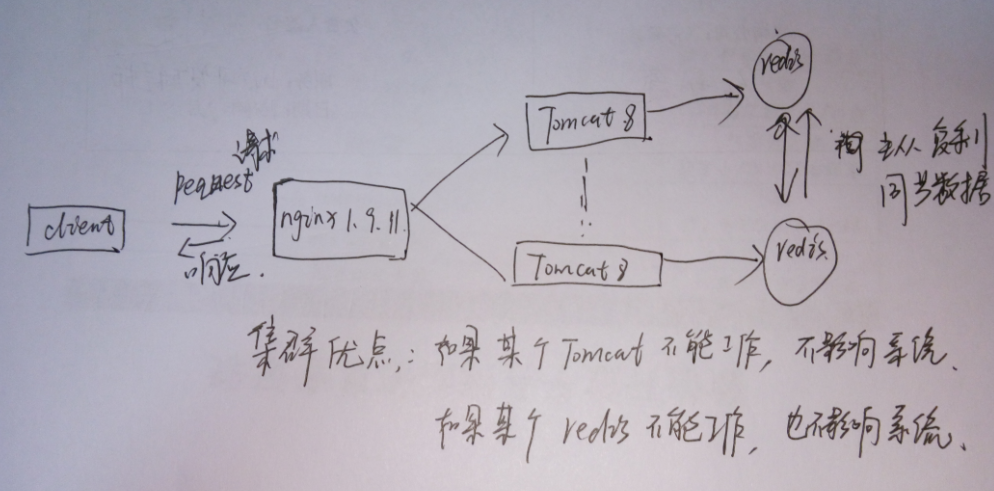 先来搭建nginx-1.9.111.先本地下载nginx,从本地上传nginx-1.9.11.tar.gz到centos服务器上
pscp C:\Users\Administrator\Desktop\linux版本\nginx
-1.9.11.tar.gz  root@115.29.144.131:/root
12122.解压后得到以下目录
tar -zxvf nginx-1.9.11.tar.gz11
 3.安装nginx前,要确保系统安装了g++、gcc、openssl-devel、pcre-devel和zlib-devel软件
yum install gcc-c++
yum -y install zlib zlib-devel openssl openssl--devel pcre pcre-devel
12124.检查系统安装的nginx:
find -name nginx115.删除系统额nginx
yum remove nginx116.安装nginx
cd nginx-1.9.11
./configure --prefix=/usr/local/nginx
make
make install
123412347.启动nginx
#方法1
[root@admin nginx-1.9.11]# /usr/local/nginx/sbin/nginx -c /usr/local/nginx/conf/nginx.conf
#方法2
[root@admin nginx-1.9.11]# cd /usr/local/nginx/sbin
[root@admin sbin]# ./nginx
12345123458.停止与重启ngxin
停止 #查询nginx主进程号 ps -ef | grep nginx #停止进程 kill -QUIT 主进程号 #快速停止 kill -TERM 主进程号 #强制停止 pkill -9 nginx 重启 [root@admin local]# /usr/local/nginx/sbin/nginx -s reload12345678910111234567891011nginx安装失败请参考这里Centos环境搭建两个tomcat8 请点击这里接下来来安装redis1.本地下载redis3.0.7.tar.gz,上传到linux服务器
pscp C:\Users\Administrator\Desktop\linux版本\redis
-3.0.7.tar.gz  root@115.29.144.131:/root
12122.编译redis
tar zxvf redis3.0.7.tar.gz,
cd redis3.0.7
make
123123make命令执行完成后,会在src目录下生成5个可执行文件,分别是redis-server、redis-cli、redis-benchmark、redis-check-aof、redis-check-dump 作用:redis-server:Redis服务器的daemon启动程序 redis-cli:Redis命令行操作工具。当然,你也可以用telnet根据其纯文本协议来操作 redis-benchmark:Redis性能测试工具,测试Redis在你的系统及你的配置下的读写性能 redis-check-aof:更新日志检查redis-check-dump:用于本地数据库检查 3.安装
make PREFIX=/usr/local install114.配置 Redis修改redis.conf文件的内容,这里给一个例子
# Redis configuration file example

# By default Redis does not run as a daemon. Use 'yes' if you need it.
# Note that Redis will write a pid file in /var/run/redis.pid when daemonized.
daemonize no

# When run as a daemon, Redis write a pid file in /var/run/redis.pid by default.
# You can specify a custom pid file location here.
#pidfile /var/run/redis.pid
pidfile redis.pid

# Accept connections on the specified port, default is 6379
port 6379

# If you want you can bind a single interface, if the bind option is not
# specified all the interfaces will listen for connections.
#
# bind 127.0.0.1

# Close the connection after a client is idle for N seconds (0 to disable)
timeout 300

# Set server verbosity to 'debug'
# it can be one of:
# debug (a lot of information, useful for development/testing)
# notice (moderately verbose, what you want in production probably)
# warning (only very important / critical messages are logged)
loglevel debug

# Specify the log file name. Also 'stdout' can be used to force
# the demon to log on the standard output. Note that if you use standard
# output for logging but daemonize, logs will be sent to /dev/null
logfile stdout

# Set the number of databases. The default database is DB 0, you can select
# a different one on a per-connection basis using SELECT <dbid> where
# dbid is a number between 0 and 'databases'-1
databases 16

################################ SNAPSHOTTING #################################
#
# Save the DB on disk:
#
# save <seconds> <changes>
#
# Will save the DB if both the given number of seconds and the given
# number of write operations against the DB occurred.
#
# In the example below the behaviour will be to save:
# after 900 sec (15 min) if at least 1 key changed
# after 300 sec (5 min) if at least 10 keys changed
# after 60 sec if at least 10000 keys changed
save 900 1
save 300 10
save 60 10000

# Compress string objects using LZF when dump .rdb databases?
# For default that's set to 'yes' as it's almost always a win.
# If you want to save some CPU in the saving child set it to 'no' but
# the dataset will likely be bigger if you have compressible values or keys.
rdbcompression yes

# The filename where to dump the DB
dbfilename dump.rdb

# For default save/load DB in/from the working directory
# Note that you must specify a directory not a file name.
dir ./

################################# REPLICATION #################################

# Master-Slave replication. Use slaveof to make a Redis instance a copy of
# another Redis server. Note that the configuration is local to the slave
# so for example it is possible to configure the slave to save the DB with a
# different interval, or to listen to another port, and so on.
#
# slaveof <masterip> <masterport>

# If the master is password protected (using the "requirepass" configuration
# directive below) it is possible to tell the slave to authenticate before
# starting the replication synchronization process, otherwise the master will
# refuse the slave request.
#
# masterauth <master-password>

################################## SECURITY ###################################

# Require clients to issue AUTH <PASSWORD> before processing any other
# commands. This might be useful in environments in which you do not trust
# others with access to the host running redis-server.
#
# This should stay commented out for backward compatibility and because most
# people do not need auth (e.g. they run their own servers).
#
# requirepass foobared

################################### LIMITS ####################################

# Set the max number of connected clients at the same time. By default there
# is no limit, and it's up to the number of file descriptors the Redis process
# is able to open. The special value '0' means no limts.
# Once the limit is reached Redis will close all the new connections sending
# an error 'max number of clients reached'.
#
# maxclients 128

# Don't use more memory than the specified amount of bytes.
# When the memory limit is reached Redis will try to remove keys with an
# EXPIRE set. It will try to start freeing keys that are going to expire
# in little time and preserve keys with a longer time to live.
# Redis will also try to remove objects from free lists if possible.
#
# If all this fails, Redis will start to reply with errors to commands
# that will use more memory, like SET, LPUSH, and so on, and will continue
# to reply to most read-only commands like GET.
#
# WARNING: maxmemory can be a good idea mainly if you want to use Redis as a
# 'state' server or cache, not as a real DB. When Redis is used as a real
# database the memory usage will grow over the weeks, it will be obvious if
# it is going to use too much memory in the long run, and you'll have the time
# to upgrade. With maxmemory after the limit is reached you'll start to get
# errors for write operations, and this may even lead to DB inconsistency.
#
# maxmemory <bytes>

############################## APPEND ONLY MODE ###############################

# By default Redis asynchronously dumps the dataset on disk. If you can live
# with the idea that the latest records will be lost if something like a crash
# happens this is the preferred way to run Redis. If instead you care a lot
# about your data and don't want to that a single record can get lost you should
# enable the append only mode: when this mode is enabled Redis will append
# every write operation received in the file appendonly.log. This file will
# be read on startup in order to rebuild the full dataset in memory.
#
# Note that you can have both the async dumps and the append only file if you
# like (you have to comment the "save" statements above to disable the dumps).
# Still if append only mode is enabled Redis will load the data from the
# log file at startup ignoring the dump.rdb file.
#
# The name of the append only file is "appendonly.log"
#
# IMPORTANT: Check the BGREWRITEAOF to check how to rewrite the append
# log file in background when it gets too big.

appendonly no

# The fsync() call tells the Operating System to actually write data on disk
# instead to wait for more data in the output buffer. Some OS will really flush
# data on disk, some other OS will just try to do it ASAP.
#
# Redis supports three different modes:
#
# no: don't fsync, just let the OS flush the data when it wants. Faster.
# always: fsync after every write to the append only log . Slow, Safest.
# everysec: fsync only if one second passed since the last fsync. Compromise.
#
# The default is "always" that's the safer of the options. It's up to you to
# understand if you can relax this to "everysec" that will fsync every second
# or to "no" that will let the operating system flush the output buffer when
# it want, for better performances (but if you can live with the idea of
# some data loss consider the default persistence mode that's snapshotting).

appendfsync always
# appendfsync everysec
# appendfsync no

############################### ADVANCED CONFIG ###############################

# Glue small output buffers together in order to send small replies in a
# single TCP packet. Uses a bit more CPU but most of the times it is a win
# in terms of number of queries per second. Use 'yes' if unsure.
#glueoutputbuf yes

# Use object sharing. Can save a lot of memory if you have many common
# string in your dataset, but performs lookups against the shared objects
# pool so it uses more CPU and can be a bit slower. Usually it's a good
# idea.
#
# When object sharing is enabled (shareobjects yes) you can use
# shareobjectspoolsize to control the size of the pool used in order to try
# object sharing. A bigger pool size will lead to better sharing capabilities.
# In general you want this value to be at least the double of the number of
# very common strings you have in your dataset.
#
# WARNING: object sharing is experimental, don't enable this feature
# in production before of Redis 1.0-stable. Still please try this feature in
# your development environment so that we can test it better.
# shareobjects no
# shareobjectspoolsize 1024
1234567891011121314151617181920212223242526272829303132333435363738394041424344454647484950515253545556575859606162636465666768697071727374757677787980818283848586878889909192939495969798991001011021031041051061071081091101111121131141151161171181191201211221231241251261271281291301311321331341351361371381391401411421431441451461471481491501511521531541551561571581591601611621631641651661671681691701711721731741751761771781791801811821831841851861871881891901234567891011121314151617181920212223242526272829303132333435363738394041424344454647484950515253545556575859606162636465666768697071727374757677787980818283848586878889909192939495969798991001011021031041051061071081091101111121131141151161171181191201211221231241251261271281291301311321331341351361371381391401411421431441451461471481491501511521531541551561571581591601611621631641651661671681691701711721731741751761771781791801811821831841851861871881891905 . 运行redis
redis-server redis.conf11即可在后台启动redis服务,确认运行了之后,可以用redis-benchmark命令测试看看,还可以通过redis-cli命令实际操作一下,比如: ./redis-cli set foo bar OK redis-cli get foo ”bar“ 6. 关闭redis
./redis-cli shutdown

如果端口变化可以指定端口:

./redis-cli -p 6380 shutdown
1234512345
 配置第二个redis作用从redis与主redis保持数据同步关键在于修改redis.conf这个主配置文件
1.port 6389 修改端口号

2.将# slaveof <masterip> <masterport> 改为:slaveof 127.0.0.1 6379
12341234然后继续采用上面的方法启动从redis即可

采用Redis客户端检验了一下,数据果然同步了
到这里配置redis就结束了如何完成tomcat8和redis的session同步机制呢?1.添加下面这4个jar包点我下载2.修改tomcat8的context.xml文件, 第一个tomcat8内容如下<Context> <WatchedResource>WEB-INF/web.xml</WatchedResource> <Manager pathname="" /> <Valve className="com.radiadesign.catalina.session.RedisSessionHandlerValve" /> <Manager className="com.radiadesign.catalina.session.RedisSessionManager" host="localhost" port="6379" database="0" maxInactiveInterval="60"/> </Context>12345671234567第2个tomcat8内容如下
<Context>
<WatchedResource>WEB-INF/web.xml</WatchedResource>
<Manager pathname="" />
<Valve className="com.radiadesign.catalina.session.RedisSessionHandlerValve" />
<Manager className="com.radiadesign.catalina.session.RedisSessionManager"
host="localhost" port="6389" database="0" maxInactiveInterval="60"/>
</Context>
123456712345673.重新分别启动tomcat即可
#关闭
shutdown.sh
#启动
startup.sh
12341234

相关文章推荐
- Redis Cluster 3.0搭建与使用
- Redis使用
- 架构设计:系统存储(17)——Redis集群方案:高可用
- 搭建Nginx(负载均衡)+Redis(Session共享)+Tomcat集群
- Nginx配置srcache_nginx模块搭配Redis建立缓存系统
- Redis简单梳理及集群配置
- Tomcat+redis+nginx配置
- Nginx与Redis解决高并发问题
- Redis应用场景
- Redis教程(十一) Redis集群安装
- Redis教程
- PHP 使用 Redis
- Redis集群(八):Redis Sharding集群
- redis并发
- redis相关概念
- redis如何关闭持久化
- 【备忘】大型SpringMVC,Mybatis,Redis,Solr,Nginx,SSM分布式电商项目视频教程下载
- Twemproxy代理Redis-cluster
- Redis无法链接到远程服务器
- spring+redis