elasticsearch-jdbc实现MySQL同步到ElasticSearch深入详解
2016-12-15 16:42
656 查看
转自:http://blog.csdn.net/laoyang360/article/details/51694519
逐条转换为json显然不合适,需要借助第三方工具或者自己实现。核心功能点:同步增、删、改、查同步。
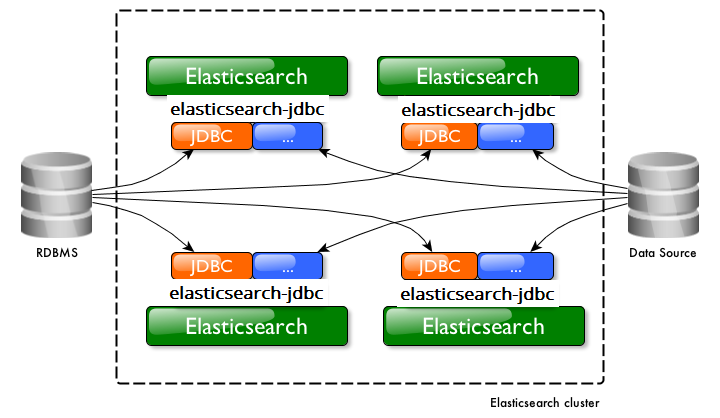
1)、elasticsearch-jdbc,严格意义上它已经不是第三方插件。已经成为独立的第三方工具。https://github.com/jprante/elasticsearch-jdbc
2)、elasticsearch-river-MySQL插件 https://github.com/scharron/elasticsearch-river-mysql
3)、Go-mysql-elasticsearch(国内作者siddontang) https://github.com/siddontang/go-mysql-elasticsearch
go-mysql-elasticsearch仍处理开发不稳定阶段。
为什么选择elasticsearch-jdbc而不是elasticsearch-river-mysql插件的原因?(参考:http://stackoverflow.com/questions/23658534/using-elasticsearch-river-mysql-to-stream-data-from-mysql-database-to-elasticsea)
1)通用性角度:elasticsearch-jdbc更通用,
2)版本更新角度:elasticsearch-jdbc GitHub活跃度很高,最新的版本2.3.3.02016年5月28日兼容Elasticsearch2.3.3版本。
而elasticsearch-river-mysql 2012年12月13日后便不再更新。
综上,选择elasticsearch-jdbc作为mysql同步Elasticsearch的工具理所当然。
1)、go-mysql-elasticsearch作者siddontang在博客提到的:
elasticsearch-river-jdbc的功能是很强大,但并没有很好的支持增量数据更新的问题,它需要对应的表只增不减,而这个几乎在项目中是不可能办到的。
http://www.jianshu.com/p/05cff717563c
2)、
博主leotse90在博文中提到elasticsearch-jdbc的缺点:那就是删除操作不能同步(物理删除)!
http://leotse90.com/2015/11/11/ElasticSearch与MySQL数据同步以及修改表结构/
我截止2016年6月16日没有测试到,不妄加评论。
elasticsearch-jdbcV2.3.2.0版本不需要安装。以下笔者使用的elasticsearch也是2.3.2测试。
操作系统:CentOS release 6.6 (Final)
看到这里,你可能会问早期的版本有什么不同呢?很大不同。从我搜集资料来看,不同点如下:
1)早期1.x版本,作为插件,需要安装。
2)配置也会有不同。
前提:
1)elasticsearch 2.3.2 安装成功,测试ok。
2)mysql安装成功,能实现增、删、改、查。
可供测试的数据库为test,表为cc,具体信息如下:
2
3
4
5
6
7
8
9
1
2
3
4
5
6
7
8
9
第一步:下载工具。
址:http://xbib.org/repository/org/xbib/elasticsearch/importer/elasticsearch-jdbc/2.3.2.0/elasticsearch-jdbc-2.3.2.0-dist.zip
第二步:导入Centos。路径自己定,笔者放到根目录下,解压。unzip elasticsearch-jdbc-2.3.2.0-dist.zip
第三步:设置环境变量。
[root@5b9dbaaa148a /]# vi /etc/profile
export JDBC_IMPORTER_HOME=/elasticsearch-jdbc-2.3.2.0
使环境变量生效:
[root@5b9dbaaa148a /]# source /etc/profile
第四步:配置使用。详细参考:https://github.com/jprante/elasticsearch-jdbc
1)、根目录下新建文件夹odbc_es 如下:
2)、新建脚本mysql_import_es.sh,内容如下;
2
3
4
5
6
7
8
9
10
11
12
13
14
15
16
17
18
19
20
21
22
23
24
25
1
2
3
4
5
6
7
8
9
10
11
12
13
14
15
16
17
18
19
20
21
22
23
24
25
3)、为 mysql_import_es.sh 添加可执行权限。
[root@5b9dbaaa148a odbc_es]# chmod a+x mysql_import_es.sh
4)执行脚本mysql_import_es.sh
[root@5b9dbaaa148a odbc_es]# ./mysql_import_es.sh
第五步:测试数据同步是否成功。
使用elasticsearch检索查询:
2
3
4
5
6
7
8
9
10
11
12
13
14
15
16
17
18
19
20
21
22
23
24
25
26
27
28
29
30
31
32
33
34
35
36
37
38
39
40
41
42
1
2
3
4
5
6
7
8
9
10
11
12
13
14
15
16
17
18
19
20
21
22
23
24
25
26
27
28
29
30
31
32
33
34
35
36
37
38
39
40
41
42
出现以上包含mysql数据字段的信息则为同步成功。
2
3
4
5
6
7
8
9
10
11
12
13
14
15
16
17
18
19
20
21
22
23
24
25
26
27
28
1
2
3
4
5
6
7
8
9
10
11
12
13
14
15
16
17
18
19
20
21
22
23
24
25
26
27
28
脚本和json文件分开,脚本执行前先加载json文件。
执行方式:直接运行脚本 ./mysql_import_es_simple.sh 即可。
目标:实现从表cc中查询id=3的name信息。
1)MySQL中sql语句查询:
2
3
4
5
6
7
1
2
3
4
5
6
7
2)elasticsearch检索:
2
3
4
5
6
7
8
9
10
11
12
13
14
15
16
17
18
19
20
21
22
23
24
25
26
27
1
2
3
4
5
6
7
8
9
10
11
12
13
14
15
16
17
18
19
20
21
22
23
24
25
26
27
错误日志位置:/odbc_es/logs
日志内容:
[root@5b9dbaaa148a logs]# tail -f jdbc.log
[04:03:39,570][INFO ][org.xbib.elasticsearch.helper.client.BaseTransportClient][pool-3-thread-1] after auto-discovery connected to [{5b9dbaaa148a}{aksn2ErNRlWjUECnp_8JmA}{10.8.5.101}{10.8.5.101:9300}{master=true}]
Bug1、[02:46:23,894][ERROR][importer.jdbc ][pool-3-thread-1] error while processing request: cluster state is RED and not YELLOW, from here on, everything will fail!
原因:
you created an index with replicas but you had only one node in the cluster. One way to solve this problem is by allocating them on a second node. Another way is by turning replicas off.
你创建了带副本 replicas 的索引,但是在你的簇中只有一个节点。
解决方案:
方案一:允许分配‘它们’到第二个节点。
方案二:关闭副本replicas(非常可行)。如下:
2
3
4
5
6
1
2
3
4
5
6
‘
Bug2、[13:00:37,137][ERROR][importer.jdbc ][pool-3-thread-1] error while processing request: no cluster nodes available, check settings {autodiscover=false, client.transport.ignore_cluster_name=false, client.transport.nodes_sampler_interval=5s, client.transport.ping_timeout=5s,
cluster.name=elasticsearch,
org.elasticsearch.client.transport.NoNodeAvailableException: no cluster nodes available, check
解决方案:
见上脚本中新增:
“elasticsearch.cluster”:”my-application”, #簇名,和/usr/local/elasticsearch/config/elasticsearch.yml 簇名保持一致。
参考:
http://stackoverflow.com/questions/11944915/getting-an-elasticsearch-cluster-to-green-cluster-setup-on-os-x
2016-6-16 思于家中床前
作者:铭毅天下
转载请标明出处,原文地址:http://blog.csdn.net/laoyang360/article/details/51694519
如果感觉本文对您有帮助,请点击‘顶’支持一下,您的支持是我坚持写作最大的动力,谢谢!
1.如何实现mysql与elasticsearch的数据同步?
逐条转换为json显然不合适,需要借助第三方工具或者自己实现。核心功能点:同步增、删、改、查同步。
2、mysql与elasticsearch同步的方法有哪些?优缺点对比?
目前该领域比较牛的插件有:
1)、elasticsearch-jdbc,严格意义上它已经不是第三方插件。已经成为独立的第三方工具。https://github.com/jprante/elasticsearch-jdbc 2)、elasticsearch-river-MySQL插件 https://github.com/scharron/elasticsearch-river-mysql
3)、Go-mysql-elasticsearch(国内作者siddontang) https://github.com/siddontang/go-mysql-elasticsearch
1-3同步工具/插件对比:
go-mysql-elasticsearch仍处理开发不稳定阶段。 为什么选择elasticsearch-jdbc而不是elasticsearch-river-mysql插件的原因?(参考:http://stackoverflow.com/questions/23658534/using-elasticsearch-river-mysql-to-stream-data-from-mysql-database-to-elasticsea)
1)通用性角度:elasticsearch-jdbc更通用,
2)版本更新角度:elasticsearch-jdbc GitHub活跃度很高,最新的版本2.3.3.02016年5月28日兼容Elasticsearch2.3.3版本。
而elasticsearch-river-mysql 2012年12月13日后便不再更新。
综上,选择elasticsearch-jdbc作为mysql同步Elasticsearch的工具理所当然。
elasticsearch-jdbc的缺点与不足(他山之石):
1)、go-mysql-elasticsearch作者siddontang在博客提到的: elasticsearch-river-jdbc的功能是很强大,但并没有很好的支持增量数据更新的问题,它需要对应的表只增不减,而这个几乎在项目中是不可能办到的。
http://www.jianshu.com/p/05cff717563c
2)、
博主leotse90在博文中提到elasticsearch-jdbc的缺点:那就是删除操作不能同步(物理删除)!
http://leotse90.com/2015/11/11/ElasticSearch与MySQL数据同步以及修改表结构/
我截止2016年6月16日没有测试到,不妄加评论。
3、elasticsearch-jdbc如何使用?要不要安装?
3.1 和早期版本不同点
elasticsearch-jdbcV2.3.2.0版本不需要安装。以下笔者使用的elasticsearch也是2.3.2测试。 操作系统:CentOS release 6.6 (Final)
看到这里,你可能会问早期的版本有什么不同呢?很大不同。从我搜集资料来看,不同点如下:
1)早期1.x版本,作为插件,需要安装。
2)配置也会有不同。
3.2 elasticsearch-jdbc使用(同步方法一)
前提: 1)elasticsearch 2.3.2 安装成功,测试ok。
2)mysql安装成功,能实现增、删、改、查。
可供测试的数据库为test,表为cc,具体信息如下:
mysql> select * from cc;
+----+------------+
| id | name |
+----+------------+
| 1 | laoyang |
| 2 | dluzhang |
| 3 | dlulaoyang |
+----+------------+
3 rows in set (0.00 sec)
1
2
3
4
5
6
7
8
9
1
2
3
4
5
6
7
8
9
第一步:下载工具。
址:http://xbib.org/repository/org/xbib/elasticsearch/importer/elasticsearch-jdbc/2.3.2.0/elasticsearch-jdbc-2.3.2.0-dist.zip
第二步:导入Centos。路径自己定,笔者放到根目录下,解压。unzip elasticsearch-jdbc-2.3.2.0-dist.zip
第三步:设置环境变量。
[root@5b9dbaaa148a /]# vi /etc/profile
export JDBC_IMPORTER_HOME=/elasticsearch-jdbc-2.3.2.0
使环境变量生效:
[root@5b9dbaaa148a /]# source /etc/profile
第四步:配置使用。详细参考:https://github.com/jprante/elasticsearch-jdbc
1)、根目录下新建文件夹odbc_es 如下:
[root@5b9dbaaa148a /]# ll /odbc_es/

drwxr-xr-x 2 root root 4096 Jun 16 03:11 logs

-rwxrwxrwx 1 root root 542 Jun 16 04:03 mysql_import_es.sh
2)、新建脚本mysql_import_es.sh,内容如下;
[root@5b9dbaaa148a odbc_es]# cat mysql_import_es.sh
’#!/bin/sh
bin=$JDBC_IMPORTER_HOME/bin
lib=$JDBC_IMPORTER_HOME/lib
echo '{
"type" : "jdbc",
"jdbc": {
"elasticsearch.autodiscover":true,
"elasticsearch.cluster":"my-application", #簇名,详见:/usr/local/elasticsearch/config/elasticsearch.yml
"url":"jdbc:mysql://10.8.5.101:3306/test", #mysql数据库地址
"user":"root", #mysql用户名
"password":"123456", #mysql密码
"sql":"select * from cc",
"elasticsearch" : {
"host" : "10.8.5.101",
"port" : 9300
},
"index" : "myindex", #新的index
"type" : "mytype" #新的type
}
}'| java \
-cp "${lib}/*" \
-Dlog4j.configurationFile=${bin}/log4j2.xml \
org.xbib.tools.Runner \
org.xbib.tools.JDBCImporter12
3
4
5
6
7
8
9
10
11
12
13
14
15
16
17
18
19
20
21
22
23
24
25
1
2
3
4
5
6
7
8
9
10
11
12
13
14
15
16
17
18
19
20
21
22
23
24
25
3)、为 mysql_import_es.sh 添加可执行权限。
[root@5b9dbaaa148a odbc_es]# chmod a+x mysql_import_es.sh
4)执行脚本mysql_import_es.sh
[root@5b9dbaaa148a odbc_es]# ./mysql_import_es.sh
第五步:测试数据同步是否成功。
使用elasticsearch检索查询:
[root@5b9dbaaa148a odbc_es]# curl -XGET 'http://10.8.5.101:9200/myindex/mytype/_search?pretty'
{
"took" : 4,
"timed_out" : false,
"_shards" : {
"total" : 8,
"successful" : 8,
"failed" : 0
},
"hits" : {
"total" : 3,
"max_score" : 1.0,
"hits" : [ {
"_index" : "myindex",
"_type" : "mytype",
"_id" : "AVVXKgeEun6ksbtikOWH",
"_score" : 1.0,
"_source" : {
"id" : 1,
"name" : "laoyang"
}
}, {
"_index" : "myindex",
"_type" : "mytype",
"_id" : "AVVXKgeEun6ksbtikOWI",
"_score" : 1.0,
"_source" : {
"id" : 2,
"name" : "dluzhang"
}
}, {
"_index" : "myindex",
"_type" : "mytype",
"_id" : "AVVXKgeEun6ksbtikOWJ",
"_score" : 1.0,
"_source" : {
"id" : 3,
"name" : "dlulaoyang"
}
} ]
}
}12
3
4
5
6
7
8
9
10
11
12
13
14
15
16
17
18
19
20
21
22
23
24
25
26
27
28
29
30
31
32
33
34
35
36
37
38
39
40
41
42
1
2
3
4
5
6
7
8
9
10
11
12
13
14
15
16
17
18
19
20
21
22
23
24
25
26
27
28
29
30
31
32
33
34
35
36
37
38
39
40
41
42
出现以上包含mysql数据字段的信息则为同步成功。
4、 elasticsearch-jdbc 同步方法二
[root@5b9dbaaa148a odbc_es]# cat mysql_import_es_simple.sh
#!/bin/sh
bin=$JDBC_IMPORTER_HOME/bin
lib=$JDBC_IMPORTER_HOME/lib
java \
-cp "${lib}/*" \
-Dlog4j.configurationFile=${bin}/log4j2.xml \
org.xbib.tools.Runner \
org.xbib.tools.JDBCImporter statefile.json

[root@5b9dbaaa148a odbc_es]# cat statefile.json
{
"type" : "jdbc",
"jdbc": {
"elasticsearch.autodiscover":true,
"elasticsearch.cluster":"my-application",
"url":"jdbc:mysql://10.8.5.101:3306/test",
"user":"root",
"password":"123456",
"sql":"select * from cc",
"elasticsearch" : {
"host" : "10.8.5.101",
"port" : 9300
},
"index" : "myindex_2",
"type" : "mytype_2"
}
}12
3
4
5
6
7
8
9
10
11
12
13
14
15
16
17
18
19
20
21
22
23
24
25
26
27
28
1
2
3
4
5
6
7
8
9
10
11
12
13
14
15
16
17
18
19
20
21
22
23
24
25
26
27
28
脚本和json文件分开,脚本执行前先加载json文件。
执行方式:直接运行脚本 ./mysql_import_es_simple.sh 即可。
5、Mysql与elasticsearch等价查询
目标:实现从表cc中查询id=3的name信息。 1)MySQL中sql语句查询:
mysql> select * from cc where id=3;
+----+------------+
| id | name |
+----+------------+
| 3 | dlulaoyang |
+----+------------+
1 row in set (0.00 sec)
1
2
3
4
5
6
7
1
2
3
4
5
6
7
2)elasticsearch检索:
[root@5b9dbaaa148a odbc_es]# curl http://10.8.5.101:9200/myindex/mytype/_search?pretty -d '
{
"filter" : { "term" : { "id" : "3" } }
}'
{
"took" : 3,
"timed_out" : false,
"_shards" : {
"total" : 8,
"successful" : 8,
"failed" : 0
},
"hits" : {
"total" : 1,
"max_score" : 1.0,
"hits" : [ {
"_index" : "myindex",
"_type" : "mytype",
"_id" : "AVVXKgeEun6ksbtikOWJ",
"_score" : 1.0,
"_source" : {
"id" : 3,
"name" : "dlulaoyang"
}
} ]
}
}
1
2
3
4
5
6
7
8
9
10
11
12
13
14
15
16
17
18
19
20
21
22
23
24
25
26
27
1
2
3
4
5
6
7
8
9
10
11
12
13
14
15
16
17
18
19
20
21
22
23
24
25
26
27
常见错误:
错误日志位置:/odbc_es/logs 日志内容:
[root@5b9dbaaa148a logs]# tail -f jdbc.log
[04:03:39,570][INFO ][org.xbib.elasticsearch.helper.client.BaseTransportClient][pool-3-thread-1] after auto-discovery connected to [{5b9dbaaa148a}{aksn2ErNRlWjUECnp_8JmA}{10.8.5.101}{10.8.5.101:9300}{master=true}]
Bug1、[02:46:23,894][ERROR][importer.jdbc ][pool-3-thread-1] error while processing request: cluster state is RED and not YELLOW, from here on, everything will fail!
原因:
you created an index with replicas but you had only one node in the cluster. One way to solve this problem is by allocating them on a second node. Another way is by turning replicas off.
你创建了带副本 replicas 的索引,但是在你的簇中只有一个节点。
解决方案:
方案一:允许分配‘它们’到第二个节点。
方案二:关闭副本replicas(非常可行)。如下:
curl -XPUT 'localhost:9200/_settings' -d '
{
"index" : {
"number_of_replicas" : 0
}
}12
3
4
5
6
1
2
3
4
5
6
‘
Bug2、[13:00:37,137][ERROR][importer.jdbc ][pool-3-thread-1] error while processing request: no cluster nodes available, check settings {autodiscover=false, client.transport.ignore_cluster_name=false, client.transport.nodes_sampler_interval=5s, client.transport.ping_timeout=5s,
cluster.name=elasticsearch,
org.elasticsearch.client.transport.NoNodeAvailableException: no cluster nodes available, check
解决方案:
见上脚本中新增:
“elasticsearch.cluster”:”my-application”, #簇名,和/usr/local/elasticsearch/config/elasticsearch.yml 簇名保持一致。
参考:
http://stackoverflow.com/questions/11944915/getting-an-elasticsearch-cluster-to-green-cluster-setup-on-os-x
2016-6-16 思于家中床前
作者:铭毅天下
转载请标明出处,原文地址:http://blog.csdn.net/laoyang360/article/details/51694519
如果感觉本文对您有帮助,请点击‘顶’支持一下,您的支持是我坚持写作最大的动力,谢谢!

相关文章推荐
- mysql主从binlog日志自动清理及手动删除
- Mysql 5.7 开启远程连接
- mysql数据库创建新用户及赋予权限
- MYSQL基础操作
- mysql触发器trigger的使用
- Mysql使用注意事项
- MySQL 5.7 Group Replication (GA Release)
- Zabbix mysql innodb文件ibdata1损坏导致mysql无法启动
- mysql编码格式设置
- mysql 三种灾备方式
- mysql 分组按条件统计
- MySQL常量查询
- cdh5.8.3安装过程中问题解决方法Error loading MySQLdb和No portmap or rpcbind service
- MySQL 四种事务隔离级别详解及对比
- 【译文】MySQL InnoDB 事物模型
- MySQL- SHOW TABLE STATUS命令
- MYSQL每隔10分钟进行分组统计的实现方法
- Mysql 不同版本 说明
- MySQL into outfile 问题解决:ERROR 1 (HY000): Can't create/write to file
- mysql 配置 utf8 依然乱码