Java多线程之创建任务和线程
2016-12-14 17:19
417 查看
Runnable创建线程
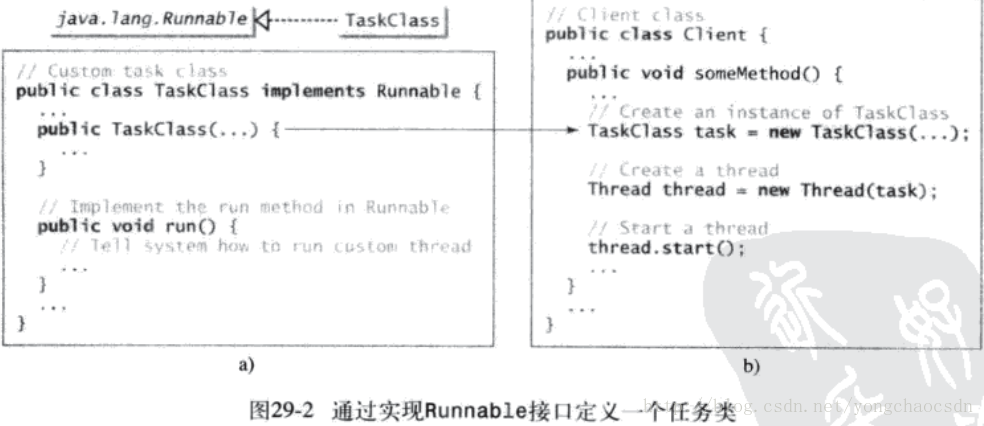
任务就是对象。为了创建任务,必须首先为任务定义一个类。任务类必须实现Runnable接口。Runnable接口非常简单,它只包含一个run方法。需要实现这个方法来告诉系统线程将如何运行。开发一个任务类的模板如图29-2a所示。一旦定义了一个TaskClass,就可以用它的构造方法创建一个任务。例如,
TaskClass task = new TaskClass(...);
任务必须在线程中执行。Thread类包括创建线程的构造方法以及控制线程的很多有用的方法。使用下面的语句创建任务的线程:
Thread thread = new Thread(task);
然后调用start()方法告诉Java虚拟机该线程准备运行,如下所示:
thread.start();
Java虚拟机通过任务的run()方法执行任务。图29-2b概括了创建一个任务,一个线程以及开始线程的主要步骤。
下面例子给出一个程序,它创建三个任务以及运行这三个任务的线程:
第一个任务打印字母a100次
第二个任务打印字母b100次
第三个任务打印1~100的整数。
如果运行这个程序,则三个线程将共享CPU,并且在控制台上轮流打印字母和数字。
package chapter29;

public class TaskThreadDemo
{
public static void main(String[] args)
{
//Create tasks
Runnable printA = new PrintChar('a',100);
Runnable printB = new PrintChar('b',100);
Runnable print100 = new PrintNum(100);

//Create threads
Thread thread1 = new Thread(printA);
Thread thread2 = new Thread(printB);
Thread thread3 = new Thread(print100);

//Start threads
thread1.start();
thread2.start();
thread3.start();
}
}

//The task for printing a character a specified number of times
class PrintChar implements Runnable
{
private char charToPrint;//The character to print
private int times;//The number of times to repeat

/*
* Construct a task with specified character to print
* times to print the character
*/
public PrintChar(char c,int t)
{
charToPrint = c;
times = t;
}

/*
* Override the run() method to tell the system
* what task to perform
*/
public void run()
{
for(int i = 0; i < times; i++)
{
System.out.println(charToPrint);
}
}
}

//The task class for printing numbers from 1 to n for a given n
class PrintNum implements Runnable
{
private int lastNum;

/*Construct a task for printing 1,2,.....n*/
public PrintNum(int n)
{
lastNum = n;
}

/*Tell the thread how to run*/
public void run()
{
for(int i = 1; i <= lastNum; i++)
{
System.out.println(" " + i);
}
}
}
该程序创建了三个任务。为了同时运行它们,创建三个线程。调用start()方法启动一个线程,它会导致任务中的run()方法被执行。当run()方法执行完毕,线程就终止。
因为前两个任务printA和printB有类似的功能,所以它们可以定义在同一个任务类PrintChar中。PrintChar类实现Runnable,并且覆盖run()方法,使之具备打印字符动作。该类提供根据给定次数打印任意单个字符的框架。可运行对象printA和printB都是PrintChar类的实例。
PrintNum类实现Runnable,并且覆盖run()方法,使之具备打印数字的动作。该类提供对于任意整数n,打印从
1到n的整数的框架。可运行对象print100是PrintNum类的一个实例。
注意:如果看不到并发运行三个线程的效果,那么就要增加打印字符的个数。例如:
Runnable printA = new PrintChar('a',10000);package heima;
/*
* 需求:简单的卖票程序
* 多个窗口同时买票
*
* 创建线程的第二种方式:实现Runnable接口
*
* 步骤:
* 1.定义类实现Runnable接口
* 2.覆盖Runnable接口中的run方法。
* 将线程要运行的代码存放在该run方法中。
* 3.通过Thread类建立线程对象。
* 4.将Runnable接口的子类对象作为实际参数传递给Thread类的构造函数。
* 为什么要将Runnable接口的子类对象传递给Thread的构造函数。
* 因为:自定义的run方法所属的对象是Runnable接口的子类对象
* 所以要让线程去指定指定对象的run方法。就必须明确该run方法所属对象。
* 5.调用Thread类的start方法开启线程并调用Runnable接口子类的run方法
*
* 实现方式和继承方式有什么区别呢?
*
* 实现方式好处:避免了单继承的局限性。
* 在定义线程时,建议使用实现方式。
*
* 两种方式区别:
* 继承Thread:线程代码存放Thread子类run方法中
* 实现Runnable,线程代码存在接口的子类的run方法中。
*/
class Ticket implements Runnable
{
private int tick = 100;
public void run()
{
while(true)
{
if(tick > 0)
{
System.out.println(Thread.currentThread().getName() + "......sale : " + tick--);
}
}
}
}
public class TicketThread
{
public static void main(String[] args)
{
Ticket t = new Ticket();
Thread t1 = new Thread(t);
Thread t2 = new Thread(t);
Thread t3 = new Thread(t);
Thread t4 = new Thread(t);
t1.start();
t2.start();
t3.start();
t4.start();
/*Ticket t1 = new Ticket();
Ticket t2 = new Ticket();
Ticket t3 = new Ticket();
Ticket t4 = new Ticket();
t1.start();
t2.start();
t3.start();
t4.start();*/
}
}创建线程的另一种方法:Thread类
Thread类包含为任务而创建的线程的构造方法,以控制线程的方法。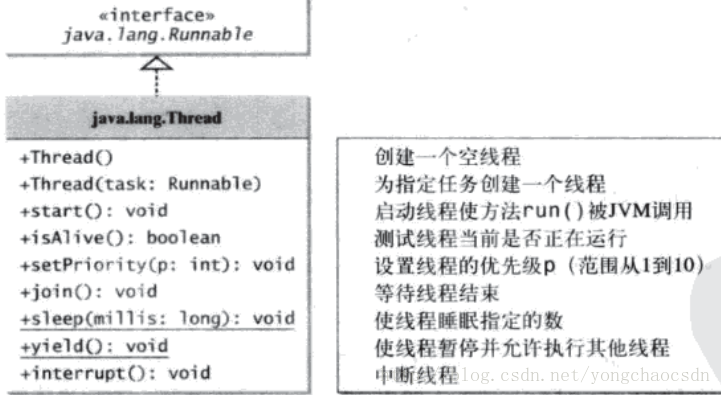
步骤:
1.定义类继承Thread,
2.复写Thread类中的run方法,
目的:将自定义代码存储在run方法。让线程运行。
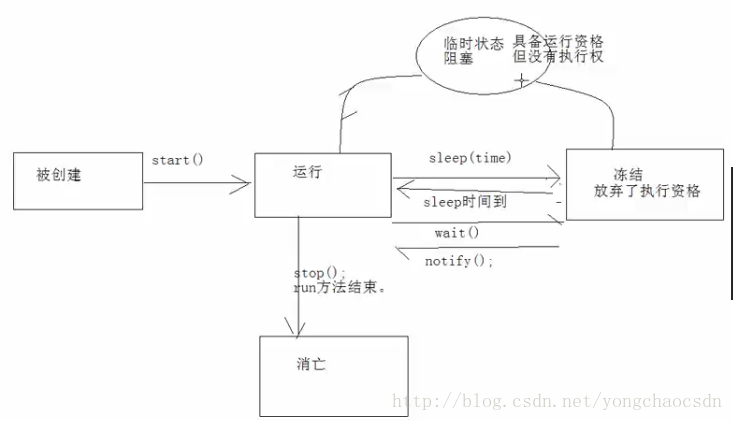
3.调用线程的start方法,
该方法两个作用:启动线程,调用run方法
发现运行结果每一次都不同,
因为多个线程都获取cpu的执行权,cpu执行到谁,谁就运行。明确一点,在某一时刻,只能有一个程序在运行,(多核除外)
cpu在做着快速的切换,以达到看上去是同时运行的效果。我们可以形象把多线程的运行认为在互相抢夺cpu的执行权。
这就是多线程的一个特性:随机性,谁抢到谁执行,至于执行多长,cup说了算。
为什么要覆盖run方法呢?
Thread类用于描述线程
该类定义了一个功能,用于存储线程要运行的代码。该存储功能就是run方法
也就是说Thread类中的run方法,用于存储线程要运行的代码。
class Demo extends Thread
{
public void run()
{
for(int x = 0; x < 60; x++)
{
System.out.println("demo run----"+x);
}
}
}
class ThreadDemo
{
public static void main(String[] args)
{
Demo d = new Demo();//创建好一个线程。
d.start();//开启线程并执行该线程的run方法
//d.run();//仅仅是对象调用方法,而线程创建了,并没有运行。
for(int x = 0; x < 60; x++)
System.out.println("Hello World!--" + x);
}
}
/*
练习:
创建两个线程,和主线程交替运行。
*/
class Test extends Thread
{
private String name;
Test(String name)
{
this.name = name;
}
public void run()
{
for (int x = 0; x < 60; x++)
{
System.out.println(name + " run..." + x);
}
}
}

public class ThreadTest
{
public static void main(String[] args)
{
Test t1 = new Test("one");
Test t2 = new Test("two");
t1.start();
t2.start();
//t1.run();
//t2.run();

for(int x = 0; x < 60; x++)
{
System.out.println("main......" + x);
}
}
}
线程的运行状态
获取线程对象及名称
package heima;

/*
* 原来线程都有自己默认的名称
* Thread-编号 该编号从0开始。
*
* static Thread currentThread():获取当前线程对象。
* getName():获取线程名称
*
* 设置线程名称:setName或者构造函数。
*/
class Test extends Thread
{
private String name;
Test(String name)
{
this.name = name;
}
public void run()
{
for (int x = 0; x < 60; x++)
{
System.out.println((Thread.currentThread() == this) + "..." + this.getName() + " run..." + x);
}
}
}

public class ThreadTest
{
public static void main(String[] args)
{
Test t1 = new Test("one");
Test t2 = new Test("two");
t1.start();
t2.start();
//t1.run();
//t2.run();

for(int x = 0; x < 60; x++)
{
System.out.println("main......" + x);
}
}
}

相关文章推荐
- java多线程与高并发库应用(二)线程创建和定时任务Timer
- Java【多线程知识总结(1)】用Thread类创建线程
- Java【多线程知识总结(5)】比较继承Thread类创建线程和实现Runnable接口创建线程这两种方式
- 初学Java多线程:用Thread类创建线程
- Java笔记3 多线程<1>线程概述、多线程的创建、多线程的安全问题、静态同步函数的锁、死锁
- java多线程总结一:线程的两种创建方式及优劣比较
- Java【多线程知识总结(4)】通过实现Runnable接口创建线程
- 2. 初学Java多线程:用Thread类创建线程
- 初学Java多线程:使用Runnable接口创建线程
- 初学Java多线程:使用Runnable接口创建线程
- Java 中的多线程-两种创建方式,定时器的应用,线程的安全问题可以用银行转账来说明
- Java【多线程知识总结(5)】比较继承Thread类创建线程和实现Runnable接口创建线程这两种方式
- java多线程总结一:线程的两种创建方式及优劣比较
- 【java多线程与并发库】---传统java多线程<2> 线程创建方式
- 3. 初学Java多线程:使用Runnable接口创建线程
- Java多线程2—线程的创建
- Java多线程2—线程的创建
- 初学Java多线程【3】:使用Runnable接口创建线程
- java多线程总结一: 线程的两种创建方式及优劣比较
- java多线程系列_用Thread类创建线程(2)