从零开始学JAVA(08)-使用SpringMVC4 Restful 风格引用静态文件 css/js/png
2016-12-07 23:32
791 查看
在写完helloworld后想给网页加点样式(*.css),结果怎么也显示不了,百度了很多种方法后试行尝试,试验成功并记录下来,方便以后查看。
时隔两年,继续学习JAVA,太久没学了,忘记得差不多,还好以前写的helloworld,还能用。
一、关于开发环境
eclipse-jee-neon-1a-win32
Jdk 1.8u112 (32位版本)
SpringMVC 4.3.4.RELEASE
apache-tomcat-8.5.8
二、helloworld.jsp文件中的引用的样式表为 style.css 放在res/css文件夹中
三、加载静态资源 方法一
引用上一章的代码(http://www.cnblogs.com/lin557/p/4305405.html),需要修改web.xml与mydispatcher-servlet.xml两个文件,
原文件内容如下:
web.xml
修改为:
这里增加了*.css的处理
当然可以换成别的,比如说*.js,*.png....等等,方法如下:
配置完web.xml,还需要修改mydispatcher-servlet.xml,启用default-servlet-handler
mydispatcher-servlet.xml 原文如下:
修改为:
最后:需要把静态文件(css,jsp,png,gif)放在根目录(WebContent或WebRoot)下才能被成功被页面引用。这种方法只能指向根目录(我不知道是否可以换成其他目录),如果要支持多种类型的文件,需要在web.xml里进行多次配置,否则会出现404的错误提示。
此方法目标结构为:
四、加载静态资源 方法二
web.xml保持不变,且不能有第一种方法中的代码
修改mydispatcher-servlet.xml
这种方法优点在于不需要额外的配置,只要把静态文件(css/js/png/jpg/gif等等)放在res文件夹中,都能可以直接调用。而且可以指定目录的位置。
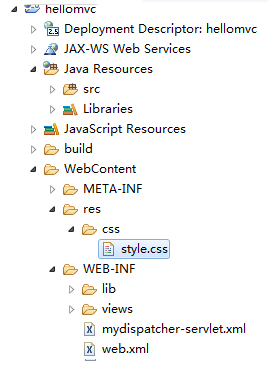
此方法目录结构为

五、总结
从初学者的角度看,方法二感觉比较方便。
2016-12-07 by lin
时隔两年,继续学习JAVA,太久没学了,忘记得差不多,还好以前写的helloworld,还能用。
一、关于开发环境
eclipse-jee-neon-1a-win32
Jdk 1.8u112 (32位版本)
SpringMVC 4.3.4.RELEASE
apache-tomcat-8.5.8
二、helloworld.jsp文件中的引用的样式表为 style.css 放在res/css文件夹中
<link rel="stylesheet" href="res/css/style.css">
三、加载静态资源 方法一
引用上一章的代码(http://www.cnblogs.com/lin557/p/4305405.html),需要修改web.xml与mydispatcher-servlet.xml两个文件,
原文件内容如下:
web.xml
<?xml version="1.0" encoding="UTF-8"?>
<web-app id="WebApp_ID" version="2.5"
xmlns="http://java.sun.com/xml/ns/javaee"
xmlns:xsi="http://www.w3.org/2001/XMLSchema-instance"
xsi:schemaLocation="http://java.sun.com/xml/ns/javaee http://java.sun.com/xml/ns/javaee/web-app_2_5.xsd">
<display-name>Spring MVC</display-name>

<servlet>
<servlet-name>mydispatcher</servlet-name>
<servlet-class>
org.springframework.web.servlet.DispatcherServlet
</servlet-class>
<load-on-startup>1</load-on-startup>
</servlet>

<servlet-mapping>
<servlet-name>mydispatcher</servlet-name>
<url-pattern>/</url-pattern>
</servlet-mapping>

<context-param>
<param-name>contextConfigLocation</param-name>
<param-value>/WEB-INF/mydispatcher-servlet.xml</param-value>
</context-param>

<listener>
<listener-class>
org.springframework.web.context.ContextLoaderListener
</listener-class>
</listener>
</web-app>
修改为:
<?xml version="1.0" encoding="UTF-8"?>
<web-app id="WebApp_ID" version="2.5"
xmlns="http://java.sun.com/xml/ns/javaee"
xmlns:xsi="http://www.w3.org/2001/XMLSchema-instance"
xsi:schemaLocation="http://java.sun.com/xml/ns/javaee http://java.sun.com/xml/ns/javaee/web-app_2_5.xsd">
<display-name>Spring MVC</display-name>

<servlet>
<servlet-name>mydispatcher</servlet-name>
<servlet-class>
org.springframework.web.servlet.DispatcherServlet
</servlet-class>
<load-on-startup>1</load-on-startup>
</servlet>

<servlet-mapping>
<servlet-name>mydispatcher</servlet-name>
<url-pattern>/</url-pattern>
</servlet-mapping>

<context-param>
<param-name>contextConfigLocation</param-name>
<param-value>/WEB-INF/mydispatcher-servlet.xml</param-value>
</context-param>

<!-- 使用默认的方式进行处理 -->
<servlet-mapping>
<servlet-name>default</servlet-name>
<url-pattern>*.css</url-pattern>
</servlet-mapping>

<listener>
<listener-class>
org.springframework.web.context.ContextLoaderListener
</listener-class>
</listener>
</web-app>
这里增加了*.css的处理
<!-- 使用默认的方式进行处理 -->
<servlet-mapping>
<servlet-name>default</servlet-name>
<url-pattern>*.css</url-pattern>
</servlet-mapping>
当然可以换成别的,比如说*.js,*.png....等等,方法如下:
<servlet-mapping>
<servlet-name>default</servlet-name>
<url-pattern>*.css</url-pattern>
<url-pattern>*.js</url-pattern>
<url-pattern>*.png</url-pattern>
<url-pattern>*.gif</url-pattern>
</servlet-mapping>
配置完web.xml,还需要修改mydispatcher-servlet.xml,启用default-servlet-handler
mydispatcher-servlet.xml 原文如下:
<?xml version="1.0" encoding="UTF-8"?>
<beans xmlns="http://www.springframework.org/schema/beans"
xmlns:mvc="http://www.springframework.org/schema/mvc"
xmlns:context="http://www.springframework.org/schema/context"
xmlns:xsi="http://www.w3.org/2001/XMLSchema-instance"
xsi:schemaLocation="http://www.springframework.org/schema/beans http://www.springframework.org/schema/beans/spring-beans-4.0.xsd http://www.springframework.org/schema/mvc http://www.springframework.org/schema/mvc/spring-mvc-4.0.xsd http://www.springframework.org/schema/context http://www.springframework.org/schema/context/spring-context-4.0.xsd">
<context:component-scan base-package="com.web.controller" />
<bean
class="org.springframework.web.servlet.view.InternalResourceViewResolver">
<property name="prefix">
<value>/WEB-INF/views/</value>
</property>
<property name="suffix">
<value>.jsp</value>
</property>
</bean>
</beans>
修改为:
<?xml version="1.0" encoding="UTF-8"?>
<beans xmlns="http://www.springframework.org/schema/beans"
xmlns:mvc="http://www.springframework.org/schema/mvc"
xmlns:context="http://www.springframework.org/schema/context"
xmlns:xsi="http://www.w3.org/2001/XMLSchema-instance"
xsi:schemaLocation="http://www.springframework.org/schema/beans http://www.springframework.org/schema/beans/spring-beans-4.0.xsd http://www.springframework.org/schema/mvc http://www.springframework.org/schema/mvc/spring-mvc-4.0.xsd http://www.springframework.org/schema/context http://www.springframework.org/schema/context/spring-context-4.0.xsd"> <!-- 默认的注解映射的支持 -->
<mvc:annotation-driven />
<!-- 对静态资源文件的访问  -->
<mvc:default-servlet-handler />

<context:component-scan base-package="com.web.controller" />
<bean
class="org.springframework.web.servlet.view.InternalResourceViewResolver">
<property name="prefix">
<value>/WEB-INF/views/</value>
</property>
<property name="suffix">
<value>.jsp</value>
</property>
</bean>
</beans>
最后:需要把静态文件(css,jsp,png,gif)放在根目录(WebContent或WebRoot)下才能被成功被页面引用。这种方法只能指向根目录(我不知道是否可以换成其他目录),如果要支持多种类型的文件,需要在web.xml里进行多次配置,否则会出现404的错误提示。
此方法目标结构为:
四、加载静态资源 方法二
web.xml保持不变,且不能有第一种方法中的代码
<!-- 使用默认的方式进行处理 这里不能出现 不然会出问题 -->
<servlet-mapping>
<servlet-name>default</servlet-name>
<url-pattern>*.css</url-pattern>
</servlet-mapping>
<?xml version="1.0" encoding="UTF-8"?>
<web-app id="WebApp_ID" version="2.5"
xmlns="http://java.sun.com/xml/ns/javaee"
xmlns:xsi="http://www.w3.org/2001/XMLSchema-instance"
xsi:schemaLocation="http://java.sun.com/xml/ns/javaee http://java.sun.com/xml/ns/javaee/web-app_2_5.xsd">
<display-name>Spring MVC</display-name>

<servlet>
<servlet-name>mydispatcher</servlet-name>
<servlet-class>
org.springframework.web.servlet.DispatcherServlet
</servlet-class>
<load-on-startup>1</load-on-startup>
</servlet>

<servlet-mapping>
<servlet-name>mydispatcher</servlet-name>
<url-pattern>/</url-pattern>
</servlet-mapping>

<context-param>
<param-name>contextConfigLocation</param-name>
<param-value>/WEB-INF/mydispatcher-servlet.xml</param-value>
</context-param>

<listener>
<listener-class>
org.springframework.web.context.ContextLoaderListener
</listener-class>
</listener>
</web-app>
修改mydispatcher-servlet.xml
<?xml version="1.0" encoding="UTF-8"?>
<beans xmlns="http://www.springframework.org/schema/beans"
xmlns:mvc="http://www.springframework.org/schema/mvc"
xmlns:context="http://www.springframework.org/schema/context"
xmlns:xsi="http://www.w3.org/2001/XMLSchema-instance"
xsi:schemaLocation="http://www.springframework.org/schema/beans http://www.springframework.org/schema/beans/spring-beans-4.0.xsd http://www.springframework.org/schema/mvc http://www.springframework.org/schema/mvc/spring-mvc-4.0.xsd http://www.springframework.org/schema/context http://www.springframework.org/schema/context/spring-context-4.0.xsd"> <!-- 默认的注解映射的支持 -->
<mvc:annotation-driven />

<mvc:resources mapping="/res/**" location="/WEB-INF/res/" cache-period="31556926"/>

<context:component-scan base-package="com.web.controller" />
<bean
class="org.springframework.web.servlet.view.InternalResourceViewResolver">
<property name="prefix">
<value>/WEB-INF/views/</value>
</property>
<property name="suffix">
<value>.jsp</value>
</property>
</bean>
</beans>
这种方法优点在于不需要额外的配置,只要把静态文件(css/js/png/jpg/gif等等)放在res文件夹中,都能可以直接调用。而且可以指定目录的位置。
此方法目录结构为
五、总结
从初学者的角度看,方法二感觉比较方便。
2016-12-07 by lin

相关文章推荐
- Java NIO概述
- LeetCode 217. Contains Duplicate(Java)
- Java课程设计——扫雷(winmine)
- Java---方法重载和方法覆盖
- (forEach url out set catch 等)javaweb中JSTL的Core 核心标签库知识点
- JUnit-4.11使用报java.lang.NoClassDefFoundError: org/hamcrest/SelfDescribing错误 .
- Java-JDBC_简单示例CURD
- Java——调用命令行执行命令后到Java控制台显示
- 个人博客开发笔记
- JavaWeb-struts2动态方法调用
- jdk-1.7.0环境部署
- 关于引用类型转化的一些东西
- Java 多线程编程
- Java 序列化
- java_day02_identifier
- Java中的中文乱码问题
- 用JNative.jar包做java与底层交互时遇到的大坑!
- Struts2请求参数校验
- Java 基础 - 多线程基础
- Java 5:方法设计