【nginx源码学习与运用 二】ngx_bufs_t 与 ngx_chain_t相关操作
2016-12-06 09:41
627 查看
【nginx源码学习与运用】系列博客中的示例代码在csdn的代码托管服务器CODE上,地址https://code.csdn.net/u012819339/nginx_study ,你可以将其自由的下载到本地,或者通过git来实时获取更新
本篇博客是在上一篇的基础上又学习了nginx中ngx_buf_t 与ngx_chain_t相关知识与部分操作方法,并给出了例程,项目代码见csdn的
其它方法暂且略过,没有演示
main.c
本篇博客是在上一篇的基础上又学习了nginx中ngx_buf_t 与ngx_chain_t相关知识与部分操作方法,并给出了例程,项目代码见csdn的
相关结构
ngx_buf_s结构:
struct ngx_buf_s {
u_char          *pos;//当前处理位置,意义可以由使用者决定
u_char          *last; //有效内容到此为止
off_t            file_pos; //略
off_t            file_last;

u_char          *start;  //buffer起始位置
u_char          *end;   //buffer结束位置
ngx_buf_tag_t    tag;
ngx_file_t      *file;
ngx_buf_t       *shadow;

/* the buf's content could be changed */
unsigned         temporary:1;  //临时内存标志位,为1时表示数据在内存中且这段内存可以修改

/*
* the buf's content is in a memory cache or in a read only memory
* and must not be changed
*/
unsigned         memory:1;

/* the buf's content is mmap()ed and must not be changed */
unsigned         mmap:1;

unsigned         recycled:1;
unsigned         in_file:1;
unsigned         flush:1;
unsigned         sync:1;
unsigned         last_buf:1;
unsigned         last_in_chain:1;

unsigned         last_shadow:1;
unsigned         temp_file:1;

/* STUB */ int   num;
};ngx_chain_s以及
ngx_bufs_t
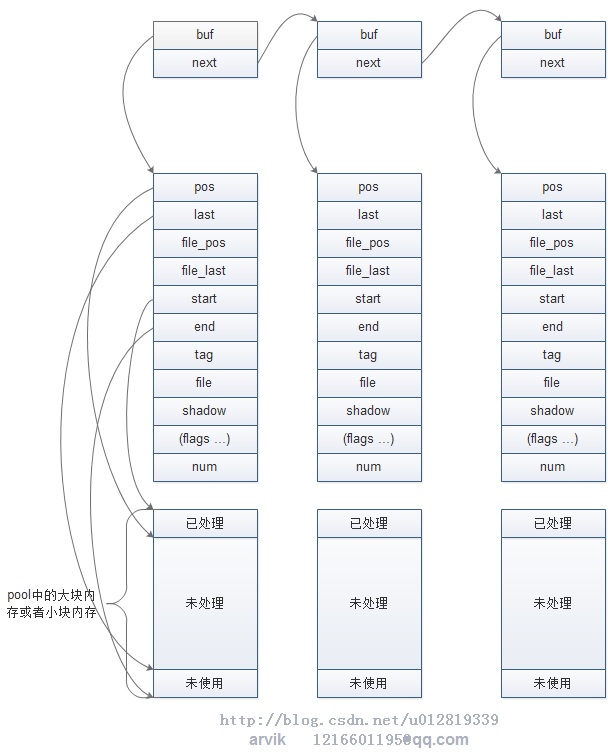
struct ngx_chain_s {
ngx_buf_t    *buf; //指向当前ngx_buf_t缓冲区
ngx_chain_t  *next; //指向下一个ngx_chain_t结构
};

typedef struct {
ngx_int_t    num; //缓冲区个数
size_t       size; //缓冲区大小
} ngx_bufs_t;
结构图:
ngx_chain_t
结构图:
操作方法:
| 函数 | 解释 |
|---|---|
| ngx_create_temp_buf | 从内存池中申请一块临时用的内存 |
| ngx_create_chain_of_bufs | 创建chain链 |
| ngx_chain_add_copy | 将in链 链接到chain链末尾 |
使用方法与注意事项
见代码示例代码
arvik将nginx中的部分基础结构代码提出来了,好作为新手学习练习使用。见 https://code.csdn.net/u012819339/nginx_studymain.c
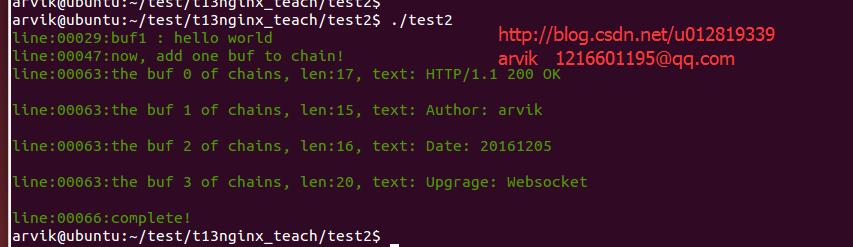
/*
blog:   http://blog.csdn.net/u012819339 email:  1216601195@qq.com
author: arvik
*/

#include <stdio.h>
#include <string.h>
#include "ak_core.h"
#include "pt.h"

char h_buf[200] = "HTTP/1.1 200 OK\r\nAuthor: arvik\r\nDate: 20161205\r\nUpgrage: Websocket\r\nConnection: close\r\n";

int main()
{
ngx_pool_t *p;
ngx_uint_t i = 0;
ngx_bufs_t my_bufs = {.num = 3, .size = 64*sizeof(char)};
char *pb = NULL, *pb1 = NULL;
int len;

p = ngx_create_pool(1000);  //并不负责清零内存
if(p == NULL)
return -1;

ngx_buf_t *buf1 = ngx_create_temp_buf(p, 64);  //申请一个临时缓冲区
if(buf1 == NULL)
return -1;

strcpy(buf1->start, "hello world!");
buf1->pos += strlen("hello world");

PT_Info("buf1 : %.*s\n", buf1->pos - buf1->start, buf1->start);

ngx_chain_t *ct = ngx_create_chain_of_bufs(p, &my_bufs);
if(ct == NULL)
return -1;

ngx_chain_t *t = NULL;
ngx_chain_t *t1 = NULL;
for(t = ct, pb= h_buf; t; t = t->next, i++)  //每个buf都是定长的chain
{
pb1 = strchr(pb, '\n');
len = pb1 + 1 - pb;
memcpy(t->buf->start, pb, len);
t->buf->pos += len;

pb = pb1+1;
}

PT_Info("now, add one buf to chain!\n");

//以上chain中的buf都是定长,较为浪费内存,以下方式则根据字符串的长度分配一个长度恰好合适的buf并添加到chain链中
pb1 = strchr(pb, '\n');
len = pb1 + 1 - pb;
my_bufs.num = 1;
my_bufs.size = len;

ngx_chain_t *in = ngx_create_chain_of_bufs(p, &my_bufs);
memcpy(in->buf->start, pb, len);
in->buf->pos += len;

ngx_chain_add_copy(p, &ct, in);//将in链加入ct链尾部

for(i = 0, t1 = ct; t1; t1 = t1->next, i++)  //答应chain中的每个buf内容
{
PT_Info("the buf %d of chains, len:%d, text: %.*s\n", i, t1->buf->pos - t1->buf->start, t1->buf->pos - t1->buf->start, t1->buf->start);
}

PT_Info("complete!\n");
ngx_destroy_pool(p);
}
运行结果
截图如下:

相关文章推荐
- 【nginx源码学习与运用 六】红黑树结构ngx_rbtree_t
- 【nginx源码学习与运用 一】内存池结构ngx_pool_t
- 【nginx源码学习与运用 八】哈希表结构ngx_hash_t
- 【nginx源码学习与运用 七】基数树结构ngx_radix_tree_t
- nginx 源码学习笔记(十七)—— ngx_worker_process_cycle子进程执行
- nginx 源码学习笔记(七)——内存分配相关源码分析
- Nginx源码学习-双向链表(ngx_queue_t)实现及实例分析
- nginx 源码学习笔记(十四)—— 全局变量ngx_cycle
- [转]nginx 源码学习笔记(十五)—— ngx_master_process_cycle 多进程(一)
- nginx 源码学习笔记(十八)—— ngx_add_inherited_sockets 继承的sockets
- nginx源码学习(二) 内存池结构 ngx_pool_t
- nginx 源码学习笔记(十)——基本容器——ngx_hash
- nginx 源码学习笔记(十)——基本容器——ngx_hash
- nginx 源码学习(五) 基本数据结构 ngx_list_t
- nginx 源码学习笔记(十五)—— ngx_master_process_cycle 多进程(一)
- nginx 源码学习笔记(二十一)—— event 模块(二) ——事件驱动核心ngx_process_events_and_timers
- nginx 源码学习笔记(十二)——基本容器——ngx_buf
- nginx 源码学习笔记(十二)——基本容器——ngx_buf
- nginx 源码学习笔记(十五)—— ngx_master_process_cycle 多进程(一)
- nginx 源码学习笔记(十五)—— ngx_master_process_cycle 多进程(一)