C#图像处理——3(图片效果)
2016-12-05 09:48
260 查看
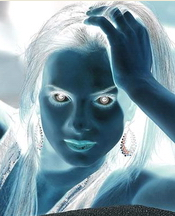
一. 底片效果
原理: GetPixel方法获得每一点像素的值, 然后再使用SetPixel方法将取反后的颜色值设置到对应的点.
效果图:
代码实现:
private void button1_Click(object sender, EventArgs e)
{
//以底片效果显示图像
try
{
int Height = this.pictureBox1.Image.Height;
int Width = this.pictureBox1.Image.Width;
Bitmap newbitmap = new Bitmap(Width, Height);
Bitmap oldbitmap = (Bitmap)this.pictureBox1.Image;
Color pixel;
for (int x = 1; x < Width; x++)
{
for (int y = 1; y < Height; y++)
{
int r, g, b;
pixel = oldbitmap.GetPixel(x, y);
r = 255 - pixel.R;
g = 255 - pixel.G;
b = 255 - pixel.B;
newbitmap.SetPixel(x, y, Color.FromArgb(r, g, b));
}
}
this.pictureBox1.Image = newbitmap;
}
catch (Exception ex)
{
MessageBox.Show(ex.Message, "信息提示", MessageBoxButtons.OK, MessageBoxIcon.Information);
}
}
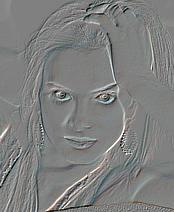
二. 浮雕效果
原理: 对图像像素点的像素值分别与相邻像素点的像素值相减后加上128, 然后将其作为新的像素点的值.
效果图:
代码实现:
private void button1_Click(object sender, EventArgs e)
{
//以浮雕效果显示图像
try
{
int Height = this.pictureBox1.Image.Height;
int Width = this.pictureBox1.Image.Width;
Bitmap newBitmap = new Bitmap(Width, Height);
Bitmap oldBitmap = (Bitmap)this.pictureBox1.Image;
Color pixel1, pixel2;
for (int x = 0; x < Width - 1; x++)
{
for (int y = 0; y < Height - 1; y++)
{
int r = 0, g = 0, b = 0;
pixel1 = oldBitmap.GetPixel(x, y);
pixel2 = oldBitmap.GetPixel(x + 1, y + 1);
r = Math.Abs(pixel1.R - pixel2.R + 128);
g = Math.Abs(pixel1.G - pixel2.G + 128);
b = Math.Abs(pixel1.B - pixel2.B + 128);
if (r > 255)
r = 255;
if (r < 0)
r = 0;
if (g > 255)
g = 255;
if (g < 0)
g = 0;
if (b > 255)
b = 255;
if (b < 0)
b = 0;
newBitmap.SetPixel(x, y, Color.FromArgb(r, g, b));
}
}
this.pictureBox1.Image = newBitmap;
}
catch (Exception ex)
{
MessageBox.Show(ex.Message, "信息提示", MessageBoxButtons.OK, MessageBoxIcon.Information);
}
}
三. 黑白效果
原理: 彩色图像处理成黑白效果通常有3种算法;
(1).最大值法: 使每个像素点的 R, G, B 值等于原像素点的 RGB (颜色值) 中最大的一个;
(2).平均值法: 使用每个像素点的 R,G,B值等于原像素点的RGB值的平均值;
(3).加权平均值法: 对每个像素点的 R, G, B值进行加权
---自认为第三种方法做出来的黑白效果图像最 "真实".
效果图:

代码实现:
private void button1_Click(object sender, EventArgs e)
{
//以黑白效果显示图像
try
{
int Height = this.pictureBox1.Image.Height;
int Width = this.pictureBox1.Image.Width;
Bitmap newBitmap = new Bitmap(Width, Height);
Bitmap oldBitmap = (Bitmap)this.pictureBox1.Image;
Color pixel;
for (int x = 0; x < Width; x++)
for (int y = 0; y < Height; y++)
{
pixel = oldBitmap.GetPixel(x, y);
int r, g, b, Result = 0;
r = pixel.R;
g = pixel.G;
b = pixel.B;
//实例程序以加权平均值法产生黑白图像
int iType =2;
switch (iType)
{
case 0://平均值法
Result = ((r + g + b) / 3);
break;
case 1://最大值法
Result = r > g ? r : g;
Result = Result > b ? Result : b;
break;
case 2://加权平均值法
Result = ((int)(0.7 * r) + (int)(0.2 * g) + (int)(0.1 * b));
break;
}
newBitmap.SetPixel(x, y, Color.FromArgb(Result, Result, Result));
}
this.pictureBox1.Image = newBitmap;
}
catch (Exception ex)
{
MessageBox.Show(ex.Message, "信息提示");
}
}
四. 柔化效果
原理: 当前像素点与周围像素点的颜色差距较大时取其平均值.
效果图:

代码实现:
private void button1_Click(object sender, EventArgs e)
{
//以柔化效果显示图像
try
{
int Height = this.pictureBox1.Image.Height;
int Width = this.pictureBox1.Image.Width;
Bitmap bitmap = new Bitmap(Width, Height);
Bitmap MyBitmap = (Bitmap)this.pictureBox1.Image;
Color pixel;
//高斯模板
int[] Gauss ={ 1, 2, 1, 2, 4, 2, 1, 2, 1 };
for (int x = 1; x < Width - 1; x++)
for (int y = 1; y < Height - 1; y++)
{
int r = 0, g = 0, b = 0;
int Index = 0;
for (int col = -1; col <= 1; col++)
for (int row = -1; row <= 1; row++)
{
pixel = MyBitmap.GetPixel(x + row, y + col);
r += pixel.R * Gauss[Index];
g += pixel.G * Gauss[Index];
b += pixel.B * Gauss[Index];
Index++;
}
r /= 16;
g /= 16;
b /= 16;
//处理颜色值溢出
r = r > 255 ? 255 : r;
r = r < 0 ? 0 : r;
g = g > 255 ? 255 : g;
g = g < 0 ? 0 : g;
b = b > 255 ? 255 : b;
b = b < 0 ? 0 : b;
bitmap.SetPixel(x - 1, y - 1, Color.FromArgb(r, g, b));
}
this.pictureBox1.Image = bitmap;
}
catch (Exception ex)
{
MessageBox.Show(ex.Message, "信息提示");
}
}
五.锐化效果
原理:突出显示颜色值大(即形成形体边缘)的像素点.
效果图:

实现代码:
private void button1_Click(object sender, EventArgs e)
{
//以锐化效果显示图像
try
{
int Height = this.pictureBox1.Image.Height;
int Width = this.pictureBox1.Image.Width;
Bitmap newBitmap = new Bitmap(Width, Height);
Bitmap oldBitmap = (Bitmap)this.pictureBox1.Image;
Color pixel;
//拉普拉斯模板
int[] Laplacian ={ -1, -1, -1, -1, 9, -1, -1, -1, -1 };
for (int x = 1; x < Width - 1; x++)
for (int y = 1; y < Height - 1; y++)
{
int r = 0, g = 0, b = 0;
int Index = 0;
for (int col = -1; col <= 1; col++)
for (int row = -1; row <= 1; row++)
{
pixel = oldBitmap.GetPixel(x + row, y + col); r += pixel.R * Laplacian[Index];
g += pixel.G * Laplacian[Index];
b += pixel.B * Laplacian[Index];
Index++;
}
//处理颜色值溢出
r = r > 255 ? 255 : r;
r = r < 0 ? 0 : r;
g = g > 255 ? 255 : g;
g = g < 0 ? 0 : g;
b = b > 255 ? 255 : b;
b = b < 0 ? 0 : b;
newBitmap.SetPixel(x - 1, y - 1, Color.FromArgb(r, g, b));
}
this.pictureBox1.Image = newBitmap;
}
catch (Exception ex)
{
MessageBox.Show(ex.Message, "信息提示");
}
}
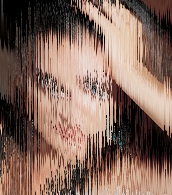
六. 雾化效果
原理: 在图像中引入一定的随机值, 打乱图像中的像素值
效果图:
实现代码:
private void button1_Click(object sender, EventArgs e)
{
//以雾化效果显示图像
try
{
int Height = this.pictureBox1.Image.Height;
int Width = this.pictureBox1.Image.Width;
Bitmap newBitmap = new Bitmap(Width, Height);
Bitmap oldBitmap = (Bitmap)this.pictureBox1.Image;
Color pixel;
for (int x = 1; x < Width - 1; x++)
for (int y = 1; y < Height - 1; y++)
{
System.Random MyRandom = new Random();
int k = MyRandom.Next(123456);
//像素块大小
int dx = x + k % 19;
int dy = y + k % 19;
if (dx >= Width)
dx = Width - 1;
if (dy >= Height)
dy = Height - 1;
pixel = oldBitmap.GetPixel(dx, dy);
newBitmap.SetPixel(x, y, pixel);
}
this.pictureBox1.Image = newBitmap;
}
catch (Exception ex)
{
MessageBox.Show(ex.Message, "信息提示");
}
}
原理: GetPixel方法获得每一点像素的值, 然后再使用SetPixel方法将取反后的颜色值设置到对应的点.
效果图:
代码实现:
private void button1_Click(object sender, EventArgs e)
{
//以底片效果显示图像
try
{
int Height = this.pictureBox1.Image.Height;
int Width = this.pictureBox1.Image.Width;
Bitmap newbitmap = new Bitmap(Width, Height);
Bitmap oldbitmap = (Bitmap)this.pictureBox1.Image;
Color pixel;
for (int x = 1; x < Width; x++)
{
for (int y = 1; y < Height; y++)
{
int r, g, b;
pixel = oldbitmap.GetPixel(x, y);
r = 255 - pixel.R;
g = 255 - pixel.G;
b = 255 - pixel.B;
newbitmap.SetPixel(x, y, Color.FromArgb(r, g, b));
}
}
this.pictureBox1.Image = newbitmap;
}
catch (Exception ex)
{
MessageBox.Show(ex.Message, "信息提示", MessageBoxButtons.OK, MessageBoxIcon.Information);
}
}
二. 浮雕效果
原理: 对图像像素点的像素值分别与相邻像素点的像素值相减后加上128, 然后将其作为新的像素点的值.
效果图:
代码实现:
private void button1_Click(object sender, EventArgs e)
{
//以浮雕效果显示图像
try
{
int Height = this.pictureBox1.Image.Height;
int Width = this.pictureBox1.Image.Width;
Bitmap newBitmap = new Bitmap(Width, Height);
Bitmap oldBitmap = (Bitmap)this.pictureBox1.Image;
Color pixel1, pixel2;
for (int x = 0; x < Width - 1; x++)
{
for (int y = 0; y < Height - 1; y++)
{
int r = 0, g = 0, b = 0;
pixel1 = oldBitmap.GetPixel(x, y);
pixel2 = oldBitmap.GetPixel(x + 1, y + 1);
r = Math.Abs(pixel1.R - pixel2.R + 128);
g = Math.Abs(pixel1.G - pixel2.G + 128);
b = Math.Abs(pixel1.B - pixel2.B + 128);
if (r > 255)
r = 255;
if (r < 0)
r = 0;
if (g > 255)
g = 255;
if (g < 0)
g = 0;
if (b > 255)
b = 255;
if (b < 0)
b = 0;
newBitmap.SetPixel(x, y, Color.FromArgb(r, g, b));
}
}
this.pictureBox1.Image = newBitmap;
}
catch (Exception ex)
{
MessageBox.Show(ex.Message, "信息提示", MessageBoxButtons.OK, MessageBoxIcon.Information);
}
}
三. 黑白效果
原理: 彩色图像处理成黑白效果通常有3种算法;
(1).最大值法: 使每个像素点的 R, G, B 值等于原像素点的 RGB (颜色值) 中最大的一个;
(2).平均值法: 使用每个像素点的 R,G,B值等于原像素点的RGB值的平均值;
(3).加权平均值法: 对每个像素点的 R, G, B值进行加权
---自认为第三种方法做出来的黑白效果图像最 "真实".
效果图:
代码实现:
private void button1_Click(object sender, EventArgs e)
{
//以黑白效果显示图像
try
{
int Height = this.pictureBox1.Image.Height;
int Width = this.pictureBox1.Image.Width;
Bitmap newBitmap = new Bitmap(Width, Height);
Bitmap oldBitmap = (Bitmap)this.pictureBox1.Image;
Color pixel;
for (int x = 0; x < Width; x++)
for (int y = 0; y < Height; y++)
{
pixel = oldBitmap.GetPixel(x, y);
int r, g, b, Result = 0;
r = pixel.R;
g = pixel.G;
b = pixel.B;
//实例程序以加权平均值法产生黑白图像
int iType =2;
switch (iType)
{
case 0://平均值法
Result = ((r + g + b) / 3);
break;
case 1://最大值法
Result = r > g ? r : g;
Result = Result > b ? Result : b;
break;
case 2://加权平均值法
Result = ((int)(0.7 * r) + (int)(0.2 * g) + (int)(0.1 * b));
break;
}
newBitmap.SetPixel(x, y, Color.FromArgb(Result, Result, Result));
}
this.pictureBox1.Image = newBitmap;
}
catch (Exception ex)
{
MessageBox.Show(ex.Message, "信息提示");
}
}
四. 柔化效果
原理: 当前像素点与周围像素点的颜色差距较大时取其平均值.
效果图:
代码实现:
private void button1_Click(object sender, EventArgs e)
{
//以柔化效果显示图像
try
{
int Height = this.pictureBox1.Image.Height;
int Width = this.pictureBox1.Image.Width;
Bitmap bitmap = new Bitmap(Width, Height);
Bitmap MyBitmap = (Bitmap)this.pictureBox1.Image;
Color pixel;
//高斯模板
int[] Gauss ={ 1, 2, 1, 2, 4, 2, 1, 2, 1 };
for (int x = 1; x < Width - 1; x++)
for (int y = 1; y < Height - 1; y++)
{
int r = 0, g = 0, b = 0;
int Index = 0;
for (int col = -1; col <= 1; col++)
for (int row = -1; row <= 1; row++)
{
pixel = MyBitmap.GetPixel(x + row, y + col);
r += pixel.R * Gauss[Index];
g += pixel.G * Gauss[Index];
b += pixel.B * Gauss[Index];
Index++;
}
r /= 16;
g /= 16;
b /= 16;
//处理颜色值溢出
r = r > 255 ? 255 : r;
r = r < 0 ? 0 : r;
g = g > 255 ? 255 : g;
g = g < 0 ? 0 : g;
b = b > 255 ? 255 : b;
b = b < 0 ? 0 : b;
bitmap.SetPixel(x - 1, y - 1, Color.FromArgb(r, g, b));
}
this.pictureBox1.Image = bitmap;
}
catch (Exception ex)
{
MessageBox.Show(ex.Message, "信息提示");
}
}
五.锐化效果
原理:突出显示颜色值大(即形成形体边缘)的像素点.
效果图:
实现代码:
private void button1_Click(object sender, EventArgs e)
{
//以锐化效果显示图像
try
{
int Height = this.pictureBox1.Image.Height;
int Width = this.pictureBox1.Image.Width;
Bitmap newBitmap = new Bitmap(Width, Height);
Bitmap oldBitmap = (Bitmap)this.pictureBox1.Image;
Color pixel;
//拉普拉斯模板
int[] Laplacian ={ -1, -1, -1, -1, 9, -1, -1, -1, -1 };
for (int x = 1; x < Width - 1; x++)
for (int y = 1; y < Height - 1; y++)
{
int r = 0, g = 0, b = 0;
int Index = 0;
for (int col = -1; col <= 1; col++)
for (int row = -1; row <= 1; row++)
{
pixel = oldBitmap.GetPixel(x + row, y + col); r += pixel.R * Laplacian[Index];
g += pixel.G * Laplacian[Index];
b += pixel.B * Laplacian[Index];
Index++;
}
//处理颜色值溢出
r = r > 255 ? 255 : r;
r = r < 0 ? 0 : r;
g = g > 255 ? 255 : g;
g = g < 0 ? 0 : g;
b = b > 255 ? 255 : b;
b = b < 0 ? 0 : b;
newBitmap.SetPixel(x - 1, y - 1, Color.FromArgb(r, g, b));
}
this.pictureBox1.Image = newBitmap;
}
catch (Exception ex)
{
MessageBox.Show(ex.Message, "信息提示");
}
}
六. 雾化效果
原理: 在图像中引入一定的随机值, 打乱图像中的像素值
效果图:
实现代码:
private void button1_Click(object sender, EventArgs e)
{
//以雾化效果显示图像
try
{
int Height = this.pictureBox1.Image.Height;
int Width = this.pictureBox1.Image.Width;
Bitmap newBitmap = new Bitmap(Width, Height);
Bitmap oldBitmap = (Bitmap)this.pictureBox1.Image;
Color pixel;
for (int x = 1; x < Width - 1; x++)
for (int y = 1; y < Height - 1; y++)
{
System.Random MyRandom = new Random();
int k = MyRandom.Next(123456);
//像素块大小
int dx = x + k % 19;
int dy = y + k % 19;
if (dx >= Width)
dx = Width - 1;
if (dy >= Height)
dy = Height - 1;
pixel = oldBitmap.GetPixel(dx, dy);
newBitmap.SetPixel(x, y, pixel);
}
this.pictureBox1.Image = newBitmap;
}
catch (Exception ex)
{
MessageBox.Show(ex.Message, "信息提示");
}
}

相关文章推荐
- [译]用MIDP 2.0 实现图片渐入渐出效果
- 擦除式图片轮番显示效果
- :[转]不间断连续图片滚动效果的制作方法
- Asp.net(C#)给图片加上水印效果
- Asp.net(C#)给图片加上水印效果 (转)
- 如何在CSS中实现图片交替效果
- CSS opacity - 实现图片半透明效果(转)
- 做首页图片显示效果程序总结
- [转]下面是模仿的DropDownList的效果,支持图片,多列,换行等
- 淡进淡出的图片效果
- gif的动画图片,可否实现文字水印和图片水印的效果呢?
- JavaScript:多图片变化且每次的效果不同
- 不间断连续图片滚动效果的制作方法(ZT)
- Asp.net(C#)给图片加上水印效果
- 新浪体育图片新闻动态效果代码
- [导入]如何实现立体的DataGrid和具有Windows效果的图片按钮
- 点阵效果图片制作教程
- 一个VB.NET写的简单图片缩放处理组件源代码,支持添加半透明效果小图标
- 显示图片渐隐效果
- Asp.net(C#)给图片加上水印效果