ssm框架的简单搭建
2016-12-01 09:52
507 查看
最近在maven下使用ssm框架(spring,springMVC,mybatis)进行练习,在这里就简单总结一下一个ssm框架的基本搭建过程。
在这里你首先要创建一个maven项目
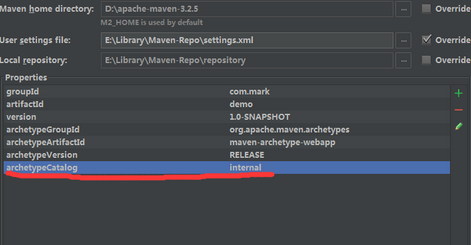
在创建过程中你要注意在这里添加一个参数archetypeCatalog=internal , 如果你没有添加这个参数,在maven生成骨架的时候会非常慢,有时候甚至会卡住。archetypeCatalog表示插件使用的archetype元数据,不加这个参数时默认为remote,local,即中央仓库archetype元数据,由于中央仓库的archetype太多了,所以导致很慢,指定为internal就表示仅使用内部元数据。
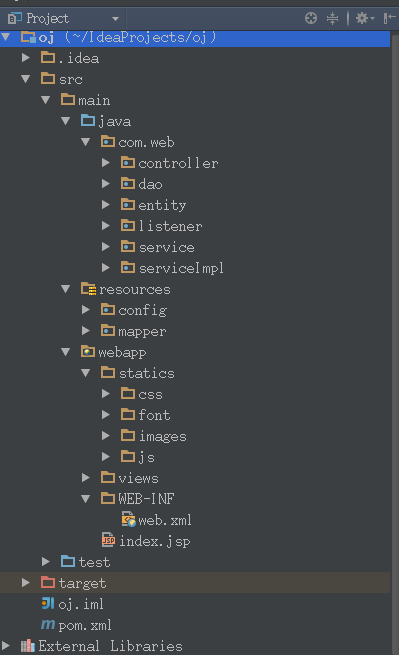
2.在创建好maven项目后,创建好自己的项目结构
3.修改pom.xml文件,
因为使用maven管理项目,所以可以通过pom.xml来直接导入jar包
4.配置好你的jdbc.properties配置文件
5.配置spring-MVC.xml
通过配置spring-MVC.xml,你可以使用注解的方式来提高开发效率,让程序员能够关注于业务的实现而不是重复枯燥的配置操作。
6.配置spring-Mybatis.xml
通过对这个文件的配置,可以简化所有的数据库操作,只需要通过写基本的sql语句就可以通过配置来操作对应的数据库。
7.配置mybatis-config.xml
在这里为你的java bean 命名
8.修改web.xml文件
到这里一个基本的ssm框架就搭建好了。使用ssm框架可以使我们写程序的过程更加方便简洁,提高效率。
在这里你首先要创建一个maven项目
在创建过程中你要注意在这里添加一个参数archetypeCatalog=internal , 如果你没有添加这个参数,在maven生成骨架的时候会非常慢,有时候甚至会卡住。archetypeCatalog表示插件使用的archetype元数据,不加这个参数时默认为remote,local,即中央仓库archetype元数据,由于中央仓库的archetype太多了,所以导致很慢,指定为internal就表示仅使用内部元数据。
2.在创建好maven项目后,创建好自己的项目结构
3.修改pom.xml文件,
因为使用maven管理项目,所以可以通过pom.xml来直接导入jar包
<project xmlns="http://maven.apache.org/POM/4.0.0" xmlns:xsi="http://www.w3.org/2001/XMLSchema-instance"
xsi:schemaLocation="http://maven.apache.org/POM/4.0.0 http://maven.apache.org/maven-v4_0_0.xsd"> <modelVersion>4.0.0</modelVersion>
<groupId>com.web.oj</groupId>
<artifactId>com.web.ojtest</artifactId>
<packaging>war</packaging>
<version>1.0-SNAPSHOT</version>
<name>com.web.ojtest Maven Webapp</name>
<url>http://maven.apache.org</url>

<properties>
<!-- spring版本号 -->
<spring.version>4.2.2.RELEASE</spring.version>
<!-- mybatis版本号 -->
<mybatis.version>3.2.8</mybatis.version>
<!-- log4j日志文件管理包版本 -->
<slf4j.version>1.6.6</slf4j.version>
<log4j.version>1.2.9</log4j.version>
</properties>

<dependencies>
<dependency>
<groupId>javax.servlet.jsp.jstl</groupId>
<artifactId>javax.servlet.jsp.jstl-api</artifactId>
<version>1.2.1</version>
</dependency>

<!-- junit测试包 -->
<!-- https://mvnrepository.com/artifact/junit/junit -->
<dependency>
<groupId>junit</groupId>
<artifactId>junit</artifactId>
<version>4.11</version>
</dependency>

<dependency>
<groupId>commons-fileupload</groupId>
<artifactId>commons-fileupload</artifactId>
<version>1.2.1</version>
</dependency>

<!-- https://mvnrepository.com/artifact/javax.servlet/javax.servlet-api -->
<dependency>
<groupId>javax.servlet</groupId>
<artifactId>javax.servlet-api</artifactId>
<version>3.1.0</version>
</dependency>

<!-- 阿里巴巴数据源包 -->
<dependency>
<groupId>com.alibaba</groupId>
<artifactId>druid</artifactId>
<version>1.0.2</version>
</dependency>

<!-- spring核心包 -->
<!-- springframe start -->
<dependency>
<groupId>org.springframework</groupId>
<artifactId>spring-core</artifactId>
<version>${spring.version}</version>
</dependency>

<dependency>
<groupId>org.springframework</groupId>
<artifactId>spring-web</artifactId>
<version>${spring.version}</version>
</dependency>

<dependency>
<groupId>org.springframework</groupId>
<artifactId>spring-oxm</artifactId>
<version>${spring.version}</version>
</dependency>

<dependency>
<groupId>org.springframework</groupId>
<artifactId>spring-tx</artifactId>
<version>${spring.version}</version>
</dependency>

<dependency>
<groupId>org.springframework</groupId>
<artifactId>spring-jdbc</artifactId>
<version>${spring.version}</version>
</dependency>

<dependency>
<groupId>org.springframework</groupId>
<artifactId>spring-webmvc</artifactId>
<version>${spring.version}</version>
</dependency>

<dependency>
<groupId>org.springframework</groupId>
<artifactId>spring-aop</artifactId>
<version>${spring.version}</version>
</dependency>

<dependency>
<groupId>org.springframework</groupId>
<artifactId>spring-context-support</artifactId>
<version>${spring.version}</version>
</dependency>

<dependency>
<groupId>org.springframework</groupId>
<artifactId>spring-aop</artifactId>
<version>${spring.version}</version>
</dependency>

<dependency>
<groupId>org.springframework</groupId>
<artifactId>spring-test</artifactId>
<version>${spring.version}</version>
</dependency>
<!-- springframe end -->

<!-- mybatis核心包 -->
<dependency>
<groupId>org.mybatis</groupId>
<artifactId>mybatis</artifactId>
<version>${mybatis.version}</version>
</dependency>
<!-- mybatis/spring包 -->
<dependency>
<groupId>org.mybatis</groupId>
<artifactId>mybatis-spring</artifactId>
<version>1.2.2</version>
</dependency>
<!-- mysql驱动包 -->
<dependency>
<groupId>mysql</groupId>
<artifactId>mysql-connector-java</artifactId>
<version>5.1.29</version>
</dependency>

<!-- json数据 -->
<dependency>
<groupId>org.codehaus.jackson</groupId>
<artifactId>jackson-mapper-asl</artifactId>
<version>1.9.13</version>
</dependency>

<!-- 日志文件管理包 -->
<!-- log start -->
<dependency>
<groupId>log4j</groupId>
<artifactId>log4j</artifactId>
<version>${log4j.version}</version>
</dependency>
<dependency>
<groupId>org.slf4j</groupId>
<artifactId>slf4j-api</artifactId>
<version>${slf4j.version}</version>
</dependency>
<dependency>
<groupId>org.slf4j</groupId>
<artifactId>slf4j-log4j12</artifactId>
<version>${slf4j.version}</version>
</dependency>
<dependency>
<groupId>junit</groupId>
<artifactId>junit</artifactId>
<version>4.11</version>
</dependency>

<!-- https://mvnrepository.com/artifact/javax.servlet/jstl -->
<dependency>
<groupId>javax.servlet</groupId>
<artifactId>jstl</artifactId>
<version>1.2</version>
</dependency>

</dependencies>

<build>
<finalName>com.web.ojtest</finalName>
<plugins>
<plugin>
<groupId>org.apache.maven.plugins</groupId>
<artifactId>maven-compiler-plugin</artifactId>
<configuration>
<source>1.6</source>
<target>1.6</target>
</configuration>
</plugin>
</plugins>
<resources>
<!--表示把java目录下的有关xml文件,properties文件编译/打包的时候放在resource目录下-->
<resource>
<directory>${basedir}/src/main/java</directory>
<includes>
<include>**/*.properties</include>
<include>**/*.xml</include>
</includes>
</resource>
<resource>
<directory>${basedir}/src/main/resources</directory>
</resource>
</resources>

</build>
</project>
4.配置好你的jdbc.properties配置文件
5.配置spring-MVC.xml
通过配置spring-MVC.xml,你可以使用注解的方式来提高开发效率,让程序员能够关注于业务的实现而不是重复枯燥的配置操作。
<?xml version="1.0" encoding="UTF-8"?>
<beans xmlns="http://www.springframework.org/schema/beans"
xmlns:xsi="http://www.w3.org/2001/XMLSchema-instance"
xmlns:context="http://www.springframework.org/schema/context"
xmlns:mvc="http://www.springframework.org/schema/mvc"
xsi:schemaLocation="http://www.springframework.org/schema/beans http://www.springframework.org/schema/beans/spring-beans-3.2.xsd http://www.springframework.org/schema/context http://www.springframework.org/schema/context/spring-context-3.2.xsd http://www.springframework.org/schema/mvc http://www.springframework.org/schema/mvc/spring-mvc.xsd"> <import resource="classpath:config/spring-mybatis.xml" />

<!--启用spring的一些annotation -->
<context:annotation-config/>

<!-- 引入jdbc配置文件 -->
<context:property-placeholder location="classpath:config/jdbc.properties"/>

<!-- 自动扫描该包,使SpringMVC认为包下用了@controller注解的类是控制器 -->
<context:component-scan base-package="com.web.controller">
<context:include-filter type="annotation" expression="org.springframework.stereotype.Controller"/>
</context:component-scan>

<!-- 自动扫描该包,使SpringMVC认为包下用了@service注解的类是逻辑器 -->
<context:component-scan base-package="com.web.serviceImpl">
<context:include-filter type="annotation" expression="org.springframework.stereotype.Service"/>
</context:component-scan>

<!-- 自动扫描该包,使SpringMVC认为包下用了@repository注解的类是dao -->
<context:component-scan base-package="com.web.dao">
<context:include-filter type="annotation" expression="org.springframework.stereotype.Repository"/>
</context:component-scan>

<!--HandlerMapping 无需配置,springmvc可以默认启动-->

<!--静态资源映射-->
<!--本项目把静态资源放在了WEB-INF的statics目录下,资源映射如下,html文件也属于静态资源-->
<mvc:resources mapping="/css/**" location="/statics/css/"/>
<mvc:resources mapping="/font/**" location="/statics/font/"/>
<mvc:resources mapping="/js/**" location="/statics/js/"/>
<mvc:resources mapping="/images/**" location="/statics/images/"/>
<mvc:resources mapping="/views/**" location="/views/"/>

<!--但是项目部署到linux下发现WEB-INF的静态资源会出现无法解析的情况,但是本地tomcat访问正常,因此建议还是直接把静态资源放在webapp的statics下,映射配置如下-->
<!--<mvc:resources mapping="/css/**" location="/statics/css/"/>-->
<!--<mvc:resources mapping="/js/**" location="/statics/js/"/>-->
<!--<mvc:resources mapping="/images/**" location="/statics/images/"/>-->

<!-- 配置注解驱动 可以将request参数与绑定到controller参数上 -->
<mvc:annotation-driven/>

<!-- 对模型视图名称的解析,即在模型视图名称添加前后缀(如果最后一个还是表示文件夹,则最后的斜杠不要漏了) 使用JSP-->
<!-- 默认的视图解析器 在上边的解析错误时使用 (默认使用html)- -->
<bean id="defaultViewResolver" class="org.springframework.web.servlet.view.InternalResourceViewResolver">
<property name="viewClass" value="org.springframework.web.servlet.view.JstlView"/>
<property name="prefix" value="/views/"/><!--设置JSP文件的目录位置-->  <!--指定前缀-->
<property name="suffix" value=".jsp"/> <!--指定后缀-->
</bean>

<!-- springmvc文件上传需要配置的节点-->
<bean id="multipartResolver" class="org.springframework.web.multipart.commons.CommonsMultipartResolver">
<property name="maxUploadSize" value="20971500"/>
<property name="defaultEncoding" value="UTF-8"/>
<property name="resolveLazily" value="true"/>
</bean>

</beans>
6.配置spring-Mybatis.xml
通过对这个文件的配置,可以简化所有的数据库操作,只需要通过写基本的sql语句就可以通过配置来操作对应的数据库。
<?xml version="1.0" encoding="UTF-8"?>
<beans xmlns="http://www.springframework.org/schema/beans"
xmlns:xsi="http://www.w3.org/2001/XMLSchema-instance" xmlns:p="http://www.springframework.org/schema/p"
xsi:schemaLocation="http://www.springframework.org/schema/beans http://www.springframework.org/schema/beans/spring-beans.xsd">
<!--定义一个使用dbcp实现的数据源-->
<bean id="dataSource" class="com.alibaba.druid.pool.DruidDataSource" init-method="init"
destroy-method="close" >
<property name="driverClassName">
<value>${jdbc_driverClassName}</value>
</property>
<property name="url">
<value>${jdbc_url}</value>
</property>
<property name="username">
<value>${jdbc_username}</value>
</property>
<property name="password">
<value>root</value>
</property>
<!-- 连接池最大使用连接数 -->
<property name="maxActive">
<value>20</value>
</property>
<!-- 初始化连接大小 -->
<property name="initialSize">
<value>1</value>
</property>
<!-- 获取连接最大等待时间 -->
<property name="maxWait">
<value>60000</value>
</property>
<!-- 连接池最大空闲 -->
<property name="maxIdle">
<value>20</value>
</property>
<!-- 连接池最小空闲 -->
<property name="minIdle">
<value>3</value>
</property>
<!-- 自动清除无用连接 -->
<property name="removeAbandoned">
<value>true</value>
</property>
<!-- 清除无用连接的等待时间 -->
<property name="removeAbandonedTimeout">
<value>180</value>
</property>
<!-- 连接属性 -->
<property name="connectionProperties">
<value>clientEncoding=UTF-8</value>
</property>
</bean>

<!-- mybatis文件配置,扫描所有mapper文件 -->
<!--定义数据源所要注入使用的bean-->
<bean id="sqlSessionFactory"
class="org.mybatis.spring.SqlSessionFactoryBean"
p:dataSource-ref="dataSource"
p:configLocation="classpath:config/mybatis-config.xml"
p:mapperLocations="classpath:mapper/*.xml"/><!-- configLocation为mybatis属性 mapperLocations为所有mapper-->

<!-- spring与mybatis整合配置,扫描所有dao -->
<bean class="org.mybatis.spring.mapper.MapperScannerConfigurer"
p:basePackage="com.web.dao"
p:sqlSessionFactoryBeanName="sqlSessionFactory"/>

<!-- 配置事物管理器对数据源进行事务管理 -->
<bean id="transactionManager"
class="org.springframework.jdbc.datasource.DataSourceTransactionManager"
p:dataSource-ref="dataSource"/>

</beans>
7.配置mybatis-config.xml
在这里为你的java bean 命名
<?xml version="1.0" encoding="UTF-8" ?>
<!DOCTYPE configuration
PUBLIC "-//mybatis.org//DTD Config 3.0//EN"
"http://mybatis.org/dtd/mybatis-3-config.dtd">
<configuration>
<!-- 命名空间 -->
<typeAliases>

<typeAlias alias="list" type="java.util.List"/>
<typeAlias alias="Problem" type="com.web.entity.Problem"/>

</typeAliases>

<!-- 映射map -->
<mappers>
</mappers>
</configuration>
8.修改web.xml文件
<?xml version="1.0" encoding="UTF-8"?>
<web-app xmlns="http://java.sun.com/xml/ns/javaee"
xmlns:xsi="http://www.w3.org/2001/XMLSchema-instance"
xsi:schemaLocation="http://java.sun.com/xml/ns/javaee http://java.sun.com/xml/ns/javaee/web-app_3_0.xsd" version="3.0">
<!--welcome pages-->
<welcome-file-list>
<welcome-file>index.jsp</welcome-file>
</welcome-file-list>

<!-- 监听器配置 -->
<listener>
<listener-class>com.web.listener.ContextLoaderListener</listener-class>
</listener>

<!-- 引入框架 must -->
<servlet>
<servlet-name>springMVC</servlet-name>
<servlet-class>org.springframework.web.servlet.DispatcherServlet</servlet-class>
<init-param>
<param-name>contextConfigLocation</param-name>
<param-value>classpath:config/spring-MVC.xml</param-value>
</init-param>
<load-on-startup>1</load-on-startup>
</servlet>
<servlet-mapping>
<servlet-name>springMVC</servlet-name>
<url-pattern>/</url-pattern>
</servlet-mapping>

<!-- 设置字符编码 -->
<filter>
<filter-name>encodingFilter</filter-name>
<filter-class>org.springframework.web.filter.CharacterEncodingFilter</filter-class>
<init-param>
<param-name>encoding</param-name>
<param-value>UTF-8</param-value>
</init-param>
<init-param>
<param-name>forceEncoding</param-name>
<param-value>true</param-value>
</init-param>
</filter>
<filter-mapping>
<filter-name>encodingFilter</filter-name>
<url-pattern>/*</url-pattern>
</filter-mapping>

</web-app>
到这里一个基本的ssm框架就搭建好了。使用ssm框架可以使我们写程序的过程更加方便简洁,提高效率。

相关文章推荐
- SpringMVC笔记——SSM框架搭建简单实例
- 使用idea搭建一个简单的SSM框架:(1)使用idea创建maven项目
- 2017/09/03简单搭建SSM框架
- SSM框架搭建过程--SSM简单整合实例
- SpringBoot搭建SSM框架的简单功能实现源码
- ssm框架简单搭建
- SpringMVC笔记——SSM框架搭建简单实例
- 搭建简单的ssm maven框架
- SSM框架搭建简单的前后台分离项目(后台篇)
- SpringMVC笔记——SSM框架搭建简单实例
- ssm框架搭建(下) 简单案例
- SSM简明教程:简单的十步教你搭建人生第一个SSM框架
- 使用idea搭建一个简单的SSM框架:(3)配置spring+mybatis
- IDEA搭建简单的SSM(spring+springMVC+mybatis)框架
- SSM框架搭建简单实例
- SSM框架环境的简单搭建
- Javaweb简单博客系统-----(一)ssm框架搭建
- SSM第一篇 最简单的SSM框架搭建过程--SSM简单整合
- springboot搭建简单ssm框架
- 一个简单的ssm框架的搭建