iOS-工具类封装-图片轮播无限循环
2016-11-27 19:23
579 查看
UIScrollView图片轮播无限循环
为了方便别人使用只提供以下接口:图片的frame,图片名,分页控件的currentPageIndicatorTintColor和pageIndicatorTintColor,如下列代码:
- (void)viewDidLoad {
[super viewDidLoad];
STPageView * pageView = [STPageView pageView];
pageView.frame = CGRectMake(50, 70, 270, 150);
pageView.imageNames = @[@"img_00", @"img_01", @"img_02"];
pageView.currentColor = [UIColor greenColor];
pageView.otherColor = [UIColor yellowColor];
[self.view addSubview:pageView];
}
具体实现的步骤(用xib创建)
1.创建STPageView继承于UIView
.h文件里提供如下接口@interface STPageView : UIView /** 创建pageView */ + (instancetype)pageView; /** 图片名字 */ @property (nonatomic, strong) NSArray * imageNames; /** 其他圆点的颜色 */ @property (nonatomic, strong) UIColor *otherColor; /** 当前圆点的颜色 */ @property (nonatomic, strong) UIColor *currentColor; @end
2.创建xib文件
先创建UIView控件,且继承自己所创建的类
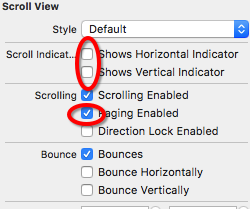
创建UIScrollerView控件和page control控件
在.m文件中拿到UIscrollView和pageControl
注意下列选项

3.方法的实现.m文件中
设置代理,遵守协议
读取xib文件
+ (instancetype)pageView{

return [[[NSBundle mainBundle] loadNibNamed:NSStringFromClass(self) owner:nil options:nil] lastObject];
}
setter方法的重写
#pragma mark - setter方法的重写
- (void)setImageNames:(NSArray *)imageNames{

_imageNames = imageNames;
//移除之前所有的imageView
// 让subviews数组中的所有对象都执行removeFromSuperview方法
[self.scrollView.subviews makeObjectsPerformSelector:@selector(removeFromSuperview)];

//根据图片名创建多个imageView
for (int i = 0; i < imageNames.count; i ++) {
UIImageView * imageView = [[UIImageView alloc] init];
imageView.image = [UIImage imageNamed:imageNames[i]];
[self.scrollView addSubview:imageView];
}
//设置总页数
self.pageControl.numberOfPages = imageNames.count;
}

- (void)setCurrentColor:(UIColor *)currentColor{
_currentColor = currentColor;
self.pageControl.currentPageIndicatorTintColor = currentColor;
}

- (void)setOtherColor:(UIColor *)otherColor{

_otherColor = otherColor;
self.pageControl.pageIndicatorTintColor = otherColor;
}
设置图片的frame
- (void)layoutSubviews{
[super layoutSubviews];
//设置scrollView的frame
self.scrollView.frame = self.bounds;
//获得scrollView的尺寸
CGFloat scrollViewW = self.scrollView.frame.size.width;
CGFloat scrollViewH = self.scrollView.frame.size.height;

//设置pageControl
CGFloat pageControlW = 100;
CGFloat pageControlH = 20;
CGFloat pageControlX = scrollViewW - pageControlW;
CGFloat pageControlY = scrollViewH - pageControlH;
self.pageControl.frame = CGRectMake(pageControlX, pageControlY, pageControlW, pageControlH);

//设置内容大小
self.scrollView.contentSize = CGSizeMake(self.imageNames.count * scrollViewW, 0);

for (int i = 0; i < self.scrollView.subviews.count; i ++) {
UIImageView * imageView = self.scrollView.subviews[i];
imageView.frame = CGRectMake(i * scrollViewW, 0, scrollViewW, scrollViewH);
}
}
实现scrollViewDelegate方法
- (void)scrollViewDidScroll:(UIScrollView *)scrollView{
self.pageControl.currentPage = (int)(scrollView.contentOffset.x / scrollView.frame.size.width + 0.5);
}
4.添加定时器(无限循环)
- (void)startTimer{
//创建一个定时器
self.timer = [NSTimer scheduledTimerWithTimeInterval:1.5 target:self selector:@selector(nextPage) userInfo:nil repeats:YES];
[[NSRunLoop mainRunLoop] addTimer:self.timer forMode:NSRunLoopCommonModes];
}
- (void)stopTimer{
[self.timer invalidate];
self.timer = nil;
}
- (void)nextPage{
NSInteger page = self.pageControl.currentPage + 1;
if (page == self.pageControl.numberOfPages) {
page = 0;
}
CGPoint offset = self.scrollView.contentOffset;
offset.x = page * self.scrollView.frame.size.width;
[self.scrollView setContentOffset:offset animated:YES];
}

相关文章推荐
- iOS实现无限循环图片轮播器的封装
- iOS - 基于AFN的工具类以及多张图片上传的封装
- ios UITableView封装之下拉-上提-图片异步加载
- ios UITableView封装之下拉-上提-图片异步加载
- iOS开发UI篇—UIScrollView控件实现图片轮播
- iOS_21团购_通过block对请求工具类的代理方法进行二次封装
- iOS开发系列--无限循环的图片浏览器
- IOS 图片轮播和开始的指导界面
- iOS开发之静态库(三)—— 图片、界面xib等资源文件封装到.a静态库
- 新闻客户端首页图片无限循环滚动展示(可点击触发不同事件)初步封装IOS
- 84 Android Hnadler 封装下载图片工具类
- iOS开发之静态库(五)—— 图片、界面xib等资源文件封装到静态框架framework
- ios UITableView封装之下拉-上提-图片异步加载
- 基于webkit的图片轮播封装
- iOS学习笔记13— UITableView封装之下拉-上提-图片异步加载
- ios UITableView封装之下拉-上提-图片异步加载
- ios UITableView封装之下拉-上提-图片异步加载 .
- ios UITableView封装之下拉-上提-图片异步加载
- 下载图片封装一个工具类,搞定图片批量下载
- iOS开发拓展篇—封装音频文件播放工具类